The Android world is moving to 64-bit and we all have to follow along. Google Play Store is sending out Emails to inform developers about the upcoming changes in August 2019 and August 2021. Here’s what you need to know, how it will affect you as a developer and why any Qt app should use Felgo Cloud Builds to save a lot of time and trouble.
Source: Google
Before we go into details, here is a quick summary of what Felgo Cloud Builds offers for any Qt and Felgo app:
- Store your signing information persistent. With Qt Creator, you will have to re-add them every time you close your project.
- Build the app for both 32-bit and 64-bit architectures simultaneously.
- Increment the version code for each build automatically.
- Generate new license keys for each build version automatically.
- Upload the generated APKs to the store, so you can access them from your Artifact Library.
All those manual steps are automated with the click of a button. Let’s take a closer look at the process.
On a side note, Apple also switched to 64-bit for iOS a couple of years ago and today they only support 64-bit.
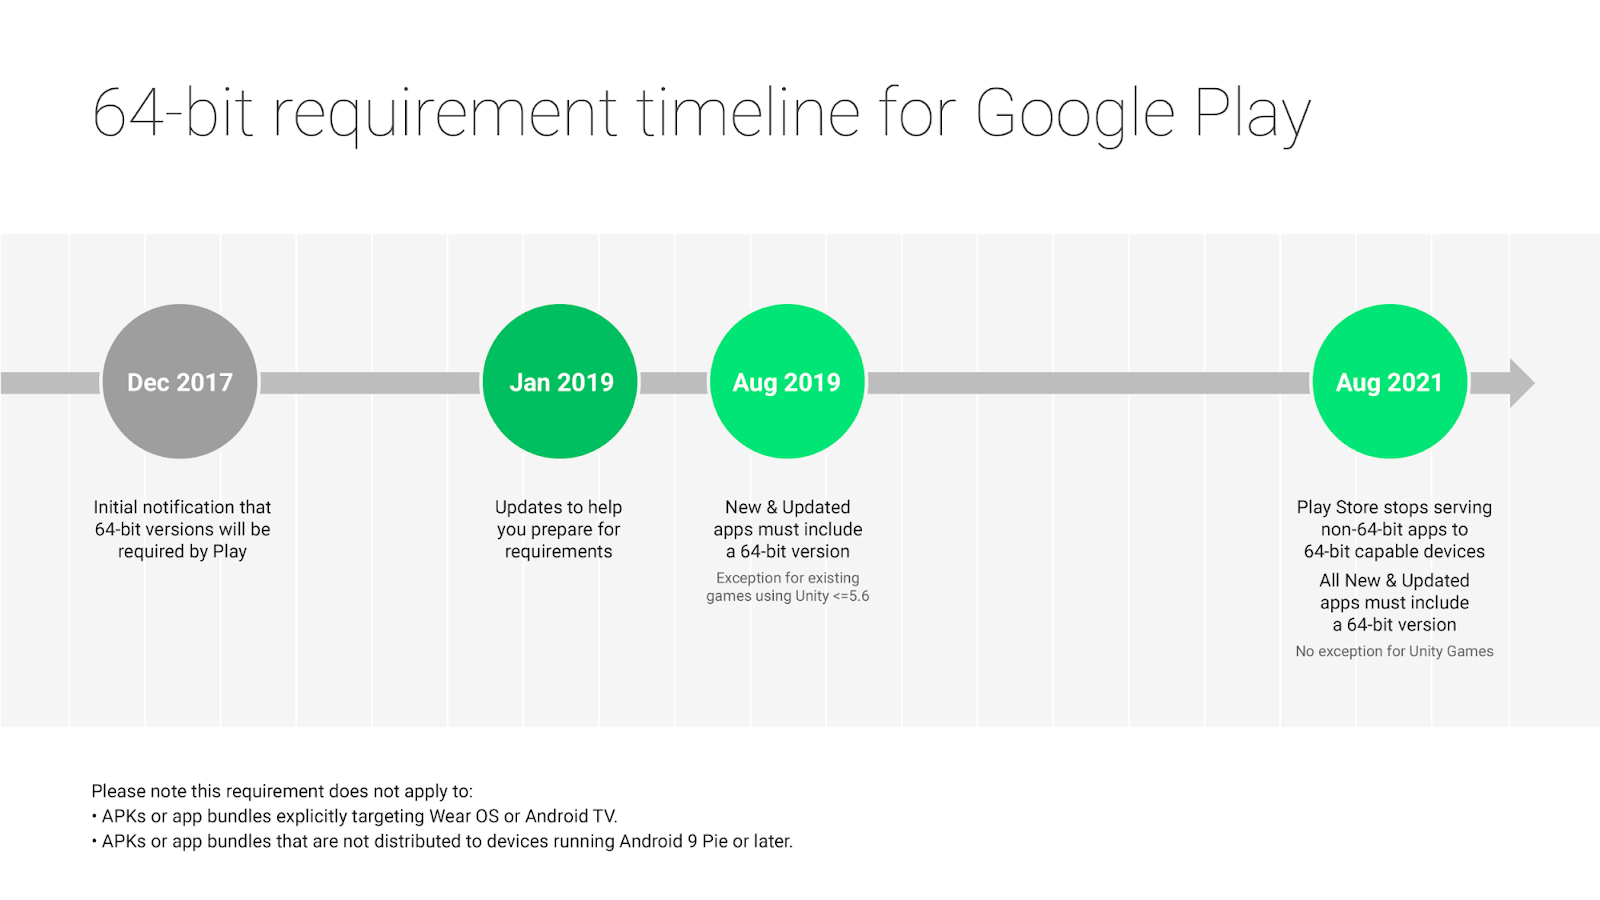
1st August 2019: Google Play no Longer Accepts Submissions without 64-Bit Architecture
This deadline does not affect the availability of any published app that is already live in the stores. Users will still be able to see and download your app from the Google Play store. If you want to upload new apps, or updates you will need to provide additional 64-bit architectures.
From their documentation: All new apps and app updates that include native code are required to provide 64-bit versions in addition to 32-bit versions when publishing to Google Play.
So what do you need to do before this deadline comes? Actually, nothing.
None of your existing apps will be affected by that deadline. You will only have to include 64-bit for any future app submission. You will learn how to do this later in this post.
There is another small new requirement that does affect any project though. The targetSdkVersion of any app must be set to at least 28 starting with 1st August. You can find this value in AndroidManifest.xml in the “android” folder of your project:
<uses-sdk android:minSdkVersion="16" android:targetSdkVersion="28"/>1st August 2021: Google Play no Longer Serves Apps without 64-Bit Architecture
This deadline will affect all apps in the Play Store. If your app does not include the 64-bit architecture, users will no longer be able to find and download it, if their device supports 64-bit.
From their documentation: Google Play will stop serving apps without 64-bit versions on 64-bit capable devices, meaning they will no longer be available in the Play Store on those devices.
So in about 2 years from now, all your live apps will have to include the 64-bit architecture. No need to panic!
How to Support Android 64-bit in Your Qt and Felgo Apps
You can choose between manual building and deployment, or automating the whole process using Felgo Cloud Builds. We will explain both options below. We highly recommend to use Cloud Builds for faster and easier building and especially for store deployment.
1. Build your Android App with 64-Bit manually using Qt Creator
Install the 64-bit Android Package for Use with Qt Creator
If you want to use manual deployment, you need to install the new Android 64-bit package first. Open the maintenance tool located in your Felgo installation directory, choose “Add or remove packages” and you will see a new package available.
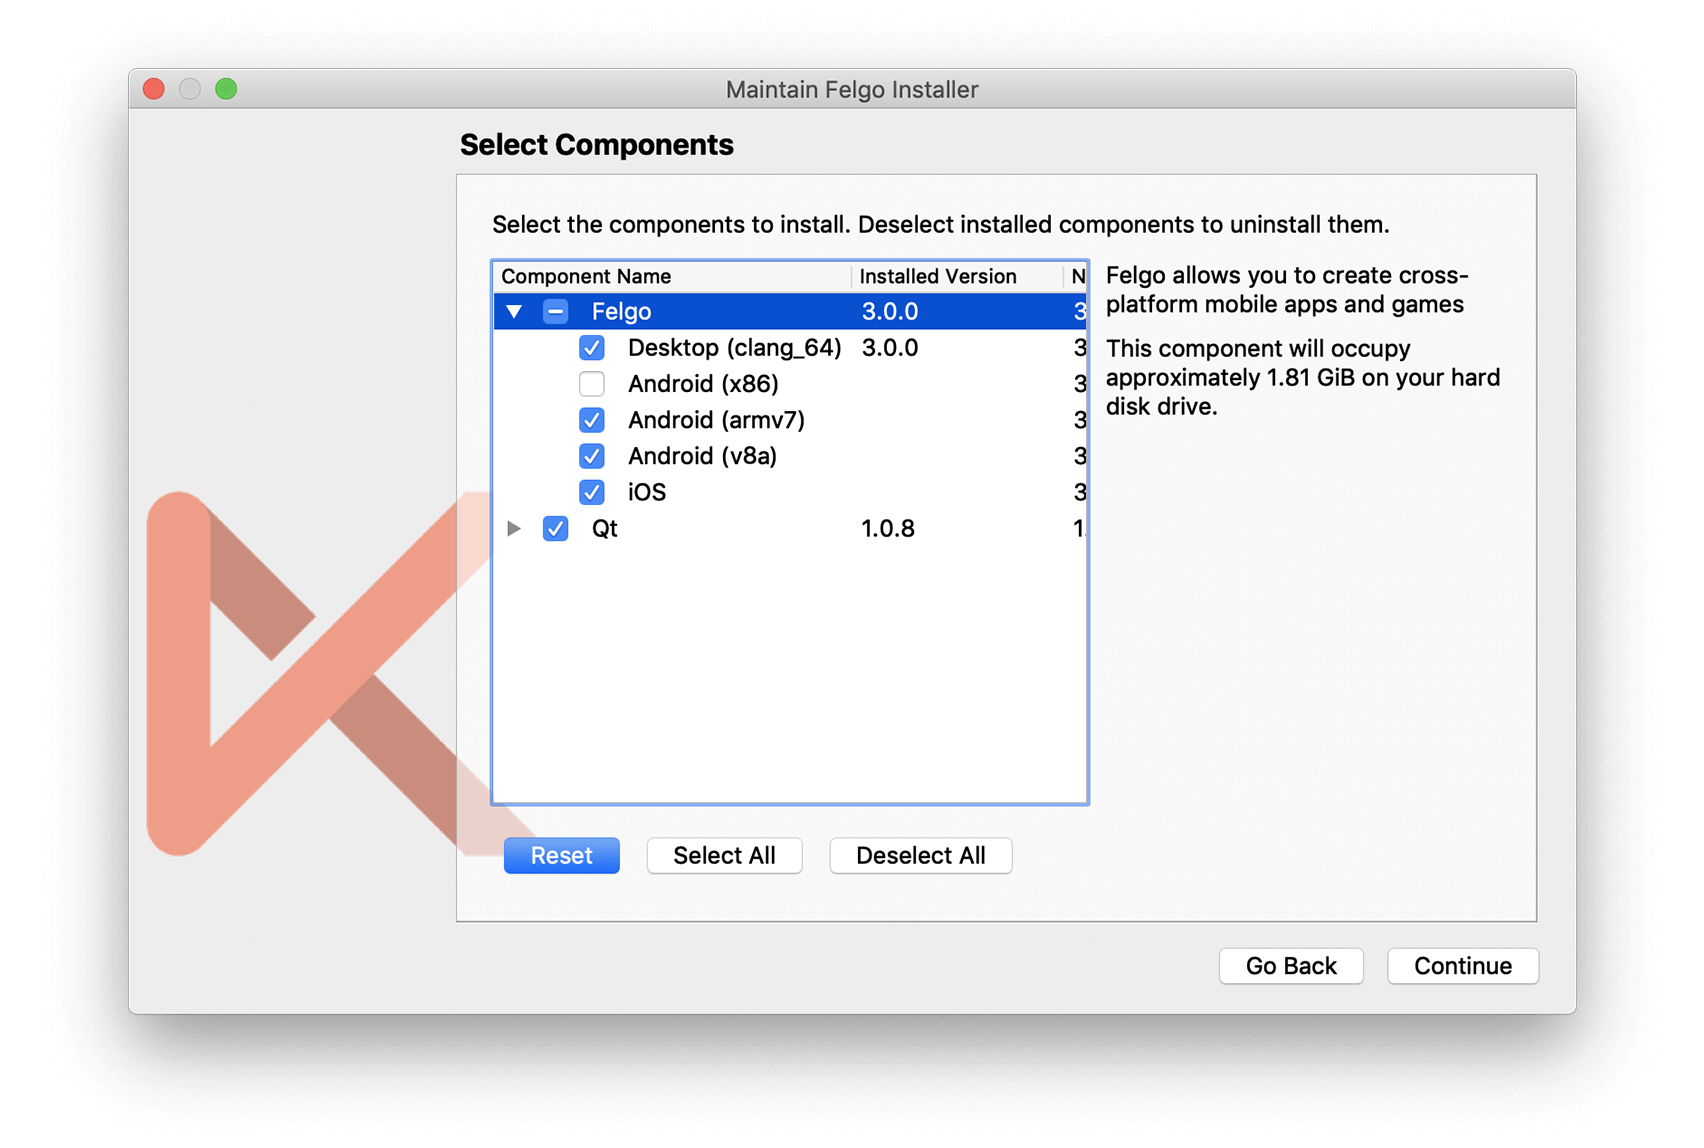
Package selection in maintenance tool.
To build the Android 64-bit architecture you need to install the new ARMv8 package, then it will be available as a kit in Qt Creator.
With a total of 3 Android packages offered, you might be wondering which you need to install and which you need to provide for an app submission. Here’s a short summary to help you decide:
- x86: With a market share of about 1.5% (and declining), this Intel 32-bit architecture is basically gone. If you plan to use the Android simulator for testing on your desktop, you can consider installing this package. For Google Play app store submissions, you can safely skip this architecture.
- ARMv7: The 32-bit architecture is widely used and was, up until now, the primary architecture used for app store submissions. It is still recommended to install this package and include this architecture in your app store submissions.
- ARMv8: This is the new 64-bit architecture. App store submissions after 1st August 2019 need to include it.
We will summarize the important steps for building and including the new 64-bit architecture for app store submissions here.
Build your Android App with 64-Bit using Qt Creator
Google Play offers 2 options to upload different architectures for a single submission.
The first one is called “Android App Bundle” and is not yet supported by Qt. However Qt already announced working on support for this format. This allows to combine all architectures into a single archive, upload it to Google Play and Google will serve the correct architecture for each user.
Until then, we use the second option, which is uploading individual APKs for different architectures. This is very straightforward, and there is only one very important detail that needs to be considered. Every APK must have a different version code set. This also means that you need to generate a separate Felgo license key, which is bound to the version code, for every architecture.
We prepared a little code example for your *.pro file, to use different version codes and license keys depending on the architecture:
# Project identifier and version
# More information: https://felgo.com/doc/felgo-publishing/#project-configuration
PRODUCT_IDENTIFIER = net.example.yourapp
PRODUCT_VERSION_NAME = 2.0.1

contains(ANDROID_TARGET_ARCH, arm64-v8a) {
 PRODUCT_VERSION_CODE = 2011 # add 1 as suffix
 PRODUCT_LICENSE_KEY = "abcd" # license key for this version code
} else {
 PRODUCT_VERSION_CODE = 2010 # add 0 as suffix
 PRODUCT_LICENSE_KEY = "efgh" # license key for this version code
}

# Optionally set a license key that is used instead of the license key from
# main.qml file (App::licenseKey for your app or GameWindow::licenseKey for your game)
# Only used for local builds and Felgo Cloud Builds (https://felgo.com/cloud-builds)
# Not used if using Felgo Live
# PRODUCT_LICENSE_KEY = "" # removed this, as already set above
You can update your existing *.pro file with this code, to make it easier to manage the different architectures. Note that Cloud Builds will require a different format, described later.
After building your app for each architecture, you will end up with 2 APKs, that you can upload with your next submission to Google Play.
If you have not yet used Android deployment with Qt or Felgo, check out the full Android deployment guide with all recommended tooling versions and important hints and tips.
2. Build your Android App with 64-Bit using Felgo Cloud Builds CI/CD
If you are not a fan of fiddling around with native frameworks or want to automate your building and publishing process, Felgo Cloud Builds got you covered.
While you can use the Felgo Live Code Reloading for development on your mobile phone without any native frameworks installed, Felgo Cloud Builds closes the gap to your testing and distribution channels.
How to use Cloud Builds to Build your Android App for 64-Bit
The Android 64-bit architecture is enabled by default when you configured the Android platform in Cloud Builds. You now also have the option of automatically increasing the version code for each build, and automatically generate license keys for those builds.
This is especially useful for the new Android 64-bit architecture, which requires 2 distinct APKs, with different version codes (and therefore different license keys).
Enable it in your project settings, like this:
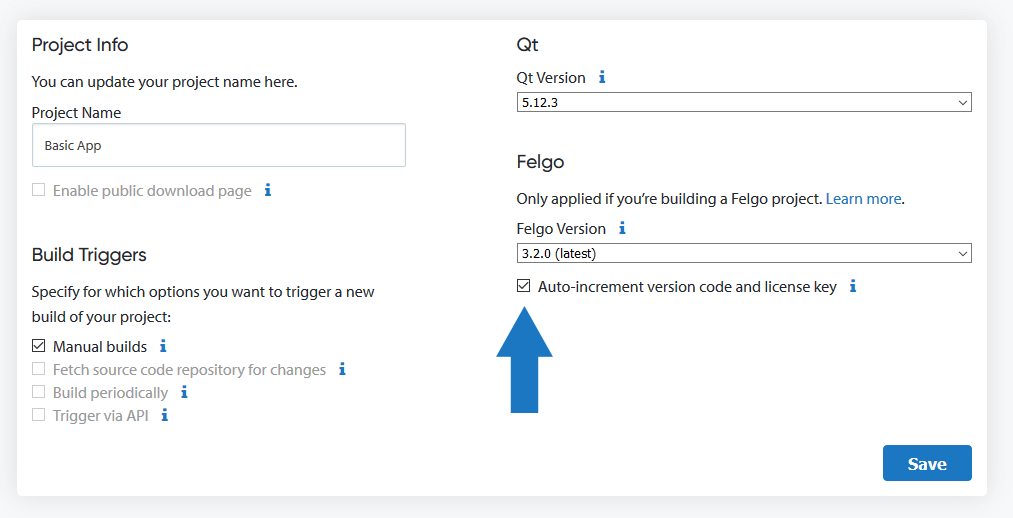
Cloud Builds project settings.
If you trigger a new build, you will now have the option to update the license key. If you already have triggered a build using this feature, you will see a suggested new version code in the dialog. For Android 64-bit, the version code is also automatically increased by 1.
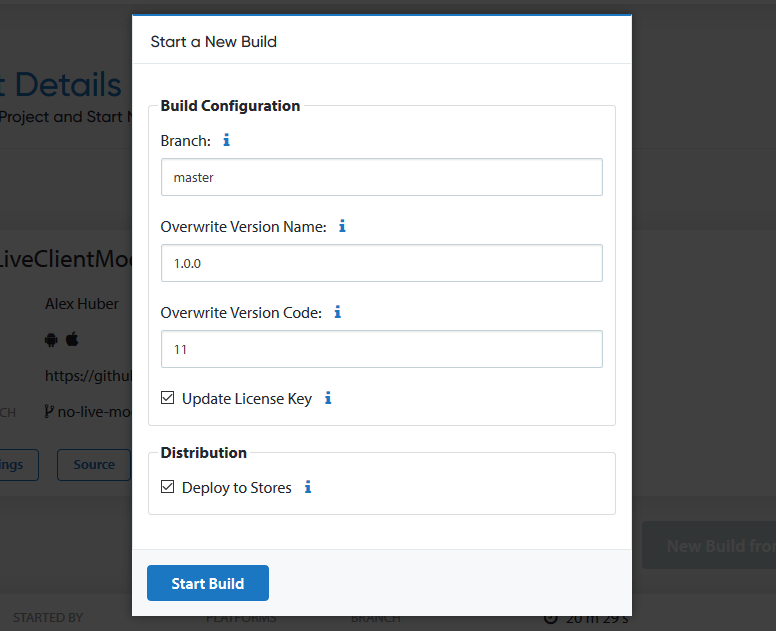
New build dialog, with option to auto-increment version code and create license keys.
After building you can download those APKs and use them for your manual submission, or also automate this with connecting your Google Play account.
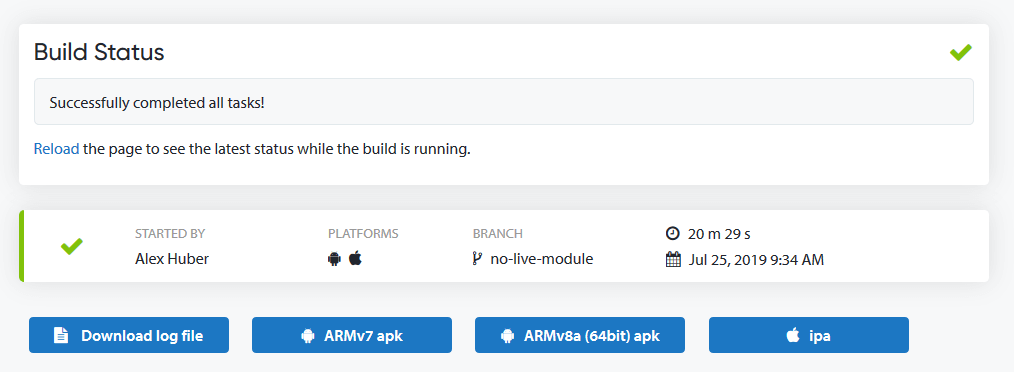
Manual download of APKs after build finished.
To enable app store uploads on Android, all you need is to provide the Google Play API JSON file of your Play Store account.

Upload of API JSON in Cloud Builds project configuration.
You can find general step-by-step instructions on how to use Felgo Cloud Builds here: Continuous Integration and Delivery (CI/CD) for Qt and Felgo
Important Migration Steps for Older Projects
If you want to make use of the new convenient feature of automatic version code increase and automatic generation of license keys, you might need to apply some changes to existing apps.
If you are unsure about any of the listed changes, you can just create a new empty project from the Qt Creator project wizard (using Felgo 3.2.0 or later), and compare the following files with your own:
- *.pro project configuration file, found in the root directory of a project.
- main.cpp entry point file, found in the root directory of a project
- build.gradle Android build configuration, found in the “android” folder of a project.
- Project-Info.plist iOS configuration file, to also use the new features for iOS builds, found in the “ios” folder of a project
The *.pro file needs to contain properties for the identifier, version name, version code and license key. If you use Felgo plugins, also make sure to move the “FELGO_PLUGINS” definitions to the root level, and not inside the “ios” block of your *.pro file. This should then look like this:
# Project identifier and version
# More information: https://felgo.com/doc/felgo-publishing/#project-configuration
PRODUCT_IDENTIFIER = net.vplay.demos.basicapp
PRODUCT_VERSION_NAME = 1.0.0
PRODUCT_VERSION_CODE = 1

# Optionally set a license key that is used instead of the license key from
# main.qml file (App::licenseKey for your app or GameWindow::licenseKey for your game)
# Only used for local builds and Felgo Cloud Builds (https://felgo.com/cloud-builds)
# Not used if using Felgo Live
PRODUCT_LICENSE_KEY = ""

# If you use plugins, move the property from the ios block to the root level instead, like this:
FELGO_PLUGINS += facebook
The main.cpp file needs a minor addition. Add this code right after the felgo.initialize(&engine) statement:
// Set an optional license key from project file
// This does not work if using Felgo Live, only for Felgo Cloud Builds and local builds
felgo.setLicenseKey(PRODUCT_LICENSE_KEY);
The build.grade file needs to include the following block, as child of the “android” item:
defaultConfig {
    applicationId = productIdentifier
    versionCode = productVersionCode.toInteger()
    versionName = productVersionName
}
The Project-Info.plist file needs to use placeholders, to apply the values defined in the *.pro file. Search for the following keys and add the placeholders:
<key>CFBundleExecutable</key>
<string>${EXECUTABLE_NAME}</string>
<key>CFBundleIdentifier</key>
<string>$(PRODUCT_BUNDLE_IDENTIFIER)</string>
<key>CFBundleName</key>
<string>${PRODUCT_NAME}</string>
<key>CFBundleShortVersionString</key>
<string>${PRODUCT_VERSION_NAME}</string>
<key>CFBundleVersion</key>
<string>${PRODUCT_VERSION_CODE}</string>
Benefits of Using Cloud Builds
There are a number of benefits in using a CI/CD for developing your projects. First of all, the obvious one, time savings:
- No setup of native frameworks required
- Cut time to provide new test versions
- Cut time for publishing new versions
- Release more frequent updates for your users
Apart from that, there are several other advantages that you can benefit from:
- Easy integration with Git
- Automatic upload to iOS TestFlight and Google Play testing tracks
- Deploy to iOS without the need for a Mac
- Soon you will also be able to select different Felgo and Qt versions to build with
Specifically for the build and deploy process of the new Android 64-bit architecture, you also gain the following benefits:
- Store your signing information persistent. With Qt Creator, you will have to re-add them every time you close your project.
- Build the app for both 32-bit and 64-bit architectures simultaneously.
- Increment the version code for each build automatically.
- Generate new license keys for each build version automatically.
- Upload the generated APKs to the store, so you can access them from your Artifact Library.
This might also be interesting for you
Continuous Integration and Delivery (CI/CD) for Qt and Felgo
QML Tutorial: How to Create Native Cross Platform Apps with Qt and Felgo | Free Udemy Course