This document contains code samples, design patterns, and useful information when looking at Felgo from an iOS developer perspective.
Use this guide to build upon your iOS coding knowledge and quickly learn the similarities and differences compared to cross-platform development with Felgo.
Compiling your Felgo app for iOS will present you with a native application package (.ipa), which you can run on an iOS device or simulator or publish in the iOS App Store. Similar to native iOS development, the build
process relies on tools shipped as part of Xcode, which needs to be installed initially.
If you do not yet have Felgo or Xcode installed, you can have a look at these guides:
You can also Integrate Felgo with Existing Applications by embedding a Felgo/Qt view in your iOS app.
Why to use Felgo?
Felgo utilizes QML + Javascript as the main coding language and is based on Qt, a well-known and feature-rich C++ framework.
This allows to save up to 90% of code compared to other languages and frameworks. It is also a cross-platform tool. This means you can compile your application for different platforms using the same code base. In this
area, Felgo supports iOS, Android and even Desktop platforms and embedded systems.
One of the biggest advantages of Felgo lies in the way you can compose your UI views, create layouts and add animations. This is where the power of QML comes into action. Felgo moves the view composition and widget
rendering away from the platform directly into your app. Instead of heavy-weight and hard to animate widgets that are rendered by the platform, you can create your UI with easily extensible and customizable items.
Building your UI this way saves code, makes it easier to maintain and feels natural. It also follows the trend to move away from 'cookie cutter' apps that were common a few years ago. Modern apps focus more on
custom designs that follow your brand and provide a rich user experience.
The simplicity of QML speeds up development, but the customizability and extensibility make it so powerful. You have full control over your UI items and layout while taking advantage of theme-able UI components that
match the native user experience of iOS or Android widgets. Combined with ready-to-use native features, backend services and the power of C++ Qt, Felgo is the perfect choice for any app use-case.
It is also possible to put your existing iOS knowledge to use and extend Felgo with custom native integrations if needed. Felgo already offers many cross-platform plugins that
integrate native frameworks and communicate with iOS (or Android).
For an overview of how to tackle different tasks in Felgo, we've summed up the most important topics and questions for you:
Views
What is the equivalent of a UIView in Felgo?
For iOS, everything that you see on the screen is a UIView. For Felgo, the same can be said for the basic QML Item type. It comes with everything you need to show,
layout and compose UI elements of your app.
But there are a few differences when it comes to rendering. Based on your UI code that consists of QML Items, the Felgo application builds a tree of Item instances. You do not require to call setNeedsDisplay()
to redraw those Items, as it is for UIView instances on iOS. Whenever Items change their visual state, the QML engine updates the UI automatically.
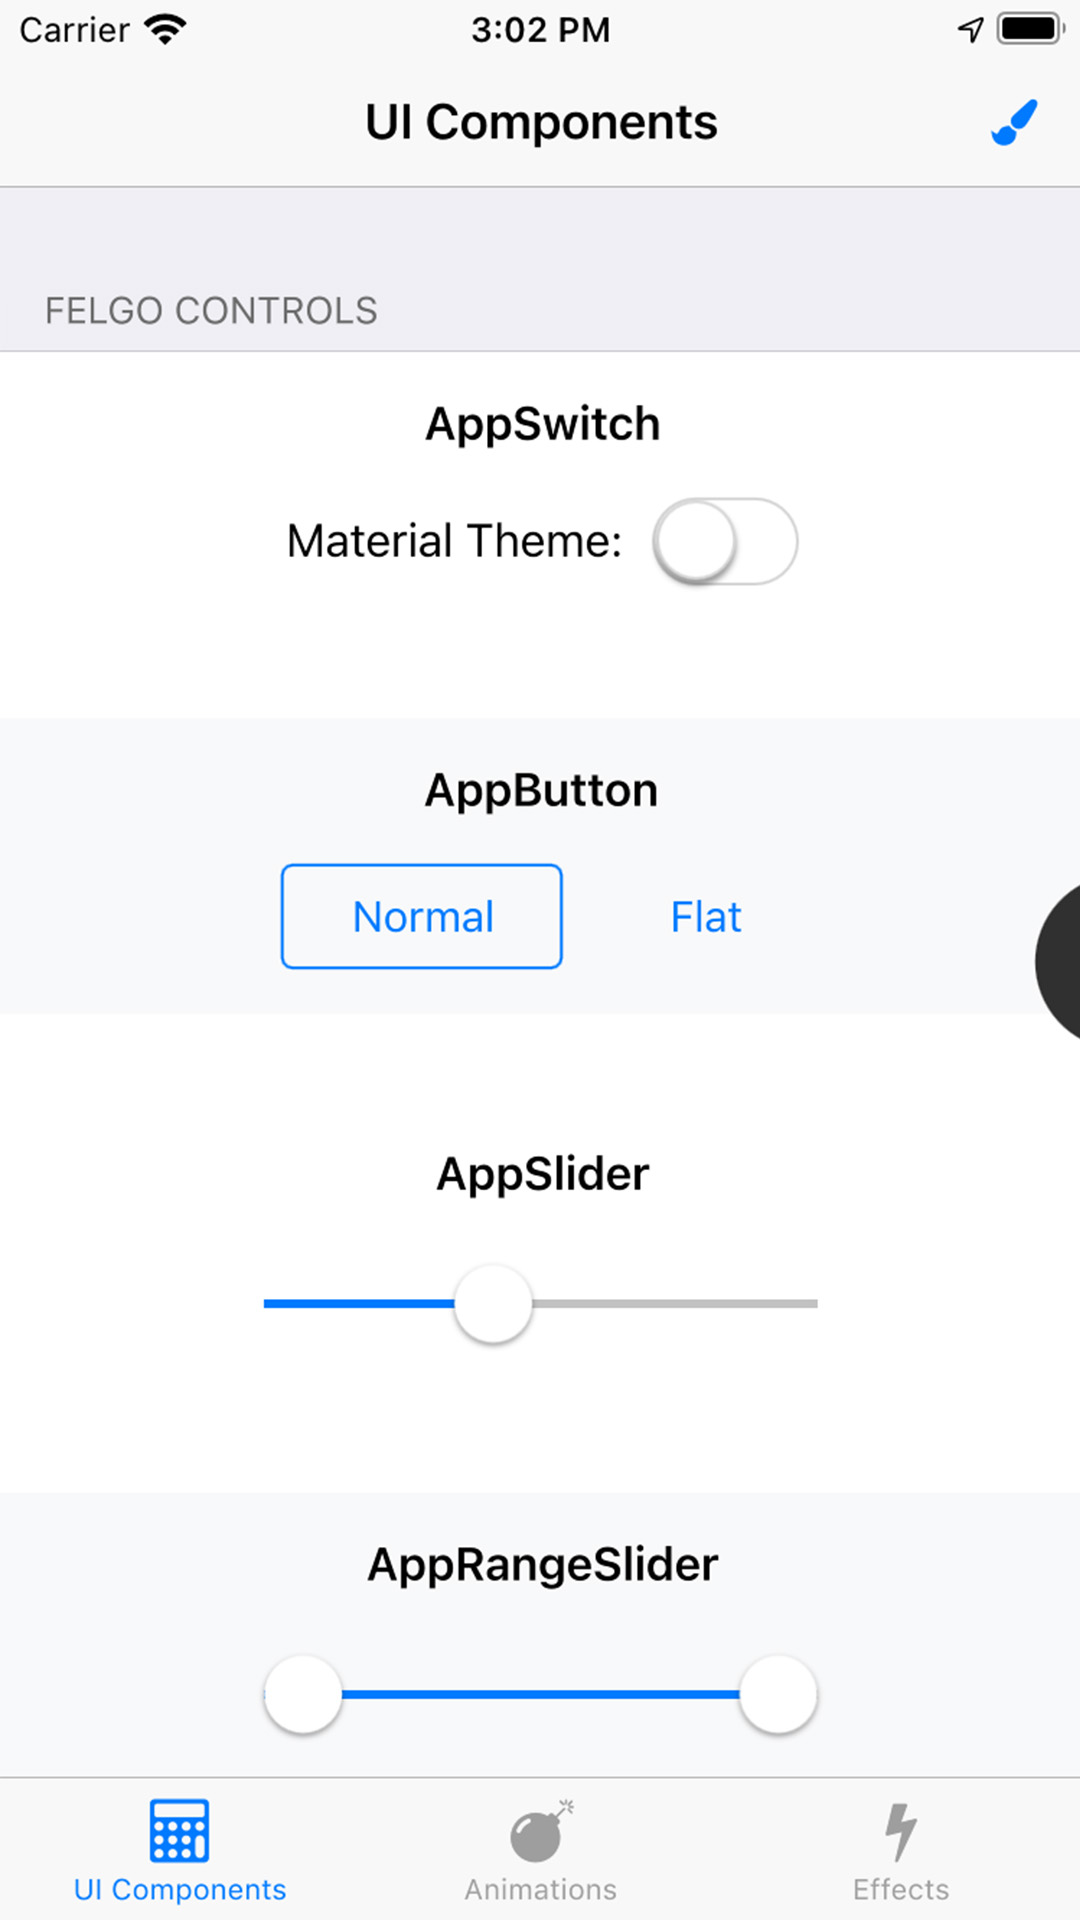
The QML rendering engine is a highly-optimized piece of C++ code, which renders your QML UI within a native view in your iOS app. Lightweight, fast and easy to work with. The Felgo App Components
offer many different items that incorporate the iOS Human Interface Guidelines. With these types, you can use the power of QML to create your iOS app. Run the app on Android, and the components will change their look to use
native Android styles and gestures instead - without touching the code.
| iOS |
Android |
|
|

|
How do I update Items?
This is a question that you no longer need to worry about. The QML Items update automatically if required. Furthermore, whenever properties of an Item change, other elements get notified. This is possible with the power of
property bindings:
import Felgo
import QtQuick
App {
property int clickCount: 0
AppPage {
AppText {
text: "You clicked " + clickCount + " times!"
anchors.centerIn: parent
}
MouseArea {
anchors.fill: parent
onClicked: clickCount = clickCount + 1
}
}
}
These few lines of QML code present us with a full-screen AppPage that comes with a white background. It contains a text, which is centered and prints the value of the App's
clickCount property. A touch anywhere on the Page is handled by the MouseArea, which increases the counter.
Due to the property binding feature, each change of the clickCount property triggers a new evaluation of the AppText's text property. This is because the
bound expression relies on the clickCount property. The AppText then updates accordingly and shows the new text value.
How do I lay out my Items? Where is my Storyboard?
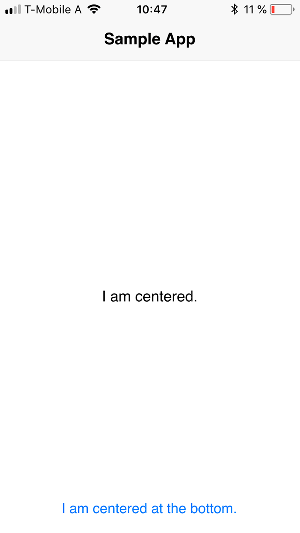
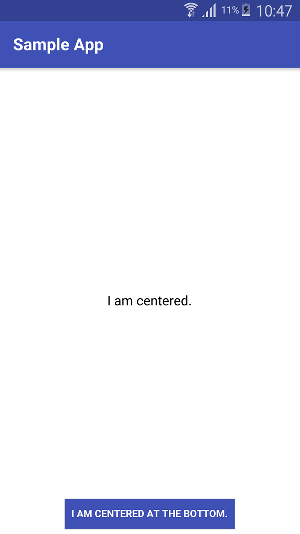
In Felgo, you use QML to layout your app. By nesting QML items you can compose UI elements on the fly. For example, to show a text and a button on a page:
| iOS |
Android |
|
|
|
import Felgo
import QtQuick
App {
NavigationStack {
AppPage {
title: "Sample App"
AppText {
text: "I am centered."
anchors.centerIn: parent
}
AppButton {
text: "I am centered at the bottom."
onClicked: console.log("Button clicked!")
anchors.horizontalCenter: parent.horizontalCenter
anchors.bottom: parent.bottom
}
}
}
}
Every Felgo app starts with a single App component defined as the root of the QML tree. Every app then usually includes a navigation item and some AppPage items for your content views.
How do I add or remove a component from my layout?
iOS requires you to use addSubview() on the parent, or removeFromSuperview() on a child view to add or remove child views. While QML also provides those possibilities, there are easier ways to
dynamically show or hide items. If you don't mind keeping the item instance in the QML tree alive, you can also control the visibility of each item as you like. Items thus do not require to be re-created and can keep their
state while being hidden.
This example toggles between two items with an AppButton:
import Felgo
App {
AppPage {
AppText {
id: appTextItem
text: "Some Text"
anchors.centerIn: parent
}
AppButton {
text: "A Button"
visible: !appTextItem.visible
onClicked: console.log("Button clicked!")
anchors.centerIn: parent
}
AppButton {
anchors.bottom: parent.bottom
flat: false
text: "Toggle"
onClicked: appTextItem.visible = !appTextItem.visible
}
}
}
How do I animate an Item?
In iOS, views offer the animate(withDuration:animations:) method on a view. Felgo offers an extensive animation framework with the Animation QML
components. It is possible to animate every basic property of your UI elements. You can even define behaviors to automatically animate properties whenever they change.
The following example allows to fade a text by animating its opacity:
import Felgo
import QtQuick
App {
AppPage {
AppButton {
anchors.horizontalCenter: parent.horizontalCenter
anchors.bottom: parent.bottom
text: "Toggle Text Item"
onClicked: textItem.opacity = textItem.visible ? 0 : 1
}
AppText {
id: textItem
anchors.centerIn: parent
text: "Hello World!"
visible: opacity != 0
Behavior on opacity {
NumberAnimation { duration: 500 }
}
}
}
}
Here is another example of how you can create complex animations. For this, you can use the SequentialAnimation and ParallelAnimation types to nest your animations. You can combine those types in any order.
You can find even more animation examples on this page: Add Animations to your App
How do I draw to the screen?
On iOS, you can use CoreGraphics to draw shapes to the screen. Felgo has a different API based on the Canvas item that allows drawing straight and
curved lines, simple and complex shapes, graphs, and referenced graphic images. It can also add text, colors, shadows, gradients, and patterns, and do low-level pixel operations.
The width and height properties of the Canvas item define the drawing area. If it requires rendering, the paint signal fires. When handling the
signal, you can draw to the Canvas using a Context2D object:
 import Felgo
 import QtQuick

 App {
   Canvas {
     id: mycanvas
     width: 100
     height: 200
     onPaint: {
       var ctx = getContext("2d");
       ctx.fillStyle = Qt.rgba(1, 0, 0, 1);
       ctx.fillRect(0, 0, width, height);
     }
   }
 }
How do I build custom QML Items?
Each .qml file of your project defines a reusable QML Component. The specified root QML Item determines the base component, which your new item extends. The new QML type can then add properties, signals, and
functions, which form the public interface of the component.
To define the layout for the item, add some child elements and position them in the view. Each child element may also be extended with new features and properties directly where it is used. You do not require to create an
own QML Item to make small additions to a single item instance in your UI.
The following example shows a clickable CustomButton.qml component with a background and text. Once imported, you can use the new type in your app:
import Felgo
import "relative-path-to-directory-of-custom-button"
App {
CustomButton {
anchors.centerIn: parent
property int count: 0
text: "You clicked "+count+" times."
backgroundColor: "yellow"
onClicked: count++
}
}
import QtQuick
Item {
implicitWidth: textItem.implicitWidth
implicitHeight: textItem.implicitHeight
property color backgroundColor: "green"
property string text: "Click Me!"
signal clicked()
Rectangle {
anchors.fill: parent
color: parent.backgroundColor
}
Text {
id: textItem
text: parent.text
anchors.centerIn: parent
}
MouseArea {
anchors.fill: parent
onClicked: parent.clicked()
}
}
Navigation and Pages
How do I navigate between pages?
In iOS, to navigate between view controllers, you use a UINavigationController that manages the stack of view controllers to display. Felgo uses a similar implementation, using the App Navigation Componnents.
You can rely on the navigation types to switch between different Pages in your app:
Apart from the app Navigation, which provides the main menu for your app, the NavigationStack is the main component for navigating back and forth
between different pages.
For passing data between pages, the easiest solution is to make relevant settings or properties available in a common parent scope. Public properties, functions, and signals of an ancestor in the QML tree are available for
direct access:
import Felgo
import QtQuick
App {
id: app
property int count: 0
NavigationStack {
AppPage {
id: mainPage
title: "Main"
Column {
anchors.centerIn: parent
AppText {
anchors.horizontalCenter: parent.horizontalCenter
text: "Count " + app.count
}
AppButton {
text: "Push Counter Page"
onClicked: mainPage.navigationStack.push(counterPageComponent)
}
}
}
}
Component {
id: counterPageComponent
AppPage {
title: "Change Count"
property AppPage target: null
Column {
anchors.centerIn: parent
AppButton {
text: "Count ++"
onClicked: {
app.count++
}
}
AppButton {
text: "Count --"
onClicked: {
app.count--
}
}
}
}
}
}

If required, you can still work with and handle custom UIViewController instances through native integrations to your Felgo app.
How do I navigate to another app?
In iOS, to send the user to another application, you use a specific URL scheme. You can use those URL schemes with Felgo with the NativeUtils::openApp() or NativeUtils::openUrl() methods.
Threading & Asynchronous Code
How do I write asynchronous code?
To avoid operations blocking your UI, iOS requires to keep the main thread free at all times. As Felgo relies on QML and Javascript, updates to the UI are already handled in a highly asynchronous and event-driven way. You
weave-in your Javascript code as part of signal handlers that execute when certain events or user interactions happen. The QML rendering engine is highly optimized, so you do not need to worry about blocking the UI when adding
your view logic.
Communication with your application backend is also easy, as you can use the asynchronous HttpRequest.
This example fetches a JSON response containing the URL to an image. The request happens asynchronously. The returned URL is then set as the AppImage source, which is able to asynchronously
load an image from an URL:
import Felgo
import QtQuick
App {
property string serverUrl: "https://jsonplaceholder.typicode.com/photos/1"
property var jsonData: undefined
Component.onCompleted: {
var request = HttpRequest
.get(serverUrl)
.then(function(res) {
jsonData = res.body
})
.catch(function(err) {
console.log(err.message)
console.log(err.response)
});
}
AppPage {
AppIcon {
anchors.centerIn: parent
iconType: IconType.refresh
NumberAnimation on rotation {
loops: Animation.Infinite
from: 0
to: 360
duration: 1000
}
}
AppImage {
source: jsonData !== undefined ? jsonData.url : ""
anchors.fill: parent
fillMode: AppImage.PreserveAspectFit
asynchronous: true
}
}
}
After request completion, the result is stored to the jsonData property. The expression for the image source relies upon on the property, so the AppImage will automatically
update and show the image as soon as the data arrives - nothing more to do.
How to Access REST Services with Qt and Felgo?
REST and RESTful web services are the most common way to access data through the Internet. In addition to the Felgo HttpRequest type of the above example, you can also use the
XMLHttpRequest object, which QML supports by default. This article gives detailed insights on how to create an App and connect to a REST service with Felgo using XmlHttpRequest: How to Access REST Services: Weather Service Example App
However, we recommended to connect to REST services with the new Felgo HttpRequest type, as it offers more features and an easier API.
How do you move work to a background thread?
For long-running and data-intense operations, it still makes sense to actively use a separate thread and notify your UI once the work is done. To quickly spawn a new thread in QML, you can add a WorkerScript item:
import Felgo
import QtQuick
App {
AppText {
id: myText
text: 'Click anywhere'
}
WorkerScript {
id: myWorker
source: "script.js"
onMessage: myText.text = messageObject.reply
}
MouseArea {
anchors.fill: parent
onClicked: myWorker.sendMessage({ 'x': mouse.x, 'y': mouse.y })
}
}
The above worker script specifies a JavaScript file, script.js, which is handled in a new thread. Here is an example script.js, which simply returns the passed mouse position:
WorkerScript.onMessage = function(message) {
WorkerScript.sendMessage({ 'reply': 'Mouse is at ' + message.x + ',' + message.y })
}
For more control over your threads and the best possible performance, you also have the full power of Qt C++ at your hands. You can find a guide how to mix Felgo QML code with Qt C++ components here: How to Expose a Qt C++ Class with Signals and Slots to QML.
Stepping into the C++ world also gives access to e.g. advanced networking features like a socket or Bluetooth connection.
The demo is also available with the Felgo SDK here: <Path to Felgo>/Examples/Felgo/appdemos/cpp-qml-integration
Project structure, localization, dependencies and assets
How do I include image assets for Felgo? What about multiple resolutions?
While iOS treats images and assets as distinct items, Felgo apps have only assets. Resources that are placed in the Images.xcassets folder on iOS, are placed in an assets folder for Felgo. As with
iOS, assets are any type of file, not just images. For example, you might also have a JSON file located in the assets folder.
Felgo projects come with an assets folder by default. To bundle the folder content along with your application, the CMakeLists.txt project configuration includes a setup like:
file(GLOB_RECURSE AssetsFiles RELATIVE ${CMAKE_CURRENT_SOURCE_DIR} assets
In addition, your project also holds an ios folder which handles platform-specific configurations like the Info.plist file or your app-icons in an asset catalog. In the same manner, the respective
platform configuration for Android is found in the android folder.
For images, Felgo follows a simple density-based format like iOS. In Felgo, you can do that with the MultiResolutionImage component. It automatically chooses the best image
version for each device's screen.
By default, Felgo allows you to provide three different images, for example:
- imageSwitching.png (e.g. 50×20 px)
- +hd/imageSwitching.png (e.g. 100×40 px)
- +hd2/imageSwitching.png (e.g. 200×800 px)
This code snippet selects the best version of the above image automatically:
import Felgo
App {
MultiResolutionImage {
source: Qt.resolvedUrl("../assets/imageSwitching.png")
width: dp(50)
height: dp(20)
}
}
To specify density-independent sizes for UI elements, you can rely on the App::dp() function. The Felgo Apps Components are already set up to have the same
physical size on all screens - regardless of their density.
For more information about density-independence in Felgo, see Supporting Multiple Screen Sizes & Screen Densities with Felgo Apps.
Where do I store strings? How do I handle localization?
Felgo is based on the Qt platform, so you can rely on Qt Linguist tools for your translations. Adding translations to your app then requires these three steps:
- Use the
qsTr() function to mark texts for translation in your QML code.
- Generate translation files for all strings (in XML format).
- Translate the texts.
- Release translation binaries for usage in your app.
See here for a full guide about internationalization and string translation: Internationalization with Felgo
What is the equivalent of Cocoapods? How do I add dependencies?
In iOS, you add dependencies by adding to your Podfile.
Felgo creates a native iOS IPA app file using the same iOS build tools that you already know. To configure the iOS app and build, you have access to a generated Xcode project file that you can configure to your
needs.
When working with Felgo Plugins for native features, only a single dependency per plugin includes all required frameworks. See the plugin documentation page for more information about plugin integration.
ViewControllers
What is the equivalent to ViewControllers in Felgo?
In iOS, a ViewController represents a portion of a user interface, most commonly used for a screen or section. These are composed together to build complex user interfaces, and help scale your application's
UI.
In Felgo, this job is done with AppPages and Navigation items directly in QML.
You can rely on the Navigation Components to switch between different Pages in your app, all within the same code:
If required, you can still work with and handle ViewControllers through native integrations to your Felgo app.
How do I listen to iOS lifecycle events?
Your Felgo app window runs within a single ViewController on iOS. For listening to lifecycle events, you can add handlers for the App::applicationPaused or
App::applicationResumed signals:
import Felgo
App {
onApplicationPaused: console.log("Application paused.")
onApplicationResumed: console.log("Application resumed.")
}
Layouts
There are many different layouting mechanisms and components available with Felgo.
For a short introduction, please see Create Layouts and Position Components in Your App.
What is the equivalent of a UITableView or UICollectionView in Felgo?
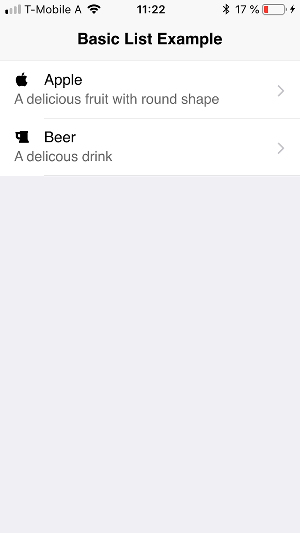
The easiest way to create a list is to use the AppListView type together with a SimpleRow delegate for the list rows:
| iOS |
Android |
|
|

|
 import Felgo

 App {
  NavigationStack {
    AppPage {
      title: "Basic List Example"

      AppListView {
        delegate: SimpleRow {}
        model: [
          {
            text: "Apple",
            detailText: "A delicious fruit with round shape",
            iconType: IconType.apple
          },

          {
            text: "Beer",
            detailText: "A delicous drink",
            iconType: IconType.beer
          }
        ]
      }
    }
  }
 }
The model-delegate system also supports JSON data structures for your data model. This makes it easy to work with and display data from REST APIs.
How do I know which list item is clicked on?
The SimpleRow::selected signal allows to handle click events on a list cell. For custom delegate items, you can add your own MouseArea for handling touch input.
 import Felgo

 App {
  NavigationStack {
    AppPage {
      title: "Clickable List Example"

      AppListView {
        delegate: SimpleRow {
          onSelected: index => console.log("Clicked Item #"+index+": "+JSON.stringify(modelData))
        }
        model: [
          {
            text: "Apple",
            detailText: "A delicious fruit with round shape",
            iconType: IconType.apple
          },

          {
            text: "Beer",
            detailText: "A delicous drink",
            iconType: IconType.beer
          }
        ]
      }
    }
  }
 }
How do I update ListViews dynamically?
The list view updates its UI automatically whenever the model changes - at least when you describe your model as a ListModel type.
For plain JSON-based models, the list is not notified when some data values within the JSON structure change. In this case, you can manually trigger a property-changed signal, which in turn updates the UI of the list:
import Felgo
App {
NavigationStack {
AppPage {
id: page
title: "Append List Item Example"
property var listData: [
{
text: "Apple",
detailText: "A delicious fruit with round shape",
iconType: IconType.apple
},
{
text: "Beer",
detailText: "A delicous drink",
iconType: IconType.beer
}
]
AppListView {
id: listView
model: page.listData
delegate: SimpleRow {
onSelected: {
page.listData.push(modelData)
page.listDataChanged()
}
}
}
}
}
}
More list examples are available here: Use ScrollViews and ListViews in Your App
How do I handle landscape transitions in Felgo?
The App::portrait or App::landscape properties allow to optimize your layout for different orientations. Similar to other properties in
QML, you can add handlers for property changes or use property bindings to adapt the UI automatically.
 import Felgo

 App {
   id: app
   onPortraitChanged: {
     if(portrait)
       console.log("orientation changed to portrait")
     else
       console.log("orientation changed to landscape")
   }

   AppText {
     text: app.landscape ? "Landscape Mode" : "Portrait Mode"
     anchors.centerIn: parent
   }
 }
You can also manually change the orientation settings at runtime, e.g. like this:
import Felgo
import QtQuick
App {
NavigationStack {
AppPage {
title: "Orientation Lock"
Column {
AppButton {
text: "Lock to landscape"
onClicked: NativeUtils.preferredScreenOrientation = NativeUtils.ScreenOrientationLandscape
}
AppButton {
text: "Remove orientation lock"
onClicked: NativeUtils.preferredScreenOrientation = NativeUtils.ScreenOrientationDefault
}
}
}
}
}
Gesture detection and touch event handling
How do I add a click listener to an item in Felgo?
In iOS, you attach a GestureRecognizer to a view to handle click events. With Felgo, there are multiple ways:
If an item already supports user interaction, you can directly handle the events in your code. The following example adds an AppButton and handles the clicked signal:
 import Felgo

 App {

   AppButton {
     text: "Click Me!"
     anchors.centerIn: parent
     onClicked: text = "Thanks!"
   }

 }
To handle clicks for a custom Item, you can attach a MouseArea to it:
 import Felgo
 import QtQuick

 App {

    Rectangle {
     width: dp(200)
     height: dp(200)
     color: "lightyellow"
     anchors.centerIn: parent

     MouseArea {
       anchors.fill: parent
       onClicked: parent.color = "lightgreen"
     }
   }

 }
How do I handle other gestures on items?
You can work with different MouseArea signals to adapt it for your use-case. However, the MouseArea can only handle a single touch point. For more information on gestures and handling multiple touch points, please see: Handle Touch and Gestures in Your App.
Theming and text
How do I theme my app?
Felgo allows you to style your app with app-wide theme settings using the Theme component. This is in most cases more convenient than styling every single component itself. You can Style Your App with Themes for some simple theming examples.
The default Theme settings implement platform-specific styles, like the default iOS style on iOS or Material Style on Android, for a native look and feel on both platforms. The following example shows how to manually change
the used platform theme in your code:
How do I set an app-wide custom font?
In iOS, you import ttf font files into your project and create a reference in the Info.plist file. This is rather complicated, especially if using fonts with Interface Builder files.
Felgo is built with Themeing and customization support from the ground up. Felgo components make use of two different fonts, the Theme::normalFont and the Theme::boldFont. By default, these fonts match the platform's default font for Felgo components.
If you want to explicitly provide your own font you can override the Theme properties with a FontLoader object:
import Felgo
import QtQuick
App {
onInitTheme: {
Theme.normalFont = arialFont
}
FontLoader {
id: arialFont
source: "../assets/fonts/Arial.ttf"
}
AppPage {
AppText {
text: "I'm in Arial"
}
}
}
Make sure to add your custom fonts to your app's assets and to provide the correct path in the FontLoader object.
You can also use the custom font in your own app components, like the following example:
Text {
font.family: Theme.normalFont.name
text: "Custom text item"
}
Instead of replacing the general Theme font, you can also use a FontLoader and only overwrite the font.family property for certain text
items.
How do I style my Text items?
Along with the font, you can customize many other styling properties of an AppText item, such as:
- color
- elide
- font.bold
- font.capitalization
- font.family
- font.italic
- font.letterSpacing
- font.pixelSize
- font.weight
- font.wordSpacing
- horizontalAlignment
- lineHeight
- maximumLineCount
- verticalAlignment
- wrapMode
What is the equivalent of a placeholder in a text field?
Input controls like AppTextInput or AppTextField own a placeHolderText property, which
you can use for your placeholder text.
import Felgo
import QtQuick
App {
AppPage {
MouseArea {
anchors.fill: parent
onClicked: textEdit.focus = false
}
Rectangle {
anchors.fill: textEdit
anchors.margins: -dp(8)
color: "lightgrey"
}
AppTextInput {
id: textEdit
width: dp(200)
placeholderText: "What's your name?"
anchors.centerIn: parent
}
}
}
How do I show validation errors?
The text input components provide predefined validators that you can use, they are called inputMethodHints.
You can also add custom validators to restrict the accepted input to a certain input type or expression. Input that does not match the validator is not accepted. To do custom validations and show errors for accepted input,
you can add simple checks and control the visibility of errors with property bindings:
import Felgo
import QtQuick
App {
Rectangle {
anchors.fill: textInput
anchors.margins: -dp(8)
color: "lightgrey"
}
AppTextInput {
id: textInput
width: dp(200)
placeholderText: "What's your name?"
anchors.centerIn: parent
validator: RegularExpressionValidator {
regularExpression: /[A-Za-z]+/
}
property bool isTooLong: textInput.text.length >= 6
}
AppText {
text: "Error: Use less than 6 letters."
color: "red"
anchors.top: textInput.bottom
anchors.topMargin: dp(16)
anchors.left: textInput.left
visible: textInput.isTooLong
}
}
How do I access GPS or other device sensors?
Felgo allows you to access various device sensors, with the Qt Sensors QML Types.
The components for Positioning, Maps, and Navigation are found in the Qt Positioning and Qt
Location modules.
For an easy and convenient way to show a map with the current user position, you can also rely on the AppMap type:
import Felgo
import QtLocation
import QtQuick
App {
AppMap {
anchors.fill: parent
plugin: Plugin {
name: "maplibregl"
parameters: [
PluginParameter {
name: "maplibregl.mapping.additional_style_urls"
value: "https://api.maptiler.com/maps/streets/style.json?key=get_your_own_OpIi9ZULNHzrESv6T2vL"
}
]
}
showUserPosition: true
zoomLevel: 13
Component.onCompleted: {
if(userPositionAvailable)
center = userPosition.coordinate
}
onUserPositionAvailableChanged: {
if(userPositionAvailable)
zoomToUserPosition()
}
}
}
How do I access the camera?
The Felgo NativeUtils allow triggering native device features from within your QML code. For example to show dialogs, open the camera, access the gallery or work with contacts.
This simple example allows to take a photo with the device camera:
 import Felgo
 import QtQuick

 App {
   AppImage {
     id: image
     anchors.fill: parent
     fillMode: AppImage.PreserveAspectFit
     autoTransform: true
   }

   AppButton {
     text: "Take Photo"
     anchors.centerIn: parent
     onClicked: NativeUtils.displayCameraPicker("Take Photo")
   }

   Connections {
     target: NativeUtils
     onCameraPickerFinished: (accepted, path) =>{
       image.source = ""
       if(accepted) {
         image.source = path
       }
     }
   }
 }
To embed a camera view directly in your app, you can use the Camera, CaptureSession and VideoOutput types:
 import Felgo
 import QtQuick
 import QtMultimedia

 App {
   CaptureSession {
     camera: Camera {
       active: true
     }
     videoOutput: videoOutput
   }

   VideoOutput {
     id: videoOutput
     anchors.fill: parent
     fillMode: VideoOutput.PreserveAspectCrop
   }
 }
How do I set up push notifications?
Felgo supports both server-triggered and local notifications with Felgo Plugins. All plugins offer a platform-agnostic API and rely on native frameworks for each platform.
See the GoogleCloudMessaging Plugin or the OneSignal Plugin to add server-triggered notifications.
Local notifications are available with the Notification Plugin. The following example schedules a notification to be fired after 5 seconds and trigger the notificationFired signal. You
can also try to put the app in the background, to get the notification on your home screen. In this case, the notificationFired signal will be called when you enter the app after clicking on the notification.
import QtQuick
import Felgo
App {
NotificationManager {
id: notificationManager
onNotificationFired: notificationId => {
NativeUtils.displayMessageBox("Notification", "id: "+notificationId, 1)
}
}
Notification {
id: idleNotification
notificationId: "idleNotification"
message: "Anyone here? Haven't seen you in a while..."
timeInterval: 5
}
AppButton {
text: "Schedule Notification (5s)"
anchors.centerIn: parent
onClicked: {
notificationManager.cancelNotification(idleNotification.notificationId)
notificationManager.scheduleNotification(idleNotification)
}
}
}
How do I log in with Facebook?
Felgo allows integrating Facebook with the Facebook Plugin. See the plugin documentation for more information and detailed integration steps.
How do I use Firebase features?
The Firebase Plugin is the right tool for integrating Firebase Authentication, Real-time Database or Cloud Storage features. See the plugin page for more information and detailed
integration steps.
The Firebase Plugin has seen lots of improvements and new features lately. In case you are missing anything or run into issues, don't hesitate to get in touch!
How do I build my own custom native integrations?
In Felgo you code with QML, so going native first means to step into the Qt C++ world. You can find a guide on how to mix Felgo QML code with Qt C++ components here: How to Expose a Qt C++ Class with Signals and Slots to QML
The demo is also available with the Felgo SDK: <Path to Felgo>/Examples/Felgo/appdemos/cpp-qml-integration
Working with native iOS code is easy, as Objective-C is directly compatible with C++. But before you dive in too deep: Our developers are experts at building such native integrations, and we're happy to add features or build
extensions as part of our support package offering!
Databases and local storage
How do I access UserDefaults in Felgo?
The App::settings property allows to store simple key/value pairs in a local database. If you format the value as a JSON string, you can also store more complex data in a very easy
way.
import Felgo
import QtQuick
App {
id: app
property int numberAppStarts
Component.onCompleted: {
numberAppStarts = app.settings.getValue("numberAppStarts") || 0
numberAppStarts++
app.settings.setValue("numberAppStarts", numberAppStarts)
}
NavigationStack {
AppPage {
title: "Settings"
AppText {
anchors.centerIn: parent
text: "App starts: " + numberAppStarts
}
}
}
}
The App settings in the above example internally rely on the Storage component. You can also add your own Storage to save your key-value pairs to a distinct database. You can find more info
on storage, data and Firebase here: Store Data Persistent
How do I access SQLite in Felgo?
You can access a local SQLite Database using the Qt Quick Local Storage QML Types.
More App Use-Case Examples
In the documentation navigation on the left-hand side, you can find tons of useful examples grouped into the main use-cases for app developers. Make sure to check them out!