After going through the basics of QML and Qt Creator in Getting Started with Felgo and Qt Creator, we can now continue to the really hot stuff: We learn the basics how to use the
Felgo Games and create a simple game with that knowledge. The game will be a physics objects stacking game: Try to put as many objects on top of each other as possible until the sky is reached.
Resources
Images and sounds for this game are available for you to download right here: Download Resources
You will learn where to put them later in this tutorial.
Entity Basics
A game entity is an object that interacts with the game and responds to player input or other entities. Other terms for entity are actor, or game object. However, in the Felgo documentation the term
entity or game entity is used. Examples for entities are player-controllable objects like cars, power-ups, projectiles or enemy units.
An entity consists of components that define what the entity is actually doing. There are components that get rendered like the Image component. In addition
the Felgo Games provide more components for all kind of fields needed for games:
- Physics
- Animations
- Particle Effects
- AI and
- Sounds.
An overview of all components is available in Felgo Games Components Reference.
So an entity itself is only a container of different components that has a unique EntityBase::entityId and an EntityBase::entityType. The entityId is important for entity removal. The entityType is used for example for collision checking.
Let's create a new Felgo project from the project wizard like explained in Getting Started with Felgo and Qt Creator and start with the following code:
 import Felgo 4.0
 import QtQuick 2.0

 GameWindow {
   id: gameWindow

     EntityManager {
         id: entityManager
         entityContainer: scene
     }

     Scene {
         id: scene

         EntityBase {
             entityId: "box1"
             entityType: "box"

             Image {
                 source: "../assets/img/box.png"
                 width: 32
                 height: 32
             }
         }
     }
 }
This code demonstrates how to define an entity with a single Image component to display an image in the img folder relative to the qml file. The entityId and entityType are not needed yet, but are
added for clarity and because it is good practice to always define them for new entities. The EntityManager component is required as soon as an entity is defined, because when new
entities are created at runtime it must know under which parent item the entity should be added. Thus the EntityManager::entityContainer property is set to the scene.
All dynamically created entities are put as children of this item. This topic is handled in more detail in the bottom section Entity Creation & Removal at
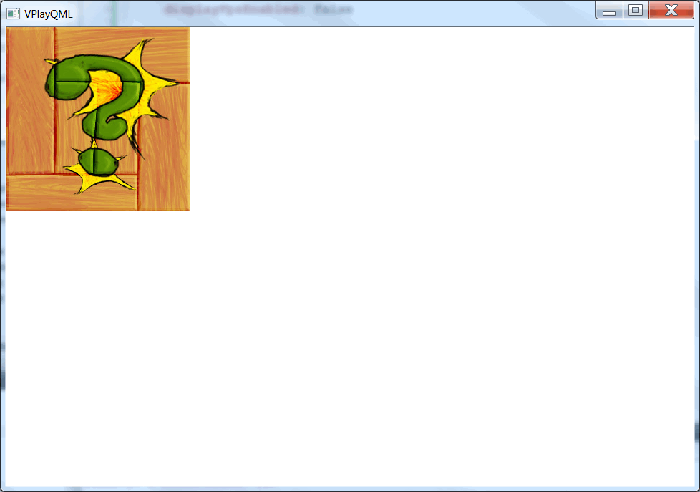
runtime. The box1 entity is created when the scene is loaded at the default position 0/0, so on the top left corner of the scene.
The only thing that we are missing before we can run the app, is the box.png image that we used in the code above. Download the Resources
if you haven't done so already, and extract the content (img and snd folder) into the assets folder of your project.
Now run the app and you will see the following:
Adding Physics
The game is not too interesting so far, so we add some physics to it to please our gamer's soul. It is as simple as that:
GameWindow {
id: gameWindow
onSplashScreenFinished: world.running = true
Scene {
id: scene
PhysicsWorld {
id: world
running: false
gravity.y: 9.81
z: 10
updatesPerSecondForPhysics: 60
velocityIterations: 5
positionIterations: 5
debugDrawVisible: false
}
EntityBase {
entityId: "box1"
entityType: "box"
Image {
id: boxImage
source: "../assets/img/box.png"
width: 32
height: 32
}
BoxCollider {
anchors.fill: boxImage
}
}
}
}
We just have added the physics component BoxCollider to our entity and with anchors.fill: boxImage it is the same size as the image. Felgo also provides other colliders if
your shape is not rectangular: A CircleCollider and PolygonCollider for arbitrary complex physics shapes. However, the physics shape is often
sufficient to be an assumption of the real object and the player most of the time won't recognize the difference if it's not 100% exact. Thus you can usually try the BoxCollider or CircleCollider at first and only when they are not sufficient use a PolygonCollider.
When you run the game now, you will see the box falling down because we set the gravity.y property to 9.81 which equals earth gravity. You are not forced to use that gravity setting - in fact in later versions
of the game we want the objects to fall faster and increase the gravity setting. So balance it so the game is most fun to play.
You can change all kinds of physics properties of BoxCollider like the velocity, damping, friction, density or set up collision filters when you want to collide only with some other
collider categories. You can also use the physics system only for collision detection if you do not want to move entities based on physics but with custom behaviors. An example would be to animate the entity with a NumberAnimation and an easing type, or with a MoveToPointHelper to move towards a target point or another entity. In
case you only want to use physics for collision testing but not to modify the entity position from physics calculations, set the ColliderBase::collisionTestingOnlyMode property of the collider components to true, which is false by default.
The box is now falling down endlessly because nothing stops it. So let us change that by adding a ground where the box can fall upon:
EntityBase {
entityId: "ground1"
entityType: "ground"
height: 20
anchors {
bottom: scene.bottom
left: scene.left
right: scene.right
}
Rectangle {
anchors.fill: parent
color: "blue"
}
BoxCollider {
anchors.fill: parent
bodyType: Body.Static
}
}
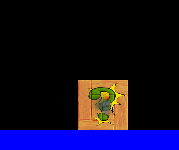
So now the ground entity is added to the Scene and the box falls down on it. The most important part here is that the ground is a static body. That means it is not affected by gravity and will stay at the same
position. The default bodyType is dynamic. The width of the entity is set to the scene size by anchoring to the left and right of scene - note that setting the width to scene.width would have the same
effect. When you run the game, you will see the physics shape falling on the ground.
Adding Particles, Audio and Collision Detection
We now add more interesting stuff to our demo game. We want to play a collision sound when the box falls on the ground, and start a smoke particle effect for a couple of seconds. So here is what it looks like:
EntityBase {
entityId: "box1"
entityType: "box"
x: scene.width/2
Image {
id: boxImage
source: "../assets/img/box.png"
anchors.fill: boxCollider
}
BoxCollider {
id: boxCollider
width: 32
height: 32
anchors.centerIn: parent
fixture.onBeginContact: {
collisionSound.play();
collisionParticleEffect.start();
}
}
GameSoundEffect {
id: collisionSound
source: "../assets/snd/boxCollision.wav"
}
GameParticle {
id: collisionParticleEffect
fileName: "SmokeParticle.json"
}
}
The sound and particle effect are available as part of the Felgo Games and are easy to use. The GameSoundEffect::source points to the relative path of the sound file that
we want to play. It also has an id to be able to access it in the onBeginContact handler. As you can see, we changed the size of the box to make it smaller and better match the particle effect size.
Mention that the anchors.centerIn: parent now shifts the transform point of the entity: when we positioned the entity at 0/0 before, it was positioned in the top left of the scene. Now, as we anchor the image and
also the collider to the center, the center point of the entity is 0/0 which would lead to half of the entity being out of the scene. Thus we position it in the horizontal center of the scene initially.
You can use pre-made particle effects for smoke, fire and splatter effects that ship with Felgo or create custom ones with the Particle component. The best way to choose a particle effect
for your game, is using the Felgo Particle Editor. You can open the Felgo Particle Editor by navigating to the Felgo SDK folder and then to the
demos/ParticleEditor folder. Open the ParticlEditor.pro file with Qt Creator and you then can choose from a wide range of particle effects and modify them if you like. If you have an iOS or Android
device, you can also search for Felgo Particle Editor in the app store and try the particle effects on your mobile device, and send you the effect via email once you are happy with the results!
The SmokeParticle.json file used in this demo is one of the sample particle effects, and you can copy it and the particleSmoke.png file from the particle editor qml folder. Alternatively, you can
also find them in the Resources zip archive in the particle folder. Just throw them into the entities folder next to the Box.qml
file. All that is left, is to point to that file with fileName: "SmokeParticle.json", if you put the files somewhere else, like e.g. the assets folder, make sure to adapt the path to the json file.
When you run the project now, the smoke particle effect is shown when 2 physics bodies collide:
Adding Box Movement
We are now getting more interactive: the player shall be able to drag the box around. There are many ways to move an entity like using the Animation component or
MoveToPointHelper, but for physics-driven games the MouseJoint is the easiest one. Have a look at the code:
Scene {
Component {
id: mouseJoint
MouseJoint {
maxForce: 30000
dampingRatio: 1
frequencyHz: 2
}
}
MouseArea {
anchors.fill: parent
property Body selectedBody: null
property MouseJoint mouseJointWhileDragging: null
onPressed: {
selectedBody = world.bodyAt(Qt.point(mouseX, mouseY));
console.debug("selected body at position", mouseX, mouseY, ":", selectedBody);
if(selectedBody) {
mouseJointWhileDragging = mouseJoint.createObject(world)
mouseJointWhileDragging.target = Qt.point(mouseX, mouseY)
mouseJointWhileDragging.bodyB = selectedBody
}
}
onPositionChanged: {
if (mouseJointWhileDragging)
mouseJointWhileDragging.target = Qt.point(mouseX, mouseY)
}
onReleased: {
if(selectedBody) {
selectedBody = null
if (mouseJointWhileDragging)
mouseJointWhileDragging.destroy()
}
}
}
}
Component Element
Here we are using the Component element to put a MouseJoint into it. The Component element is the same as if the MouseJoint was defined in a separate file, and its children (so the MouseJoint) is not created when the Scene is loaded! Instead, we create a new joint every
time the user touches on a box. While the user drags the box around, the onPositionChanged handler is called where the target position of the MouseJoint is updated. Finally,
when the user releases the touch, the created MouseJoint is removed.
Entity Creation & Removal at runtime
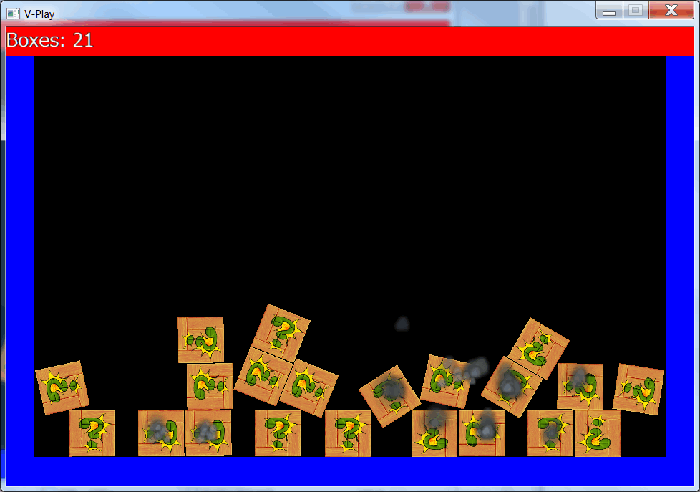
Right now the box is pretty lonesome and the game is not that much fun - so let's change that! After this section, you can stack as many boxes on top of each other as possible, until the first box reaches the top. Therefore
we need to create several boxes the longer the game lasts, and add some walls on the side and a top wall for detecting the end of the game.
It will look like this:
We start with the creation of new boxes at random positions. You can use the EntityManager for creating new entities. The EntityManager needs
the QML Component that should be created, which can either be a path to the qml file or the Component item where the entity is defined. Like mentioned above, if
you define an entity within a QML Component element, it is the same as defining an entity in a separate file. To make the code more readable, we put the whole EntityBase definition of box
and wall into two separate files Box.qml and Wall.qml and put them into an entities folder relative to our main.qml file.
Box.qml in entities subfolder:
import QtQuick 2.0
import Felgo 4.0
EntityBase {
id: box
entityType: "box"
width: 32
height: 32
transformOrigin: Item.TopLeft
Image {
id: boxImage
source: Qt.resolvedUrl("../../assets/img/box.png")
anchors.fill: boxCollider
}
BoxCollider {
id: boxCollider
x: -width/2
y: -height/2
friction: 1.6
restitution: 0
density: 0.1
fixture.onBeginContact: (other, contactNormal) => {
collisionSound.play();
}
}
GameSoundEffect {
id: collisionSound
source: Qt.resolvedUrl("../../assets/snd/boxCollision.wav")
}
}
Wall.qml in entities subfolder:
import QtQuick 2.0
import Felgo 4.0
EntityBase {
entityType: "wall"
signal collidedWithBox
property alias color: rectangle.color
property alias collider: collider
Rectangle {
id: rectangle
color: "blue"
anchors.fill: parent
}
BoxCollider {
id: collider
anchors.fill: parent
bodyType: Body.Static
fixture.onBeginContact: collidedWithBox()
}
}
With these changes, the main qml file can reference the entities by their file name. Because the entities are put in a subfolder, an import to this folder is needed. Mention that the import is put within "". This indicates a
relative path from the qml file and allows to structure your code into folders.
import "entities"
Scene {
Box {
x: scene.width/2
y: 50
}
Wall {
height: 20
anchors {
bottom: scene.bottom
left: scene.left
right: scene.right
}
}
}
We can now create new boxes randomly after 2-5 seconds with the following code snippet:
Scene {
property int createdBoxes: 1
Text {
text: "Boxes: " + scene.createdBoxes
color: "white"
z: 1
}
Timer {
id: timer
interval: Math.random()*3000 + 2000
running: true
repeat: true
onTriggered: {
var newEntityProperties = {
x: Math.random()*(scene.width-2*50) + 50,
y: 50,
rotation: Math.random()*360
}
entityManager.createEntityFromUrlWithProperties(
Qt.resolvedUrl("entities/Box.qml"),
newEntityProperties);
scene.createdBoxes++
interval = Math.random()*3000 + 2000
timer.restart()
}
}
}
The Timer component is useful for code that should be called delayed. In the onTriggered handler a new entity is created. As we have our Box in an own
qml file, EntityManager::createEntityFromUrlWithProperties() can be used. Mention that the url could also be a web link! So you could create your
entities on a web server or in a Dropbox account and load the entity remotely. This speeds up the development toolchain because you don't have to re-deploy the game to your phone but just reload the application! In
onTriggered we also calculate a new interval and restart the timer with the new interval.
We are almost done now, all that is left is to place a wall right and left of the scene, and a red-colored one to the top. When the top one is reached, the game is over and will start from the beginning again. And this is
how it works:
Scene {
Wall {
height: 20
anchors {
bottom: scene.bottom
left: scene.left
right: scene.right
}
}
Wall {
width: 20
height: scene.height
anchors {
left: scene.left
}
}
Wall {
width: 20
height: scene.height
anchors {
right: scene.right
}
}
Wall {
height: 20
width: scene.width
anchors {
top: scene.top
}
color: "red"
onCollidedWithBox: {
entityManager.removeEntitiesByFilter(["box"]);
scene.createdBoxes = 0;
}
}
}
In here all box entities get removed, and the createdBoxes counter is reset to 0. Mention that the wall entities are not removed, because they should stay around the scene when a new game starts.
If you are wondering where the onCollidedWithBox handler comes from: it was added before to the Wall.qml file, when a collision is detected with the wall:
EntityBase {
entityType: "wall"
signal collidedWithBox
property alias color: rectangle.color
Rectangle {
id: rectangle
color: "blue"
anchors.fill: parent
}
BoxCollider {
anchors.fill: parent
bodyType: Body.Static
fixture.onBeginContact: collidedWithBox()
}
}
You can browse the full source code of this guide at the StackTheBox Demo.
Defining Component Interfaces
So as you can see, you can design your components & entities to have interfaces to the outside: either properties (with an automatic changed-handler) or signals, which are basically functions that are called when something
of interest happens. You can also forward internal properties of child components to the outside with a property alias. This is used for the color property of the Rectangle, which is then set to red for the top wall. As you can see, we define a signal called collidedWithBox in Wall.qml. That allows us to
call onCollidedWithBox for the top wall to detect a collision between the wall and a box. Alternatively, we could have done the collision detection in the Box entity, together with a further check if the collided
entityType is a wall and if the entityId is topWall, but that is left as an exercise.
You have now created a simple, physics based stacking boxes game. The final step in the development process is to test and deploy it on your mobile device. Continue to the Deploying Felgo
Games & Apps guide for more information about that.
To dig deeper into other examples and full demo games, you can now browse through the Felgo Games Examples and Demos. Examples are smaller code tutorials, whereas demos are more complex and
complete demo games of different genres like tower-defense or platformer games.


