Introduction
This game idea and its image and audio resources are from the excellent Corona tutorial on Ray Wenderlich's site http://www.raywenderlich.com/22064/how-to-make-a-simple-game-with-corona.
This tutorial assumes you already had a look at Getting Started with Felgo and Qt Creator. They provide you with the very basics which may not be fully explained in this tutorial.
Nevertheless, this tutorial aims at beginners, so let's give it a shot.
Resources
Images and sounds for this game are available for you to download right here: Download Resources
New Project
Create a new Empty Felgo Project with the name BalloonPop. Now extract the resource files that you just downloaded into the qml directory of your project. Since you are already here, also create a
new folder entities (which we will need later) inside the qml directory.
On to a little brainstorming. What major components do we need to create this game?
- We already know, our root element is the GameWindow in the
main.qml which will then hold our Scene for the game.
- Obviously there will be balloons.
- We want to keep the balloons inside the scene so we need walls to surround it.
- A little heads-up display to give the player information.
We cut down the Code in the main.qml to the minimum, like this:
 import Felgo 4.0
 import QtQuick 2.0

 GameWindow {

   Scene {}
 }
Game scene
Keep in mind that larger games will definitely have more than just the game scene (e.g. menu, settings,...). So it's common to define the different scenes in separate files, making the code more readable. Go ahead and add a
BalloonScene.qml to your qml directory.
Now we will put the Scene element here, and our GameWindow will hold our custom scene.
BalloonScene.qml
 import Felgo 4.0
 import QtQuick 2.0

 Scene {

 }
main.qml
import Felgo 4.0
import QtQuick 2.0
GameWindow {
BalloonScene {}
}
Our main.qml is finished now since this is our only scene.
Let's take a look at our BalloonScene.qml. We add some basic features that we definitely need.
Scene {
property int balloons: 0
property int balloonsMax : 100
property int time : 20
property bool gameRunning: false
sceneAlignmentY: "top"
EntityManager {
id: entityManager
entityContainer: balloonScene
}
PhysicsWorld {z: 1; gravity.y: -1}
Image {source:"../assets/img/clouds.png"; anchors.fill:gameWindowAnchorItem}
GameSoundEffect {source:"../assets/snd/balloonPop.wav"}
BackgroundMusic {source:"../assets/snd/music.mp3"}
}
Now we can set the maximum number of balloons that we want to have on the scene, as well as the time we give the player to pop them. Furthermore we added a counter balloons that will hold the current number of
balloons alive and a flag to indicate if the game is running or not.
The EntityManager is used to create balloons at runtime. The PhysicsWorld with a very low gravity of -1 in y direction makes the
balloons float up gently.
The background Image and BackgroundMusic improve the gaming experience, I have no doubt about that! Have a look at
anchors.fill:gameWindowAnchorItem in the background Image. This is needed to avoid black borders on different mobile devices with different screen
sizes. Also the sceneAlignmentY: "top" is there for a similar reason, we ensure that the ceiling of our scene is at the top of the screen.
The GameSoundEffect object loads the pop sound for the balloons. This one will have to be available to the balloons themselves so we need to add a little fix here.
Scene {
id: balloonScene
property alias popSound: popSound
GameSoundEffect {id:popSound; source:"../assets/snd/balloonPop.wav"}
}
Adding an id to the Scene gives us the possibility to interact with it from outside. The pop sound can now be accessed via balloonScene.popSound thanks to the property alias that
points at our GameSoundEffect object.
Run the project and enjoy the beautiful sky, prettified by the delightful music, isn't that already enough? Not for us!
We'll proceed with some walls, everyone likes walls.
Walls
Following the lessons we learned in Getting Started with Felgo and Qt Creator, we will create a reusable wall entity. Add an entities folder as subfolder of
qml if you haven't done that already. Now add a new file Wall.qml to the entities folder.
Insert the following code to Wall.qml
import QtQuick 2.0
import Felgo 4.0
EntityBase {
entityType: "wall"
width: 1
height: 1
BoxCollider {
anchors.fill: parent
bodyType: Body.Static
}
}
So what happened here? We want the walls to be invisible, so we don't add anything like a Rectangle or similar. We just want them to block our balloons, so we
add a BoxCollider that fills the whole wall. Also, the wall shouldn't be affected by gravity, that's why we tell it to be Body.Static.
Now add some walls to the BalloonScene.qml, just before the last closing }. Additionally we need to import our entities folder to be able to use our Wall.qml
import "entities"
Scene {
Wall {height:parent.height+50; anchors.right:parent.left}
Wall {height:parent.height+50; anchors.left:parent.right}
Wall {width:parent.width; anchors.bottom:parent.top}
}
We want the walls to be outside of the scene, so we use the anchors. E.g. we anchor the furthest right side of the wall to the furthest left side of the scene, meaning the body of the wall is left outside of the
screen. The reason I put +50 to the height, which causes the wall to go 50 pixels below the scene, is that we don't lose any balloons to the sides while creating them. You will understand this security measure in a few
moments.
Ok looks fine, not that there is anything new to see if we run the project, but anyway, time for balloons!
Balloons
Add a Balloon.qml file to the entities folder.
Insert the following code to Balloon.qml
import QtQuick 2.0
import Felgo 4.0
EntityBase {
entityType: "balloon"
width: sprite.width
height: sprite.height
MultiResolutionImage {
id: sprite
source: "../../assets/img/balloon.png"
}
CircleCollider {
radius: sprite.width/2
fixture.restitution: 0.5
}
MouseArea {
anchors.fill: sprite
}
Component.onCompleted: {
x = utils.generateRandomValueBetween(0,balloonScene.width-sprite.width)
y = balloonScene.height
}
}
There are some more things to say about this piece of code. In our case, we want the size of the balloon to result from the size of the MultiResolutionImage we load, so it's
super easy to replace that one. The MultiResolutionImage uses the correct image size depending on the display resolution. To learn more about multi-resolution support check out
How to create mobile games for different screen sizes and resolutions.
A CircleCollider matches the shape of a balloon best and way better than a BoxCollider. Add some fixture.restitution to make the
balloon bouncy.
The MouseArea fills the whole balloon image and is used to make them pop when the balloon is touched.
And the last little bit of code, the Component.onCompleted section will define the position of the balloon when it is created. We want the balloons to spawn at the very bottom of your scene, and thanks to the
id:balloonScene that we gave the Scene, we can get its width and height for this calculation.
At the end of BalloonScene.qml, just before the last closing }, we add this piece of code
Timer {
interval: 20
running: true
repeat: true
onTriggered: {
entityManager.createEntityFromUrl(Qt.resolvedUrl("entities/Balloon.qml"));
balloons++
if(balloons===balloonsMax) {
running = false
gameRunning = true
}
}
}
Finally we got some action in here. Watch the balloons getting a little crazy when you run the project. So crazy that we made the side walls a little longer than maybe needed, just in case...
What did we do? We used a Timer with an interval of 20ms. So every 20ms it will trigger. And on each of these triggers we tell our EntityManager to create a new entity from our Balloon.qml file, in other words a new balloon. If our maximum number of balloons is reached, we stop the timer and start the game.
Handling the Felgo Splash Screen
When running the code you might have noticed the Felgo Splash Screen, which is only visible for developers that use our free plan. Our game scene is already created and starts running
in the background while the splash is still visible. This allows the splash to also act as a basic loading screen for the first visible scene - after splash is finished the scene is immediately shown.
Unfortunately there's one issue caused by this behavior: We already start the game and create balloons while the splash is still visible. This happens because the Timer that creates the balloons starts running automatically
after it is created. So let's add some code to delay our balloon creation until the splash screen is finished:
Let us change the Timer in BalloonScene.qml to not run automatically:
Scene {
function start() {
spawnBaloons.start()
}
Timer {
id: spawnBaloons
interval: 20
repeat: true
onTriggered: {
entityManager.createEntityFromUrl(Qt.resolvedUrl("entities/Balloon.qml"));
balloons++
if(balloons===balloonsMax) {
running = false
gameRunning = true
}
}
}
}
For the Timer, we removed the running: true setting and added an id. We can then use the new start() function of our scene to start the Timer anytime we want. To start it right after the splash is
gone we can use the onSplashScreenFinished signal in our main.qml.
GameWindow {
id: gameWindow
onSplashScreenFinished: balloonScene.start()
BalloonScene {
id: balloonScene
}
}
Start the game again, you will see the balloons popping up after the splash is gone just as we wanted them to.
Note: For initialization code that can safely be run while the splash is still showing you can also use the Component.onCompleted signal instead. In addition, if you removed the splash screen by purchasing a
Felgo license, the two signals are identical. We recommend to only use onSplashScreenFinished for code that requires to be run right after the
splash. Otherwise the regular Component.onCompleted signal is the better choice.
Now we have everything correctly set up, so what's next? You don't want to hurt no balloon, do you? Me neither, but the players may want to, so let's make them pop-able.
Popping the balloons
This is done by adding a simple piece of code to our Balloon.qml, more precisely the MouseArea
MouseArea {
anchors.fill: sprite
onPressed: {
if(balloonScene.gameRunning) {
balloonScene.balloons--
balloonScene.popSound.play()
removeEntity()
}
}
}
We listen on the MouseArea::pressed signal of the MouseArea. If the player
touches the balloon we count down the current number of balloons, play the pop sound and remove the entity. Of course we only allow this to happen if the game is running.
Not too challenging when you got infinite time. We take care of that now.
Ending the game
Add this at the end of BalloonScene.qml, just before the last closing }
Timer {
id: gameTimer
running: gameRunning
repeat: true
onTriggered: {
time--
if(time === 0 || balloons === 0) {
gameRunning = false
}
}
}
The timer is only running if the game is running, meaning it starts after all balloons are loaded and the game started. After each second (we don't necessarily need to define that interval because 1 second is the default
interval) the timer triggers. On every trigger we decrease the remaining time. Then we check if the time is already over or the player managed to pop all balloons, in both cases we stop the game.
The only thing missing now is a little heads-up display.
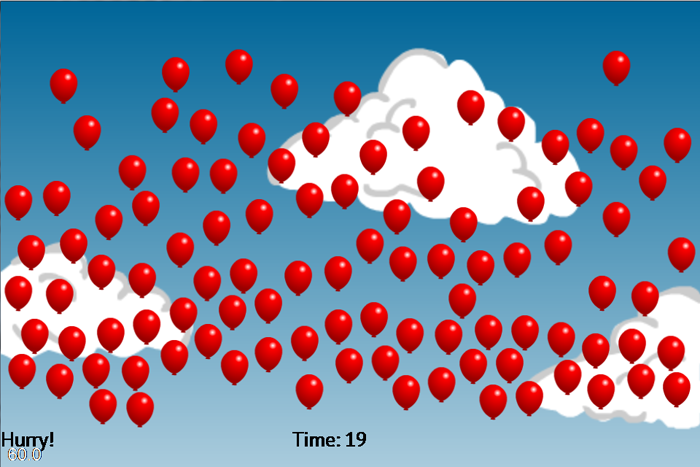
HUD
We want to keep it as simple as possible, one row at the bottom will do it. We want to display the remaining time, and a little info field.
Add this to BalloonScene.qml, e.g. above our timers
Row {
anchors.bottom: parent.bottom
z: 2
Text {id:infoText; width:200; height:40; text:"Loading balloons..."}
Text {id:timeText; height:40; text:"Time: "+balloonScene.time}
}
Now we got a Row with 2 Texts. The 2nd one displays the text "Time: " followed by the remaining time of
the game.
The 1st one should give the player some information. We start with the text "Loading balloons...". After all balloons are loaded we want to give the player feedback that he can start popping them now.
Add this to your BalloonScene.qml, more precisely the first Timer, used to create the balloons
if(balloons===balloonsMax) {
running = false
gameRunning = true
infoText.text = "Hurry!"
}
This changes the text property of our infoText Item to "Hurry!", telling the player that the game is running.
The last thing we want to add are some motivating words to the player at the end of the game.
Add this to your BalloonScene.qml, more precisely the second Timer, used for the game time
if(time === 0 || balloons === 0) {
gameRunning = false
if(balloons === 0) infoText.text = "Perfect, take a cookie!"
else if(balloons < balloonsMax/2) infoText.text = "Well, that was decent..."
else infoText.text = "Not your day huh..."
}
Depending on the number of balloons the player popped, he gets a feedback about his success as soon as the time ran out or he popped all balloons.
So that's it for now, enjoy the gaming experience! If you have any questions regarding this tutorial, don't hesitate to visit the support forums.
Visit Felgo Games Examples and Demos to gain more information about game creation with Felgo and to see the source code of existing apps in the app stores.


