Introduction
Multiple scenes, like menu, credits or preferences, and multiple levels are essential to nearly any good game. We will take a look at how easy it is to cover those requirements and set up a well-structured project with
Felgo.
The code, that we will build step by step, is also available as a template for new Felgo 2 projects. Click File/New Project in Qt Creator and then select Template - Multi Scene Multi Levels to
create a new project based on this template.
This tutorial assumes you already had a look at Getting Started with Felgo and Qt Creator. They provide you with the very basics which won't be fully explained in this tutorial.
Furthermore our project will support different screen sizes and resolutions. You can learn more about that here: How to create mobile games for different screen sizes and
resolutions
Resources
Resources for this project are available for you to download right here: Download Resources
New Project
Create a new Empty Felgo 3 Project with a name of your choice. Then extract the resource files that you just downloaded into the
assets folder of your project.
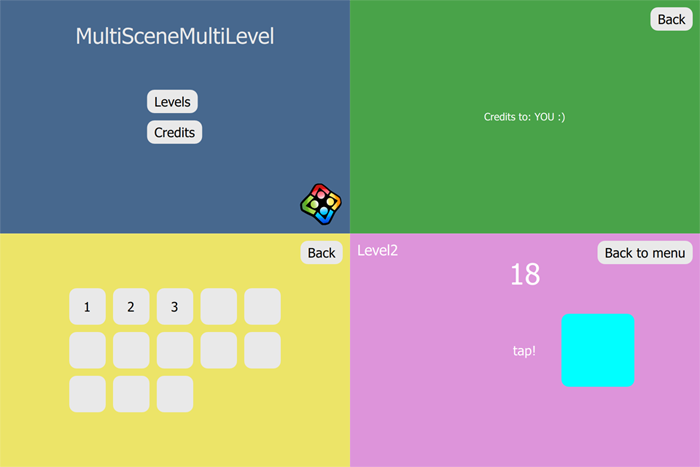
Let's quickly summarize what we are about to create:
- menu scene as our home scene
- credits scene
- a scene where we can select a level
- and the game scene to play the selected level
First, we cut down the Code in the main.qml to the minimum, like this:
import Felgo 4.0
import QtQuick 2.0
GameWindow {
id: gameWindow
EntityManager {
id: entityManager
}
}
We won't need the functionality of the EntityManager in this tutorial, but you will most likely need it in a real game, so adding the EntityManager won't hurt nobody.
Now the GameWindow is ready to carry our scenes, so let's create some.
SceneBase and Scenes
There could be a couple of characteristics that are exactly the same in each of the scenes, so smart people (like you and me are!) plan ahead and create a SceneBase as a base component for all our scenes.
Create a folder with the name common inside the qml folder of your project. Then add a SceneBase.qml file to your common folder
 import Felgo 4.0
 import QtQuick 2.0

 Scene {
   id: sceneBase
 }
We will add more code later, as we encounter things that will fit in this base component.
Now we use the SceneBase to create our scenes and add different background rectangles to each of them plus a "logo" for the menu scene. Create a folder with the name scenes inside the qml folder of
your project. Add the following files, each containing the code below it, to your scenes folder:
MenuScene.qml
import Felgo 4.0
import QtQuick 2.0
import "../common"
SceneBase {
id:menuScene
Rectangle {
anchors.fill: parent.gameWindowAnchorItem
color: "#47688e"
}
Text {
anchors.horizontalCenter: parent.horizontalCenter
y: 30
font.pixelSize: 30
color: "#e9e9e9"
text: "MultiSceneMultiLevel"
}
}
Note that we have to import the common folder at the top of the code, because the SceneBase.qml file is located in that directory, while our MenuScene is in the scenes
directory.
CreditsScene.qml
import Felgo 4.0
import QtQuick 2.0
import "../common"
SceneBase {
id:creditsScene
Rectangle {
anchors.fill: parent.gameWindowAnchorItem
color: "#49a349"
}
}
SelectLevelScene.qml
import Felgo 4.0
import QtQuick 2.0
import "../common"
SceneBase {
id:selectLevelScene
Rectangle {
anchors.fill: parent.gameWindowAnchorItem
color: "#ece468"
}
}
GameScene.qml
import Felgo 4.0
import QtQuick 2.0
import "../common"
SceneBase {
id:gameScene
Rectangle {
anchors.fill: parent.gameWindowAnchorItem
color: "#dd94da"
}
}
The next step is to add all those scenes to our main.qml, which should then look like this
import Felgo 4.0
import QtQuick 2.0
import "../scenes"
GameWindow {
id: gameWindow
MenuScene {
id: menuScene
}
SelectLevelScene {
id: selectLevelScene
}
CreditsScene {
id: creditsScene
}
GameScene {
id: gameScene
}
}
Awesome, if we run the project we got 4 scenes, overlaying each other, so effectively we only see the last one added, which is the GameScene. Although that's a very nice pink, it needs some improvement!
Controlling the visibility
The easiest way to only show one scene is to hide all scenes by default, and only display the scene we currently need. Wait what do I read there, hide ALL scenes? Now that should be no problem, thanks to our
SceneBase.
Add one line to SceneBase.qml and all our scenes are hidden by default
Scene {
id: sceneBase
opacity: 0
visible: opacity > 0
enabled: visible
}
But how do I set the current scene visible? And what is that first comment in the code talking about? PropertyChanges?
Add this at the end of your main.qml
GameWindow {
state: "menu"
states: [
State {
name: "menu"
PropertyChanges {target: menuScene; opacity: 1}
PropertyChanges {target: gameWindow; activeScene: menuScene}
},
State {
name: "selectLevel"
PropertyChanges {target: selectLevelScene; opacity: 1}
PropertyChanges {target: gameWindow; activeScene: selectLevelScene}
},
State {
name: "credits"
PropertyChanges {target: creditsScene; opacity: 1}
PropertyChanges {target: gameWindow; activeScene: creditsScene}
},
State {
name: "game"
PropertyChanges {target: gameScene; opacity: 1}
PropertyChanges {target: gameWindow; activeScene: gameScene}
}
]
}
There is our answer. We use a state machine. The GameWindow has a property state which we use to define our current scene.
Our default scene is the MenuScene, so we write state: "menu". We just changed the value of the state property and that triggers our state machine. It will browse through the states we
defined, and execute the corresponding PropertyChanges. In our case, we set the opacity of the MenuScene to 1, making it visible
while the other scenes stay hidden.
If we change the state again, the state machine will take care that the PropertyChanges of the old state will be reversed. So e.g. if we would now
change the state to "credits", the opacity of the MenuScene will be automatically changed to 0 again, and the CreditsScene will have its opacity changed to 1.
We are also changing the activeScene property of the GameWindow to set the focus on the current scene, you will learn why we do this later in this tutorial.
If we run the project now, we see the right home scene, but that's about it. Time to add some navigation.
We will create a small reusable button for all our menu items.
Add a MenuButton.qml file to the common folder, with this content:
import QtQuick 2.0
Rectangle {
id: button
width: buttonText.width+ paddingHorizontal*2
height: buttonText.height+ paddingVertical*2
color: "#e9e9e9"
radius: 10
property int paddingHorizontal: 10
property int paddingVertical: 5
property alias text: buttonText.text
signal clicked
Text {
id: buttonText
anchors.centerIn: parent
font.pixelSize: 18
color: "black"
}
MouseArea {
id: mouseArea
anchors.fill: parent
hoverEnabled: true
onClicked: button.clicked()
onPressed: button.opacity = 0.5
onReleased: button.opacity = 1
}
}
It's Time for Change! (changing the scenes)
Our MenuScene will have 2 buttons. One to go to the selectLevelScene, and the other one to go to the CreditsScene.
Add this to the MenuScene.qml
SceneBase {
id: menuScene
signal selectLevelPressed
signal creditsPressed
Column {
anchors.centerIn: parent
MenuButton {
text: "Levels"
onClicked: selectLevelPressed()
}
MenuButton {
text: "Credits"
onClicked: creditsPressed()
}
}
}
To make our code cleaner and easier to maintain, we will put all the logic for changing the scenes in our GameWindow in the main.qml. The scenes will only emit a signal which
button has been pressed, and the GameWindow will listen to those signals and change the states (and scenes).
What we are missing now is the listener for these signals.
Add this to your main.qml, more precisely the MenuScene
MenuScene {
id: menuScene
onSelectLevelPressed: gameWindow.state = "selectLevel"
onCreditsPressed: gameWindow.state = "credits"
}
If we run the project, we can switch from the MenuScene to other scenes, but we can't go back, that's not very handy. Every scene will have some kind of back functionality, even the MenuScene which
we will take care of at the very end of this tutorial. Luckily, the Scene already support back button support with Scene::backButtonPressed.
Thanks to that, every scene can send a request to go back. All we need is a simple back button and listen to that signal.
Add this to CreditsScene.qml, the SelectLevelScene.qml and the GameScene.qml
MenuButton {
text: "Back"
anchors.right: selectLevelScene.gameWindowAnchorItem.right
anchors.rightMargin: 10
anchors.top: selectLevelScene.gameWindowAnchorItem.top
anchors.topMargin: 10
onClicked: backButtonPressed()
}
And then add listeners to main.qml like this
SelectLevelScene {
id: selectLevelScene
onBackButtonPressed: gameWindow.state = "menu"
}
CreditsScene {
id: creditsScene
onBackButtonPressed: gameWindow.state = "menu"
}
GameScene{
id: gameScene
onBackButtonPressed: gameWindow.state = "selectLevel"
}
Go ahead, run the project and enjoy jumping around between the scenes, what a pleasure!
Creating the levels
Before we can talk about the levels, we gotta figure out what our game actually is about. We will keep it as simple as it gets, since this tutorial is not primarily about creating a game. But I will use the simple game
mechanics to show you some stuff that could be useful to you as well.
The game will be about having a simple rectangle, that moves or jumps around, and you score a point for each successful tap on it. Again, we will try to separate the components as good as possible, to make the code easier to
understand and maintain. The Level will only handle how the rectangle behaves and moves, and will emit a signal if the rectangle is tapped successfully. The GameScene will listen to this signal and
increase the score.
Since all of our levels will need the signal that is emitted when the rectangle is pressed, we will create a LevelBase and use it as the base component for our levels, just like we did it with the scenes.
Furthermore, we will load the levels dynamically, having only the one we currently play consume memory.
Create a Levelbase.qml file in the common folder and add this content:
import QtQuick 2.0
Item {
property string levelName
signal rectanglePressed
}
Now we will create 3 levels and I will add a bit of explanation to each one of them.
Create a levels folder in your qml folder and add a Level1.qml file to it. Then add this to your Level1.qml file:
import QtQuick 2.0
import Felgo 4.0
import "../common" as Common
Common.LevelBase {
levelName: "Level1"
Rectangle {
color: "orange"
width: 100
height: 100
radius: 10
anchors.centerIn: parent
MouseArea {
anchors.fill: parent
onPressed: rectanglePressed()
}
}
}
Important thing to note, Felgo already has a LevelBase component, for use with the LevelLoader and the LevelEditor. Since we created our own one, and want to use this one, we need to add a qualifier (pretty much like a namespace) to it. We are doing this by adding as Common to the
import of the common folder. And then use Common.LevelBase to make sure the right one is used.
The rest is pretty straightforward. Just a rectangle with a MouseArea, and if it is pressed, we call our signal to indicate that the rectangle is pressed
successfully.
Now create a Level2.qml file to the levels folder and add this code:
import QtQuick 2.0
import Felgo 4.0
import "../common" as Common
Common.LevelBase {
levelName: "Level2"
Rectangle {
id: rectangle
color: "cyan"
width: 100
height: 100
radius: 10
property bool togglePosition: false
anchors.horizontalCenter: parent.horizontalCenter
anchors.horizontalCenterOffset: togglePosition ? -100 : 100
anchors.verticalCenter: parent.verticalCenter
MouseArea {
anchors.fill: parent
onPressed: {
rectangle.togglePosition = !rectangle.togglePosition
rectanglePressed()
}
}
}
}
That one is a bit more interesting. We want the rectangle to jump from left to right and vice versa each time we tap it. We are using a custom property togglePosition which is either true or false to indicate if
the rectangle is left or right. First of all we center the rectangle in the level, and then we add a property binding on the horizontalCenterOffset property to move it 100 pixel to the left or right of the
center.
Next create a Level3.qml file to the levels folder and add this code:
import QtQuick 2.0
import Felgo 4.0
import "../common" as Common
Common.LevelBase {
levelName: "Level3"
Rectangle {
id: rectangle
color: "blue"
width: 100
height: 100
radius: 10
anchors.horizontalCenter: parent.horizontalCenter
anchors.horizontalCenterOffset: 120
anchors.verticalCenter: parent.verticalCenter
MouseArea {
anchors.fill: parent
onPressed: rectanglePressed()
}
}
SequentialAnimation {
running: true
loops:
            Animation.Infinite
NumberAnimation {
target: rectangle
duration: 1500
property: "anchors.horizontalCenterOffset"
easing.type: Easing.InOutQuad
to: -120
}
NumberAnimation {
target: rectangle
duration: 1500
property: "anchors.horizontalCenterOffset"
easing.type: Easing.InOutQuad
to: 120
}
}
}
Animation time! We are using the SequentialAnimation component, that will play all the child animations one after the other. Like in the 2nd level,
we are using the horizontalCenterOffset property to change the position of the rectangle relative to the center of the level. The start offset is set to 120 pixel. The first animation will change this to -120
pixel, the second one back to 120 pixel. Then the first animation is played again since we have set the SequentialAnimation to loops:
Animation.Infinite.
Time to select and play a level.
Selecting a level
We start with adding some code to SelectLevelScene.qml
SceneBase {
id: selectLevelScene
signal levelPressed(string selectedLevel)
Grid {
anchors.centerIn: parent
spacing: 10
columns: 5
MenuButton {
text: "1"
width: 50
height: 50
onClicked: {
levelPressed("Level1.qml")
}
}
MenuButton {
text: "2"
width: 50
height: 50
onClicked: {
levelPressed("Level2.qml")
}
}
MenuButton {
text: "3"
width: 50
height: 50
onClicked: {
levelPressed("Level3.qml")
}
}
Repeater {
model: 10
MenuButton {
text: " "
width: 50
height: 50
}
}
}
}
We added a signal that indicates that a level has been selected, and pass the filename of the selected level as a parameter. The level selection is a Grid where we
added 3 MenuButtons for our levels and some empty ones with a Repeater, just to have some content.
Passing the selected Level to the GameScene
Go to the main.qml file and change the code of the LevelSelectionScene component like this:
SelectLevelScene {
id: selectLevelScene
onLevelPressed: {
gameScene.setLevel(selectedLevel)
gameWindow.state = "game"
}
onBackButtonPressed: gameWindow.state = "menu"
}
Now if a level is selected, we pass the selected level to the GameScene and switch the state to "game", which will cause the scenes to change. Before we can run this code without any errors, we need to add the
setLevel function to our GameScene.
The GameScene
I explain the code part by part as we add it, at the end of this section I will also post the full source code of the GameScene for you to copy and paste.
Go to the GameScene.qml file and change the content to this:
import Felgo 4.0
import QtQuick 2.0
import "../common"
SceneBase {
id:gameScene
property string activeLevelFileName
property variant activeLevel
function setLevel(fileName) {
activeLevelFileName = fileName
}
Rectangle {
anchors.fill: parent.gameWindowAnchorItem
color: "#dd94da"
}
MenuButton {
text: "Back to menu"
anchors.right: gameScene.gameWindowAnchorItem.right
anchors.rightMargin: 10
anchors.top: gameScene.gameWindowAnchorItem.top
anchors.topMargin: 10
onClicked: {
backButtonPressed()
activeLevel = undefined
activeLevelFileName = ""
}
}
Loader {
id: loader
source: activeLevelFileName !== "" ? "../levels/" + activeLevelFileName : ""
onLoaded: {
item.width = gameScene.width
item.height = gameScene.height
activeLevel = item
}
}
}
There you go, we got the function to set the level filename. The real magic happens in the Loader element though. It loads the component that is defined in the
source property. Setting the source to "" will cause the Loader element to unload the level. So if we are passing a level filename via the
setLevel function, we are changing the activeLevelFileName to something different than "" and this will make our Loader element load the
level. Once it is loaded, we can access it with item in the onLoaded handler. Note that we are reseting (and therefore unloading) the level when pressing the "Back" button.
Since we defined a levelName for each level, why not display it?! Add this:
Text {
anchors.left: gameScene.gameWindowAnchorItem.left
anchors.leftMargin: 10
anchors.top: gameScene.gameWindowAnchorItem.top
anchors.topMargin: 10
color: "white"
font.pixelSize: 20
text: activeLevel !== undefined ? activeLevel.levelName : ""
}
What we are missing now is some game logic, so change your code like this:
SceneBase {
id:gameScene
property string activeLevelFileName
property variant activeLevel
property int score: 0
Loader {
id: loader
source: activeLevelFileName !== "" ? "../levels/" + activeLevelFileName : ""
onLoaded: {
score = 0
item.width = gameScene.width
item.height = gameScene.height
activeLevel = item
}
}
Connections {
target: activeLevel !== undefined ? activeLevel : null
onRectanglePressed: {
score++
}
}
Text {
anchors.horizontalCenter: parent.horizontalCenter
anchors.top: gameScene.gameWindowAnchorItem.top
anchors.topMargin: 30
color: "white"
font.pixelSize: 40
text: score
}
}
If a level is loaded, we connect to it and listen to the rectanglePressed signal. If it is emitted, we increase our score. Additionally we display the score on the screen. That was way too easy, right? We will
just add a little more to make the "game" feel better. A countdown at the start of the game, so the player can mentally prepare for the upcoming tap tap tap tap tap ...
Just a little more modification:
SceneBase {
id:gameScene
property string activeLevelFileName
property variant activeLevel
property int score: 0
property int countdown: 0
property bool gameRunning: countdown === 0
Loader {
id: loader
source: activeLevelFileName !== "" ? "../levels/" + activeLevelFileName : ""
onLoaded: {
score = 0
item.width = gameScene.width
item.height = gameScene.height
activeLevel = item
countdown = 3
}
}
Connections {
target: activeLevel !== undefined ? activeLevel : null
onRectanglePressed: {
if(gameRunning) {
score++
}
}
}
Text {
anchors.centerIn: parent
color: "white"
font.pixelSize: countdown > 0 ? 160 : 18
text: countdown > 0 ? countdown : "tap!"
}
Timer {
repeat: true
running: countdown > 0
onTriggered: {
countdown--
}
}
}
We make heavy use of property bindings here. First we have a gameRunning property that only becomes true if the countdown property is 0. Then we got a Timer that is triggered every second (1000ms is the default interval) but is only running if the countdown is greater than 0. And then we got a Text element that displays the countdown if it is bigger then 0, or shows "tap!" once the countdown becomes 0. And to start this whole countdown machine, all we have to do is
set the countdown property to anything bigger than 0, in our case we set it to 3 when the level is loaded. Our score will only get increased if the game is running.
The whole source code of the GameScene.qml file should now look something like this:
import Felgo 4.0
import QtQuick 2.0
import "../common"
SceneBase {
id:gameScene
property string activeLevelFileName
property variant activeLevel
property int score: 0
property int countdown: 0
property bool gameRunning: countdown === 0
function setLevel(fileName) {
activeLevelFileName = fileName
}
Rectangle {
anchors.fill: parent.gameWindowAnchorItem
color: "#dd94da"
}
MenuButton {
text: "Back to menu"
anchors.right: gameScene.gameWindowAnchorItem.right
anchors.rightMargin: 10
anchors.top: gameScene.gameWindowAnchorItem.top
anchors.topMargin: 10
onClicked: {
backButtonPressed()
activeLevel = undefined
activeLevelFileName = ""
}
}
Text {
anchors.left: gameScene.gameWindowAnchorItem.left
anchors.leftMargin: 10
anchors.top: gameScene.gameWindowAnchorItem.top
anchors.topMargin: 10
color: "white"
font.pixelSize: 20
text: activeLevel !== undefined ? activeLevel.levelName : ""
}
Loader {
id: loader
source: activeLevelFileName !== "" ? "../levels/" + activeLevelFileName : ""
onLoaded: {
score = 0
item.width = gameScene.width
item.height = gameScene.height
activeLevel = item
countdown = 3
}
}
Connections {
target: activeLevel !== undefined ? activeLevel : null
onRectanglePressed: {
if(gameRunning) {
score++
}
}
}
Text {
anchors.horizontalCenter: parent.horizontalCenter
anchors.top: gameScene.gameWindowAnchorItem.top
anchors.topMargin: 30
color: "white"
font.pixelSize: 40
text: score
}
Text {
anchors.centerIn: parent
color: "white"
font.pixelSize: countdown > 0 ? 160 : 18
text: countdown > 0 ? countdown : "tap!"
}
Timer {
repeat: true
running: countdown > 0
onTriggered: {
countdown--
}
}
}
Sweet, the core functionality is finished. Time to get some rest? NOPE, we ain't no lazy people. We add just a little more features.
We want it smooth! (fading effect)
We are using the opacity property to set the scenes visible and invisible. Since the opacity is a value of the QML type real (which is also known as float or double in other languages) within the range between 0
and 1, we can create a fade effect when switching scenes just by animating it.
All you have to do is add this to the SceneBase.qml file:
Scene {
id: sceneBase
Behavior on opacity {
NumberAnimation {property: "opacity"; easing.type: Easing.InOutQuad}
}
}
Oh boy, thats so smooooooth!
For Android users, the hardware back button is the common way to navigate backwards in applications. Luckily, the Scene already supports this with Scene::backButtonPressed.
An important thing to know is that any hardware button press only gets handled in the scene that is focused. Being displayed doesn't automatically mean that something is focused, so we got to take care of that.
This is the main reason why we set the activeScene property of the GameWindow in our state machine in the main.qml because it will automatically call
forceActiveFocus() on that scene.
If we change a scene, we set the new one as activeScene, that's all the magic.
Close the game
What if we press the hardware back button in our home scene (MenuScene)? Normally that should cause the game to be closed on Android. So let's add this, including a message box, asking the user if he really
wants to quit the game.
Add this to the MenuScene in main.qml
MenuScene {
id: menuScene
onSelectLevelPressed: gameWindow.state = "selectLevel"
onCreditsPressed: gameWindow.state = "credits"
onBackButtonPressed: {
NativeUtils.displayMessageBox("Really quit the game?", "", 2);
}
Connections {
target: NativeUtils
onMessageBoxFinished: {
if(accepted && window.activeScene === menuScene)
Qt.quit()
}
}
}
If the signal backPressed gets called in the MenuScene, we display the message box. With the Connections element we check if the
player pressed yes. In this case we close the game with Qt.quit().
That's it for now! If you have any questions regarding this tutorial, don't hesitate to visit the support forums.
Visit Felgo Games Examples and Demos to gain more information about game creation with Felgo and to see the source code of existing apps in the app stores.
Further perspectives
- Loading scenes at runtime is also possible, just like loading levels, but this can become a bit tricky. If you need this feature now, you can take a look at the Squaby Demo
source code to get a thought-provoking impulse.
- Also different animations between scenes are possible. Dig deeper into Animation and Transitions in Qt Quick to find out more about that.


