Schedule native local push notifications in your app.
Schedule Time-Based Reminders
Remind your users of events or appointments in your calendar or to-do app. Schedule a countdown and inform your users even if your app is in the background.
Increase User Retention
Schedule a local push notification which brings your users back into your app or game after a certain time of inactivity.
Overview
In comparison to server-side push notifications local notifications are triggered at a certain point of time. Local notifications are scheduled from within your app logic and therefore do not require any server-side logic
for integration. Therefore they are ideally suited for applications with time-based behaviors, for example for apps like to-do list and calendar apps.
When scheduling a notification you specify a fire date at which the notification should be presented to the user. This can be either given as relative timestamp (Notification::timeInterval) or as an absolute UNIX timestamp (Notification::timestamp).
Note: iOS currently allows a maximum of 64 simultaneously scheduled notifications; the system keeps the soonest-firing notifications and discards all others.
As soon as the system delivers a local notification the NotificationManager::notificationFired signal is emitted in following cases:
- If the app is currently in the foreground the signal is emitted immediately, there isn't however a sound played and no banner is displayed.
- If the app is in the background the system plays a short notification sound and displays a banner with your provided message. If the user then taps the notification the
app goes to the foreground and the signal is emitted. The system also sets the provided number on the app icon on iOS or in the notification area on Android, which gets
cleared out again as soon as the user opens your app.
Use Cases
Local push notifications can be used for several use cases, here are some of them:
Timer-based Apps
A lot of apps notify users at a specific point of time about custom events or appointments. Such timer-based apps like to-do or calendar apps are ideally suited for local notification usage. As an example you can have a look
at the example below.
User Retention
You can bring your users back to your app after a certain amount of time of inactivity. As an example you can schedule an inactivity notification which gets triggered when a user does not open your app for more than 24
hours, like shown in the example below.
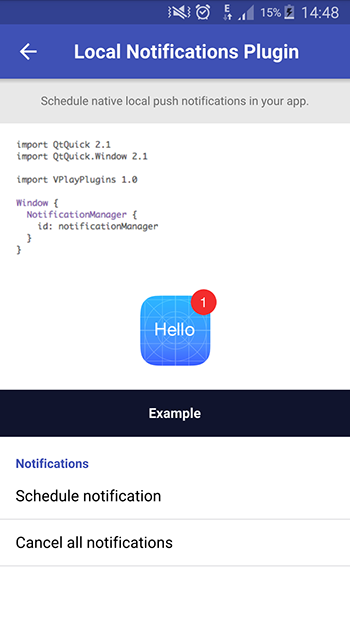
Notification Examples
Plugin Demo App
To try the plugin or see an integration example have a look at the Felgo Plugin Demo app.
Please also have a look at our plugin example project on GitHub: https://github.com/FelgoSDK/PluginDemo.
Example Usage
To use local notifications in your app you have to add a NotificationManager item somewhere in the top hierarchy of your QML code like in the example below. Then you can schedule
notifications based on Notification::timeInterval or Notification::timestamp, depending on your use case.
import Felgo
import QtQuick
App {
NotificationManager {
id: notificationManager
onNotificationFired: notificationId => {
console.debug("Notification with id " + notificationId + " fired")
}
}
Notification {
id: staticNotification
notificationId: "static_notification"
message: "I'm statically defined in the app"
timeInterval: 5
}
NavigationStack {
AppPage {
id: page
title: "Local Notification"
Column {
anchors.centerIn: parent
AppButton {
text: "Static Notification (interval)"
onClicked: {
notificationManager.scheduleNotification(staticNotification)
}
}
AppButton {
text: "Dynamic Notification (timestamp)"
onClicked: {
var unixTimestamp = Math.round((new Date()).getTime() / 1000)
notificationManager.schedule({ notificationId: "dynamic_notification", message: "I'm dynamically defined in the app", timestamp: unixTimestamp + 5})
}
}
AppButton {
text: "Cancel Notifications"
textColor: "red"
textColorPressed: Qt.lighter("red", 1.8)
onClicked: {
notificationManager.cancelAllNotifications()
}
}
}
}
}
}
Available QML Items
|
Notification
|
Item represents a single local notification which can be scheduled with the NotificationManager item
|
|
NotificationManager
|
Item allows scheduling native local push notifications on iOS & Android
|
Adding and Activating Plugins
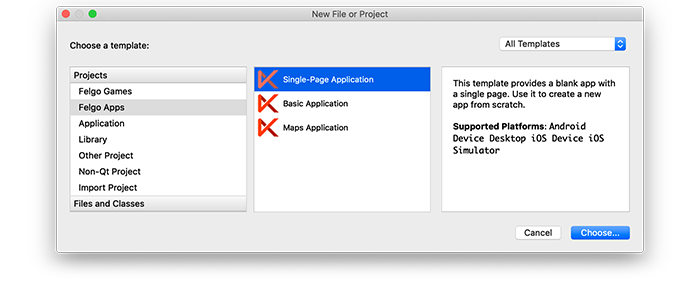
How to Add a Felgo Plugin to your App or Game
When you create a new project, you can choose to add example plugin integrations as well. Open Qt Creator and choose “File / New File or Project”, then choose Single-Page Application in the Felgo Apps section or any
other wizard. For Felgo Games, you can also find an own Game with Plugins project template as an own wizard.
Then select the platforms you want to run your application on. The plugins are available for both iOS & Android. There is a fallback functionality in place on Desktop platforms so your project still works when you call
methods of the plugins. This allows you to do the main development on your PC, and for testing the plugin functionality you can run the project on iOS and Android.
After the Kit Selection, you can choose which of the plugins you’d like to add to your project:

Then complete the wizard, your project is now set up with all the correct plugin dependencies for Android & iOS automatically. This includes:
- Setting up the
.gradle file for Android.
- Setting up the
.plist file for iOS.
- Setting up the
CMakeLists.txt file to include the plugin libraries for iOS.
Note: Additional integration steps are still required for most plugins, for example to add the actual plugin libraries for iOS to your project. Please have a look at the integration steps described in the
documentation for each of the used plugins.
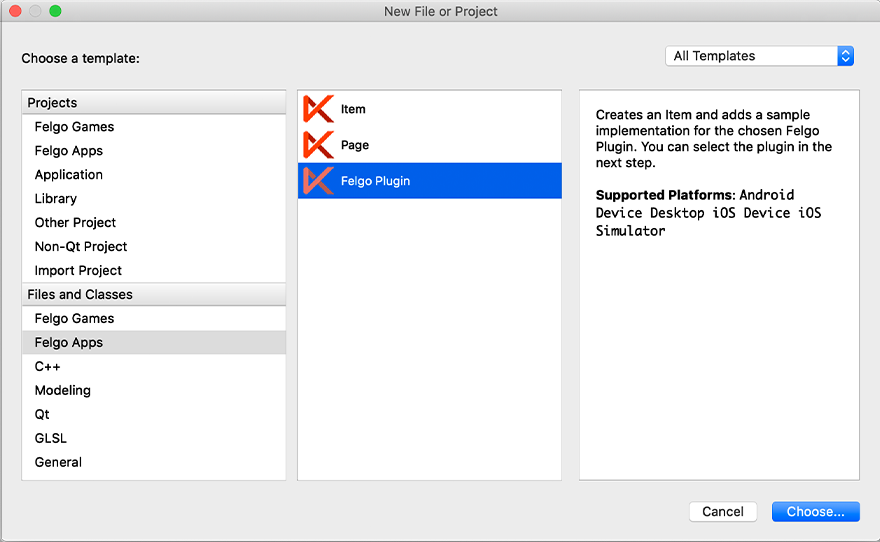
If you have an existing Felgo application, follow these steps to include a plugin to your app or game:
In Qt Creator, select “File / New File or Project” and choose either Felgo Games or Felgo Apps from Files and Classes. Then select Felgo Plugin and press Choose.
You can now select the plugin you want to add:

The plugin item, which contains the chosen plugin and a short usage example, is now added to your project. To use the item in your project, simply perform these steps:
- Include the created item (use the name you entered in the template before) in your
main.qml file.
- Modify the
CMakeLists.txt file & .plist file for iOS usage. See the iOS integration guide of the chosen plugin for more information.
- Modify the the
.gradle file for Android usage. See the Android integration guide of the chosen plugin for more information.
Note: If you have an existing Qt application, you can also add Felgo Plugins to your app! See here
how to do this.
Activating Plugins with a License Key
You can test all plugins as soon as the required integration steps and plugin configuration are completed.
However, the plugins are only available as Trial Versions if they are not activated with a valid license. When you are using unlicensed plugins, a dialog is shown and a watermark overlays your application to notify you about
the testing state of the plugin.
All monetization plugins are free to use in all licenses, other plugins are only fully usable if you have purchased the Startup or Business license. To activate plugins and enable
their full functionality it is required to create a license key. You can create such a key for your application using the license creation page.
This is how it works:
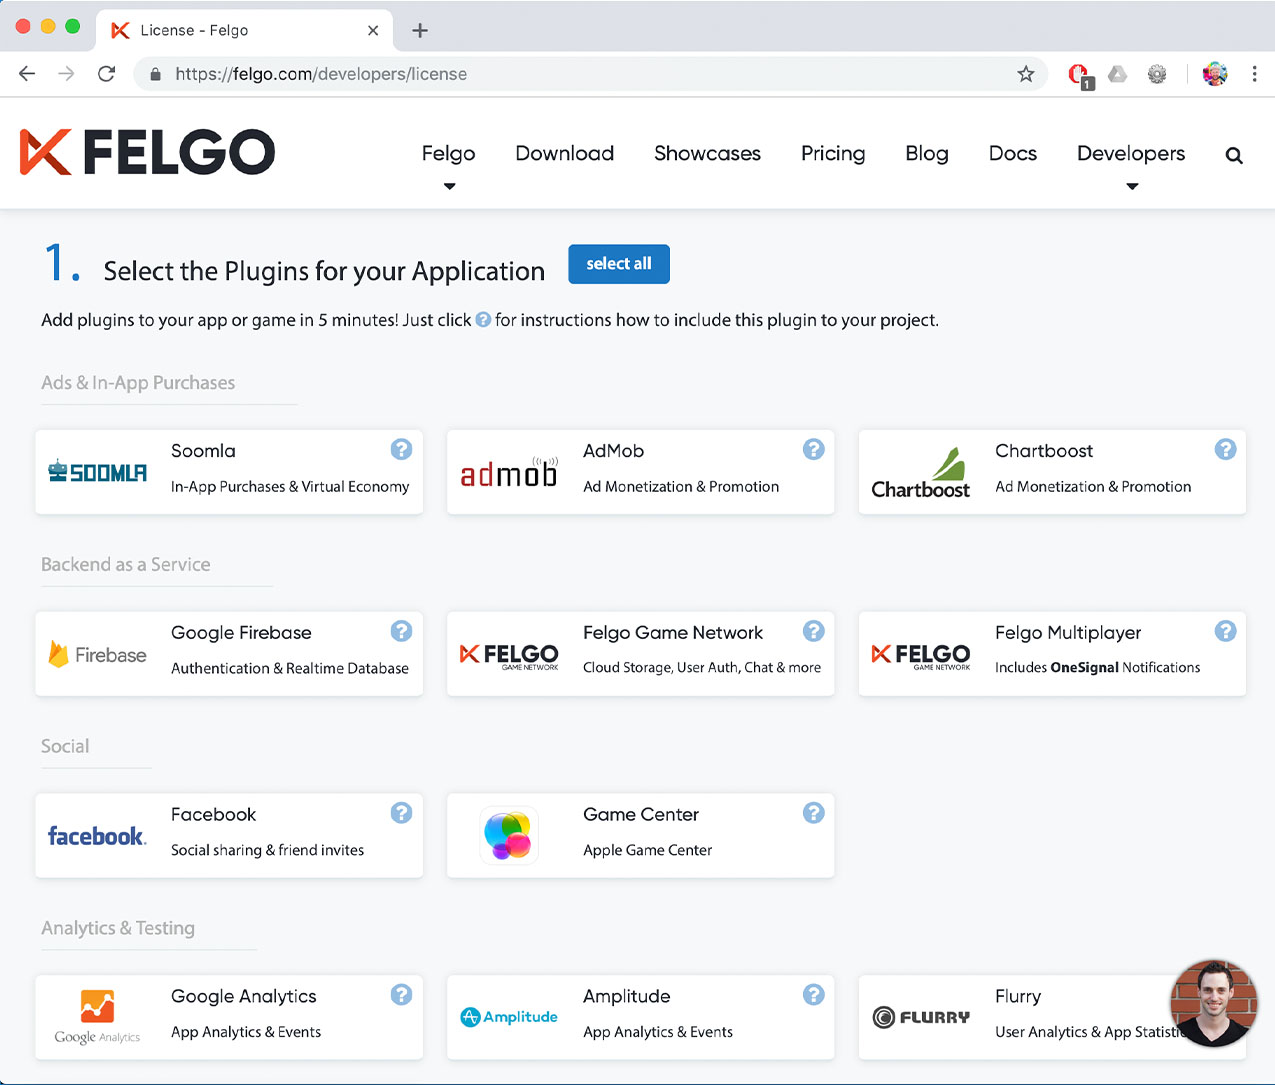
- Choose the plugins you want to include in your license key:
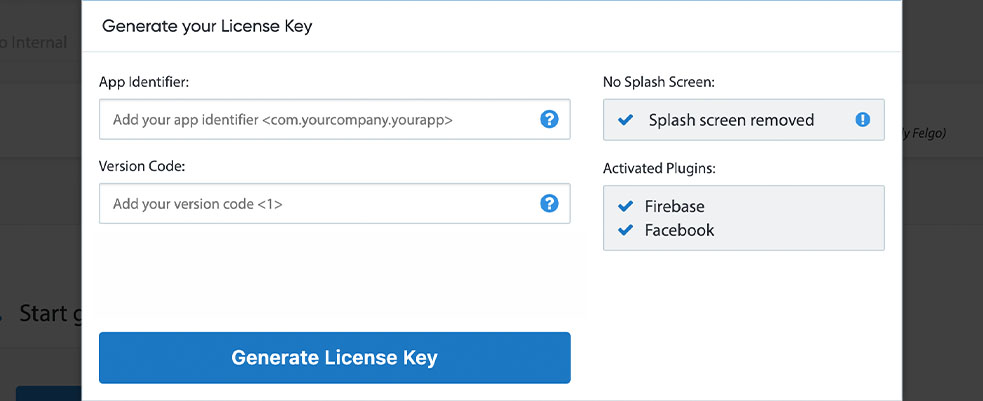
- Click on “Generate License Key” and set the app identifier & version code of your application. You can see that the AdMob plugin was enabled in this license key:
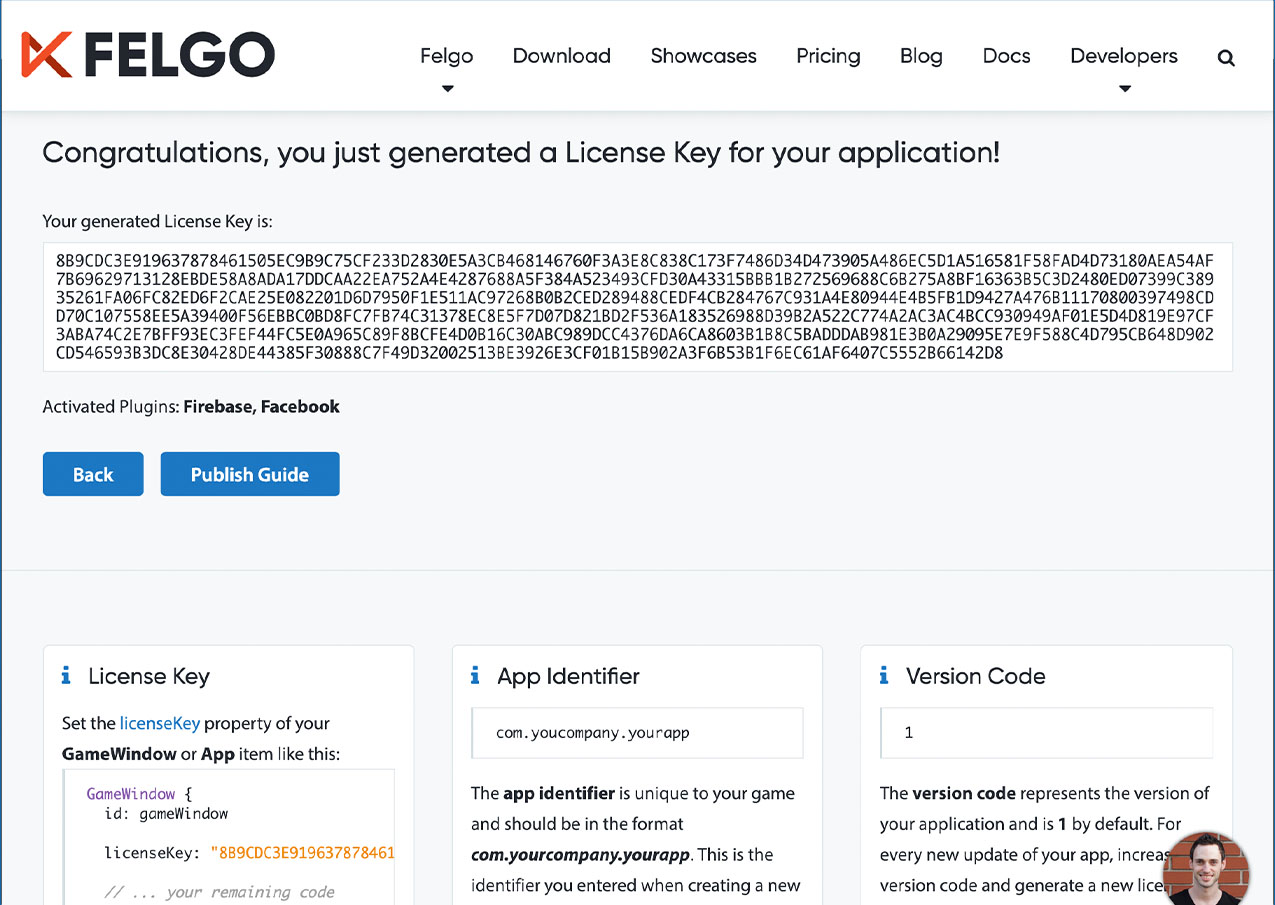
- Copy the generated licenseKey to your GameWindow or App component.
- You can now fully use the selected plugins!
Integration
To use the Notification plugin you need to add the platform-specific native libraries to your project, described here:
iOS Integration Steps
No further steps to to.
Android Integration Steps
- Open your
build.gradle file and add the following lines to the dependencies block:
 dependencies {
   implementation 'com.felgo.plugins:plugin-notification:4.+'
 }
- Please also make sure that your
build.gradle contains a correct entry for the application id of your app in the android block:
android {
defaultConfig.applicationId = '<your-app-id>'
}
Note: If you did not create your project from any of our latest wizards, make sure that your project uses the Gradle Build System like described here.
Note: Make sure to set an app icon for your app in the AndroidManifest.xml file, as this one is used as default icon for a background notification.
Note: Some Android devices restrict stopped or background apps from being notified. This is for battery optimzation. Thus the notification might not show up in some cases. Those devices usually offer to disable
these restrictions per app in the system settings. You can ask your use to disable the restriction and navigate to that settings page. The intent action ACTION_REQUEST_IGNORE_BATTERY_OPTIMIZATIONS shows that page natively on the device.
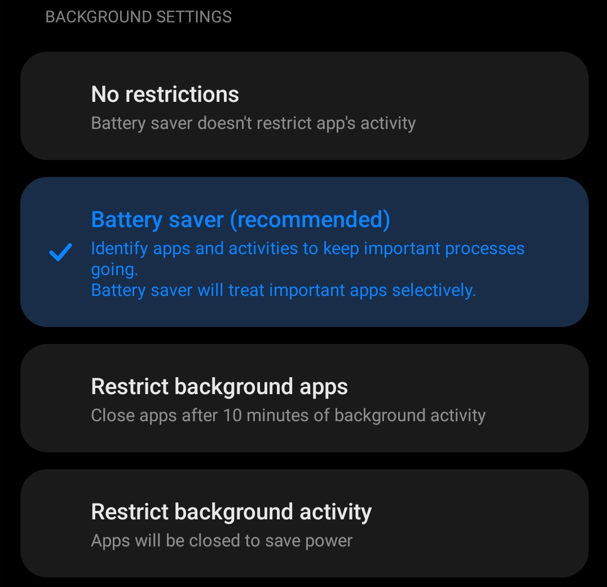
Notifications might not be shown unless the user selects "no restrictions" in this or a similar UI.
You can use the NativeObject API to show this UI and prompt the user:
App {
Component.onCompleted: {
if(Qt.platform.os === "android") {
var Context = NativeObjectUtils.getClass("android/content/Context")
var Intent = NativeObjectUtils.getClass("android/content/Intent")
var Settings = NativeObjectUtils.getClass("android/provider/Settings")
var Uri = NativeObjectUtils.getClass("android/net/Uri")
var activity = NativeObjectUtils.getActivity()
var packageName = activity.callMethod("getPackageName")
var powerManager = activity.callMethod("getSystemService", [Context.getStaticProperty("POWER_SERVICE")])
var isIgnoring = powerManager.callMethod("isIgnoringBatteryOptimizations", [packageName])
if(isIgnoring) {
console.log("Already ignoring battery optimizations.")
}
else {
var requestAction = Settings.getStaticProperty("ACTION_REQUEST_IGNORE_BATTERY_OPTIMIZATIONS")
var requestIntent = Intent.newInstance(requestAction)
var dataUri = Uri.callStaticMethod("parse", ["package:" + packageName])
requestIntent.callMethod("setData", [dataUri])
activity.callMethod("startActivity", [requestIntent])
}
}
}
}
To use this, also add the following permission to your android/AndroidManifest.xml file:
<uses-permission android:name="android.permission.REQUEST_IGNORE_BATTERY_OPTIMIZATIONS"/>
However, Google Play requires that an app has a dedicated use case to allow requesting this. For more information, read the official Android documentation.


