Integrate with Wikitude to implement augmented reality apps.
Image & Object Recognition
Use the device's camera to track images and 3D objects in realtime.
Geo AR
Use the device's sensors to track points of interest (POIs) in realtime.
Instant Tracking
Use the device's sensors and camera to position virtual objects in the real world.
Cloud Recognition
Store your recognition data in the cloud and edit it while your app is already published.
Overview
The Wikitude plugin uses the JavaScript SDK by Wikitude to implement feature-rich augmented reality (AR) apps in HTML and JavaScript.
Add the WikitudeArView item to your QML project and load a Wikitude HTML app from assets or an URL. For information on how to implement AR apps in HTML and JavaScript, see the
Wikitude SDK homepage.
Augmented Reality with Wikitude and Felgo
Improved AR capabilities for mobile platforms are one of the biggest trends of 2018. Apps with AR features like Yelp, Google Translate or Pokémon GO are only the beginning. Augmented reality allows to create innovative user
experiences that support your brand. See Why and How to Add Augmented Reality to Your Mobile App for a full introduction to AR with Wikitude and Felgo.
Why use Wikitude instead of ARKit or ARCore?
Wikitude bridges the gap between different devices, platforms and levels of AR support. It offers a single cross platform API to integrate AR features across iOS & Android with a single code base.
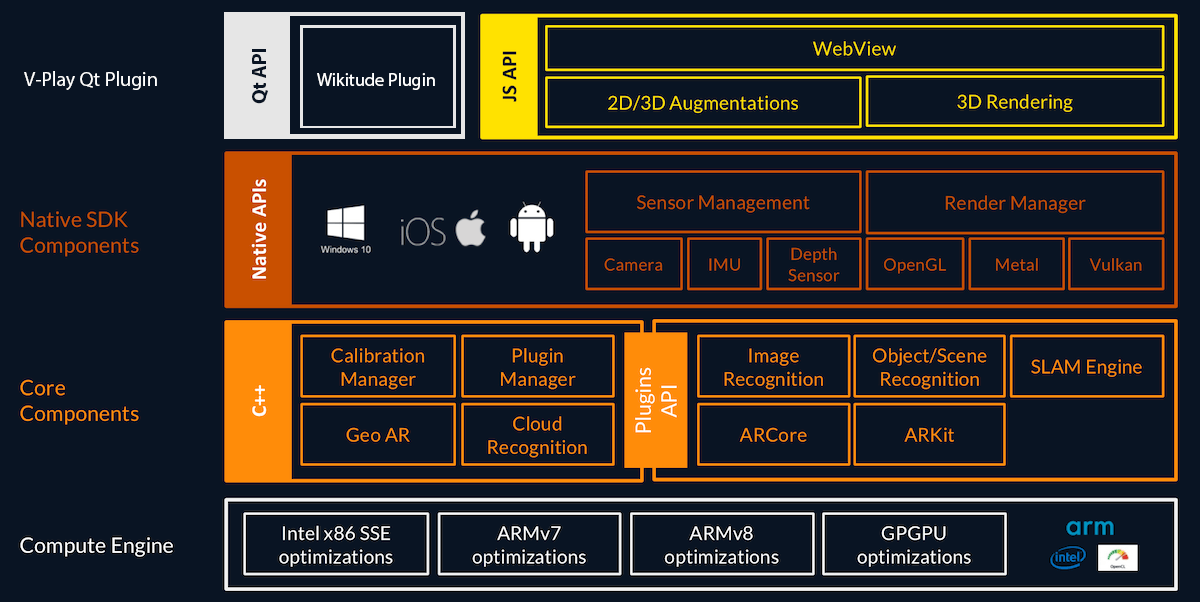
Wikitude provides a rich AR experience across platforms. To achieve that, it relies on several abstraction layers:
The Core Components handle features like Image Recognition and Object/Scene Recognition. Wikitude built the so-called SLAM Engine to offer all AR features across devices and platforms.
In case Apple’s ARKit or Google’s ARCore are available, Wikitude uses these native frameworks instead of its own engine. In addition, Wikitude can also run on iOS and Android devices that do not have such native support for
AR.
So compared to native development with ARKit or ARCore, Wikitude even supports AR on devices that are not able to run those native AR features. If your goal is to make your app available on as many devices as possible,
Wikitude is the go-to solution.
To use Wikitude, you can embed a Wikitude augmented reality view into your existing native apps. It is not required to modify other views of your iOS or Android app. Wikitude also offers several plugins to use Wikitude in
conjunction with cross-platform app frameworks like Felgo, via its Qt Plugin.
How to Create Wikitude AR Worlds
The Wikitude SDK makes it easy to create augmented reality views. It builds on web technologies (HTML, JavaScript, CSS) to create so-called ARchitect worlds. These augmented reality experiences are ordinary HTML pages. They
use the ARchitect JavaScript API to create objects in augmented reality. That is why the WikitudeArView QML component owns an arWorldSource property. It refers to the index.html of the ARchitect world:
It is quite simple, as all the magic happens in the JavaScript code for the Architect world. The above example includes transparentvideo.js, which amounts to only 80 lines of code. The code snippet below shows
how the main part looks like. It uses image tracking and overlays a video when the image is recognized:
var World = {
init: function initFn() {
this.createOverlays();
},// create augmented reality overlays
createOverlays: function createOverlaysFn() {
this.targetCollectionResource =new AR.TargetCollectionResource("assets/magazine.wtc", {
onError: function(errorMessage) {
alert(errorMessage);
}
});
this.tracker =new AR.ImageTracker(this.targetCollectionResource, {
onError: function(errorMessage) {
alert(errorMessage);
}
});
var video =new AR.VideoDrawable("assets/transparentVideo.mp4",0.7, {
translate: {
x: -0.2,
y: -0.12
},
isTransparent: true
});
video.play(-1);
video.pause();
var pageOne =new AR.ImageTrackable(this.tracker,"*", {
drawables: {
cam:
[video]
},
onImageRecognized: function onImageRecognizedFn() {
video.resume();
},
onImageLost: function onImageLostFn() {
video.pause();
},
onError: function(errorMessage) {
alert(errorMessage);
}
});
}
};
World.init();
See the Wikitude documentation for details of their JavaScript API and step-by-step tutorials.
You can run this example youself with Image Recognition QML demo of the Wikitude use cases below.
Use Cases
The Wikitude SDK supports multiple features for different use cases of augmented reality. For a full guide about the SDK's capabilities see the official Wikitude documentation.
Wikitude AR apps are created in HTML and JavaScript. These can be loaded into Felgo QML apps and games using the WikitudeArView QML type.
Image Recognition
The following demo code includes everything you need to embed a Wikitude view in your QML app. It loads the Wikitude example from above, which overlays a transparent video, as if it were part of the image:
import QtQuick.Controls
import QtQuick
import Felgo
App {
// name of the Wikitude example to load
property stringexample: "11_Video_4_Bonus-TransparentVideo"
readonly property boolexampleIsLoaded: samplesDl.available// NavigationStack can display Pages and adds a NavigationBarNavigationStack {
id: navStack// at startup show either arPage or downloadPage, in case the example is not loaded yetComponent.onCompleted: navStack.push(exampleIsLoaded ? arPage : downloadPage)
}
// arPage: Page with a Wikitude view
property ComponentarPage: AppPage {
title: "AR Example"// configure Wikitude viewWikitudeArView {
id: arViewanchors.fill: parentarWorldSource: samplesDl.getExtractedFileUrl(example+"/index.html")
running: truecameraPosition: WikitudeArView.BackCamera//license key for Felgo QML Live applicenseKey: "g0q44ri5X4TwuXQ/9MDYmZxsf2qnzTdDIyR2dWhO6IUkLSLU4IltPMLWFirdj+7kFZOdWAhRUD6fumVXLXMZe6Y1iucswe1Lfa5Q7HhQvPxEq0A7uSU8sfkHLPrJL0z5e72DLt7qs1h25RJvIOiRGDoRc/h/tCWwUdOL6ChDnyJTYWx0ZWRfX8Vh9c9kcuw4+pN/0z3srlwIHPV5zJuB1bixlulM4u1OBmX4KFn+4+2ASRCNI+bk655mIO/Pk3TjtYMrgjFR3+iYHvw1UmaYMVjsrgpcVkbzJCT6QmaW8LejnfXDNLAbZSov64pVG/b7z9IZPFLXxRSQ0MRLudoSDAh6f7wMTQXQsyqGrZeuQH1GSWtfjl/geJYOvQyDI+URF58B5rcKnrX6UZW3+7dP92Xg4npw7+iGrO1M4In/Wggs5TXrmm25v2IYOGhaxvqcPCsAvbx+mERQxISrV+018fPpL8TzR8RTZZ5h7PRfqckZ3W54U1WSiGn9bOj+FjDiIHlcvIAISpPg2Vuq88gLp0HJ5W+A+sVirqmmCyU9GKeV5Faiv62CJy6ANCZ83GGX2rWcIAh1vGOQslMr9ay4Js+rJsVN4SIhCYdw9Em9hSpoZgimnOaszI7zn9EnPwVQgNETgVm7pAZdLkH5hxFoIKOPG2e79ZKKmzlkB/IZigoHZWNDUCFnEHDNFlTZjOEwoPi8DDGfzOEOGngWE7jmp24N7GzAP7e54Y3e48KtmIJ1/U0PFKOoi2Yv0Gh+E1siU5MBf8dLO7y7GafJWJ2oCUqJG0pLb2cgTf9pjkr625BV3XxODRylgqc5/UymTY6l1J0qO43u5hH3zaejng4I9cgieA3Y553rAEafAsfhrRmWsLW/kBdu4KLfY4eQ9z4B0TweW/xsofS0bkIqxalh9YuGBUsUhrwNUY7w6jgC6fjyMhtDdEHAlXC2fW1xLHEvY9CKojLNJQUnA0d5QCa22arI8IK63Jn8Cser9Cw57wOSSY0ruoJbctGdlsr/TySUkayAJJEmHjsH73OdbAztGuMjVq7Y643bTog4P3Zoysc="
}
}
// downloadPage: Page for downloading the Wikitude example at runtime// this is only required to retrieve the Wikitude sources for the Felgo QML Live app, Wikitude sources can also be bundled with the app otherwise
property ComponentdownloadPage: AppPage {
title: "AR Example - Download"Column {
anchors.fill: parentanchors.margins: dp(12)
spacing: dp(12)
AppText {
text: samplesDl.status===DownloadableResource.UnAvailable
? qsTr("Wikitude example requires to be downloaded (~ 2MB)")
: samplesDl.status===DownloadableResource.Downloading
? qsTr("Downloading example... (%1%)").arg(samplesDl.progress)
: qsTr("Extracting example... (%1%)").arg(samplesDl.progress)
width: parent.width
}
AppButton {
text: samplesDl.status===DownloadableResource.UnAvailable ? qsTr("Start download") : qsTr("Cancel download")
onClicked: if(samplesDl.status===DownloadableResource.UnAvailable)
samplesDl.download()
elsesamplesDl.cancel()
}
ProgressBar {
width: parent.widthfrom: 0to: 100value: samplesDl.progress
}
}
}
// component to download additional app resources, like the Wikitude exampleDownloadableResource {
id: samplesDlsource: "https://felgo.com/qml-sources/wikitude-examples/"+example+".zip"extractAsPackage: truestorageLocation: FileUtils.DownloadLocationstorageName: exampleonDownloadFinished: error => {
if(error===DownloadableResource.NoError) {
navStack.clearAndPush(arPage) // open AR page after download is finished
}
}
}
}
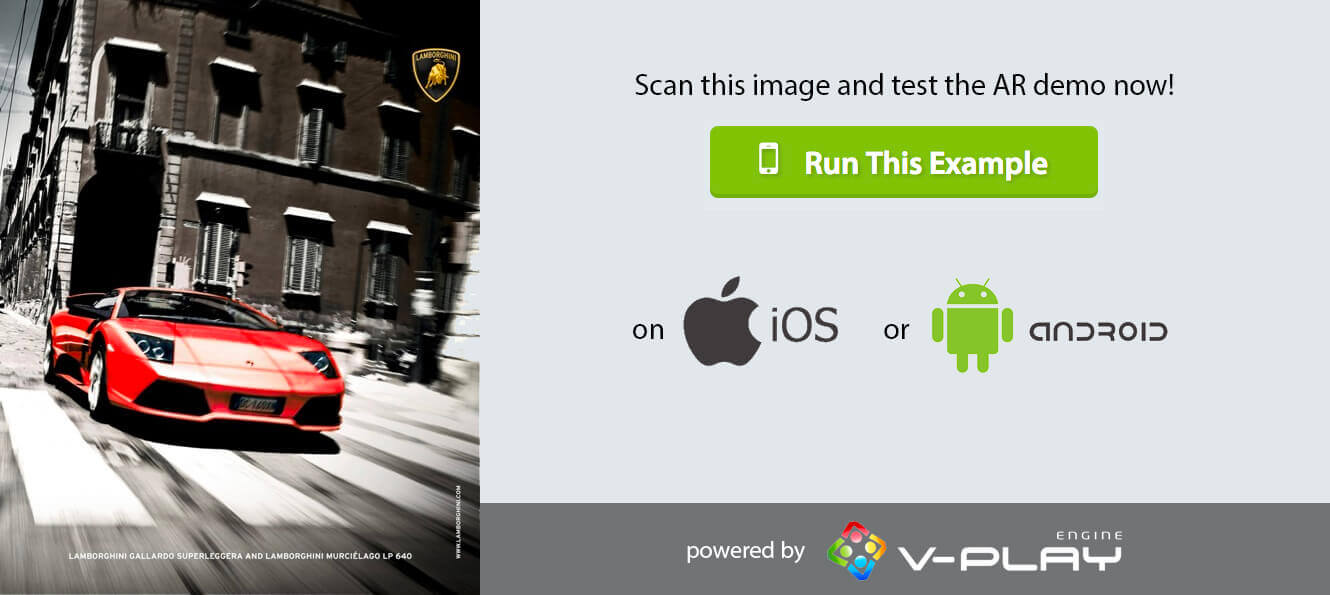
You can test the Image Tracking AR demo with the image below.
Image Recognition works with up to 1000 images that can be recognized offline. Wikitude can switch seamlessly between augmenting recognized images and other forms of tracking, like geo-located points of interest within the
live camera image.
The code above downloads the configured Wikitude example as zip, extracts the archive, and runs the demo in a Wikitude augmented reality view. Pretty amazing, actually. Go ahead and try it yourself by clicking on one of the
“Run this Example” buttons.
The possibility to download assets or code at runtime is a super useful advantage of Felgo. This means that the original app can stay small while additional features are downloaded on demand. However, if the AR part is
essential in your own app, you can also bundle the Wikitude code so the AR assets are available without an additional download.
The minimum QML code required thus boils down to a few lines of code:
With Instant Tracking, you can add augmented reality to your app or game without the need for so-called markers.
It displays AR content in the room by analyzing the camera image and data from multiple device sensors. Instant tracking works in both indoor and outdoor environments.
The following demo uses Instant Tracking to put 3D objects into the world:
import QtQuick.Controls
import QtQuick
import Felgo
App {
// configuration to load the instant tracking demo
property stringexample: "05_InstantTracking_4_SceneInteraction"// no other changes required
readonly property boolexampleIsLoaded: samplesDl.available// NavigationStack can display Pages and adds a NavigationBarNavigationStack {
id: navStack// at startup show either arPage or downloadPage, in case the example is not loaded yetComponent.onCompleted: navStack.push(exampleIsLoaded ? arPage : downloadPage)
}
// arPage: Page with a Wikitude view
property ComponentarPage: AppPage {
title: "AR Example"// configure Wikitude viewWikitudeArView {
id: arViewanchors.fill: parentarWorldSource: samplesDl.getExtractedFileUrl(example+"/index.html")
running: truecameraPosition: WikitudeArView.BackCamera//license key for Felgo QML Live applicenseKey: "g0q44ri5X4TwuXQ/9MDYmZxsf2qnzTdDIyR2dWhO6IUkLSLU4IltPMLWFirdj+7kFZOdWAhRUD6fumVXLXMZe6Y1iucswe1Lfa5Q7HhQvPxEq0A7uSU8sfkHLPrJL0z5e72DLt7qs1h25RJvIOiRGDoRc/h/tCWwUdOL6ChDnyJTYWx0ZWRfX8Vh9c9kcuw4+pN/0z3srlwIHPV5zJuB1bixlulM4u1OBmX4KFn+4+2ASRCNI+bk655mIO/Pk3TjtYMrgjFR3+iYHvw1UmaYMVjsrgpcVkbzJCT6QmaW8LejnfXDNLAbZSov64pVG/b7z9IZPFLXxRSQ0MRLudoSDAh6f7wMTQXQsyqGrZeuQH1GSWtfjl/geJYOvQyDI+URF58B5rcKnrX6UZW3+7dP92Xg4npw7+iGrO1M4In/Wggs5TXrmm25v2IYOGhaxvqcPCsAvbx+mERQxISrV+018fPpL8TzR8RTZZ5h7PRfqckZ3W54U1WSiGn9bOj+FjDiIHlcvIAISpPg2Vuq88gLp0HJ5W+A+sVirqmmCyU9GKeV5Faiv62CJy6ANCZ83GGX2rWcIAh1vGOQslMr9ay4Js+rJsVN4SIhCYdw9Em9hSpoZgimnOaszI7zn9EnPwVQgNETgVm7pAZdLkH5hxFoIKOPG2e79ZKKmzlkB/IZigoHZWNDUCFnEHDNFlTZjOEwoPi8DDGfzOEOGngWE7jmp24N7GzAP7e54Y3e48KtmIJ1/U0PFKOoi2Yv0Gh+E1siU5MBf8dLO7y7GafJWJ2oCUqJG0pLb2cgTf9pjkr625BV3XxODRylgqc5/UymTY6l1J0qO43u5hH3zaejng4I9cgieA3Y553rAEafAsfhrRmWsLW/kBdu4KLfY4eQ9z4B0TweW/xsofS0bkIqxalh9YuGBUsUhrwNUY7w6jgC6fjyMhtDdEHAlXC2fW1xLHEvY9CKojLNJQUnA0d5QCa22arI8IK63Jn8Cser9Cw57wOSSY0ruoJbctGdlsr/TySUkayAJJEmHjsH73OdbAztGuMjVq7Y643bTog4P3Zoysc="
}
}
// downloadPage: Page for downloading the Wikitude example at runtime// this is only required to retrieve the Wikitude sources for the Felgo QML Live app, Wikitude sources can also be bundled with the app otherwise
property ComponentdownloadPage: AppPage {
title: "AR Example - Download"Column {
anchors.fill: parentanchors.margins: dp(12)
spacing: dp(12)
AppText {
text: samplesDl.status===DownloadableResource.UnAvailable
? qsTr("Wikitude example requires to be downloaded (~ 2MB)")
: samplesDl.status===DownloadableResource.Downloading
? qsTr("Downloading example... (%1%)").arg(samplesDl.progress)
: qsTr("Extracting example... (%1%)").arg(samplesDl.progress)
width: parent.width
}
AppButton {
text: samplesDl.status===DownloadableResource.UnAvailable ? qsTr("Start download") : qsTr("Cancel download")
onClicked: if(samplesDl.status===DownloadableResource.UnAvailable)
samplesDl.download()
elsesamplesDl.cancel()
}
ProgressBar {
width: parent.widthfrom: 0to: 100value: samplesDl.progress
}
}
}
// component to download additional app resources, like the Wikitude exampleDownloadableResource {
id: samplesDlsource: "https://felgo.com/qml-sources/wikitude-examples/"+example+".zip"extractAsPackage: truestorageLocation: FileUtils.DownloadLocationstorageName: exampleonDownloadFinished: error => {
if(error===DownloadableResource.NoError) {
navStack.clearAndPush(arPage) // open AR page after download is finished
}
}
}
}
The only thing that changed is this line, which configures the new Wikitude example:
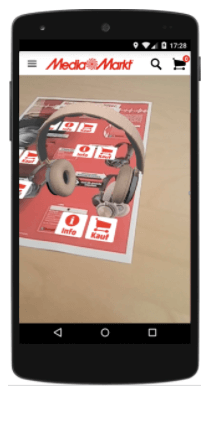
Object recognition technology creates an additional touch point to interact with users, allowing real-time and 360 degrees AR experiences around real-world objects.
Build augmented reality experiences using a variety of real-world objects.
Multiple Image Targets
This feature enables recognition of several images simultaneously. Once the images are recognized, developers will be able to layer 3D models, buttons, videos, images and more on each target. Additionally, augmentations will
be able to interact with each other based on the targets' positions.
Multiple image target recognition can be used to bring interactivity to many apps.
Extended Tracking
Extended Tracking allows going beyond targets. Once the target image is recognized, users can continue the AR experience by freely moving their devices without the need of keeping the marker in the camera view.
3D Augmentations
The Wikitude SDK can load and render 3D models in the augmented reality scene.
It lets you import aD model from your favorite tools like Autodesk® Maya® 3D or Blender. You can also import animations, textures, and materials.
Cloud Recognition
Wikitude's Cloud Recognition service allows working with thousands of target images hosted in the cloud. Wikitude's technology is a scalable solution with very quick response time and high recognition rate.
Show additional information or 3D scene when scanning a certain image.
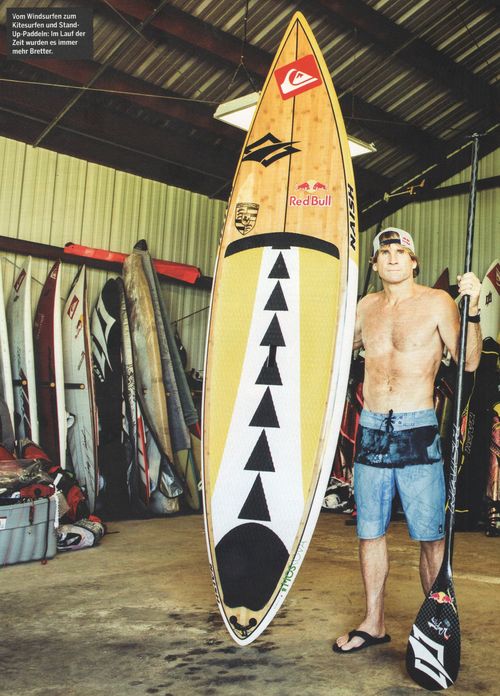
For example to enhance your print advertisement in a magazine with AR features:
Wikitude Showcases
There are also many real life showcases of apps and games that integrate AR features built with Wikitude. See Why and How to Add Augmented Reality to Your Mobile App for some awesome
examples and a glimpse on the future of mobile AR.
AR Assets Location
The QML type WikitudeArView loads AR apps built with HTML and JavaScript from its arWorldSource. Set this property to an
URL to your HTML file as the entry point of the AR application. The HTML file can load additional resources, like .js script anc .css stylesheets.
You can place these files in your project's assets folder. In this case, you can set arWorldSource to a relative URL, like
"../assets/myArApp/index.html".
Note:WikitudeArView does not support loading the AR world from Qt resources (qrc:// URLs). If you load your QML files from resources, you can place the Wikitude
HTML/JavaScript app in a separate folder that is deployed in the app or game's assets instead. For more information about deployment folders, see the publishing guide.
If your HTML/JavaScript app becomes large, you can consider loading it remotely with DownloadableResource as a .zip archive. See Wikitude SDK Examples App for an example QML app that makes use of this.
Wikitude Examples
Wikitude SDK Examples App
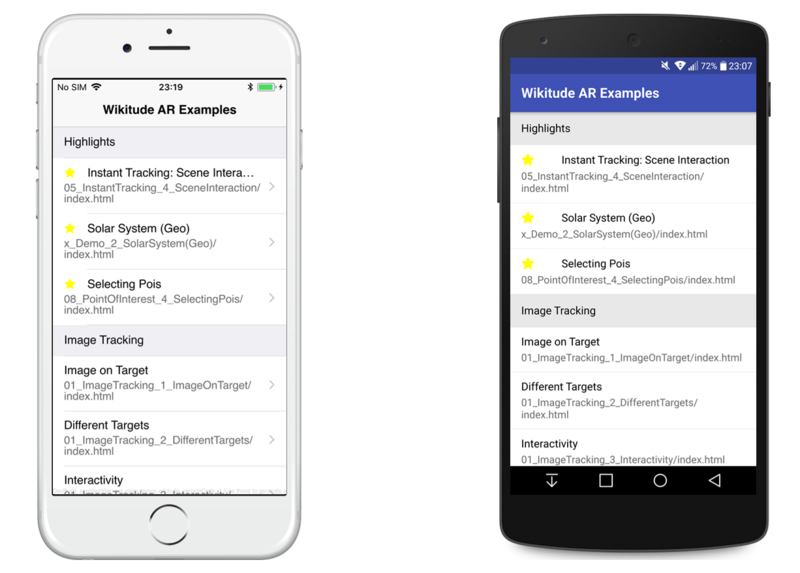
The Wikitude SDK comes with a wide variety of ready-made augmented reality examples. These examples use all the different features of Wikitude. You can use all of them with the WikitudeArView, just download them from the official Wikitude Github repository.
The following demo app allows you to to browse all Wikitude SDK Examples from within a single app. It uses DownloadableResource to load the example apps at runtime as a
.zip archive.
This app contains many different examples using the features of the Wikitude SDK. Some of them use marker images: Image Tracking, Multiple Targets, and Cloud Recognition. Some work completely without markers: Instant
Tracking, Points of Interest (POIs) and Geo AR.
You can use the following marker images with most of the examples:
The WikitudeArView item loads an AR app built for the Wikitude SDK written in HTML and JavaScript. This example uses the first of the Wikitude SDK examples.
import Felgo
App {
//licenseKey: "<generate one from https://felgo.com/licenseKey>"NavigationStack {
AppPage {
title: qsTr("Main Page")
WikitudeArView {
anchors.fill: parent//license key for Felgo QML Live applicenseKey: "g0q44ri5X4TwuXQ/9MDYmZxsf2qnzTdDIyR2dWhO6IUkLSLU4IltPMLWFirdj+7kFZOdWAhRUD6fumVXLXMZe6Y1iucswe1Lfa5Q7HhQvPxEq0A7uSU8sfkHLPrJL0z5e72DLt7qs1h25RJvIOiRGDoRc/h/tCWwUdOL6ChDnyJTYWx0ZWRfX8Vh9c9kcuw4+pN/0z3srlwIHPV5zJuB1bixlulM4u1OBmX4KFn+4+2ASRCNI+bk655mIO/Pk3TjtYMrgjFR3+iYHvw1UmaYMVjsrgpcVkbzJCT6QmaW8LejnfXDNLAbZSov64pVG/b7z9IZPFLXxRSQ0MRLudoSDAh6f7wMTQXQsyqGrZeuQH1GSWtfjl/geJYOvQyDI+URF58B5rcKnrX6UZW3+7dP92Xg4npw7+iGrO1M4In/Wggs5TXrmm25v2IYOGhaxvqcPCsAvbx+mERQxISrV+018fPpL8TzR8RTZZ5h7PRfqckZ3W54U1WSiGn9bOj+FjDiIHlcvIAISpPg2Vuq88gLp0HJ5W+A+sVirqmmCyU9GKeV5Faiv62CJy6ANCZ83GGX2rWcIAh1vGOQslMr9ay4Js+rJsVN4SIhCYdw9Em9hSpoZgimnOaszI7zn9EnPwVQgNETgVm7pAZdLkH5hxFoIKOPG2e79ZKKmzlkB/IZigoHZWNDUCFnEHDNFlTZjOEwoPi8DDGfzOEOGngWE7jmp24N7GzAP7e54Y3e48KtmIJ1/U0PFKOoi2Yv0Gh+E1siU5MBf8dLO7y7GafJWJ2oCUqJG0pLb2cgTf9pjkr625BV3XxODRylgqc5/UymTY6l1J0qO43u5hH3zaejng4I9cgieA3Y553rAEafAsfhrRmWsLW/kBdu4KLfY4eQ9z4B0TweW/xsofS0bkIqxalh9YuGBUsUhrwNUY7w6jgC6fjyMhtDdEHAlXC2fW1xLHEvY9CKojLNJQUnA0d5QCa22arI8IK63Jn8Cser9Cw57wOSSY0ruoJbctGdlsr/TySUkayAJJEmHjsH73OdbAztGuMjVq7Y643bTog4P3Zoysc="//place the HTML/JS sources in this location:arWorldSource: "../assets/samples/01_ImageTracking_1_ImageOnTarget/index.html"
}
}
}
}
Advanced Configuration
AR apps use the camera to track objects and overlay images in real-time. The WikitudeArView lets you specify details how to use the device's camera(s).
The property cameraPosition defines whether to use a front- or back-facing camera. If the device does not have a camera on the specified side, the first available
one is used.
The property cameraResolution defines the resolution to use for the camera image. You can choose to use SD, HD, Full HD or automatic resolution.
The property cameraFocusMode defines how the camera focuses the image. You can choose to one-time auto-focus, continuous auto-focus or manual focus using cameraManualFocusDistance.
This example shows how to use those properties:
import Felgo
App {
//licenseKey: "<generate one from https://felgo.com/licenseKey>"NavigationStack {
AppPage {
title: qsTr("Main Page")
WikitudeArView {
anchors.fill: parentcameraPosition: WikitudeArView.BackCameracameraResolution: WikitudeArView.FullHDcameraFocusMode: WikitudeArView.ManualFocuscameraManualFocusDistance: 0.1//license key for Felgo QML Live applicenseKey: "g0q44ri5X4TwuXQ/9MDYmZxsf2qnzTdDIyR2dWhO6IUkLSLU4IltPMLWFirdj+7kFZOdWAhRUD6fumVXLXMZe6Y1iucswe1Lfa5Q7HhQvPxEq0A7uSU8sfkHLPrJL0z5e72DLt7qs1h25RJvIOiRGDoRc/h/tCWwUdOL6ChDnyJTYWx0ZWRfX8Vh9c9kcuw4+pN/0z3srlwIHPV5zJuB1bixlulM4u1OBmX4KFn+4+2ASRCNI+bk655mIO/Pk3TjtYMrgjFR3+iYHvw1UmaYMVjsrgpcVkbzJCT6QmaW8LejnfXDNLAbZSov64pVG/b7z9IZPFLXxRSQ0MRLudoSDAh6f7wMTQXQsyqGrZeuQH1GSWtfjl/geJYOvQyDI+URF58B5rcKnrX6UZW3+7dP92Xg4npw7+iGrO1M4In/Wggs5TXrmm25v2IYOGhaxvqcPCsAvbx+mERQxISrV+018fPpL8TzR8RTZZ5h7PRfqckZ3W54U1WSiGn9bOj+FjDiIHlcvIAISpPg2Vuq88gLp0HJ5W+A+sVirqmmCyU9GKeV5Faiv62CJy6ANCZ83GGX2rWcIAh1vGOQslMr9ay4Js+rJsVN4SIhCYdw9Em9hSpoZgimnOaszI7zn9EnPwVQgNETgVm7pAZdLkH5hxFoIKOPG2e79ZKKmzlkB/IZigoHZWNDUCFnEHDNFlTZjOEwoPi8DDGfzOEOGngWE7jmp24N7GzAP7e54Y3e48KtmIJ1/U0PFKOoi2Yv0Gh+E1siU5MBf8dLO7y7GafJWJ2oCUqJG0pLb2cgTf9pjkr625BV3XxODRylgqc5/UymTY6l1J0qO43u5hH3zaejng4I9cgieA3Y553rAEafAsfhrRmWsLW/kBdu4KLfY4eQ9z4B0TweW/xsofS0bkIqxalh9YuGBUsUhrwNUY7w6jgC6fjyMhtDdEHAlXC2fW1xLHEvY9CKojLNJQUnA0d5QCa22arI8IK63Jn8Cser9Cw57wOSSY0ruoJbctGdlsr/TySUkayAJJEmHjsH73OdbAztGuMjVq7Y643bTog4P3Zoysc="//place the HTML/JS sources in this location:arWorldSource: "../assets/samples/01_ImageTracking_1_ImageOnTarget/index.html"
}
}
}
}
Interaction with the AR World
The AR world of Wikitude experiences is written in HTML and JavaScript. Your QML application can interact with it by calling JavaScript functions and by receiving JSON objects.
This example shows how to call a function testFunction defined in JavaScript in the AR world and how to receive a result.
import Felgo
App {
//licenseKey: "<generate one from https://felgo.com/licenseKey>"NavigationStack {
AppPage {
title: qsTr("Main Page")
AppButton {
id: jsCmdInputanchors.top: parent.topanchors.left: parent.leftanchors.right: parent.rightanchors.margins: dp(12)
//call testFunction(1234) in the AR worldonClicked: arView.callJavascript("World.testFunction(1234)")
}
WikitudeArView {
id: arViewanchors.top: jsCmdInput.bottomanchors.bottom: parent.bottomanchors.left: parent.leftanchors.right: parent.right//license key for Felgo QML Live applicenseKey: "g0q44ri5X4TwuXQ/9MDYmZxsf2qnzTdDIyR2dWhO6IUkLSLU4IltPMLWFirdj+7kFZOdWAhRUD6fumVXLXMZe6Y1iucswe1Lfa5Q7HhQvPxEq0A7uSU8sfkHLPrJL0z5e72DLt7qs1h25RJvIOiRGDoRc/h/tCWwUdOL6ChDnyJTYWx0ZWRfX8Vh9c9kcuw4+pN/0z3srlwIHPV5zJuB1bixlulM4u1OBmX4KFn+4+2ASRCNI+bk655mIO/Pk3TjtYMrgjFR3+iYHvw1UmaYMVjsrgpcVkbzJCT6QmaW8LejnfXDNLAbZSov64pVG/b7z9IZPFLXxRSQ0MRLudoSDAh6f7wMTQXQsyqGrZeuQH1GSWtfjl/geJYOvQyDI+URF58B5rcKnrX6UZW3+7dP92Xg4npw7+iGrO1M4In/Wggs5TXrmm25v2IYOGhaxvqcPCsAvbx+mERQxISrV+018fPpL8TzR8RTZZ5h7PRfqckZ3W54U1WSiGn9bOj+FjDiIHlcvIAISpPg2Vuq88gLp0HJ5W+A+sVirqmmCyU9GKeV5Faiv62CJy6ANCZ83GGX2rWcIAh1vGOQslMr9ay4Js+rJsVN4SIhCYdw9Em9hSpoZgimnOaszI7zn9EnPwVQgNETgVm7pAZdLkH5hxFoIKOPG2e79ZKKmzlkB/IZigoHZWNDUCFnEHDNFlTZjOEwoPi8DDGfzOEOGngWE7jmp24N7GzAP7e54Y3e48KtmIJ1/U0PFKOoi2Yv0Gh+E1siU5MBf8dLO7y7GafJWJ2oCUqJG0pLb2cgTf9pjkr625BV3XxODRylgqc5/UymTY6l1J0qO43u5hH3zaejng4I9cgieA3Y553rAEafAsfhrRmWsLW/kBdu4KLfY4eQ9z4B0TweW/xsofS0bkIqxalh9YuGBUsUhrwNUY7w6jgC6fjyMhtDdEHAlXC2fW1xLHEvY9CKojLNJQUnA0d5QCa22arI8IK63Jn8Cser9Cw57wOSSY0ruoJbctGdlsr/TySUkayAJJEmHjsH73OdbAztGuMjVq7Y643bTog4P3Zoysc="//place the HTML/JS sources in this location:arWorldSource: "../assets/samples/01_ImageTracking_1_ImageOnTarget/index.html"onJavascriptCallback: jsObject => {
//received the JSON object jsObject from the AR worldconsole.log("AR JS callback: "+JSON.stringify(jsObject))
}
}
}
}
}
This calls the function testFunction in the AR world with the parameter 1234. This function can be defined in the JavaScript file in assets like this:
 var World = {
   testFunction: function(arg) {
     console.log("testFunction called in AR world")

     //this calls the javascriptCallback signal in QML:
     AR.platform.sendJSONObject({ msg: "Callback from AR world" })
   }
 };
Wikitude item provides AR capabilities of the Wikitude JavaScript SDK
Adding and Activating Plugins
How to Add a Felgo Plugin to your App or Game
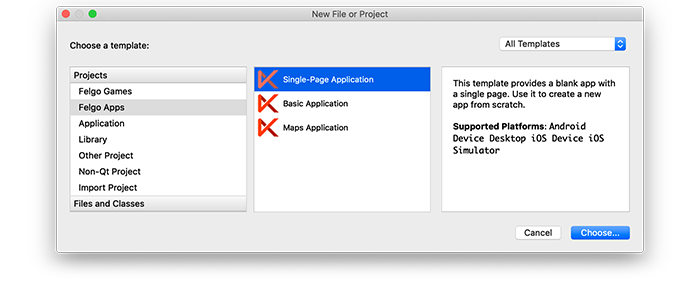
When you create a new project, you can choose to add example plugin integrations as well. Open Qt Creator and choose “File / New File or Project”, then choose Single-Page Application in the Felgo Apps section or any
other wizard. For Felgo Games, you can also find an own Game with Plugins project template as an own wizard.
Then select the platforms you want to run your application on. The plugins are available for both iOS & Android. There is a fallback functionality in place on Desktop platforms so your project still works when you call
methods of the plugins. This allows you to do the main development on your PC, and for testing the plugin functionality you can run the project on iOS and Android.
After the Kit Selection, you can choose which of the plugins you’d like to add to your project:
Then complete the wizard, your project is now set up with all the correct plugin dependencies for Android & iOS automatically. This includes:
Setting up the .gradle file for Android.
Setting up the .plist file for iOS.
Setting up the CMakeLists.txt file to include the plugin libraries for iOS.
Note: Additional integration steps are still required for most plugins, for example to add the actual plugin libraries for iOS to your project. Please have a look at the integration steps described in the
documentation for each of the used plugins.
If you have an existing Felgo application, follow these steps to include a plugin to your app or game:
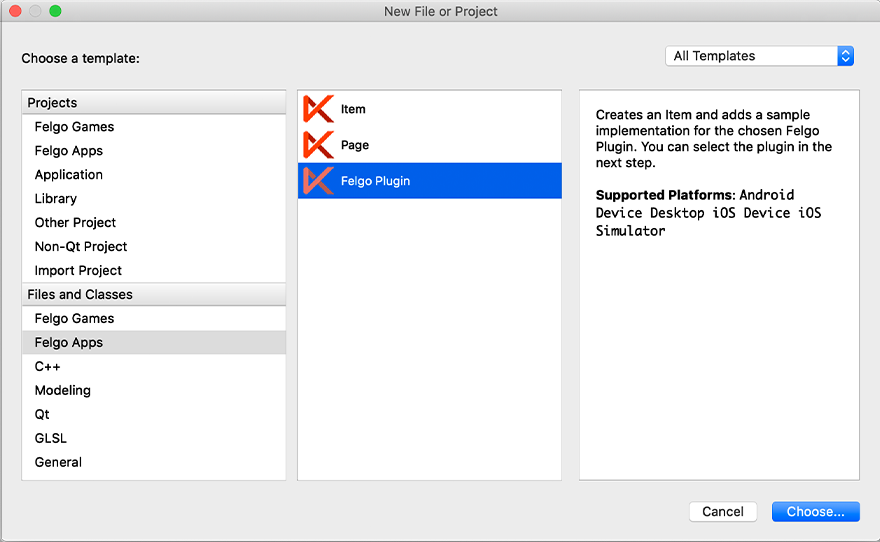
In Qt Creator, select “File / New File or Project” and choose either Felgo Games or Felgo Apps from Files and Classes. Then select Felgo Plugin and press Choose.
You can now select the plugin you want to add:
The plugin item, which contains the chosen plugin and a short usage example, is now added to your project. To use the item in your project, simply perform these steps:
Include the created item (use the name you entered in the template before) in your main.qml file.
Modify the CMakeLists.txt file & .plist file for iOS usage. See the iOS integration guide of the chosen plugin for more information.
Modify the the .gradle file for Android usage. See the Android integration guide of the chosen plugin for more information.
Note: If you have an existing Qt application, you can also add Felgo Plugins to your app! See here
how to do this.
Activating Plugins with a License Key
You can test all plugins as soon as the required integration steps and plugin configuration are completed.
However, the plugins are only available as Trial Versions if they are not activated with a valid license. When you are using unlicensed plugins, a dialog is shown and a watermark overlays your application to notify you about
the testing state of the plugin.
All monetization plugins are free to use in all licenses, other plugins are only fully usable if you have purchased the Startup or Business license. To activate plugins and enable
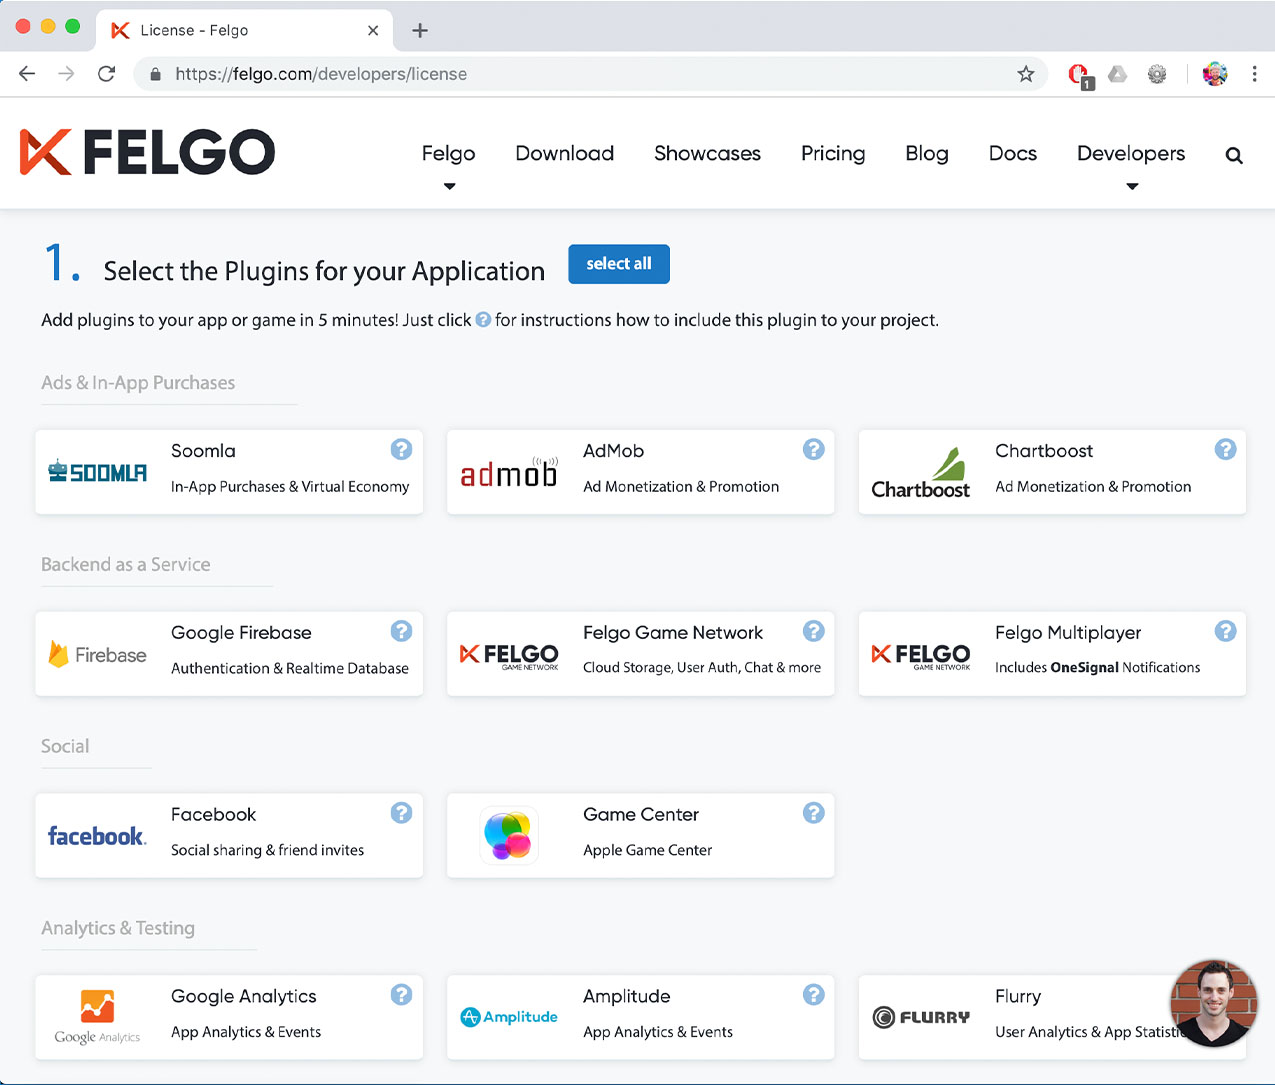
their full functionality it is required to create a license key. You can create such a key for your application using the license creation page.
This is how it works:
Choose the plugins you want to include in your license key:
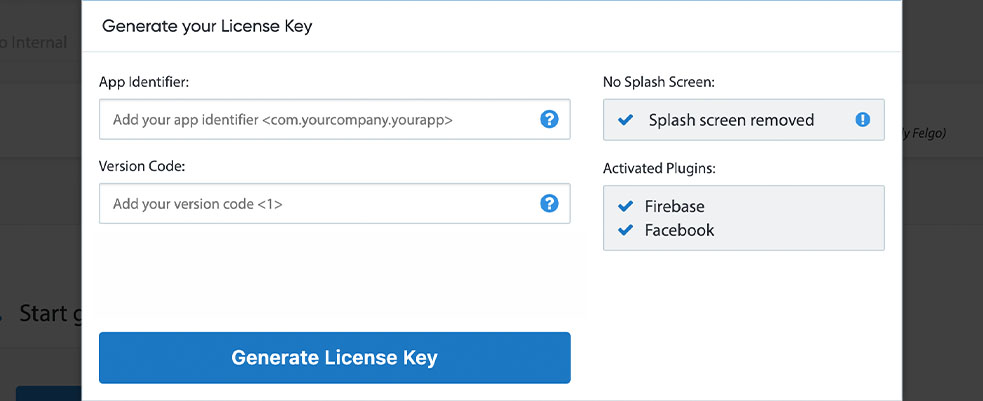
Click on “Generate License Key” and set the app identifier & version code of your application. You can see that the AdMob plugin was enabled in this license key:
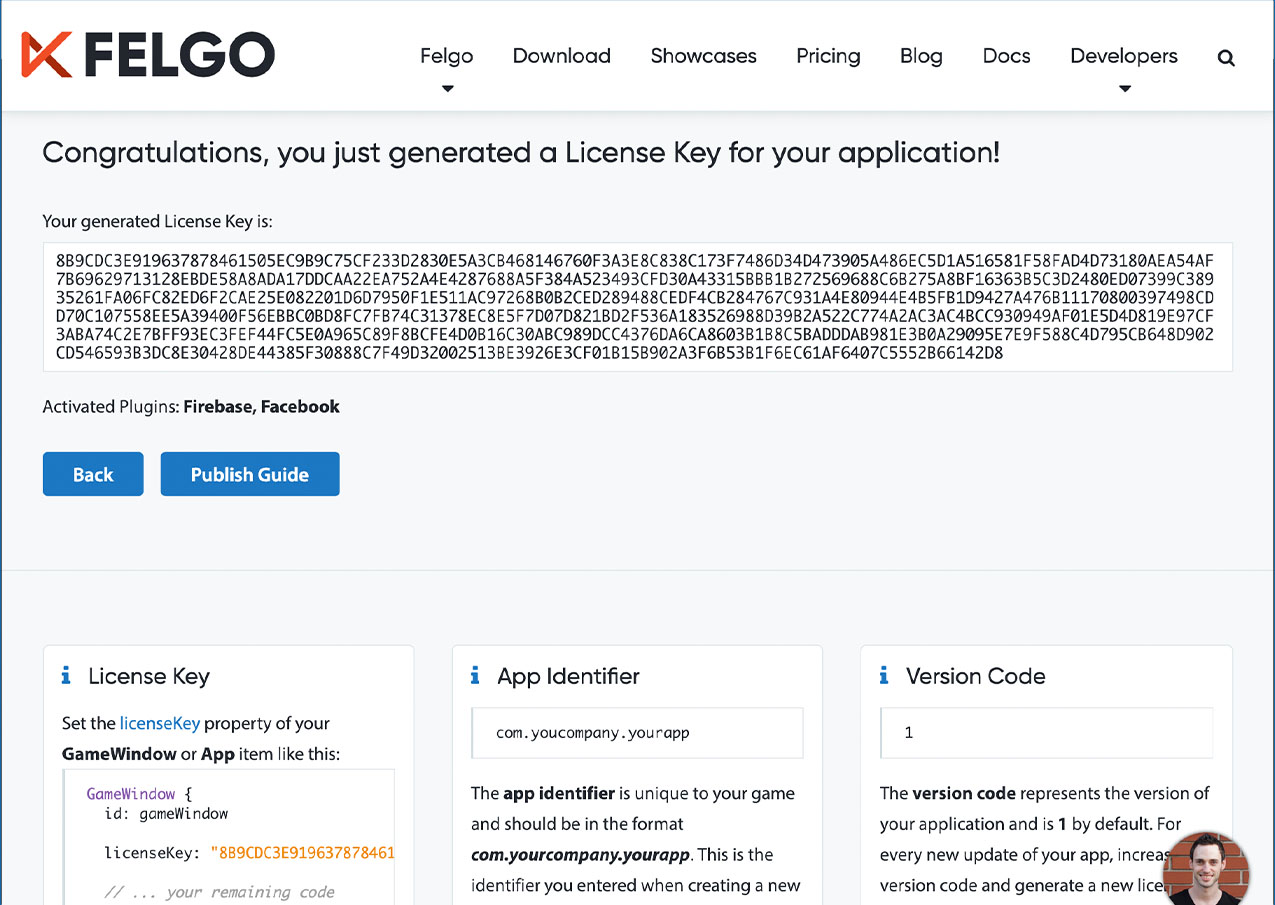
Copy the generated licenseKey to your GameWindow or App component.
You can now fully use the selected plugins!
Integration
To use the Wikitude plugin you need to add the platform-specific native libraries to your project, as described here:
Project Configuration
Add the following lines of code to your CMakeLists.txt file:
 set(FELGO_PLUGINS
    wikitude
 )
Note: Make sure to declare the FELGO_PLUGINS before calling felgo_configure_executable, which links the required Frameworks based on your settings.
Note: If you did not create your project from any of our latest wizards, make sure that your project uses the Gradle Build System like described here.
Used Wikitude SDK Versions
iOS
Wikitude iOS SDK 8.0.0
Android
Wikitude Android SDK 8.0.0
Note: Other SDK versions higher than the stated ones might also be working but are not actively tested as of now.
Sign Up and Download for Free
By signing up, you consent to Felgo processing your data & contacting you to fulfill your request. For more information on how we are committed to protecting & respecting your privacy, please review our privacy policy.
Want to find out if Felgo is a good fit for your company?
As part of the free Business evaluation, we offer a free welcome call for companies, to talk about your requirements, and how the Felgo SDK & Services can help you. Just sign up and schedule your call.
Sign up now to start your free Business evaluation: