Qt makes it easy to develop applications for desktop, mobile and embedded platforms from a single code base. No other solution offers to build native cross-platform apps for all these systems at once. Felgo is a cross-platform development solution based on the Qt framework and greatly extending it. Like Qt, Felgo runs natively on Android, iOS, Windows, macOS, Linux, Web (WebAssembly) and Embedded systems.
Felgo offers useful components for many topics, like building a responsive app navigation with a few lines of QML code:
import Felgo 3.0

 App {
   Navigation {
     NavigationItem {
       title: "Home"
       icon: IconType.home

       NavigationStack {
         Page {
          title: "Main Page"
         }
       }
     }

     NavigationItem {
       title: "Lists"
       icon: IconType.list

       NavigationStack {
         Page {
          title: "Lists"
         }
       }
     }
   }
 }
Depending on the target platform and screen size, you get the appropriate navigation. A tab navigation at the bottom on iOS, a draggable sidebar menu on Android devices, or a fixed vertical sidebar on Desktop and Embedded platforms. You can also customize and style the navigation to fit your needs, independent of the platform or screen.
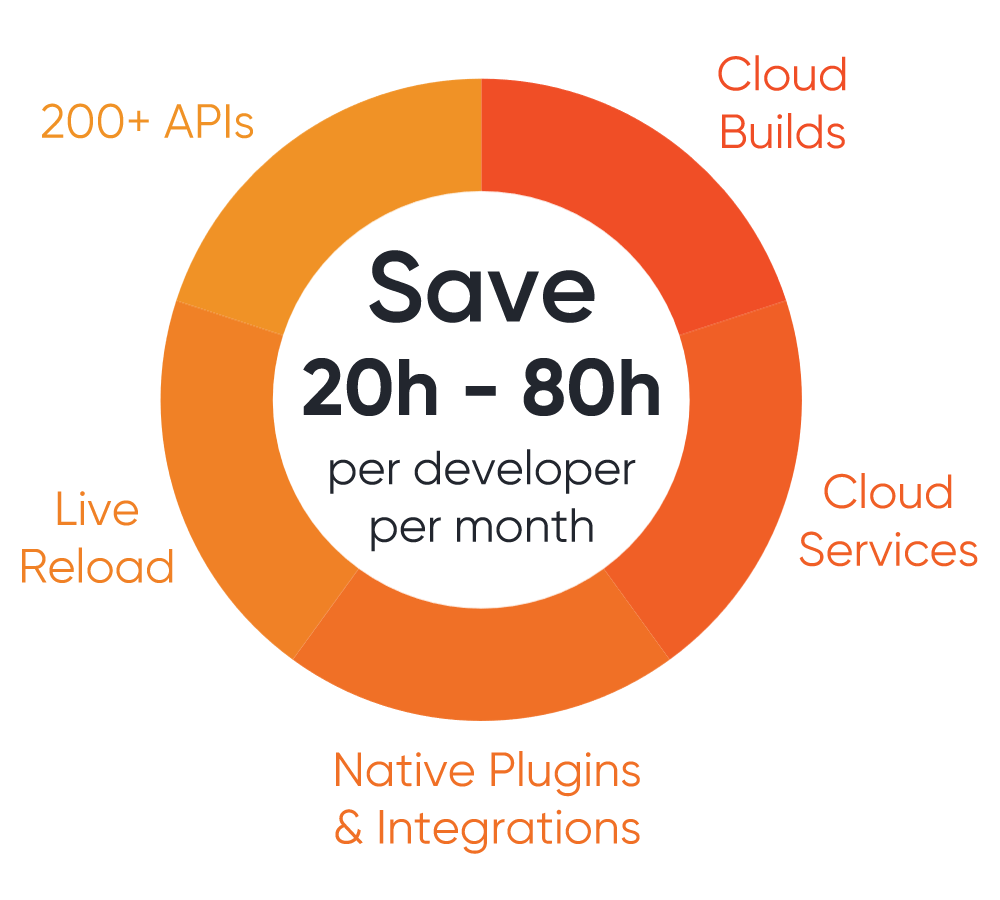
With the SDK, cloud services and unique Qt tooling, Felgo supports you throughout the whole development process.
The easiest way to use Felgo is to create a new Felgo project from scratch. If you already started a Qt project you can also use Felgo in your existing Qt application. This article guides you through all the important steps to boost your Qt development with Felgo features and tools:
- Why Use Felgo in Your Qt Application?
- Step 1: Install the Felgo SDK and Qt Tooling Additions
- Recommended: Install the Felgo SDK with the Online Installer
- Alternative: Add Felgo to Your Existing Qt Installation with Qt Marketplace
- Step 2: Log In to Your Felgo Account and Set Up the Project
- Step 3: Use Felgo Components in your QML Code
- Example 1: Integrate a Local Storage with SQLite
- Example 2: Download and Open a PDF in Your Qt Application
- Step 4: Integrate Third-party Services like Amplitude Analytics in your Qt App
- Step 5: Optimize Your Development Process with Felgo Tooling and Services
Why Use Felgo in Your Qt Application?
Felgo takes Qt application development one step further. It lets you do more with QML and saves you from writing complex C++ code. For instance, the QML-driven Felgo Qt World Summit Conference App saved 90% code in comparison to a similar implementation with pure Qt/QML: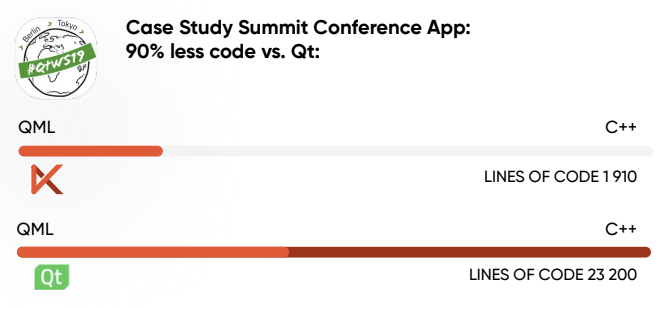
Note: To learn more about how Felgo helps Qt developers make better applications see this page. For an in-depth comparison how Felgo fares to competing cross-platform frameworks like Google Flutter or React Native, see here.
It is possible to use all Felgo features in your Qt Quick application. Both Qt Quick Controls 1 or Qt Quick Controls 2 work together with Felgo. You can also use Felgo components in your Qt Widget based app – contact us here if you’d like to get an example project to learn how to do this.
Felgo gives access to more than 200 APIs that extend Qt with capabilities such as:
- Advanced controls and native navigation
- Theming and style
- Density independence
- Responsive layout
- File handling (local/remote)
- Data management and model/view
- Multimedia
- REST networking
- Native dialogs and features
Felgo is a Qt Technology Partner and a great help to save time and money when developing Qt applications. You can also take advantage of unique Qt/QML tooling and cloud services, or use native plugins to integrate features like analytics, advertisements, in-app purchases, push notifications, user accounts, and real-time databases.
This blog post covers all the steps to use the Felgo SDK and tooling like QML Hot Reload in your Qt project. Let’s get started.
Step 1: Install the Felgo SDK and Qt Tooling Additions
Recommended: Install the Felgo SDK with the Online Installer
The first step is to install Felgo using our installer. With Felgo you get a unique Qt installation that includes Qt, the Felgo SDK, Qt Creator extensions, development tools and many open-source demos to build upon.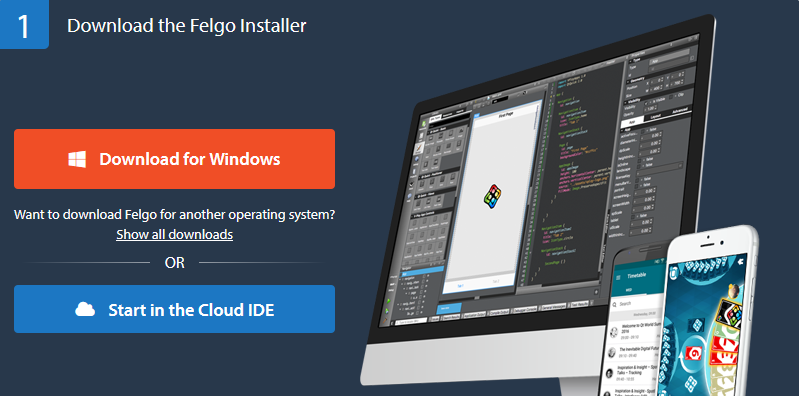
In case you already installed Qt 5 on your system, install Felgo in parallel: Having separate installations helps to avoid Qt version compatibility issues. The Felgo and Qt installation work side-by-side in two different directories.
Alternative: Add Felgo to Your Existing Qt Installation with Qt Marketplace
Installing Felgo and Qt in parallel is recommended, but you can also add Felgo to your existing Qt installation as an extension: To do so, find and get the Felgo extension in the Qt Marketplace.
After you acquired the Felgo extension from the Qt Marketplace, you can remove or add Felgo with the MaintenanceTool of your Qt installation. Find and select Felgo in the Marketplace section at the Select Components step:
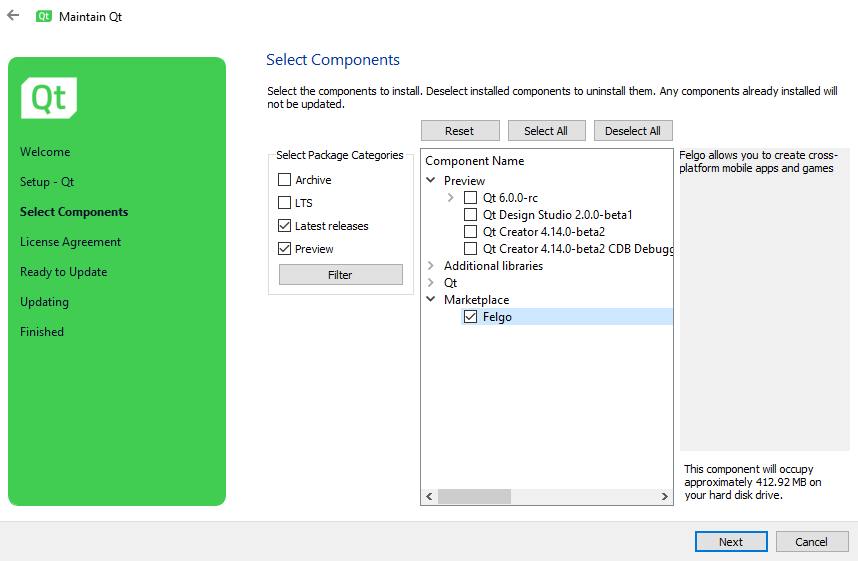
Then proceed with the installation. If you have problems adding Felgo to your existing Qt SDK, please install Felgo in addition by using the Felgo Installer. The two installations will not interfere with each other, and both work independently.
Note: Felgo thoroughly checks new Qt versions and incorporates necessary fixes before providing a stable release of the Felgo SDK. If you are using the latest Qt version and there’s no Felgo release for it yet, Felgo won’t be added to your Build Kit. In this case, you can add an earlier Qt version to your existing installation with the MaintenanceTool. See the recommended version for using Felgo in the Felgo Update Guide. It shows how to update Felgo and lists recent changes, among which you can find Qt version updates of Felgo.
In case you depend on a specific Qt version you want to use: Felgo can also provide a customized Felgo build for you as part of the Qt consulting and development services. Do not hesitate to get in touch if you have a request or run into issues!
Step 2: Log In to Your Felgo Account and Set Up the Project
Open Qt Creator and Log In with Your Felgo Account
You can now open Qt Creator and log-in to your Felgo Account on the Felgo tab, which was added by installing Felgo.
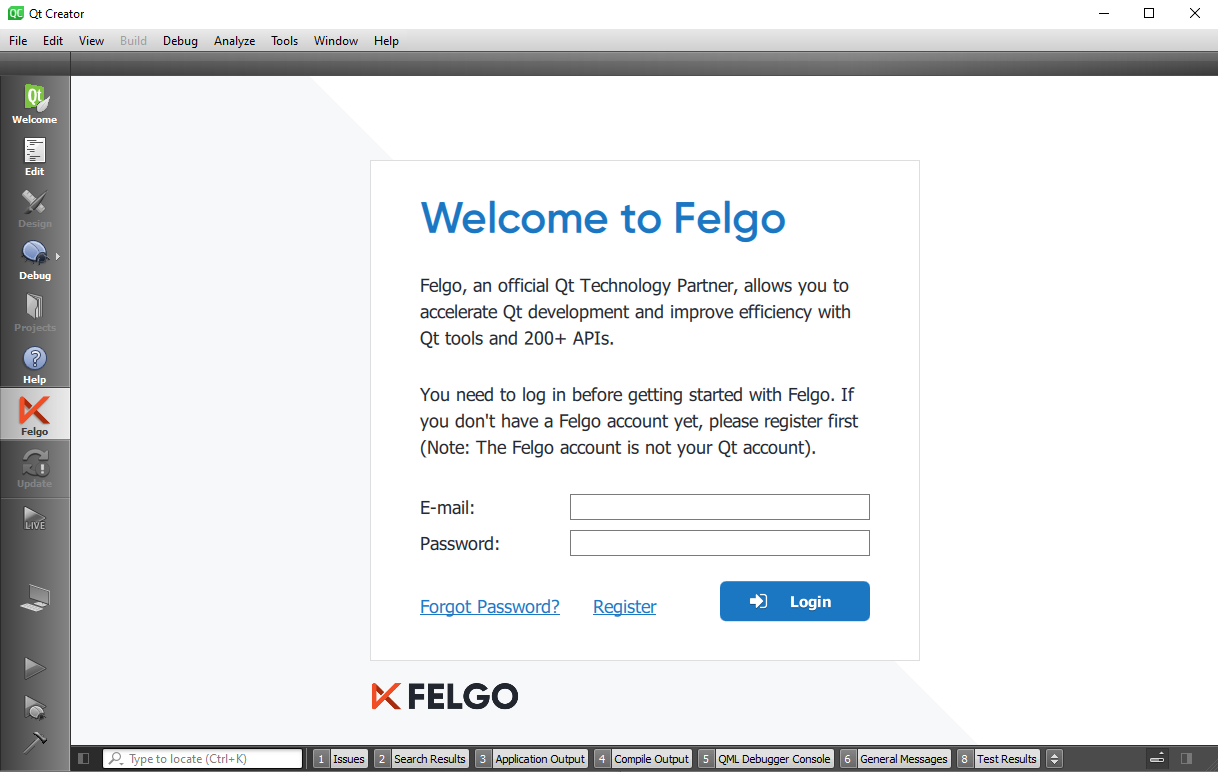
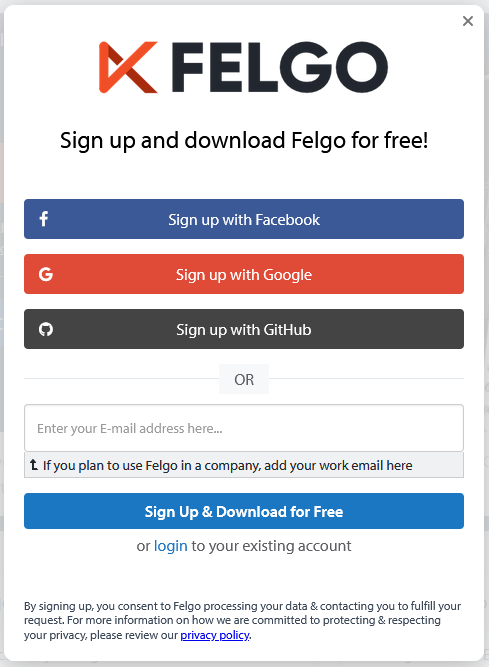
If you do not have a Felgo Account yet, you can create a new account on the Felgo Website. Open the downloads page and choose Download to open the sign-up popup, which will guide you through the registration.
As you already added Felgo to your Qt installation, you can skip the actual download after you’ve completed the sign-up.
Integrate Felgo in your Qt Quick Project
After you’ve successfully installed the Felgo SDK and logged into your Felgo account with Qt Creator, you can start using Felgo in your projects. For an example integration, see the reference Qt Quick project on GitHub:
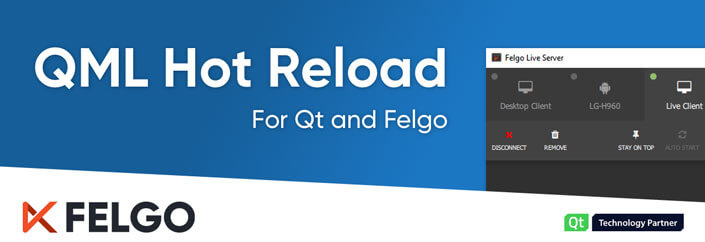
Note: When opening a project, the Felgo Qt Creator plugin opens the Felgo Live Server, which enables QML Hot Reload. Felgo Live applies QML, JavaScript and asset changes instantly on every connected device, immediately after saving. You can use pre-built client applications to connect with the server, or build your own. Learn more in Step 5: Optimize Your Development Process with Felgo Tooling and Services.
Felgo does not affect your Qt application, unless you add it to your project. See all the steps for integrating and initializing Felgo below:
1. Link the Felgo SDK in your .pro file
# Add Felgo
CONFIG += felgo
Qt Creator then also recognizes the Felgo import and gives you autocompletion support for QML types.
2. Initialize Felgo in the main.cpp of your project
#include <QGuiApplication>
#include <QQmlApplicationEngine>
#include <FelgoApplication> // 1 - include FelgoApplication

int main(int argc, char *argv[])
{
   QGuiApplication app(argc, argv);
   FelgoApplication felgo; // 2 - create FelgoApplication instance

   QQmlApplicationEngine engine;
   felgo.initialize(&engine); // 3 - initialize Felgo

   engine.load(QUrl(QStringLiteral("qrc:/main.qml")));
   return app.exec();
}
In case Qt Creator does not detect the FelgoApplication type, the SDK might not be installed correctly for the chosen Build Kit. Please try to reinstall Felgo if this happens.
Note: If you installed the Felgo extension from Qt Marketplace to your existing Qt installation, the Felgo types are only available when using the Build Kit of a Felgo-supported Qt version. See the Felgo Update Guide to find out which version of Qt the latest Felgo version targets. Add the correct Qt version with MaintenanceTool and use the respective Build Kit in Qt Creator to run your project with Qt and Felgo.
3. In your main.qml, use the Felgo App type as your main ApplicationWindow. This is the easiest way to enable Felgo QML types in your project. For creating games, the GameWindow type is also available.
import Felgo 3.0
import QtQuick 2.12

App {
 // licenseKey: "<your-license-key>"

 // ...
 Text {
   text: "Hello World"
   anchors.centerIn: parent
 }
}
If you need to keep your existing root item, add a GameWindowItem as a child to your main window instead:
import Felgo 3.0
import QtQuick 2.12
import QtQuick.Controls 2.0

ApplicationWindow {
 title: qsTr("Qt App")
 width: 640
 height: 480
 visible: true

 GameWindowItem {
   // licenseKey: "<your-license-key">
 }

 // ...
 Text {
   text: "Hello World"
   anchors.centerIn: parent
 }
}
4. Add your application id and version in your *.pro configuration with the following lines:
# Project identifier and version
# More information: https://felgo.com/doc/felgo-publishing/#project-configuration
PRODUCT_IDENTIFIER = com.felgo.demos.qtquickfelgo
PRODUCT_VERSION_NAME = 1.0.0
PRODUCT_VERSION_CODE = 1
Then add a new file qml/config.json to your project resources:
{
   "title": "Felgo App",
   "identifier": "com.felgo.demos.qtquickfelgo",
   "orientation": "auto",
   "versioncode": 1,
   "versionname": "1.0.0",
   "stage": "test"
}
The specified bundle identifier and version in the config.json are controlled by the PRODUCT_IDENTIFIER, PRODUCT_VERSION_CODE and PRODUCT_VERSION_NAME settings of your project configuration. With those variables, Felgo allows you to maintain your application identifier and version for all target platforms from a single spot in your *.pro file.
Note: When activating Felgo with a valid License Key, the specified identifier and version need to match your License Key. License Keys activate native plugins for your application and give access to advanced Felgo features. Learn more at Step 4: Integrate Third-party Services like Amplitude or Google Analytics in your Qt Application.
5. Congratulations! You can already build and run your Qt application and use the Felgo SDK.
The above config.json is relevant for Windows, macOS, Linux or Embedded targets. For Android apps, the identifier and version are configured in the AndroidManifest.xml:
<manifest package="com.felgo.demos.qtquickfelgo" android:versionCode="1" … >
If your application does not yet have an Android configuration, you can choose the Projects tab in Qt Creator, select the Android Kit, expand the Build Android APK section and choose Create Templates. This will create a default configuration within a new android subfolder of your project, which also includes the manifest.
Note: When building with Felgo for Android the PRODUCT_IDENTIFIER, PRODUCT_VERSION_CODE and PRODUCT_VERSION_NAME from your project configuration are taken over to the manifest of the generated APK. You do not need to manually update the identifier or version in the manifest.
For iOS, you can set the identifier and version in the Info.plist configuration of your app. This configuration file is created by qmake when building for iOS. You can add the following entry to your *.pro configuration to keep and use a custom iOS configuration for your project:
ios {
   QMAKE_INFO_PLIST = ios/Info.plist
}
To use the PRODUCT_IDENTIFIER, PRODUCT_VERSION_CODE and PRODUCT_VERSION_NAME from your *.pro configuration, make sure to add these settings:
<key>CFBundleIdentifier</key>
<string>$(PRODUCT_BUNDLE_IDENTIFIER)</string>
<key>CFBundleShortVersionString</key>
<string>${PRODUCT_VERSION_NAME}</string>
<key>CFBundleVersion</key>
<string>${PRODUCT_VERSION_CODE}</string>
The application identifier and version for all targets is now controlled from your project configuration. You are ready to use Felgo in your Qt application for Desktop, Mobile, Web or Embedded targets.
You can also find a reference implementation for a Qt Quick project with Felgo on GitHub:
Step 3: Use Felgo Components in your QML Code
Example 1: Integrate a Local Storage with SQLite
Using Felgo in the QML files of your Qt Quick application is easy. All Felgo types are available as QML components and can be used just like any other Item in QML. Mixing Felgo types with Qt components like Qt Quick Controls 2 is also possible.
For example, if you like to add add an easy-to-use local storage to your application, simply add the Felgo import and use the Storage component of Felgo:import QtQuick 2.12
import QtQuick.Controls 2.0
import Felgo 3.0
ApplicationWindow {
title: qsTr("Qt App")
width: 640
height: 480
visible: true
GameWindowItem {
// licenseKey: "<your-license-key>"
}
Storage {
id: storage
property int counter: storage.getValue("counter") || 0
function increaseCounter() {
counter++
storage.setValue("counter", counter)
}
}
Button {
text: "Count: "+storage.counter
onClicked: storage.increaseCounter()
anchors.centerIn: parent
}
}
Example 2: Download and Open a PDF in Your Qt Application
Felgo provides components for many different topics. DownloadableResource allows downloading app resources on demand during runtime. That way not all resources must be included in the application package, which reduces the initial download size for your application.
import QtQuick 2.12
import QtQuick.Controls 2.0
import Felgo 3.0

ApplicationWindow {
 title: qsTr("Qt App")
 width: 640
 height: 480
 visible: true

 GameWindowItem {
   // licenseKey: "<your-license-key>"
 }

 Button {
   text: "Download / Open"
   onClicked: {
     if(pdfResource.available) openPdf()
     else pdfResource.download()
   }
   anchors.centerIn: parent
 }

 DownloadableResource {
   id: pdfResource
   source: "http://www.orimi.com/pdf-test.pdf"
   storageLocation: FileUtils.DocumentsLocation
   storageName: "pdf-test.pdf"
   extractAsPackage: false
   // if the download is competed, available will be set to true
   onAvailableChanged: if(available) openPdf()
 }

 function openPdf() {
   fileUtils.openFile(pdfResource.storagePath)
 }
}
Other Felgo Components offer the same ease-of-use, for an overview of all available types and features, please have a look at the Felgo documentation.
Step 4: Integrate Third-party Services like Amplitude or Google Analytics in your Qt App
Felgo Plugins allow you to integrate leading third-party services for analytics, monetization, push notifications, cloud database and more. Felgo Plugins use native, platform-specific functionality, meaning that your app seamlessly integrates with existing platform experiences. Add Felgo Plugins right within your existing QML or C++ code without the hassle of dealing with platform-specific libraries.
Example: Add Amplitude or Google Analytics to your QML App
With the Felgo import you also have all Felgo Plugins available in QML. To integrate analytics to your app, add the Amplitude Item or Google Analytics Item to your code:
import Felgo 3.0

Amplitude {
   id: amplitude

   // From Amplitude Settings
   apiKey: "<amplitude-api-key>"

   onPluginLoaded: {
     amplitude.logEvent("App started");
   }
 }

GoogleAnalytics {
   id: ga
   // Property tracking ID from Google Analytics Dashboard
   propertyId: "<ga-property-id>"
   onPluginLoaded: {
     ga.logEvent("App Action", "Started App")
   }
 }
Plugins may require different native libraries depending on the target platform. To integrate those native frameworks for the Amplitude Plugin add this setting to your *.pro file:
# Add Felgo Amplitude plugin
FELGO_PLUGINS += amplitude
By specifying the FELGO_PLUGINS you include all relevant build settings to link the libraries of your chosen plugins when you compile the application.
Note: Google Analytics does not require any additional libraries. The Amplitude plugin works directly on Desktop too, but relies on native frameworks for iOs and Android. These native libraries are not part of your Qt project yet. Please see the detailed plugin documentation and view the Integration Steps to learn how to integrate and use each Felgo plugin on a specific platform.
Felgo License Keys and Plugin Activation
All Plugins operate in trial-modes if the application does not use a valid Felgo License Key. To set the GameWindowItem::licenseKey, create a new key for your app with the Felgo website.
After signing in to your Felgo account, you can visit the License Key Creation section of the Developers Dashboard. You can create any number of keys for your applications.This is how it works:
1. Choose the plugins you want to include in your license key. You can also select multiple plugins: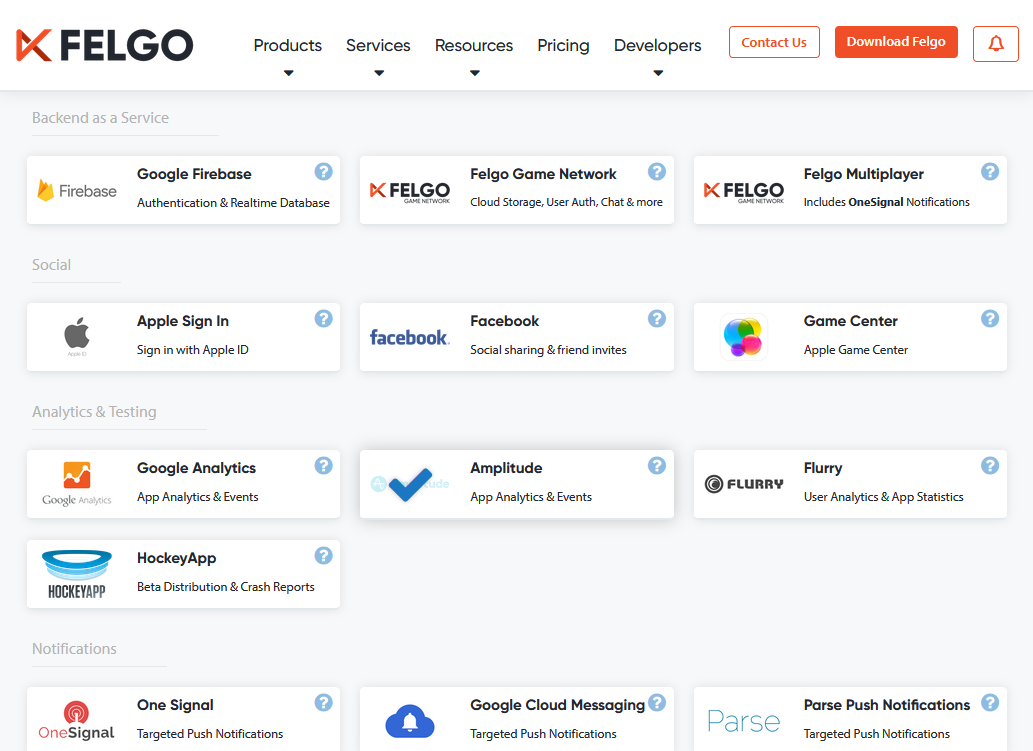
Note: Some plugins are only available with the Felgo Startup or Business plan. You can still use them in trial mode to test integration. Contact us for a free Business evaluation, with access to all features and 5h of personal support, onboarding and training!
2. After selecting your plugins, scroll down and click on Generate License Key. In the next dialog, set the app identifier & version code of your application. You can also see that the Amplitude plugin was enabled in this license key popup: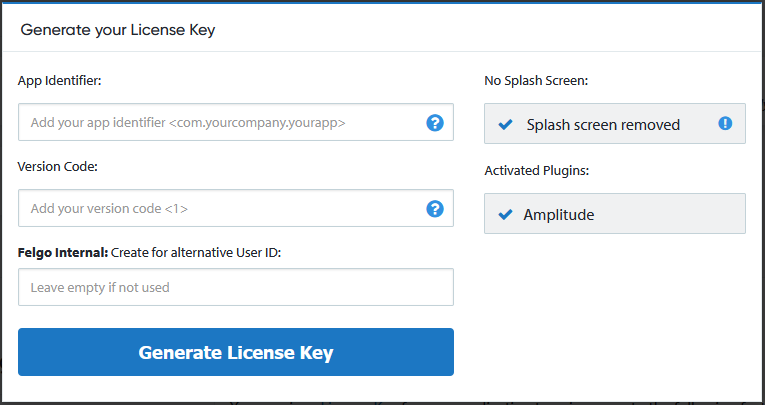
3. Press the Generate License Key button to finish. On the result page, copy the generated licenseKey to your GameWindowItem, GameWindow, or App component.
4. You can now use the Amplitude plugin in your Qt application!
This approach is the same for every plugin. Each license key activates all the plugins you need. To add additional plugins or update to a different app version or identifier, create a new License Key. If you encounter any issues when using Felgo in your Qt applications, don’t hesitate to contact us.
The full example of this guide also available on GitHub:
Step 5: Optimize Your Development Process with Felgo Tooling and Services
Use Felgo Live with QML Hot Reload for Development
Felgo Live is a standalone tool you can use for any Qt/QML project on Mobile, Desktop, Embedded or the Web (with Qt for WebAssembly). Whether you rely on the Felgo APIs in your Qt project or not: Building and deploying your application takes several minutes for each platform and device. Even small changes in the QML code of your application require you to compile and run from scratch.
To overcome this, use QML Hot Reload with Felgo Live. Felgo Live applies QML, JavaScript and asset changes instantly on every connected device, immediately after saving. It reduces deployment time from several minutes to only a couple of seconds.
.gif?width=924&name=hot-reload-3%20(1).gif)
You can start the Felgo Live Server by pressing the Live Run button in Qt Creator:
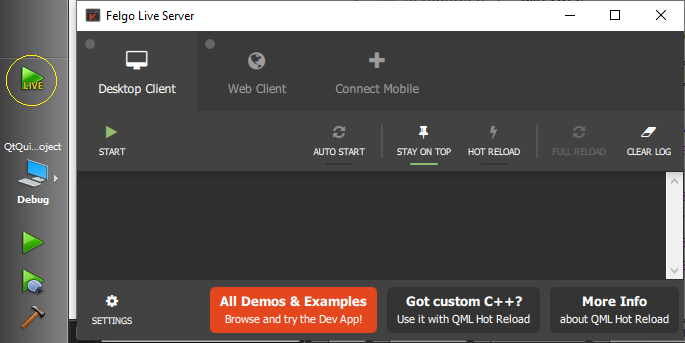
Then press the Start button in your Felgo Live Server while having the Desktop Client selected. This presents you with the Felgo Live Client. Use this pre-built client for pure Qt Quick projects without custom native additions. Felgo also provides a companion app for mobile development, the QML Live Scripting app for Android and iOS. To learn more and see Felgo Live in action, watch the free online webinar.
To enable QML Hot Reload for Qt Quick projects with custom C++ additions, you can integrate the Felgo Live module and build your own client application. This is how it works:
1. Add the felgo-live config to your pro file:
# Add Felgo, and the Felgo Live Module for QML Hot Relaod
CONFIG += felgo felgo-live
2. Include the Live Client and use it in your main.cpp instead of your main QML file
First, go to your project's main.cpp file and add the following line at the include section at the top:
#include <FelgoLiveClient>
Then, comment the engine.load statement that loads your root QML file and use the FelgoLiveClient instead:
// engine.load(QUrl(QStringLiteral("qrc:/qml/main.qml")));
FelgoLiveClient liveClient(&engine);
Congratulations, you just turned your project into a Live Client. Build and run the app for any platform you want, and connect your application to the Felgo Live Server to start developing with QML Hot Reload. Your own Felgo Live Client includes all your custom libraries and C++ code. See the Felgo Live documentation for more information on building a custom Live Client.
Explore Features, Run Demos and Develop in the Browser with Felgo Cloud IDE
The Felgo Cloud IDE is a web-based development environment for Qt and QML projects and allows you to access and edit your projects from anywhere in the world. You can see it as Qt Creator, just without a local installation. It is based on GitLab, offering you full Git integration and project management capabilities, like issue tracking and more. Felgo is an official GitLab Technology Partner and the Cloud IDE extends GitLab with custom integrations that support your Qt development.
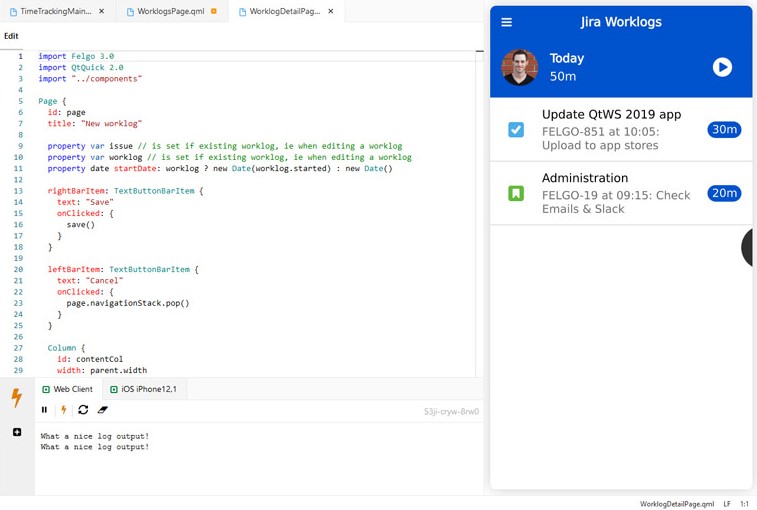
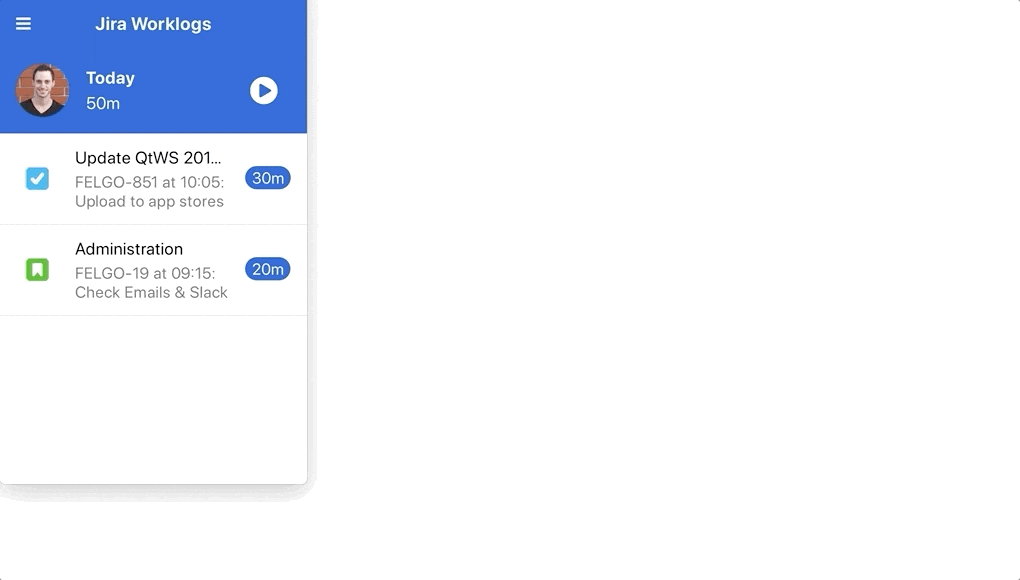
The Felgo Cloud IDE can connect to the Git repository of your Qt project, includes a code editor with auto-completion and takes advantage of QML Hot Reload to give you a live preview of your QML app. To try it yourself, you can view and modify the Time Tracking App demo in the Cloud IDE here.
Felgo offers many demos and examples. You can also start your own projects based on the open-source templates. To explore all available components and examples, see the Felgo Developer App. You can als open it in the browser.
Build, Sign and Deploy your Qt Application with Felgo Cloud Builds
Felgo Cloud Builds allows to automate building, packaging, signing and deployment of Qt apps. It is the only CI/CD solution specifically made for Qt applications. Set up your project and build configuration once, and create app builds whenever you want.
With Cloud Builds, developers do not need to install and maintain the build toolchains and SDKs for different target platforms. Felgo Cloud Builds offers continuous integration and delivery (CI/CD) for Qt and Felgo projects directly from your browser. Your apps are created with a central and stable build environment that is hosted by Felgo or on-premise. In order to make use of it, visit this webpage and set up your project.
-1.jpg?width=1920&name=CloudBuildsGraphic(1)-1.jpg)
For mobile apps, you can also connect the beta testing channels of the Android and iOS app store in order to upload new versions automatically. With these cloud services, you can allow your team to develop, build and deploy an application with ease. Felgo provides you with all important tools for cross-platform app development using Qt/QML.
Instead of worrying about pitfalls and issues that aren’t specific to your project, you can focus on the actual implementation work for your application. This saves a considerable amount of development time and makes it easier to support many platforms from a single codebase.

More Posts Like This
Release 3.7.0: The New Developer App and the Best Examples and Demos for You
Release 3.7.0: Bluetooth LE (Low Energy) with QML, Apple Sign In, Secure Keychain Storage
 Release 3.5.0: Run your Qt and Felgo Apps in the Browser with WebAssembly (WASM)