
Felgo aims to improve your whole development process, from idea to app store. Today you get access to another piece of the puzzle. Introducing: Felgo Cloud Builds
Boost your Qt and Felgo app development with continuous integration and delivery for Qt and Felgo projects. As the only CI/CD exclusively for Felgo/Qt, it enables users to build and distribute apps with minimum effort and maximum speed.
Here is a short teaser video, introducing Felgo Cloud Builds:
Felgo Cloud Builds On-Premise
Cloud Builds is available as a hosted solution by Felgo, and on-premise. Contact us if you want to host Cloud Builds on your own servers and integrate it into your existing CI/CD systems.
Contact Us for On-Premise Hosting
Build your Apps in the Cloud with Felgo Cloud Builds
A great development workflow will make your good developers great, and your great developers exceptional. Deploying a new version to the app stores can be an annoying and time-consuming task. You need to make sure all your native tooling for each platform is set up and working as expected. And unfortunately, those tend to just break more often than you would like to.
Felgo already eliminates the need for native tooling while developing Qt/QML apps with Felgo Live code reloading. When it comes to store deployment, it was still required.
This changes with Felgo Cloud Builds. You connect your source code repository and we build the project for you, for iOS, Android and any other supported platform. Soon you will also be able to build for Windows, Mac, Linux, Embedded & Web (WebAssembly). Contact us if you need any of those platforms immediately.
You trigger a new build with a single button click and then you can:
- Download the created binaries
- Automatically upload them to your beta channels or the app stores
- Try out previous versions of your application
Build your project with Felgo Cloud Builds
Benefits of Using Cloud Builds
There are a number of benefits in using a CI/CD for developing your projects. First of all, the obvious one, time savings:
- No setup of native frameworks required
- Cut time to provide new test versions
- Cut time for publishing new versions
- Release more frequent updates for your users
The whole build and deployment process to both app stores only takes about 5-10 minutes.
Apart from that, there are several other advantages that you can benefit from:
- Easy integration with Git
- Automatic upload to iOS TestFlight and Google Play testing tracks
- Deploy to iOS without the need for a Mac
- Soon you will also be able to select different Felgo and Qt versions to build with
Why we built Felgo Cloud Builds for Continuous Integration and Delivery?
We built hundreds of projects using Qt on mobile platforms. Looking back at all the time spent on building and uploading binaries for every supported platform, we knew this had to change. With Felgo, we already made a lot of things simpler and faster during development, but manual publishing was still a major time-consuming process.
This is why now is the perfect time to use Felgo Cloud Builds. Cross-platform cloud building and publishing. Out of the box. Rapidly.
How to build apps with Felgo Cloud Builds
Your project is easy to set up. And after done once, there is no need to touch the configuration again, just build!
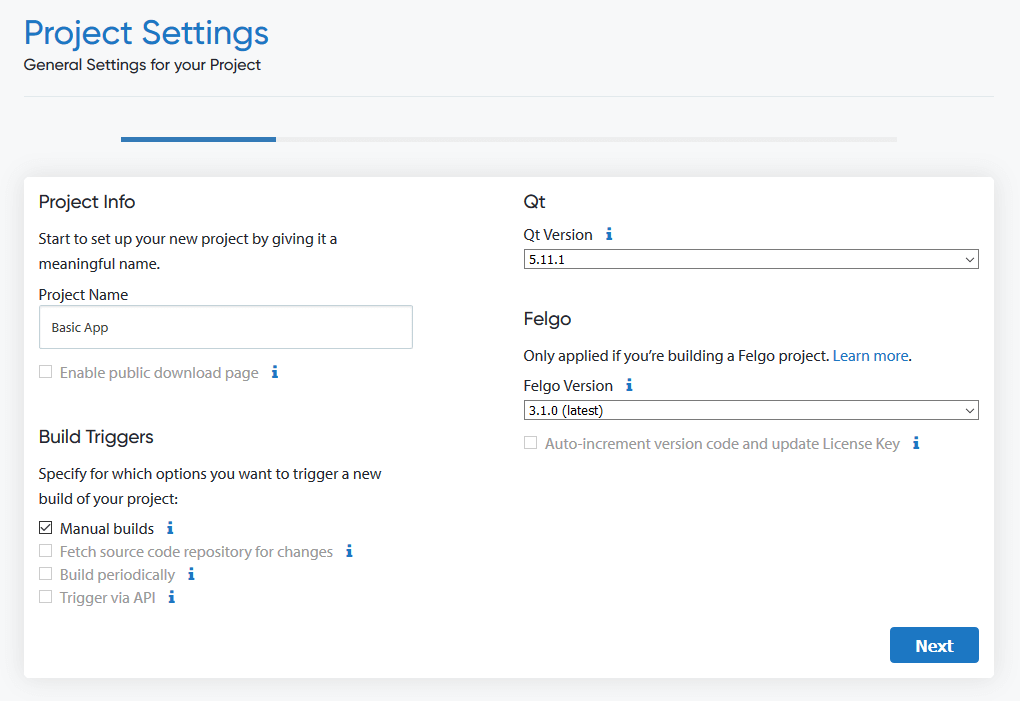
1. Create a new Project
Visit https://felgo.com/cloud-builds and create a new project.
First up are the general settings. You will also be able to choose different Qt and Felgo versions for your builds soon.
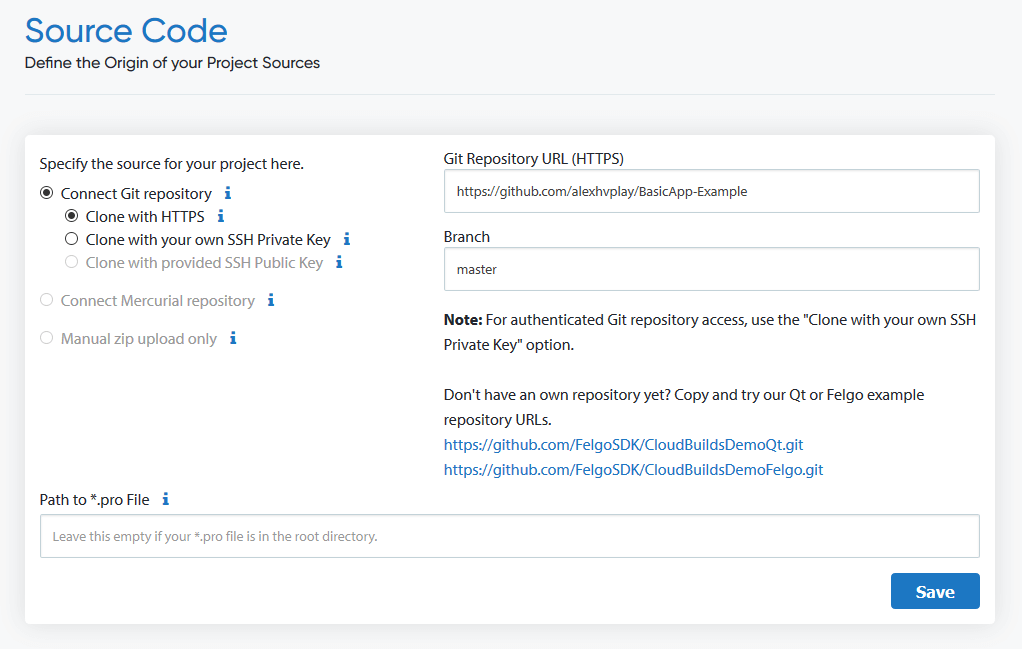
2. Connect your Git repository
In order to fetch your source code for building, you need to provide access to your Git repository.
For public repositories, this is the easiest, as you can just provide the HTTPS URL.
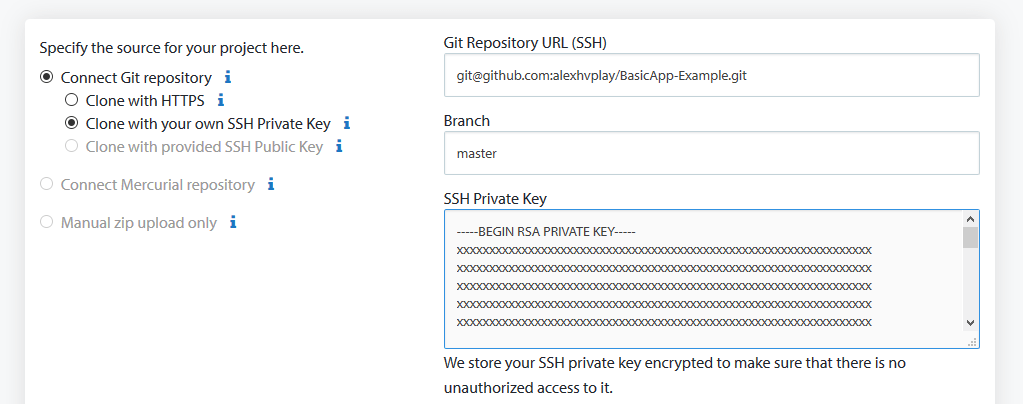
For private repositories, we recommend to generate a new SSH key pair. Then you can add the public key to your repository, and the private key to Cloud Builds (just as if it was your local development environment).
You can use GitHub, GitLab, Bitbucket, and custom private Git repositories.
3. Select target platforms and provide signing details
You can decide what platforms you want to build your application for.
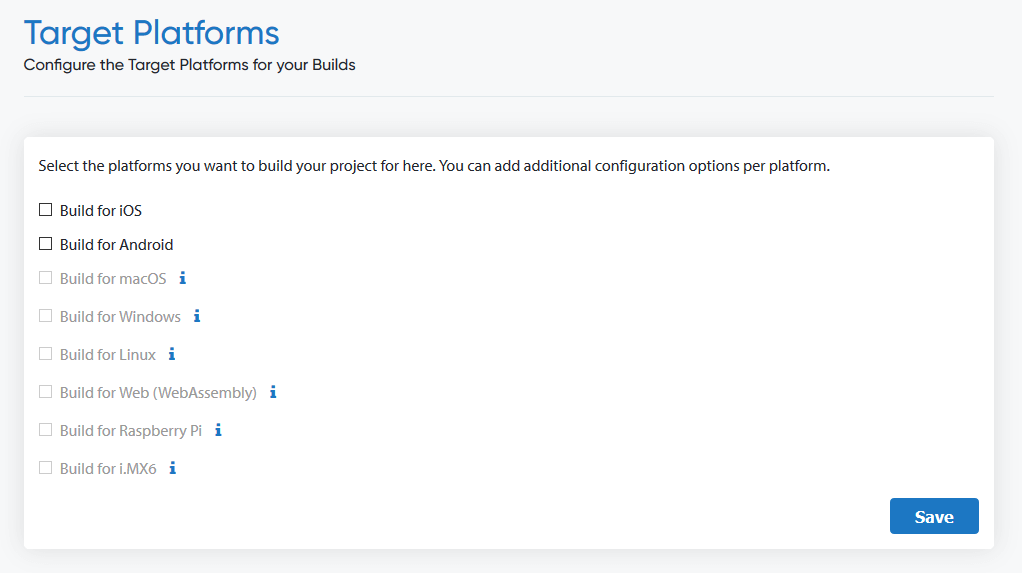
iOS
Apple requires you to have an active App Store Connect account, in order to sign your application. To create a build that can be distributed and installed on your device, you need to provide your Certificate (*.p12 format) and Mobileprovision.
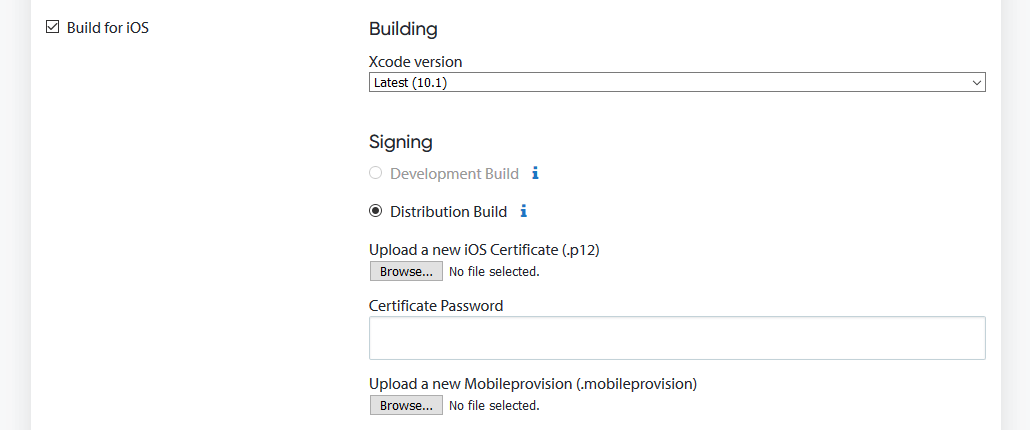
Please follow the Apple developer documentation if you are not familiar with how to obtain this information.
Android
Android is less restrictive when it comes to signing and deployment. You can use the Development Build option to create test builds without providing any further information.
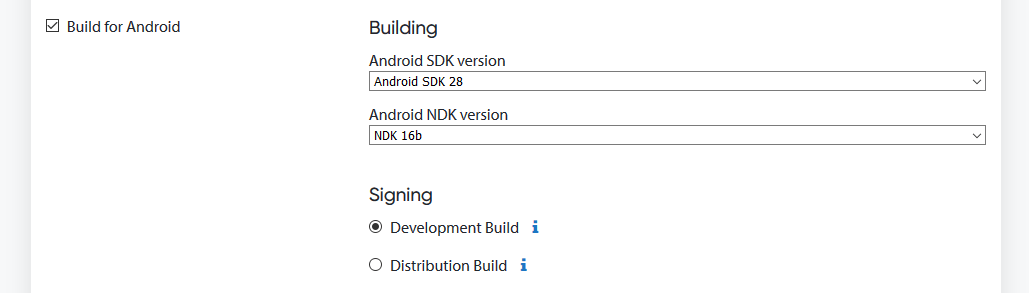
Make sure that your Android device allows installation of apps from unknown sources (not via Google Play Store), to install the development build directly on your device.
If you want to create a distribution build, signed with your own certificate, you need to provide your Keystore, together with the associated credentials.
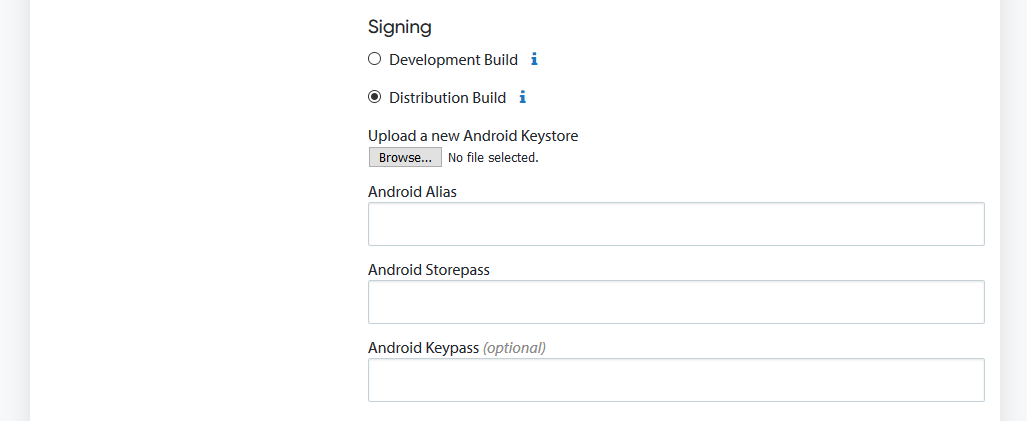
Please follow the Android developer documentation if you are not familiar with how to obtain this information.
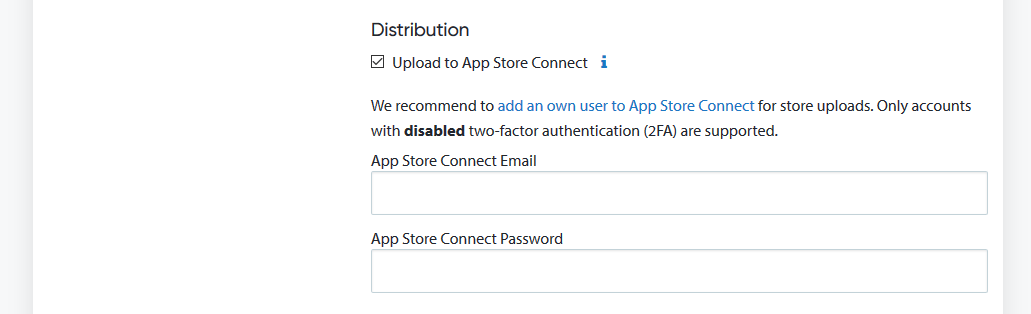
4. Configure app store uploads
Felgo Cloud Builds also allows you to upload your builds to the app stores. Then you can release them as test versions or publish updates for your users.
iOS
For iOS, it is required to provide the credentials of an App Store Connect user account. To guarantee the maximum access control for you, we recommend adding an own user to App Store Connect for Cloud Build access.
Android
In order to fully configure an app in the Google Play Store, one manual APK upload is required. Before this, the App Identifier is not set within the Play Store, and the automatic uploads of Cloud Builds cannot be matched with the store app.
To enable app store uploads on Android, you need to provide the Google Play API JSON file of your Play Store account.

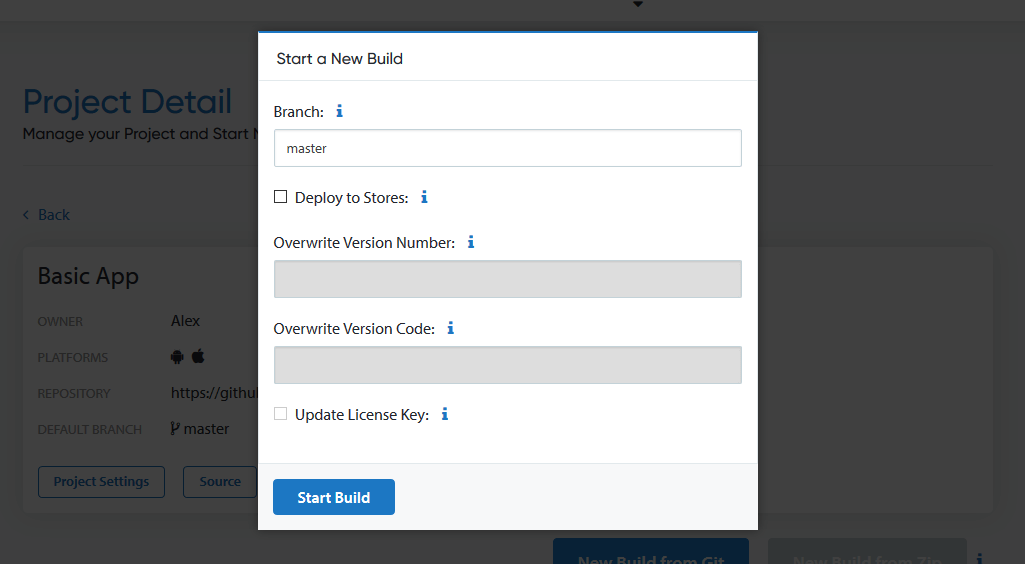
5. Build the project and grab a (quick) coffee
Now you are all set and can trigger a new build. This will only take about 5-10 minutes, depending on your configured platforms and if store deployment is enabled as well.

You can start a build using the “New Build” button. Then you can define the branch (or leave default) and enable deployment to app stores.
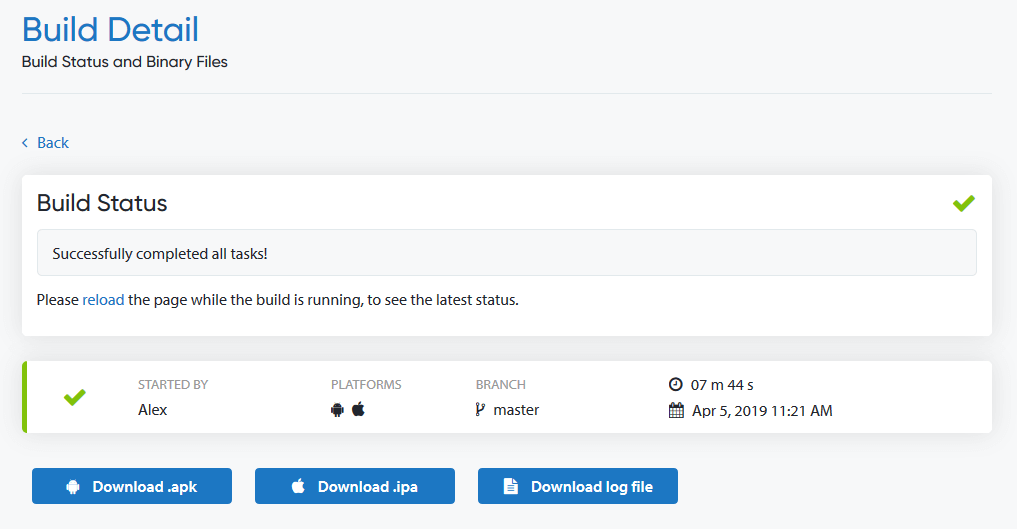
6. Download and Install Binaries
Once the build is finished you can download the binaries and test them on your devices. For iOS builds, the recommended procedure is to use automatic store deployment and to install the app using TestFlight.
7. Release Test Versions or Publish Updates
If store deployment is enabled, your new builds will appear in the configured stores. You can release them as new test versions or updates for your published apps.
Can I use Felgo Cloud Builds?
Felgo Cloud Builds is designed to work with any Qt and Felgo project. It is free to start on a fair-use policy, for any Felgo user. Just sign up for a Felgo account and you can start building.
If you require advanced options, you will soon be able to customize your builds, with settings like:
- Select Qt version
- Select Felgo version
- Select Android SDK & NDK versions
- Select Xcode version
- Integrate custom pre/post build scripts
Felgo Cloud Builds can also be hosted on-premise.
Contact us if you need early access to any of those features.
More Benefits with using Felgo
Felgo adds a lot of features on top of Qt, which you can also use with Felgo Cloud Builds.
- Auto-incrementing version codes for cloud builds
- Native UI for iOS and Android apps
- Responsive design
- Advanced mobile components and native features
- Custom UI and visual effects
- Game engine and gaming components
- Plugins for augmented reality, machine learning, monetization, analytics and many more
This might also be Interesting for You
V-Play is Now Felgo – New Release & Roadmap
QML Tutorial: How to Create Native Cross Platform Apps with Qt and Felgo | Free Udemy Course
Develop Cross-Platform Apps with Qt: Felgo Apps for iOS, Android, Desktop & Embedded


