Overview
Felgo allows local development and deployment for Embedded targets. Felgo targets Embedded devices with cross-compilation, meaning that you write and compile your code on your local development PC and then deploying
applications to the Embedded device. This allows you to run the very same app from a single source code on Desktop, mobile, the Web and Embedded.
This guide describes how to build, deploy & run Felgo apps on Embedded devices.
Felgo for Embedded supports a variety of hardware target devices that are known to work well with Qt for Device Creation, including NXP i.MX6, i.MX7 & i.MX8 boards from Toradex,
Ginzinger & others, Intel NUC, NVIDIA Tegra platform, Qualcomm Snapdragon platform, Raspberry & Arduino boards, and more.
Raspberry Pi
Felgo supports Raspberry Pi as Embedded Linux target platform. Libraries for the Raspberry Pi 3 (target) and Linux (host) are available via the MaintenanceTool for all Felgo customers on a paid plan. For other models (Pi
1/2/4/Zero) and hosts, see Other Platforms.
Support for other Embedded devices is available upon request in the Felgo Business Plan.
Add Felgo Packages for Embedded Targets
The Felgo installer only installs the packages for your desktop system initially. You can add other packages via the Maintenance Tool.
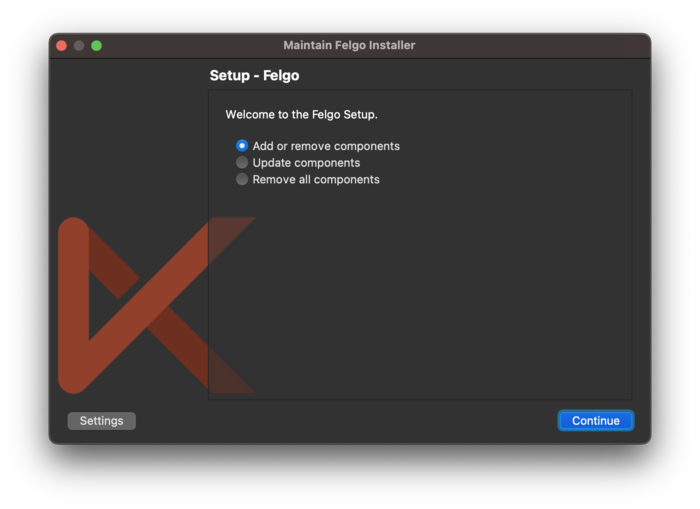
To install the packages for embedded targets you need to first add your Felgo-registered email address and password to the Maintenance Tool. The executable is located within the installation directory of your Felgo SDK and
called MaintenanceTool. Run this application and click the Settings button at the bottom-left:
Open the Repositories tab, choose the User defined repositories entry and click Add.
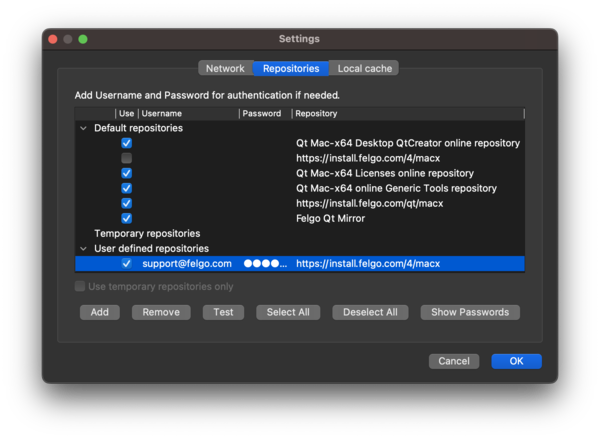
Provide your Felgo username (email) and password as shown in the above image. Set the Repository url depending on your platform:
- https://install.felgo.com/authenticated/2/windows
- https://install.felgo.com/authenticated/2/macx
- https://install.felgo.com/authenticated/2/linux
If a click on Test does not show any error everything works correctly.
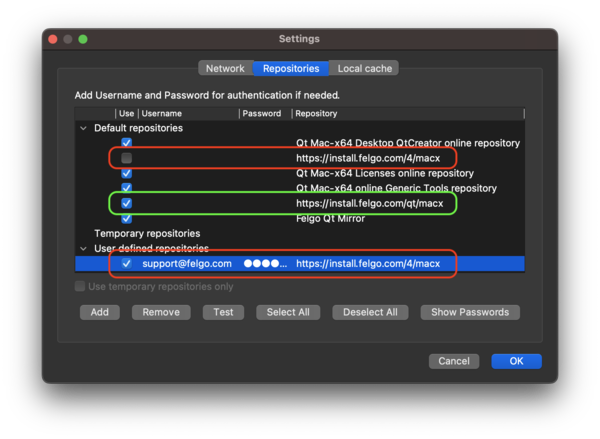
Note: In the Default repositories section, you can also disable the anonymous entry that was previously used. For example https://sdk.v-play.net/2/macx on macOS. Make sure to not
accidentally deactivate the "qt" repository!
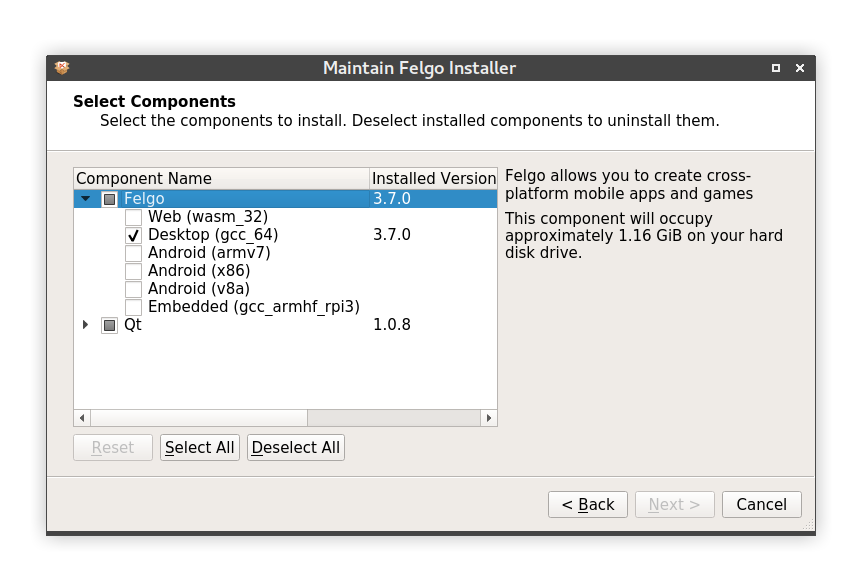
Close the settings with OK. You can now proceed with the installer. Select Add or remove components and choose the Embedded platforms you want to add:
Raspberry Pi
Setup Raspberry Pi
You need a Raspberry Pi, an SD Card (8GB or more), a power cable and peripherals of your preference (mouse/keyboard/ethernet cable/HDMI cable).
Felgo recommends using Raspberry OS (former Raspbian) as the operating system on your Raspberry device. It is the officially endorsed operating system by the company behind the Pi and at the same time the most popular
& stable OS for Raspberry Pi. Note that Raspberry Pi currently is only supported on Felgo 3.
To install Raspberry OS, follow these steps:
- Download Raspberry OS from https://www.raspberrypi.org/software/operating-systems/. You can select any of the offered download options, note that Lite
doesn't have a traditional UI shell included.
- Unpack the archive and flash the image to your SD Card. You can find more information at the official guide.
- Insert the SD Card in the Raspberry Pi and plug in peripherals & power.
- At first boot, wait until the setup process completes and then login. The default login is: username pi and password raspberry.
After installation, the flashed Raspberry Pi needs to be configured so that it can be remote-controlled over the network (i.e., by Qt Creator or your PC's terminal software). To do so, follow these steps:
Felgo SDK for Raspberry Pi
To use the Raspberry Pi target for Felgo, use the Maintenance Tool of your Felgo installation and install the components targeting your
Raspberry Pi device model (Pi 3 corresponds to Embedded gcc_armhf_rpi3).
The package contains everything you need for building & running apps for Raspberry Pi (an optimized build of Qt, the sysroot, the Linaro toolchain with GCC cross compilers and more). The installer also automatically sets up
a Qt kit in Qt Creator.
Qt and Felgo applications require additional shared library dependencies, Qt configuration and more to be runnable on a Raspberry Pi. Felgo provides a ready-to-use zip archive for deploying all dependencies to the Pi that
allows to properly run your Qt/Felgo application. You can download the zip file here. Copy the zip file FelgoLive-gcc_armhf_rpi3.zip to your Pi
and unpack it in the Raspberry Pi home folder.
# Type via SSH, or directly on a terminal on the Raspberry Pi
f=FelgoLive-gcc_armhf_rpi3.zip && curl https:
This installs the Felgo Developer App that allows browsing demos and examples. It also allows to use Felgo QML Hot Reload.
Run on Raspberry Pi with Felgo QML Hot Reload
This is the recommended way to get your application running on the Raspberry Pi in the fastest possible manner.
Follow the steps above to install the Felgo Developer App on your Raspberry Pi. You can then directly develop with QML Hot Reload on your Raspberry Pi,
without any Raspberry Pi specific installation on your PC.
Start the Felgo Developer App on your Raspberry Pi by running the following command within your PC's terminal:
ssh pi@raspberrypi.local bash FelgoLive/FelgoLiveClient.sh
Alternatively, you can also run the script directly on your Pi (using a file manager or terminal).
Click "Connect" on the Pi to connect to the Felgo Hot Reload application running on your PC.
See the Felgo Hot Reload documentation for more details.
Build and Deploy for Raspberry Pi with Qt Creator
Start Qt Creator, open your project and select the Felgo Embedded rpi Kit as Build Kit.
Note: You can select your kits after creating a new project or later by activating kits in the "Projects" tab of the Qt Creator sidebar.
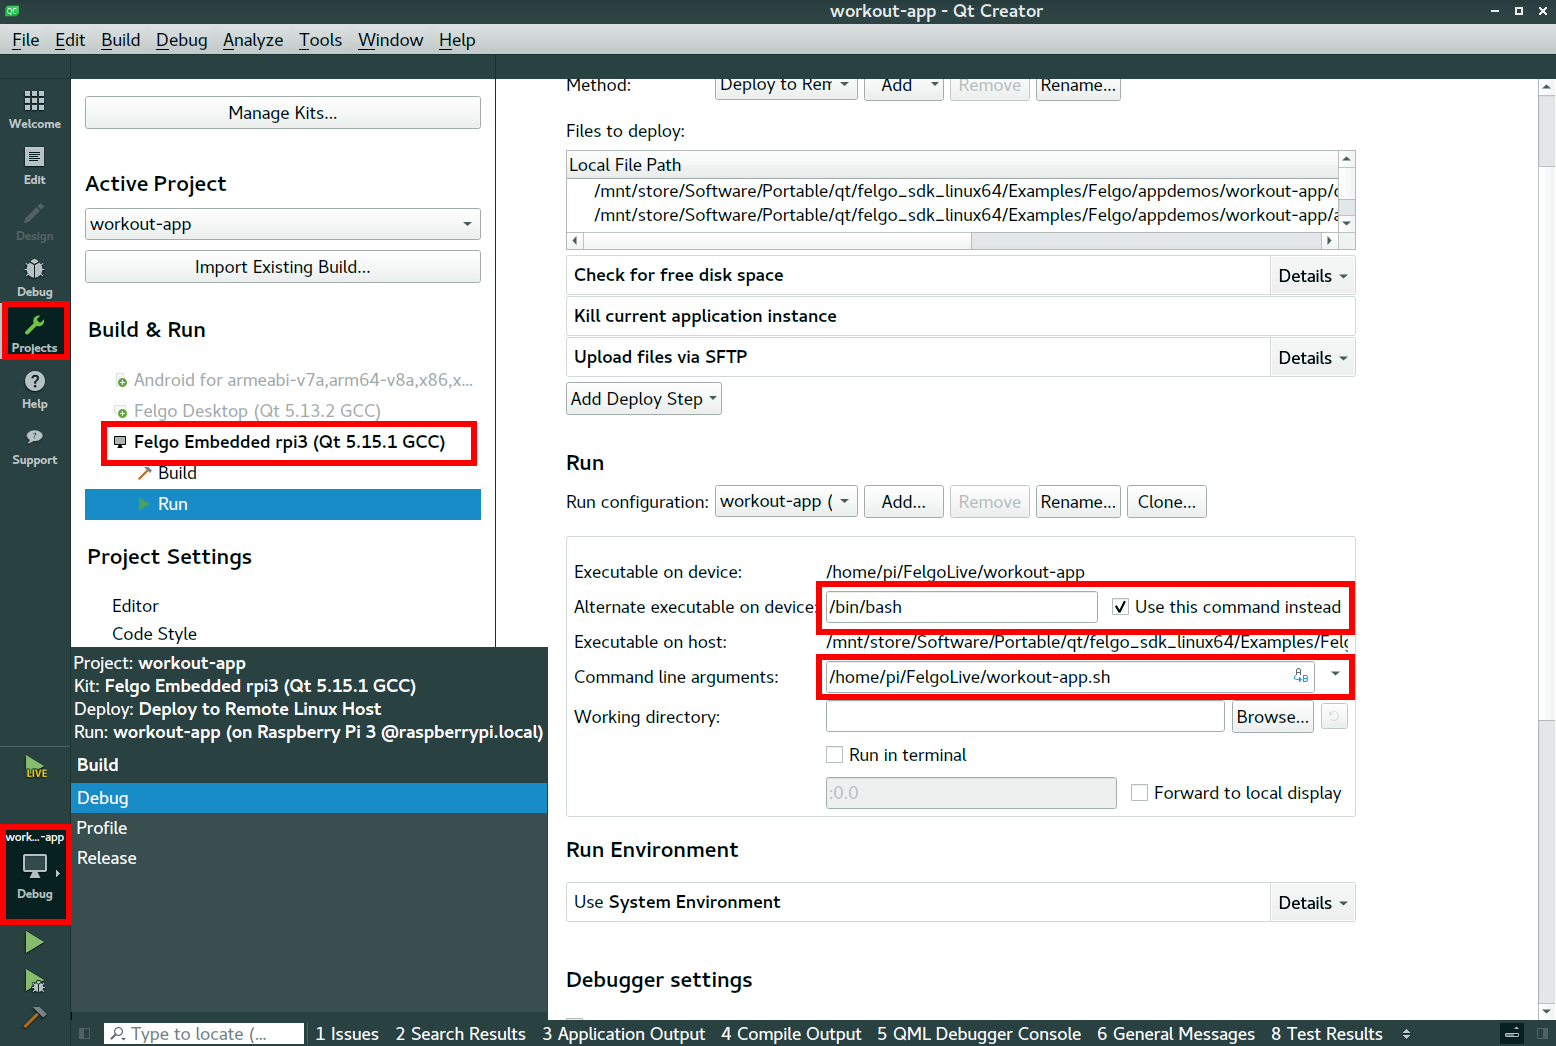
For every newly opened project, apply the following changes to the rpi Kit and its "Run" configuration:
- Check "Use this command instead"
- Enter
/bin/bash at the "Alternate executable on device"
- Enter
/home/pi/FelgoLive/<PROJECTNAME>.sh at "Command line arguments". Start with the executable file path from above and add .sh.
You also need to create the shell script at the given .sh file path. To do so, run this command on your PC's terminal:
ssh pi@raspberrypi.local cp FelgoLive/FelgoLiveClient.sh FelgoLive/workout-app.sh
This creates a copy of the starter script provided by the Qt Runtime Environment of the Felgo Developer App.
It reuses the same environment and is pre-configured to let you press start and directly run your project.
You can now develop in Qt Creator and compile and run your application on a connected Raspberry Pi by clicking Build & Run ( the green "Play" button).
Notes about Felgo for Raspberry Pi
- For proper hardware acceleration, the application needs to be executed with the EGLFS platform plugin.
If an X server is running (default in the "Desktop" Raspberry OS images), the "xcb" platform plugin will get loaded.
If there is no X server running (default in the "Lite" Raspberry OS image), the .sh starter script will automatically launch
with EGLFS.
You can manually specify the platform plugin by modification of the starter script.
- Video playback requires hardware acceleration.
- Audio playback requires a running PulseAudio server. On Raspbian OS "Desktop images" downloaded after December 2020, PulseAudio is pre-configured.


