NativeUtils
The NativeUtils singleton allows opening native message boxes, input dialogs and browsers. More...
| Import Statement: |
import Felgo 4.0 |
Properties
Signals
Methods
- bool clearKeychainValue(string identifier)
- string deviceManufacturer()
- string deviceModel()
- void displayAlertDialog(string title, string description, string okButtonTitle, string
cancelButtonTitle)
- void displayAlertSheet(string title, stringlist items, bool cancelable)
- void displayCameraPicker()
- void displayDatePicker(date initialDate, date minDate, date maxDate)
- void displayFilePicker(string title, string path, string filter, string selectedFilter, bool
selectMultiple)
- void displayImagePicker(string title)
- void displayMessageBox(string title, string description, int buttons)
- void displayTextInput(string title, string description, string placeholder, string text, string
okButtonTitle, string cancelButtonTitle)
- void fetchGalleryPhotos()
- void getCachedAssetPath(string id, var jsCallback)
- string getConnectionType()
- string getKeychainValue(string identifier)
- string getPhoneCountryIso()
- bool isNfcAvailable()
- bool openApp(string launchParam)
- bool openUrl(string urlString)
- void sendEmail(string to, string subject, string message)
- bool setKeychainValue(string identifier, string value)
- void setStatusBarStyle(style)
- void share(string text, string url)
- void startNfcNdefSession(string message)
- int statusBarHeight()
- void stopNfcNdefSession()
- bool storeContacts(string vCard)
- void vibrate()
Detailed Description
This object is available as a singleton from all QML components when Felgo is imported via import Felgo. It is accessible with the name NativeUtils. It allows to
open platform-specific widgets for displaying message boxes and input dialogs. These elements have the same style as other dialogs of the platform. You can use it as a convenience, when designing custom dialogs matching your
game's UI is not desired.
It also allows to open the browser on the mobile and desktop platforms with openUrl().
Note: This type is now available as a QML singleton type as of Felgo 4.0.0. Use it with the upper-case name instead of the lower-case context property name.
Example Usages
The following example shows a message box with 2 buttons to check if the app should be quit when the back key is pressed or when pressed on the quit button. When the Open Felgo Website button is
clicked, the Felgo website is opened in the default external browser application of the system.
MessageBox and Opening URL with System Browser
import Felgo
import QtQuick
GameWindow {
Scene {
SimpleButton {
text: "Quit app"
onClicked: openMessageBoxWithQuitQuestion()
}
focus: true
Keys.onBackButtonPressed: openMessageBoxWithQuitQuestion()
SimpleButton {
text: "Open Felgo Website"
onClicked: NativeUtils.openUrl("https://felgo.com")
}
}
Connections {
target: NativeUtils
onMessageBoxFinished: {
console.debug("the user confirmed the Ok/Cancel dialog with:", accepted)
if(accepted)
Qt.quit()
}
}
function openMessageBoxWithQuitQuestion() {
NativeUtils.displayMessageBox(qsTr("Really quit the game?"), "", 2);
}
}
This example shows how to query user input and to save it in a Text element.
import Felgo
import QtQuick
GameWindow {
Scene {
id: scene
property string userName: "My Username"
SimpleButton {
text: "Enter User Name"
onClicked: NativeUtils.displayTextInput("Your user name:", "", "", scene.userName);
}
}
Connections {
target: NativeUtils
onTextInputFinished: (accepted, enteredText) => {
if(accepted) {
scene.userName = enteredText;
console.log("Entered userName:", scene.userName);
}
}
}
}
Note: If you have multiple sources where you could start MessageBoxes or InputDialogs, you need to store which source started the MessageBox or InputDialog in a property.
Otherwise you would not know which source originated the NativeUtils call. In a future SDK version, the MessageBox and InputDialog will be available as own QML items, which makes this
workaround obsolete. To accelerate this integration, please contact us so we know you would need this feature urgently.
Take a Screenshot and Share it
This example shows how to take a screenshot of the current screen and store it in a temporary folder on the device. See FileUtils for more information.
That image can then be shared with other apps using the share() method. Additionally, the screenshot it displayed using the AppImage
component.
 import Felgo
 import QtQuick

 App {
   id: app

   property url imageUrl: ""

   NavigationStack {
     id: stack

     AppPage {
       title: "Share screenshot"

       Column {
         anchors.fill: parent

         AppButton {
           text: "Take screenshot"
           onClicked: stack.grabToImage(function(result) {
             var fileName = "Image" + new Date().getTime() + ".png"
             var filePath = FileUtils.storageLocation(FileUtils.TempLocation, fileName)

             result.saveToFile(filePath)

             app.imageUrl = FileUtils.getUrlByAddingSchemeToFilename(filePath)
           })
         }

         AppImage {
           id: resultImage
           width: app.width - dp(40)
           x: dp(20)
           height: dp(200)
           fillMode: Image.PreserveAspectFit
           autoTransform: true

           source: app.imageUrl
         }

         AppButton {
           text: "Share image"
           onClicked: NativeUtils.share("Image from Felgo", app.imageUrl)
         }
       }
     }
   }
 }
How do I build my own custom native integrations?
In Felgo you code with QML, so going native first means to step into the Qt C++ world. You can find a guide how to mix Felgo QML code with Qt C++ components here: How to Expose a Qt C++ Class with Signals and Slots to QML
The demo is also available with the Felgo SDK: <Path to Felgo>/Examples/Felgo/appdemos/cpp-qml-integration
Working with your native Android code from C++ then requires JNI as the bridge between the two languages. Weaving in native iOS code is a little easier, as Objective-C is directly compatible with C++. But before you dive in
too deep: Our developers are experts at building such native integrations, and we're happy to add features or build extensions as part of our support package offering!
More Frequently Asked Development Questions
Find more examples for frequently asked development questions and important concepts in the following guides:
Property Documentation
Returns the connection type of the current device. The connection type can be one of the following:
none: Device is offline2g: Device has 2G network connectivity3g: Device has 3G network connectivity4g: Device has 4G network connectivity5g: Device has 5G network connectivitycellular: Device has any kind of cellular network connectivity. Only set if the specific connectivity could not be determined.wifi: Device has a WiFi network connectivityunknown: Connection type can not be determined (default on all unsupported platforms)
The property tells about the actual network connectivity that is available from the device, it does not tell if a specific server or endpoint is reachable from the current network.
import Felgo
import QtQuick
App {
id: app
AppPage {
AppText {
anchors.centerIn: parent
text: "App is online: " + app.isOnline + " with connection: " + NativeUtils.connectionType
}
}
}
Note: This property is only supported on Android and iOS. The property is unknown on all other platforms.
This property was introduced in Felgo 3.10.0.
See also getConnectionType().
Contains a list of all contacts including name and all phone numbers per contact. This property is only supported on Android and iOS.
On iOS, it is required to add an NSContactsUsageDescription entry to your Project-Info.plist:
 <key>NSContactsUsageDescription</key>
 <string>App would like to read contacts from the Addressbook.</string>
On Android, it is required to add the READ_CONTACTS permission to your AndroidManifest.xml:
<uses-permission android:name="android.permission.READ_CONTACTS"/>
Note: If your targetSdkVersion in AndroidManifest.xml is 23 or higher, it asks the user for the permission on first use. At this point, this property
contains an empty list of contacts. Once the user accepted the permission, it contains the actual contacts. You can use property bindings to automatically update your QML logic.
The property contains a JSON array with objects containing the following keys:
name: The contact's full name as a string. Includes first and last name.company: The contact's company name as a string.phoneNumbers: A JSON array with each of the contact's phone numbers as a string.phoneNumbersDetails: A JSON array with details about each of the contact's phone numbers as a JSON object. Each entry in the list contains the keys label and
value.emailAddresses: A JSON array with each of the contact's email addresses as a string.addresses: A JSON array with each of the contact's addresses as a JSON object. Each entry in the list contains keys for the address details, like Country,
City, Street, and ZIP.
Example for the data contained in contacts:
 [
   {
     name: "Kate Bell",
     company: "Microsoft",
     phoneNumbers: [ "(555) 564-8582", "(555) 524-7213" ]
     phoneNumbersDetails: [
       { "label": "Work", "value": "(555) 564-8582" },
       { "label": "Home", "value": "(555) 524-7213" }
     ]
     addresses: [
       { "Country": "USA", "City": "Redmond", "State": "WA", "Street": "One Microsoft Way", "ZIP": "12345-1234" }
     ],
     emailAddresses: [ "k.bell@microsoft.at", "k.bell@gmail.com" ]
   },
   {
     name: "Daniel Higgins",
     phoneNumbers: ["555-478-7672"]
   },
   ...
 ]
Use this example code to show all contacts with name and all attached phone numbers:
import Felgo
App {
AppPage {
AppListView {
anchors.fill: parent
model: NativeUtils.contacts
delegate: SimpleRow {
text: modelData.name
detailText: modelData.phoneNumbers.join(", ")
}
}
}
}
You can also use the property contacts to retrieve just the first phone number stored per contact.
Note: The phone numbers are returned in the format as they are stored in the address book by the user. To normalize phone numbers, you can use the country code of the device's own phone number and replace the starting 0 with the device's country code.
See also contacts, phoneNumber, getPhoneCountryIso(), and storeContacts().
|
displaySleepEnabled : bool
|
Set this property to true to allow devices to go into a "sleep" state where the screen dims after a specific period of time without any user input. The default value is true for app development, and false for games.
Note: The default value is applied during the app theme initialization. Use the App::initTheme signal to configure your own setting at app startup when the theme is
ready.
Contains a list of photos that are retrieved from the gallery or camera roll on iOS and Android. To populate (or reload) the list, call NativeUtils::fetchGalleryPhotos() initially.
The returned list consists of objects with an ID and a path to the photo. It also contains a path to a pre-cached image thumbnail, if available:
var photo = NativeUtils.galleryPhotos[0]
var photoId = photo.id
var photoPath = photo.assetPath
var thumbnailPath = photo.thumbnailPath
Note: On Android 10+, the assetPath entry will be a content:// URI instead of a file:// URI. This is required in order to support
the scoped storage enforcement in Android 11. You can use this URI anywhere a file URI is expected in QML. Read more about the changes in the Android
docs. Scoped storage is only supported when building with Qt 5.15+. In case you use a lower Qt version, the paths will still use legacy external storage. On Android 10, you can add <application
android:requestLegacyExternalStorage="true" ...> to your AndroidManifest.xml to support this. Thus it will no longer work on Android 11+ if you are using an older Qt version than
5.15.
The path is a reference to the image and can be used as source property of an AppImage item. To get an absolute file path reference for further actions outside of your code, you can use NativeUtils::getCachedAssetPath():
var photo = NativeUtils.galleryPhotos[0]
NativeUtils.getCachedAssetPath(photo.id, function(success, filePath) {
})
On iOS, it is required to add an NSPhotoLibraryUsageDescription entry to your Project-Info.plist:
 <key>NSPhotoLibraryUsageDescription</key>
 <string>App would like to access the library.</string>
On Android, it is required to add a permission to your AndroidManifest.xml.
If your targetSdkVersion is 33 or higher (Android 13+), use READ_MEDIA_IMAGES. If targetting older SDKs, use READ_EXTERNAL_STORAGE. You
can also add both to the manifest. At runtime, it automatically requests the one fitting your target and runtime version.
 <uses-permission android:name="android.permission.READ_MEDIA_IMAGES" />
 <uses-permission android:name="android.permission.READ_EXTERNAL_STORAGE" />
Note: If your targetSdkVersion in AndroidManifest.xml is 23 or higher, it asks the user for the permission on first use. At this point, this property
contains an empty list of photos. Once the user accepted the permission, it contains the file paths of the photos.
Note: This function is not implemented on desktop systems and WebAssembly.
The ImagePicker component uses the galleryPhotos to show a default view that allows picking multiple images. You can also create your own gallery and use the property as a model for
your views:
import Felgo
import QtQuick
App {
AppPage {
Component.onCompleted: NativeUtils.fetchGalleryPhotos()
AppListView {
anchors.fill: parent
model: NativeUtils.galleryPhotos
delegate: AppImage {
width: parent.width
height: width
fillMode: Image.PreserveAspectCrop
source: modelData.assetPath
}
}
}
}
See also fetchGalleryPhotos.
Contains the mobile device's phone number, if available. It might not be available if the user is not registered to a network or if the network does not provide this information. The property value is a string containing
the number, for example "+11234567", or an empty string "", if not available.
If your app or game has a functionality that needs the user's phone number and this method can not provide it, you can ask your user to enter his or her phone number using a displayTextInput().
This property is only supported on Android, as it is not possible to access the device phone number on iOS. On Android, it is required to add the READ_PHONE_STATE or READ_SMS permission to your AndroidManifest.xml:
<uses-permission android:name="android.permission.READ_PHONE_STATE"/>
Note: If your targetSdkVersion in AndroidManifest.xml is 23 or higher, it asks the user for the permission on first use. At this point, this property
contains an empty string. Once the user accepted the permission, it contains the actual phone number. You can use property bindings to automatically update your QML logic.
See also getPhoneCountryIso(), contacts, and storeContacts().
|
preferredScreenOrientation : int
|
Defines the preferred orientation of the screen.
The orientation of the screen on mobile devices can be either portrait or landscape. It can be set to a fixed value or controlled by the device's orientation sensor.
You can define your app's preferred orientation in AndroidManifest.xml on Android and Project-Info.plist on iOS. Setting this property allows to override the setting
at any time during runtime.
Following NativeUtils.ScreenOrientation enumeration values are available:
NativeUtils.ScreenOrientationDefault: Do not override the orientation and use the one set in AndroidManifest.xml and Project-Info.plist.NativeUtils.ScreenOrientationUnspecified: Specifies that any orientation is allowed, depending on device configuration and sensor orientation.NativeUtils.ScreenOrientationSensor: Specifies that the orientation should be determined based on device sensors.NativeUtils.ScreenOrientationPortrait: Specifies that portrait orientation should be used. Based on device configuration and sensors, either regular or upside-down portrait may be used.NativeUtils.ScreenOrientationLandscape: Specifies that landscape orientation should be used. Based on device configuration and sensors, either left or right landscape may be used.
This is useful if different screens within your app or game should use different screen orientation. E.g. to set a preferred orientation during runtime and reset it to the default value, you can use the following code
snippet:
Column {
AppButton {
text: "Lock to portrait"
onClicked: NativeUtils.preferredScreenOrientation = NativeUtils.ScreenOrientationPortrait
}
AppButton {
text: "Lock to landscape"
onClicked: NativeUtils.preferredScreenOrientation = NativeUtils.ScreenOrientationLandscape
}
AppButton {
text: "Use sensor orientation"
onClicked: NativeUtils.preferredScreenOrientation = NativeUtils.ScreenOrientationSensor
}
AppButton {
text: "Reset to default orientation"
onClicked: NativeUtils.preferredScreenOrientation = NativeUtils.ScreenOrientationDefault
}
}
Sometimes it is also useful to use fixed orientation depending on some property of your game state. In this case, NativeUtils.preferredScreenOrientation can be bound using property bindings with
the Binding item:
Binding {
target: NativeUtils
property: "preferredScreenOrientation"
value: usePortraitMode ? NativeUtils.ScreenOrientationPortrait : NativeUtils.ScreenOrientationDefault
}
To switch back to the original screen orientation, set preferredScreenOrientation to NativeUtils.ScreenOrientationDefault.
If you use Felgo Apps components, you can also define a preferred screen orientation for pages inside a NavigationStack: Just assign AppPage::preferredScreenOrientation for each page you want to push with NavigationStack::push().
Note: This property only has an effect on mobile platforms.
You can use NativeUtils::screenOrientation to find out the current orientation of the screen.
The default value for this property is NativeUtils.ScreenOrientationDefault.
This property was introduced in Felgo 2.16.0.
See also NativeUtils::screenOrientation and AppPage::preferredScreenOrientation.
On modern devices like the iPhone X, some parts of the screen are covered by native device overlays and buttons. When creating user interfaces for such devices, it may be necessary to adapt the app layout based on the
inset to the border of the screen.

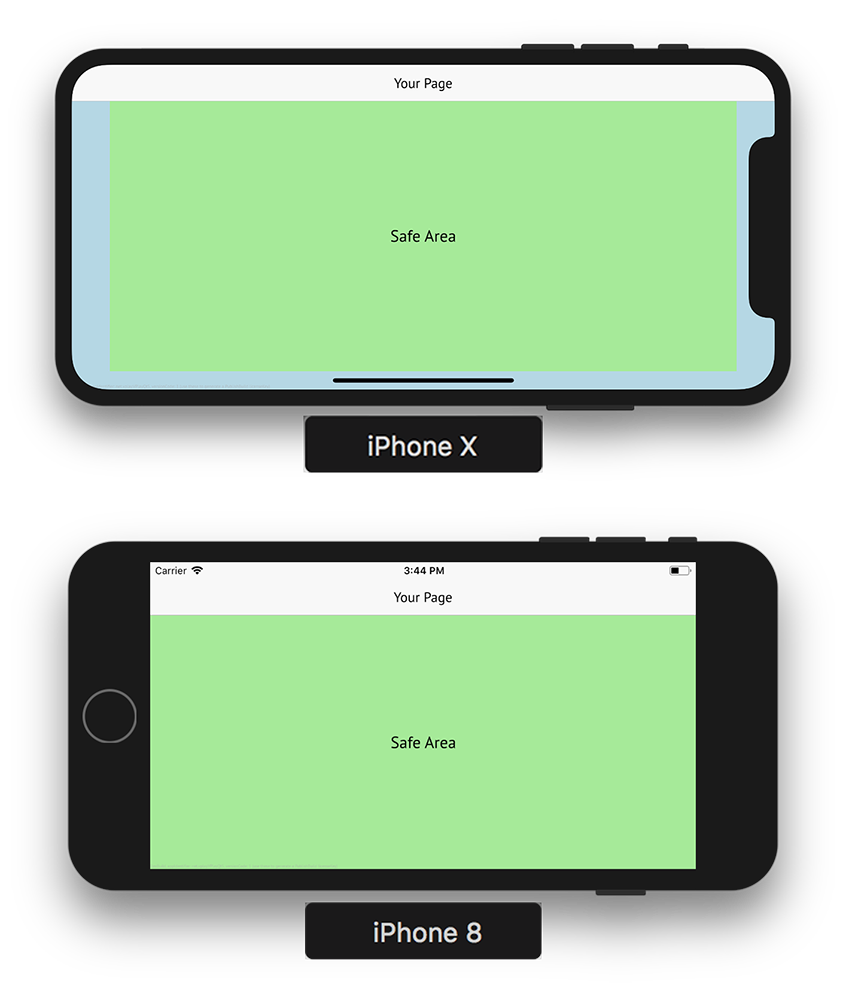
This property holds the pixel inset at the left, top, right and bottom of the screen, which you can access with:
The returned pixel value directly reflects the inset for the safe area of the screen. It is not required to apply App::dp() when used.
This property was introduced in Felgo 2.16.0.
Defines the app or game's behavior when a soft keyboard is open.
Certain Felgo components open a soft keyboard on mobile devices when in focus. Such components include AppTextInput, AppTextField and AppTextEdit.
When the soft keyboard opens, the app or game adjusts its content accordingly. Felgo supports multiple modes of behavior for this.
Following NativeUtils.SoftInputMode enumeration values are available:
NativeUtils.SoftInputModeUnspecified: Specifies no soft input mode and lets the underlying mobile platform decide.NativeUtils.SoftInputModeAdjustPan: The content view moves upwards with the height of the soft keyboard.NativeUtils.SoftInputModeAdjustResize: The content view resizes to the remaining screen area.NativeUtils.SoftInputModeAdjustNothing: The content view does not adjust with the soft keyboard. This means that the soft keyboard might hide the view that opened it.
The default value of this property is the NativeUtils.SoftInputModeUnspecified.
Setting a different mode is useful for advanced apps that customize the soft keyboard behavior. You can access the keyboard's properties with Qt::inputMethod. For example, if Qt.inputMethod.visible is true, you can add additional padding to your user interface based on Qt.inputMethod.keyboardRectangle.height.
Note: This property is only supported on Android and iOS. On other platforms, the soft keyboard's behavior cannot be changed.
Note: On iOS, the NativeUtils.SoftInputModeAdjustResize is not supported. Setting it will result in the same behavior as NativeUtils.SoftInputModeAdjustNothing.
Note: On Android, fullscreen apps will never resize, even when using the NativeUtils.SoftInputModeAdjustResize mode. Felgo apps are fullscreen with a translucent status bar per default.
If you need automatic resizing, set your app to be in windowed mode. The best way to do this is to use setStatusBarStyle() with NativeUtils.StatusBarStyleSystem. If you use the App components, you can also switch it with ThemeColors::statusBarStyle.
The below shows an example usage:
import Felgo
App {
onInitTheme: {
Theme.colors.statusBarStyle = Theme.colors.statusBarStyleSystem
NativeUtils.softInputMode = NativeUtils.SoftInputModeAdjustResize
}
}
Note: On Android, the keyboard's dimensions are not available with the NativeUtils.SoftInputModeAdjustNothing. In this case, Qt.inputMethod.keyboardRectangle
will contain a width and height of 0. This is a limitation of the operating system. Use NativeUtils.SoftInputModeAdjustResize for apps that require customized keyboard handling and make use of
the keyboard's dimensions. When using fullscreen with translucent status bar, your app will not resize as stated above, but the keyboard dimensions are still available.
Note: On Android, text fields inside a WebView only support the NativeUtils.SoftInputModeAdjustResize
mode. Thus if you use a WebView in your app or game, you can set this mode. You can set it at app start, or temporarily while the WebView is showing.
Note: On Android, you can also define this property in android/AndroidManifest.xml. It corresponds to the android:windowSoftInputMode attribute on the <activity> tag. Changing this property at runtime overrides the
setting defined in the manifest.
On Android, this means the value set in AndroidManifest.xml is still active.
This property was introduced in Felgo 3.3.0.
Signal Documentation
|
alertDialogFinished(bool accepted)
|
This signal gets emitted after the alert dialog initiated with displayAlertDialog() gets dismissed by the user. If accepted is true, the
user confirmed the dialog by pressing the OK button. If accepted is false, the user either pressed the Cancel button, or on Android either pressed the back button or touched outside of the dialog.
Note: The corresponding handler is onAlertDialogFinished.
|
alertSheetFinished(int index)
|
This signal gets emitted after the alert sheet initiated with displayAlertSheet() is finished by the user. The parameter index holds the
selected option or -1 if canceled.
Note: The corresponding handler is onAlertSheetFinished.
This signal gets emitted after the dialog initiated with displayCameraPicker() is finished by the user. If accepted is true, the user
selected an image. The parameter path holds the path to the selected image or an empty string if canceled.
Note: The corresponding handler is onCameraPickerFinished.
|
datePickerFinished(bool accepted, date date)
|
This signal gets emitted after the dialog initiated with displayDatePicker() is finished by the user. If accepted is true, the user
pressed the OK button after selecting a date. The parameter date holds the year, month and day of month of the selected date.
Note: The corresponding handler is onDatePickerFinished.
|
filePickerFinished(bool
accepted, var files)
|
This signal gets emitted after the dialog initiated with displayFilePicker() is finished by the user. If accepted is true, the user
selected one or more files. The parameter files holds a list of the file paths.
Note: The corresponding handler is onFilePickerFinished.
This signal was introduced in Felgo 3.10.0.
This signal gets emitted after the dialog initiated with displayImagePicker() is finished by the user. If accepted is true, the user
selected an image. The parameter path holds the path to the selected image or an empty string if canceled.
Note: The corresponding handler is onImagePickerFinished.
|
messageBoxFinished(bool accepted)
|
This signal gets emitted after the MessageBox dialog initiated with displayMessageBox() gets dismissed by the user. If accepted is true,
the user confirmed the MessageBox by pressing the OK button. If accepted is false, the user either pressed the Cancel button, or on Android either pressed the back button or touched outside of the
dialog.
Note: The corresponding handler is onMessageBoxFinished.
Emitted if an NFC tag with an NDEF payload format was scanned successfully.
The optional tagId is set on supported tag types, otherwise empty. The tagId is a HEX represenation of the tag identifier.
The optional payload is the first payload that gets detected on a tag, if available. Otherwise it is empty.
On iOS, the NFC session gets closed automatically after a successful detection and needs to be restarted manually with startNfcNdefSession().
See startNfcNdefSession() for an example.
Note: NFC is only supported on Android and iOS 13.0 and above.
Note: The corresponding handler is onNfcNdefPayloadDetected.
This signal was introduced in Felgo 3.10.0.
See also nfcSessionActive, isNfcAvailable(), startNfcNdefSession(), stopNfcNdefSession(), and nfcNdefError.
|
statusBarHeightChanged(real height)
|
Gets emitted as soon as the height of the statusbar changes.
This can happen on some devices when for example a call is accepted or finished, or when the display orientation changes.
Note: The corresponding handler is onStatusBarHeightChanged.
|
textInputFinished(bool accepted, string enteredText)
|
This signal gets emitted after the input dialog initiated with displayTextInput() is finished by the user. If accepted is true, the user
confirmed the text input by pressing the OK button. The text input is then stored in enteredText. If accepted is false, the user either pressed the Cancel button, or on Android
either pressed the back button or touched outside of the dialog.
Note: The corresponding handler is onTextInputFinished.
Method Documentation
Delete a value based on a given identifier from the native Keychain on the device.
Here is an example how to delete a Keychain item:
NativeUtils.clearKeychainValue("identifier")
Note: The keychain is only implemented on iOS and Android, on all other platforms the function uses unencrypted QSettings as fallback.
Returns result
See also getKeychainValue() and setKeychainValue().
Returns a string representing the manufacturer name of iOS and Android devices, e.g. Samsung, LG or Apple. Returns unknown on all other platforms.
See also deviceModel().
Returns the model identifier string of iOS and Android devices. Returns unknown on other platforms.
Note: The identifier does not necessarily match the device name. For example, the model iPhone8,2 represents the iPhone 6s Plus, whereas SM-G925F is the
identifier for the Galaxy S6 Edge. You can have a look at websites like https://www.theiphonewiki.com/wiki/Models or http://samsung-updates.com to see which model identifier belongs to which device.
See also deviceManufacturer().
Displays a native alert dialog with a given title, an optional description that can provide more details, an OK button and an optional Cancel button.
By default, the additional dialog description is an empty string and okButtonTitle is set to "OK", so only an OK button is displayed. Set the cancelButtonTitle to also allow the cancel option.
In comparison to displayMessageBox(), displayAlertDialog() allows to localize the button titles. E.g. to show a dialog with localized buttons, call
NativeUtils.displayAlertDialog(qsTr("Title"), qsTr("Description"), qsTr("OK"), qsTr("Cancel"))
and provide your localizations in a language resource file or provide the strings for your specific language hardcoded.
To receive the result of the user input, use the Connections element and the alertDialogFinished signal handler like demonstrated in MessageBox and Opening URL with System Browser.
Note: To show a more advanced native-looking dialog, use the MessageDialog.
See also alertDialogFinished().
|
void displayAlertSheet(string title, stringlist items, bool cancelable)
|
Displays a modal alert sheet with the specific options. It uses an AlertDialog on Android and a UIActionSheet on iOS.
The native dialog shows the title and offers the specified items as options. The parameter cancelable decides whether the user can cancel the dialog or is
forced to choose an option.
See also alertSheetFinished().
|
void displayCameraPicker()
|
Allows to take a photo by starting the native camera, if available.
It copies the new photo to the app's private storage folder. It uses the FileUtils.AppDataLocation. For more info see Storage Location. You
can access the file path in cameraPickerFinished().
Note: On iOS, the FileUtils.AppDataLocation changes when the app gets updated. To persist the images returned from this method, it is recommended to store only the file name using
FileUtils::cropPathAndKeepFilename(). To get the actual file name back, use FileUtils::storageLocation() with FileUtils.AppDataLocation.
Note: To store files to FileUtils.AppDataLocation on Android, add the following line to android/res/xml/file_paths.xml:
<files-path name="files" path="."/>
If you are developing for iOS, please make sure to include descriptions for the camera usage and for storing photos to your ios/Project-Info.plist configuration, for example:
 <key>NSCameraUsageDescription</key>
 <string>Take photos for the user profile.</string>
 <key>NSPhotoLibraryAddUsageDescription</key>
 <string>App would like to save photos in your library.</string>
If you are developing for Android, no special permissions are needed for this function on current Android versions. If you plan to support Android 4.3 (API level 18) and lower however, you need to declare the permission
for external storage in AndroidManifest.xml:
 <manifest ...>
   ...

   <uses-permission android:name="android.permission.WRITE_EXTERNAL_STORAGE"
                    android:maxSdkVersion="18" />

 </manifest>
Note: When displaying images taken with the device camera, they might be shown incorrectly rotated. Activate AppImage::autoTransform to also consider the orientation of the shot and show the image correctly.
See also cameraPickerFinished().
|
void displayDatePicker(date initialDate, date minDate, date
maxDate)
|
Allows to choose a date from a calendar by displaying a native date picker dialog, if available.
The parameters allow detailed control over the selectable dates. The first parameter, initialDate, specifies the date selected when the date picker is opened. The second parameter, minDate, and the third parameter, maxDate, specify the range of selectable dates. It is also possible to omit all three parameters, or to only specify the initialDate.
Example calls:
NativeUtils.displayDatePicker()
NativeUtils.displayDatePicker("2018-02-09")
NativeUtils.displayDatePicker("2018-02-09", "2018-01-01", "2018-02-28")
See also datePickerFinished().
Displays a native file picker control. Different features are supported depending on the platform. The parameters are optional and match the QFileDialog::getOpenFileName capabilities:
- title - Caption text of the dialog.
- path - Base path for the file picker.
- filter - Adds filter options for certain file types.
- selectedFilter - The initially selected filter option.
- selectMultiple - If multiple files can be selected.
Note: The Android platform uses ContentProvider URIs and requires native APIs for working with the file storage. The displayFilePicker method thus copies the chosen files to the apps cache directory. This allows
you to directly access the selected files for further processing.
This method was introduced in Felgo 3.10.0.
See also filePickerFinished().
|
void displayImagePicker(string title)
|
Allows to choose a photo from the device by displaying the native image picker, if available. The title parameter specifies the title of the picker dialog.
It copies the chosen photo to the app's private storage folder. It uses the FileUtils.AppDataLocation. For more info see Storage Location.
You can access the file path in imagePickerFinished().
Note: On iOS, the FileUtils.AppDataLocation changes when the app gets updated. To persist the images returned from this method, it is recommended to store only the file name using
FileUtils::cropPathAndKeepFilename(). To get the actual file name back, use FileUtils::storageLocation() with FileUtils.AppDataLocation.
Note: To store files to FileUtils.AppDataLocation on Android, add the following line to android/res/xml/file_paths.xml:
<files-path name="files" path="."/>
Note: If you want to select multiple images, or display the image picker inline in you app, you can use the ImagePicker QML component.
If you are developing for iOS, please make sure to include an entry about the photo library usage description to your ios/Project-Info.plist configuration, for example:
 <key>NSPhotoLibraryUsageDescription</key>
 <string>Select pictures for the user profile.</string>
Note: When displaying images taken with the device camera, they might be shown incorrectly rotated. Activate AppImage::autoTransform to also consider the orientation of the shot and show the image correctly.
See also imagePickerFinished().
Displays a native-looking message box dialog with a given title, an optional description that can provide more details, an OK button and an optional Cancel button. By default,
the additional dialog description is an empty string and buttons is set to 1, so only an OK button is displayed. To also add a Cancel button, call the following: NativeUtils.displayMessageBox("Really Quit?", "", 2).
To receive the result of the user input, use the Connections element and the messageBoxFinished signal handler like demonstrated in MessageBox and Opening URL with System Browser.
Note: To show a more advanced native-looking dialog, use the MessageDialog.
See also messageBoxFinished().
Displays a native-looking message input dialog with a given title, a description that can provide more details, a placeholder that is displayed as long as
the input field is empty (optional) and a prefilled text. The dialog also provides an OK and a Cancel button, which can optionally be localized with okButtonTitle and cancelButtonTitle.
The signal textInputFinished gets emitted after the user dismisses the dialog. Use the Connections element to receive the result of textInputFinished like explained in User Input With Native Dialog.
Note: For custom text input dialogs, use the TextInput component from the QtQuick module.
See also textInputFinished().
|
void fetchGalleryPhotos()
|
Fetches photos from the device gallery or camera roll and makes them available with NativeUtils::galleryPhotos. This is also used internally to populate the ImagePicker, a component to select multiple Images from the device gallery.
See also galleryPhotos.
|
void getCachedAssetPath(string id, var jsCallback)
|
Requests an absolute file path (cached file) to the asset with the given id and returns it within the callback. The jsCallback function receives a success flag and the filePath for the requested asset:
var photo = NativeUtils.galleryPhotos[0]
NativeUtils.getCachedAssetPath(photo.id, function(success, filePath) {
})
Using this method is necessary if you want to use an image retrieved from NativeUtils::galleryPhotos because the given path might be a virtual reference to an image
from the device's gallery and not an absolute file path already (e.g. if displaying images from iCloud on iOS).
This function is also used internally to populate the ImagePicker, a component to select multiple Images from the device gallery.
Note: This function is not implemented on desktop systems and WebAssembly.
See also galleryPhotos.
Synchronously queries and returns the current connection type from the device. If you want to use the current connection type with a binding, have a look at connectionType. For a description of possible values, see connectionType.
Note: This method is only supported on Android and iOS. The return value is unknown on all other platforms.
This method was introduced in Felgo 3.10.0.
See also connectionType.
Read a value based on a given identifier from the native Keychain on the device.
Here is an example how to read a Keychain value:
NativeUtils.getKeychainValue("identifier", "value")
Note: The keychain is only implemented on iOS and Android, on all other platforms the function uses unencrypted QSettings as fallback.
See also setKeychainValue() and clearKeychainValue().
Returns the country code string according to ISO 3166-1 of your mobile device's SIM card, if available. It might not be available if, for example, there is no SIM card inserted into the device. The return value is a string
representing this country, for example "us", or an empty string "", if not available.
This method is only supported on Android, as it is not possible to access the device phone status on iOS. On Android, it is required to add the READ_PHONE_STATE or READ_SMS permission to your AndroidManifest.xml:
<uses-permission android:name="android.permission.READ_PHONE_STATE"/>
See also phoneNumber, contacts, and storeContacts().
Tries to launch an app identified by launchParam on the device. The required parameter value depends on the platform. For Android, the app's package identifier should be passed. On iOS, apps can only
be launched by passing url-schemes.
The method returns true if the app could be launched, false otherwise.
The following code snippet launches the Facebook app on iOS or Android if possible:
var launchParam = system.isPlatform(System.IOS) ? "fb://profile" : "com.facebook.katana"
if(!NativeUtils.openApp(launchParam)) {
}
Opens the urlString with the default application associated with the given URL protocol of the current platform. This means your game is suspended and an external application gets opened. Here is an
example for opening an URL in the platform's default browser:
NativeUtils.openUrl("https://felgo.com")
Examples of URL protocols and how this method handles them:
http(s):// - Opens the URL in a default web browser.-
mailto: - Opens the default email composer.
Note: To send emails, the method sendEmail() is preferred because of proper URL escaping.
-
file:// - If the URL points to a directory, opens the directory in the default file browser. If the URL points to a file, opens the file with the default app associated with the file type, if
one exists.
Note: Depending on the platform, no file browser to open directories or app to open a specific file type may be installed. In this case, the call does nothing and returns false. Specifically, mobile platforms
don't generally have file browsers for opening directories installed.
Note: To be able to open file:// URLs with another app on Android, if your targetSdkVersion in AndroidManifest.xml is 24 or
higher, you need to enable the paths you wish to use in android/res/xml/file_paths.xml.
Note: To open files, the method FileUtils::openFile() is preferred. It can also handle file paths without file:// prefix.
assets:/ and qrc:/ - Qt resources and app assets are not supported as they cannot be opened outside your app.
Each platform might support additional URL protocols. On iOS, for example, apps can be opened with custom URL protocols. For opening other apps, openApp() is preferred
though.
This method returns true if the URL was handled by the operating system. It returns false if the platform cannot handle the URL's protocol or the URL itself. In this
case, check the log output for the actual error.
Opens the native email app prefilled with the given to receiver, subject and message. If users do not have a default email application, they can choose
between their installed native applications that support sending emails.
Store a value (like a password) based on a given identifier securely and persistent in the native Keychain on the device.
Here is an example how to use the Keychain storage functionality:
NativeUtils.setKeychainValue("identifier", "value")
Note: The keychain is only implemented on iOS and Android, on all other platforms the function uses unencrypted QSettings as fallback.
Returns result
See also getKeychainValue() and clearKeychainValue().
|
void setStatusBarStyle(style)
|
Allows to set the status bar style for apps or games.
By default the status bar is visible for apps, and hidden for games. To change the status bar style, you can set one of the following values:
- NativeUtils.StatusBarStyleHidden: Hides the status bar.
- NativeUtils.StatusBarStyleWhite: Shows the status bar. This setting uses a white status bar for dark content on iOS.
- NativeUtils.StatusBarStyleBlack: Shows the status bar. This setting uses a black status bar for light content on iOS.
- NativeUtils.StatusBarStyleSystem: Shows the status bar. This setting uses a default status bar on iOS, with color dependent on system dark mode setting. It uses a default system themed status bar on Android.
-
NativeUtils.StatusBarStyleCustom: This value is only for advanced use-cases. This setting does never modify the system status bar. You can customize the status bar manually with native code or by using the Native Code Components.
Note: This property determines if the app uses full-screen mode on Android. Only the setting NativeUtils.StatusBarStyleSystem disables the full-screen mode.
Note: The white and black style only apply for iOS devices. On Android devices, the status bar is either hidden or translucent.
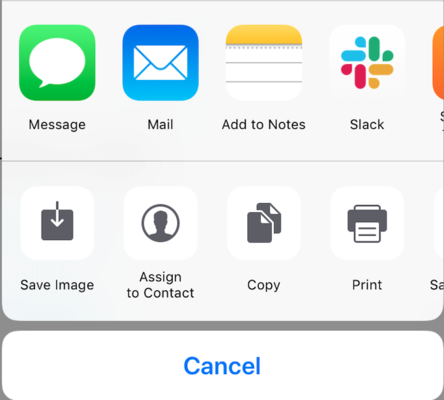
Opens the native share dialog for either a given text or url. Sharing both a text and url is not possible. This method is currently implemented on Android and iOS.
 NativeUtils.share("Check out Felgo!","https://felgo.com")
 NativeUtils.share("","file:///data/user/0/com.felgo.myapp/files/image-to-share.jpg")
The parameter text can be any text. That text is shared with another app.
The parameter url can either be a http(s):// web link or a file:// URL.
A web link is shared directly with another app, for example to display or open it.
If it is a file URL, the method shares that file's contents. This lets you share images and other files with other apps. For example, you can use the various FileUtils methods to obtain
such file URLs.
To share files on Android if your targetSdkVersion in AndroidManifest.xml is 24 or higher, you need a file provider tag in AndroidManifest.xml.
The tag is added in projects created after Felgo 2.16.
If you created your project with an earlier version of Felgo, add this entry in AndroidManifest.xml, inside the <application> tag:
 <!-- file provider needed for letting external apps (like contacts) read from a file of the app -->
 <provider android:name="android.support.v4.content.FileProvider" android:authorities="${applicationId}.fileprovider" android:exported="false" android:grantUriPermissions="true">
     <meta-data android:name="android.support.FILE_PROVIDER_PATHS" android:resource="@xml/file_paths"/>
 </provider>
Also, create a file android/res/xml/file_paths.xml with the following content:
 <paths>
   <!-- Example: to share images from the Pictures/ folder -->
   <external-files-path name="images" path="Pictures"/>

   <!-- Example: app internal files, like files saved to FileUtils.AppDataLocation -->
   <files-path name="files" path="."/>
 </paths>
On iOS, the sharing an image file allows the user to save it to the iOS Photo Gallery.
Your app required the NSPhotoLibraryAddUsageDescription in your ios/Project-Info.plist to use that feature, otherwise the app may crash:
 <key>NSPhotoLibraryAddUsageDescription</key>
 <string>App would like to save photos.</string>
|
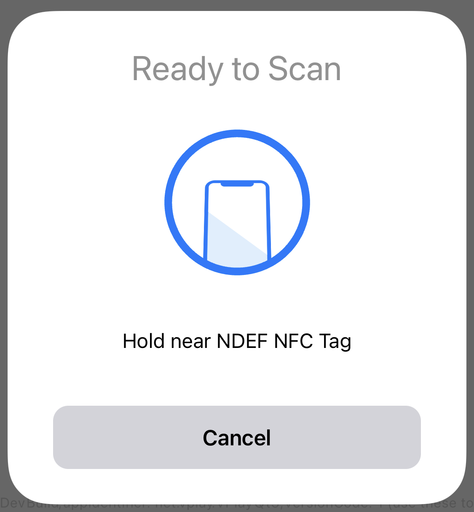
void startNfcNdefSession(string message)
|
Opens a session to read an NDEF message from a tag via NFC on supported devices on Android and iOS.
Calling the method on iOS opens the system NFC scanning dialog. You can customize the message shown with the message parameter:
Calling the method on Android opens an invisible session to scan an NFC tag, you can show your own UI while polling for a tag. The message parameter is not used on Android.
As soon as a tag was found, the nfcNdefPayloadDetected signal is emitted. If there was an error, the nfcNdefError is emitted.
Due to specific platform behavior, an NFC session automatically closes on iOS but keeps open on Android after starting a session with startNfcNdefSession(). To close an active session on Android, call stopNfcNdefSession().
On iOS, you need to open a new session with startNfcNdefSession() if you want to scan another tag.
If a device does not support NFC or NFC is disabled in system settings, the nfcNdefError is emitted.
Here is an example how to check NFC device state and read an NDEF message:
 import Felgo
 import QtQuick

 App {
   NavigationStack {
     AppPage {
       title: "NFC Demo"

       Column {
         anchors.centerIn: parent

         AppText {
           anchors.horizontalCenter: parent.horizontalCenter

           onClicked: NativeUtils.fetchNFCNDEFMessage(qsTr("Hold near NDEF NFC Tag"))
           text: "NFC Device Support: %1".arg(NativeUtils.isNfcAvailable())
         }

         AppText {
           anchors.horizontalCenter: parent.horizontalCenter

           text: "NFC Session Active: %1".arg(NativeUtils.nfcSessionActive)
         }

         Row {
           spacing: dp(5)

           AppButton {
             text: "Open Session"

             onClicked: NativeUtils.startNfcNdefSession("Hold near NDEF NFC Tag")
           }

           AppButton {
             text: "Close Session"

             onClicked: {
               result.reset()
               NativeUtils.stopNfcNdefSession()
             }
           }
         }


         AppText {
           id: result

           anchors.horizontalCenter: parent.horizontalCenter

           function showResult(text) {
             result.color = "black"
             result.text = text
           }

           function showError(text) {
             result.color = "red"
             result.text = text
           }

           function reset() {
             result.text = ""
           }
         }
       }
     }
   }

   Connections {
     target: NativeUtils

     onNfcNdefPayloadDetected: (payload, tagId) => {
       NativeUtils.vibrate()

       console.debug("Received NDEF message:", payload, "from tag:", tagId)
       result.showResult("Tag: %1\nPayload: %2".arg(tagId).arg(payload))
     }

     onNfcNdefError: reason => {
       console.debug("Error while reading NDEF message:", reason)
       result.showError(reason)
     }
   }
 }
Android Integration
To use NFC on Android devices, make sure to add the following permission to the manifest of your AndroidManifest.xml file:
<uses-permission android:name="android.permission.NFC" />
iOS Integration
To use NFC on iOS devices, make sure to add the CoreNFC framework to your project. Add the following lines to your project file:
 if(CMAKE_SYSTEM_NAME STREQUAL "iOS")
   target_link_libraries(yourAppTarget PRIVATE "-framework CoreNFC")
 endif()
You also need to add the 'Near Field Communication Tag Reading' capability to the entitlements of your app. To activate the entitlement for your app with Xcode, open the *.xcodeproj in your build directory and activate
Push Notifications in the capabilities tab.
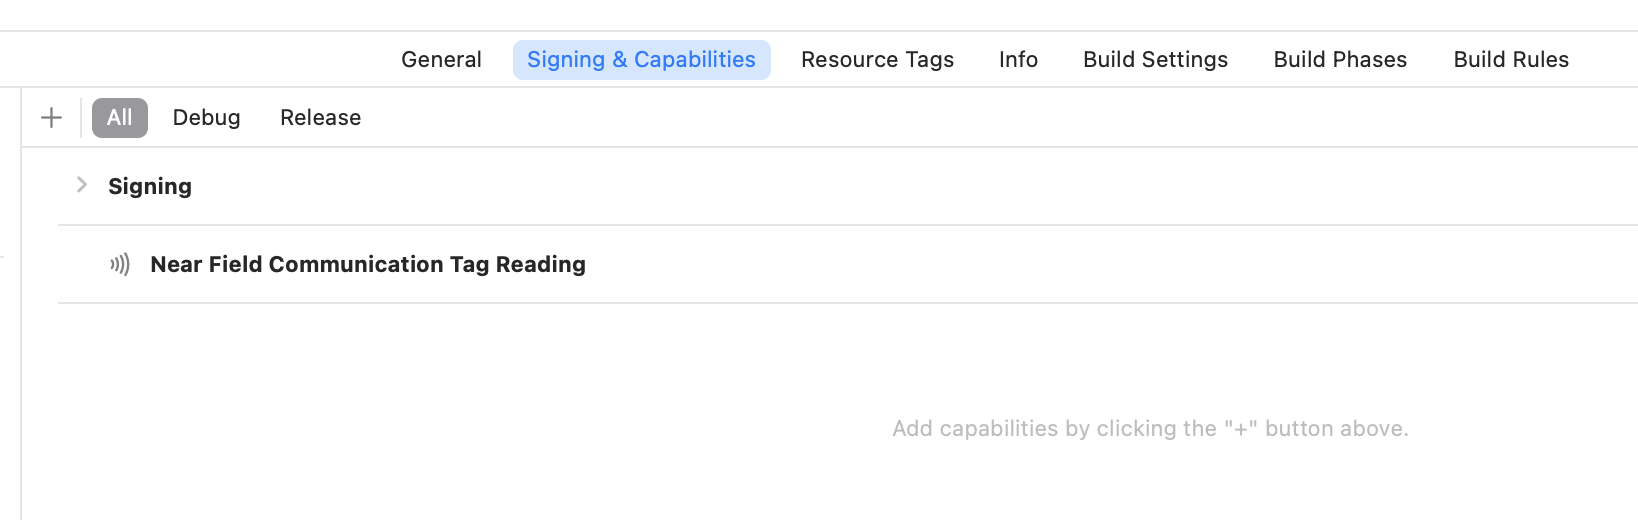
Note: It is required to again activate this setting whenever Qt Creator uses qmake to re-create the Xcode project each time you build your app.
To avoid this, you can manually set an iOS entitlements file for your project in Qt Creator. Add the following settings to your *.pro configuration to use a custom entitlements file:
 ios {
   MY_ENTITLEMENTS.name = CODE_SIGN_ENTITLEMENTS
   MY_ENTITLEMENTS.value = /absolute/path/to/entitlements_file
   QMAKE_MAC_XCODE_SETTINGS += MY_ENTITLEMENTS
 }
The entitlements_file need to include the following keys:
 <key>com.apple.developer.nfc.readersession.formats</key>
 <array>
   <string>NDEF</string>
   <string>TAG</string>
 </array>
As a last step, add the 'NFCReaderUsageDescription' key to the Project-Info.plist file:
 <key>NFCReaderUsageDescription</key>
 <string>Read NFC tags</string>
Note: NFC is only supported on Android and iOS 13.0 and above.
This method was introduced in Felgo 3.10.0.
See also nfcSessionActive, stopNfcNdefSession(), nfcNdefPayloadDetected, and nfcNdefError.
Returns the height of the native status bar of the device.
|
void stopNfcNdefSession()
|
Stores one or more contacts to the device address book. The vCard parameter passes the data for the contacts in VCF format (version 2.1).
On iOS, it is required to add an NSContactsUsageDescription entry to your Project-Info.plist:
 <key>NSContactsUsageDescription</key>
 <string>App would like to store contacts to the Addressbook.</string>
The permission for AddressBook access is then asked the first time this method is called for the app. If permission is given, it stores the contacts and returns true.
On Android, the method first stores the VCF data as contacts.vcf in the app's cache directory of the internal storage and then opens the file for importing the contacts.
Note: If your targetSdkVersion in AndroidManifest.xml is 24 or higher, you need a file provider tag in AndroidManifest.xml. The
tag is added in projects created after Felgo 2.16. If you created your project with an earlier version of Felgo, add this entry in AndroidManifest.xml, inside the <application> tag:
 <!-- file provider needed for letting external apps (like contacts) read from a file of the app -->
 <provider android:name="android.support.v4.content.FileProvider" android:authorities="${applicationId}.fileprovider" android:exported="false" android:grantUriPermissions="true">
     <meta-data android:name="android.support.FILE_PROVIDER_PATHS" android:resource="@xml/file_paths"/>
 </provider>
Also, create a file android/res/xml/file_paths.xml with the following content:
 <paths>
   <!-- the path for NativeUtils.displayCameraPicker() -->
   <external-files-path name="images" path="Pictures"/>

   <!-- app internal cache for NativeUtils.storeContacts() -->
   <cache-path name="cache" path="."/>
 </paths>
The call returns false if the user did not allow AddressBook access on iOS or if the VCF file could not be stored on Android, true otherwise.
Note: It is currently not possible to determine if the passed vCard data is valid or not. On Android, the VCF data file is successfully stored but the device can then not open the file
to import the contacts. On iOS, invalid contacts are simply not added to the AddressBook without any hint or exception. Please make sure to pass valid data and do tests on your devices to avoid problems.
The following example shows how to add a contact to the device and handles errors appropriately:
import Felgo
App {
screenWidth: 960
screenHeight: 640
AppButton {
text: "Store Contact"
anchors.centerIn: parent
onClicked: {
var vCard = "BEGIN:VCARD
VERSION:2.1
N:Felgo;Engine;;;
FN:Felgo
TEL;WORK:0123456789
EMAIL;WORK:help@felgo.com
ADR;WORK:;;Kolonitzgasse;Wien;;1030;Austria
ORG:Felgo
URL:http://www.felgo.com
END:VCARD";
var success = NativeUtils.storeContacts(vCard)
if(system.isPlatform(System.IOS)) {
if(success)
NativeDialog.confirm("Contacts stored.", "", function() {}, false)
else
NativeDialog.confirm("Could not store contacts",
"The app does not have permission to access the AddressBook, please allow access in the device settings.",
function() {}, false)
}
else if (system.isPlatform(System.Android)) {
if(!success) {
NativeDialog.confirm("Could not store contacts",
"Error when trying to store the vCard to the app's cache folder.",
function() {}, false)
}
}
else {
NativeDialog.confirm("Could not store contacts", "Storing contacts is only possible on iOS and Android.", function() {}, false)
}
}
}
}
To allow special characters for a vCard property, use CHARSET=UTF-8;ENCODING=QUOTED-PRINTABLE for the property and encode the data. The encodeQuotedPrintable function
of the following example can be used to convert a string to quoted-printable representation:
function storeContact(name) {
var name = encodeQuotedPrintable(name)
var vCard = "BEGIN:VCARD
VERSION:2.1
N;CHARSET=UTF-8;ENCODING=QUOTED-PRINTABLE:"+name+";;;;
FN;CHARSET=UTF-8;ENCODING=QUOTED-PRINTABLE:"+name+"
END:VCARD"
NativeUtils.storeContacts(vCard)
}
function encodeQuotedPrintable(text) {
var charsPerLine = 69
var curLineLength = 0
var result = ""
var utf8 = unescape(encodeURIComponent(text));
for(var i = 0; i < utf8.length; i++) {
var hexChar = utf8.charCodeAt(i).toString(16).toUpperCase()
if(hexChar.length == 1)
hexChar = "0"+hexChar
if((curLineLength + hexChar.length + 1) > charsPerLine) {
curLineLength = 0
result += "=\n"
}
curLineLength += (hexChar.length + 1)
result += ("=" + hexChar)
}
return result
}
See also contacts.
Vibrates a short duration on supported devices. This method is currently implemented on Android and iOS.
Note: Please make sure to add the
<uses-permission android:name="android.permission.VIBRATE"/>
to your AndroidManifest.xml file when using the vibration functionality on Android.


