JavaScript for Fast Prototyping
JavaScript is the main choice for app logic. You can write it inline in QML and also use separate JS files. Here is a more detailed guide on this topic: JavaScript Expressions in QML Documents
For this quick overview, we provide you with a code quick example:
import Felgo
import QtQuick
App {
id: app
property int myValue: 0
property string highLow: "low"
NavigationStack {
AppPage {
title: "JavaScript"
AppText {
anchors.centerIn: parent
text: app.myValue + " is really " + app.highLow
color: app.highLow == "low" ? "green" : "red"
}
AppButton {
text: "+2"
flat: false
anchors.horizontalCenter: parent.horizontalCenter
onClicked: {
var plus = 2
app.increaseValue(plus)
}
}
}
}
function increaseValue(amount) {
app.myValue += amount
if(app.myValue >= 10) {
app.highLow = "high"
}
}
}
Basically anytime you write any form of logic in QML, you are using JavaScript!
QML Native Code Components API
The Felgo QML Native Code Components API allows you to interact with the underlying native platform, directly from QML.
There are two main use-cases:
- Call native APIs directly with JavaScript: You no longer need to provide native wrappers in C++ to bridge between QML and native languages (Java for Android or Obj-C for iOS). The NativeObject type represents an object from the native platform. With NativeObjectUtils, you can acquire and manage references to native objects.
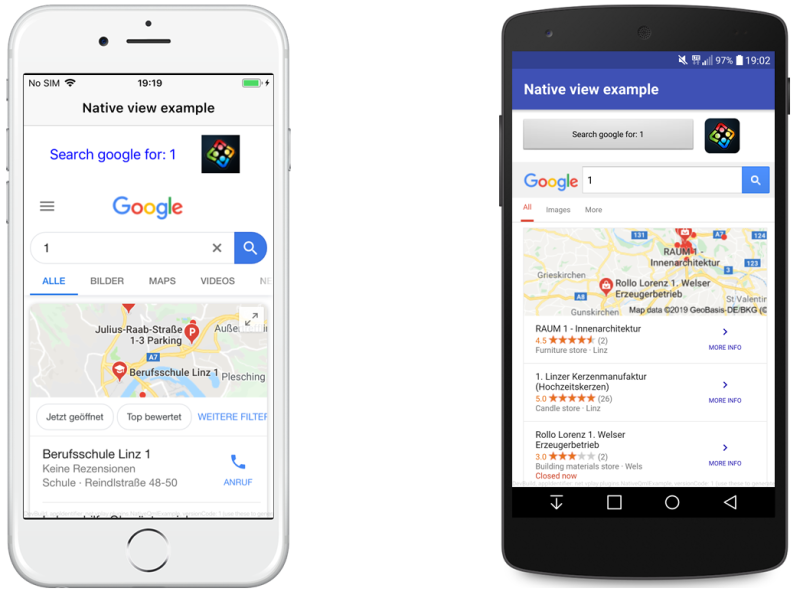
- Show a native view as part of your Qt Quick scene: The NativeView type can render a native Android or iOS view within your QML application. It integrates directly into the QML scene
graph. This means you can apply QML graphical effects, animations and more to your native views. You can even use it cross-platform by specifying different native bindings for each of the platforms.
The native components make it easy to trigger platform APIs, access device settings or request permissions from the system. This example retrieves the battery level from the system and displays it in QML:
import Felgo
import QtQuick
App {
AppButton {
anchors.centerIn: parent
text: qsTr("Check Battery")
onClicked: {
var batteryPercent = Math.round(getBatteryLevel() * 100)
text = "Battery: "+ batteryPercent + "%"
}
}
function getBatteryLevel() {
if(Qt.platform.os === "android") {
return getAndroidBatteryLevel()
}
else if(Qt.platform.os === "ios") {
return getIosBatteryLevel()
}
else {
return 0
}
}
function getAndroidBatteryLevel() {
var Intent = NativeObjectUtils.getClass("android/content/Intent")
var IntentFilter = NativeObjectUtils.getClass("android/content/IntentFilter")
var BatteryManager = NativeObjectUtils.getClass("android/os/BatteryManager")
var context = NativeObjectUtils.getContext()
var filter = IntentFilter.newInstance(Intent.getStaticProperty("ACTION_BATTERY_CHANGED"))
var batteryStatus = context.callMethod("registerReceiver", [null, filter])
var level = batteryStatus.callMethod("getIntExtra", [BatteryManager.getStaticProperty("EXTRA_LEVEL"), -1])
var scale = batteryStatus.callMethod("getIntExtra", [BatteryManager.getStaticProperty("EXTRA_SCALE"), -1])
return level / scale
}
function getIosBatteryLevel() {
var UIDevice = NativeObjectUtils.getClass("UIDevice")
var device = UIDevice.getStaticProperty("currentDevice")
device.setProperty("batteryMonitoringEnabled", true)
return device.getProperty("batteryLevel")
}
}
In addition to accessing platform APIs, you can also add a NativeView to e.g. show a native Button, ImageView or WebView in your Felgo app. This screenshot shows an example app with these three components on Android and iOS:
C++ is simply king when it comes to performance. You have the option to make use of it if you need to. We have written a detailed blog post how you can do this: How to Expose a Qt C++ Class with Signals and Slots to QML
The code from this blog post is also available as example app here: C++ QML Integration Demo App
There is also an additional example app that displays charts from a C++ model: C++ Backend Charts Demo App
Native Code for Special Use-Cases or Native Libraries
If your app requires special native libraries or a native device feature that Felgo does not yet provide, you can also include Objective C, Swift, Java or Kotlin code in your app.
We provide a simple example of how to use native code for you to download here: Download Example
The NativeUtils component provides convenient access to several native device features, such as native dialogs, alert sheets, phone contacts, native sharing, device camera and more.
Below is a list if the most important methods from NativeUtils:
|
displayAlertDialog
|
Displays a native alert dialog with a given title, an optional description that can provide more details, an OK button and an optional Cancel button. |
|
displayAlertSheet
|
Displays a modal alert sheet with the specific options. It uses an AlertDialog on Android and a UIActionSheet on iOS. |
|
displayCameraPicker
|
Allows to take a photo by starting the native camera, if available. |
|
displayDatePicker
|
Allows to choose a date from a calendar by displaying a native date picker dialog, if available. |
|
displayImagePicker
|
Allows to choose a photo from the device by displaying the native image picker, if available. |
|
displayMessageBox
|
Displays a native-looking message box dialog with a given title, an optional description that can provide more details, an OK button and an optional Cancel button. |
|
displayTextInput
|
Displays a native-looking message input dialog with a given title, a description that can provide more details, a placeholder that is displayed as long as the input field is empty (optional) and a prefilled text. |
|
getContacts
|
Returns a list of all contacts including name and phone number. |
|
openApp
|
Tries to launch an app identified by launchParam on the device. The required parameter value depends on the platform. |
|
openUrl
|
Opens the urlString with the default application associated with the given URL protocol of the current platform. |
|
sendEmail
|
Opens the native email app prefilled with the given to receiver, subject and message. |
|
share
|
Opens the native share dialog with a given text and url. |
|
storeContacts
|
Stores one or more contacts to the device address book. |
Useful Components for App Logic
Here you get a quick overview for components and concepts useful to create your app logic.
Timer for Timed Events
A Timer can be used for any logic that should either repeat, be delayed or last for a specific time interval.
import Felgo
import QtQuick
App {
id: app
property int seconds: 0
NavigationStack {
AppPage {
title: "Timer"
AppText {
anchors.centerIn: parent
text: "Seconds " + seconds
}
Timer {
running: true
repeat: true
interval: 1000
onTriggered: {
app.seconds++
}
}
}
}
}
Creating Objects Dynamically at Runtime
Each Item that you specify in your QML tree is created as an object that lives in the application and requires system resources. Depending on the
implementation it includes additional nested child elements, interacts with other objects, reacts to signals, does processing with JavaScript, and has to be layouted based on position and anchoring settings.
Each QML Item thus takes up space in memory and requires processing time. By default, all Items are created at startup and are never destroyed until the application window is closed. As your QML project grows, the creation
of all these Items at startup can take quite some time. This is especially problematic on old devices or embedded systems that only have very limited resources available.
With dynamic object creation, you can control when your QML Items are created and destroyed. This is essential for implementing fast applications that use the available system resources efficiently. Make sure that you only
create the minimum necessary UI elements and components at startup. Other elements can be loaded on-demand, for example after a certain user interaction or system event.
QML offers two different ways to do this. The first option is using a Loader item. It can load and unload a certain QML Item at runtime:
import Felgo
import QtQuick
App {
id: app
NavigationStack {
AppPage {
title: "Loader"
AppButton {
anchors.centerIn: parent
text: "Create Rectangle"
onClicked: {
loader.source = "https://felgo.com/web-assets/RedRectangle.qml"
}
}
Loader {
id: loader
onLoaded: {
item.x = dp(50)
item.y = dp(50)
}
}
}
}
}
You can set either the Loader::source or Loader::sourceComponent. Before the QML engine can create a new object it first needs to load the QML type as a Component. If you specify a
Component in your QML code it is kept in memory so you can directly use it to create QML Items on-demand. This is great if you need to create many
objects of the same type.
To also avoid the small overhead of keeping the Component in memory, you can instead specify the QML source file. With this approach, no Component or Item is created as long as the Loader is inactive. After setting the source file and activating the Loader, the objects for both
the QML Component and Item are created on-demand. This is the recommended way for most use-cases.
A good example for using Loaders are system dialogs that you keep in your root window. You can add a single Loader item to only load and show the dialog you currently need. You can also set the Loader::asynchronous property to handle component and object creation in a background thread:
import Felgo
import QtQuick
App {
Loader {
id: dialogLoader
asynchronous: true
function showMyDialog() {
dialogLoader.source = "MyDialog.qml"
}
function showOtherDialog() {
dialogLoader.source = "OtherDialog.qml"
}
onLoaded: item.open()
Connections {
target: dialogLoader.item
onClosed: dialogLoader.source = ""
}
}
}
You can find more examples in the Loader component documentation.
The second option is using functions to create components from JavaScript. You can find more detailed info on this here: Dynamic QML Object
Creation from JavaScript
import Felgo
import QtQuick
App {
id: app
NavigationStack {
AppPage {
id: page
title: "Dynamic Creation"
AppButton {
anchors.centerIn: parent
text: "Create Rectangle"
onClicked: {
rectangleComponent.createObject(page, {"x": 50, "y": 50});
}
}
}
}
Component {
id: rectangleComponent
Rectangle {
width: dp(100)
height: dp(100)
color: "red"
}
}
}
How do you move work to a background thread?
For long-running and data-intense operations, it still makes sense to actively use a separate thread and notify your UI once the work is done. To quickly spawn a new thread in QML, you can add a WorkerScript item:
import Felgo
import QtQuick
App {
AppText {
id: myText
text: 'Click anywhere'
}
WorkerScript {
id: myWorker
source: "script.js"
onMessage: msg => myText.text = msg.reply
}
MouseArea {
anchors.fill: parent
onClicked: myWorker.sendMessage({ 'x': mouse.x, 'y': mouse.y })
}
}
The above worker script specifies a JavaScript file, script.js, which is handled in a new thread. Here is an example script.js, which simply returns the passed mouse position:
WorkerScript.onMessage = function(message) {
WorkerScript.sendMessage({ 'reply': 'Mouse is at ' + message.x + ',' + message.y })
}
For more control over your threads and the best possible performance, you also have the full power of Qt C++ at your hands. Stepping into the C++ world also gives access to e.g. advanced networking features like a socket or
Bluetooth connection.
More Frequently Asked Development Questions
Find more examples for frequently asked development questions and important concepts in the following guides:
QML Logic Basics
We also feature 2 very basic tutorials if you are interested in those topics. They were orignially written for Felgo Games but apply to QML in general: