
Can you image a game without different levels? Unless we're talking about a really simple mini-game, different levels contribute a lot to create an awesome gaming experience and keep the player interested over a long period of time.
It doesn't matter if you have few large levels, like in open-world games, or many small ones, like in typical platformers. One thing is clear: The level creation always consumes a lot of time. In many cases, you will create your levels manually because your game is not suited for an automatic level generation. But level creation and level design are not easy tasks. You can spend a lot of time to set up and polish each and every level. For that matter, good level editors help you save time and provide visual support to make it easier to set up your levels.
R.U.B.E. is short for Really Useful Box2D Editor and is made by Chris Campbell / iforce2d. As the name suggests, it is mainly meant to be a graphical editor for Box2D objects. But you can also use it to create complete levels!
As Box2D is also the physics engine we use at Felgo, why don't we use RUBE to create our physics-driven levels? With that in mind, we created some components that let you import your custom levels from RUBE and use it in your game! They are especially useful for physics-based games like sidescrollers or platformers. RUBE is available for Windows, MacOS and Linux.
Let me give you some directions:
To give you a small overview of what's possible, these are just a few features of RUBE:
After you complete this tutorial, you should be able o create your own levels with RUBE and use them for your Felgo game. This tutorial covers:
As this is an advanced tutorial, you should already know the basic concepts of working with Felgo, Qt/QML and QtCreator. If you are just getting started, please consider taking a look at these tutorials first:
In case you prefer to directly look at the source code of this demo game - you can find it along with the other demos in the Felgo SDK. See here where to find the demo in your SDK directory.
For an overview of the game features, see R.U.B.E. Editor - Side Scroller.
All the resources of the game should be placed within the assets/img directory of the project. You can download them here.
The images used in this project are based on these sources:
Before we start to create our game, let me explain our game idea! As you might know penguins love speed. The penguin in this little game, let's call him Pingi, has built a bottle rocket glider. He wants to use it to fly out of the icy cave he's trapped in. Unfortunately, some gigantic sharp edged snowflakes are spinning in his way. To reach the end of the cave, he needs to avoid them - otherwise they will cut him into pieces.
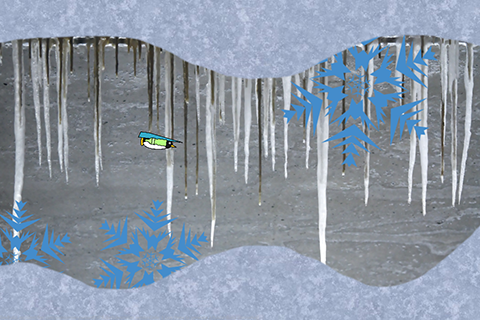
Now that we decided on a game idea, we can start to create the game. In order for RUBE and Felgo to work together, three steps are required:
One thing you have to keep in mind, is that the RUBE editor knows nothing about Felgo.
So let's start with creating our project!
First, create a new empty Felgo project in a directory of your choice. Then, create a new folder, e.g. "rube", within your project directory. This folder will contain your RUBE scenes. By default, this additional directory is not included in the deployment - the RUBE files won't be part of the final game. However, by using this subfolder of the project for RUBE, we automatically get correct file paths when we use images of our assets folder.
The structure of your project should look like this:
| Folder | Description |
|---|---|
| assets/ | Put exported levels from RUBE (.json) here. |
| assets/img/ | Put sd versions of your images here. Use these for adding images in RUBE. |
| assets/img/+hd/ | Put hd versions of your images here. |
| assets/img/+hd2/ | Put hd2 versions of your images here. |
| qml/ | Put your QML files here. |
| qml/entities/ | Put QML entities, that should be linked with RUBE objects, here. |
| rube/ | Put .rube files here. |
When we've finished our rube level, we will export it as a .json file directly to the assets folder. You are not allowed to place these JSON files anywhere else, as the parser component expects them to be within the assets directory. In addition, the JSON files will automatically be deployed along with the assets folder when we build the final game.
Before we go on, be sure to download all necessary game resources here. Just place the images within your assets/img folder.
The folder also contains the directories +hd and +hd2. Felgo automatically uses the images in these directories to support different screen resolutions (see MultiResolutionImage). The tutorial Supporting Multiple Screen Sizes & Screen Densities with Felgo also includes
more details about this topic.
The QML components in the qml/entities/ folder will be used by Felgo to automatically create game entities for certain RUBE objects. With this it is possible to add custom game code.
We will need four rube scenes (objects) for our game:
Let's start with our first RUBE scene, the saw.
Fortunately, the saw is a rather simple object. It just contains a body, a circle fixture and an image in RUBE.
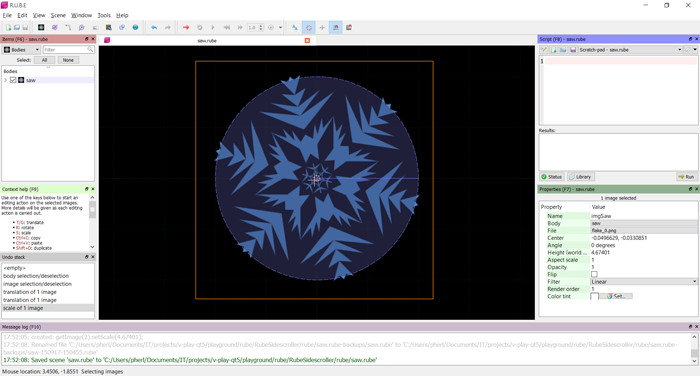
If you already have experience with the 3D graphics and animation software Blender, you are lucky. The controls in RUBE are quite similar to blender. For example:
When you have an item selected you can edit it with the buttons shown in the context help on the left. For example, if you selected an image and you are in the image mode you can press T to start translating the image. Move your mouse and press the left mouse button to finish the translation. You can also rotate (R), scale (S), copy (Ctrl+C), paste (Ctrl+V) and delete (Del) the selected item. When you're in vertex or sampler mode, you can move and insert the vertices by pressing E. On the right is the properties panel where you can edit e.g. the density of fixtures or the body an image should belong to.
Now, you know how to get along with RUBE. Don't worry I will keep it easy in the beginning, e.g. remember you to switch the modes. Follow these steps to create a sub-scene for the saw:
File->New Sceneor Ctrl+N.Add body with circle fixture.assets/img/ into RUBE. Or press space, add an image and assign the file property.I. Click on the saw image and set its center to (0, 0).S to start scaling the image. Make the image fit into the circle fixture and then press the left mouse button.T.body property of the image and then select the circle fixture body. The image is now linked to the body and will move with it.Nice, our snowflake obstacles are already finished!
The saw was pretty easy, wasn't it? Now we create the penguin, but we use a hand-crafted polygon fixture this time.
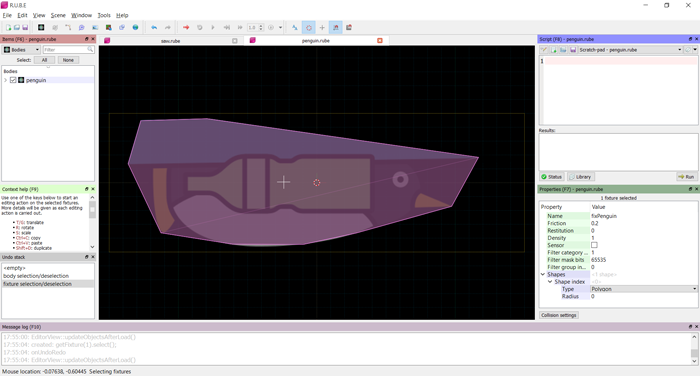
Let's give Pingi a physics shape:
space and add a body with square fixture.I for image mode) center to (0, 0) and scale to 0.5. Assign the body to its body property.V. Select one vertex of the square fixture. Press T to move it to a corner of the penguin within the image. Press E twice to get into the insert vertex mode. Insert
vertices with the left mouse button and move them until you your polygon fixture is accurate enough to match the penguin.Now that we have our penguin and saw, the only sub-scene left is our level, the cave.
The cave consists of a ground and a ceiling, with many hills. The graphics for the cave are split up in several images. If we place the parts next to each other, we get the complete cave.
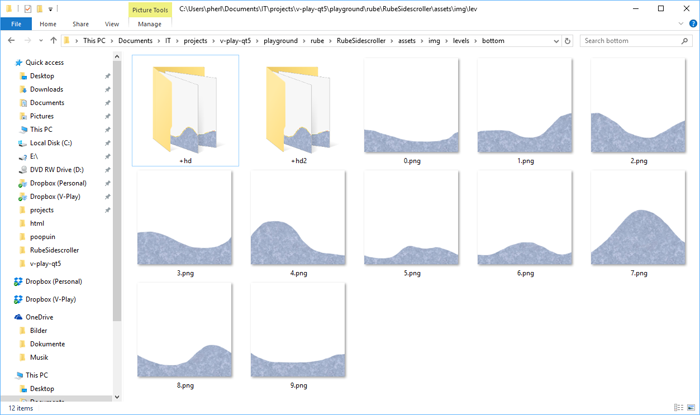
For the fixture of the cave ground and ceiling, we again need a polygon shape. Creating the polygons to follow the complex cave path seems a bit complicated, don't you think? That's why we let RUBE create them for us.
As you already placed all the images in your assets folder, you can directly start to put the cave level together in RUBE:
Ctrl while translating the items. They will snap to the grid.space and create a sampler. Move it and set its output size to cover all the top pieces completely and nothing from the bottom pieces.E (a few times) and set way points around the the top images. Also go around the corners and over the top of the ceiling images.max points and min angle of the sampler to let the polygon follow the ceiling as accurate as you want.Sampler->Create fixture from sampler. Now, RUBE creates a polygon fixture from the alpha edges of the selected images and assigns this new fixture to the selected body. This step
would fail if we had both the top and bottom parts together, because Box2D can only handle single convex fixtures.
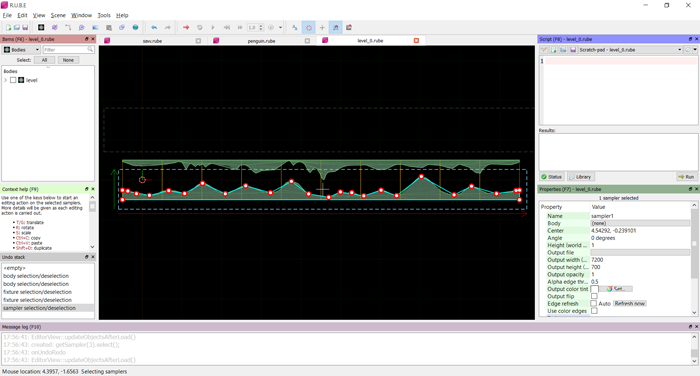
We've now finished all the parts that make up our game: the saw as an obstacle, Pingi as the player's avatar and the level.
Let's now combine them to create the game:
space and add an object. Select the level.rube in the file dialog. Select the level object in RUBE (O for objects). Place it at (0, 0) and set its scale to
10.Shift+D as often as you want.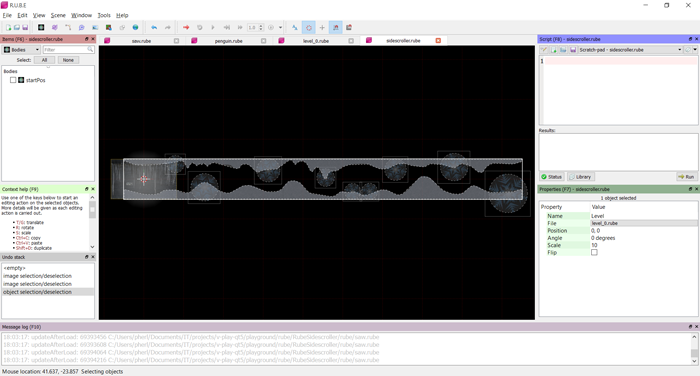
All the fixtures and graphics for our game are set up now. You could already try to export everything as sidescroller.json to the assets folder and load it with Felgo. But you won't be happy yet. To your surprise, the whole level will just fall down together with the saws and Pingi. Obviously, this can't be correct. What's missing are some physics settings for the fixtures and bodies in RUBE.
Let us fix that:
saw.rube and set its body's type property to kinematic. Also set its angular velocity to 360. With these changes, the saw always stays at its
initial position and rotates once per second for the rest of its life.penguin.rube, set the linear damping to 1.2 and set the angular damping to 15. The linear damping prevents Pingi from getting too fast. The
angular damping is really strong, which causes him to stop turning almost immediately when you don't apply any torque. Once you can play the game later, you may try different settings for your game.level.rube and set the body's type to static. This ensures that the level never moves, so it doesn't fall down anymore.Relax now, the hardest part is already done! Before doing any more modifications, let's try loading the RUBE level with Felgo. Just replace your Main.qml with this implementation:
qml/Main.qml
 import Felgo 4.0
 import QtQuick 2.0

 GameWindow {
   activeScene: scene

   // load level at game startup
   Component.onCompleted: {
     physicsWorld.running = true
     loadLevel()
   }

   Scene {
     id: scene

     property alias level: level

     EntityManager {
       id: entityManager
       entityContainer: level
     }

     Item {
       id: level

       PhysicsWorld {
         id: physicsWorld

         // physics is disabled initially, and enabled after the splash is finished
         running: false
         //gravity.y: 9.81 // this is set from rube anyways, no need to set it here
         z: 10 // draw the debugDraw on top of the entities

         // these are performance settings to avoid boxes colliding too far together
         // set them as low as possible so it still looks good
         updatesPerSecondForPhysics: 60
         velocityIterations: 5
         positionIterations: 5
         // set this to true to see the debug draw of the physics system
         // this displays all bodies, joints and forces which is great for debugging
         debugDrawVisible: false
       }
     }

     // rube parsers allows to load json files and dynamically create the game entities
     RubeParser {
       id: parser
       entitiesFolder: "entities/"
     }

     Row {
       spacing: 4
       GameButton {
         text: "Reload Rube Level"
         onClicked: {
           console.debug("start loading level")
           // call clearLevel first to start with a new level
           parser.clearLevel()

           loadLevel()
         }
       }
       GameButton {
         text: "Unload Rube Level"
         onClicked: {
           console.debug("start un-loading level")
           parser.clearLevel()
         }
       }
       GameButton {
         text: "Zoom In"
         onClicked: {
           level.scale /= 0.9
         }
       }
       GameButton {
         text: "Zoom Out"
         onClicked: {
           level.scale *= 0.9
         }
       }
     }
   }

   // loads the rube-level from a json file
   function loadLevel() {
     parser.setupLevelFromJSON( Qt.resolvedUrl("../assets/sidescroller.json"), physicsWorld, level )

     level.y = scene.height / 2
     level.x = scene.width / 2
   }
 }
This sets up our game scene. We add a new Item to our Scene that will contain the RUBE level after we load it. The only thing we
need here is our PhysicsWorld component. We also set up our EntityManager to use the level item as the entityContainer.
The most important component of the scene is the RubeParser. With the parser component, different RUBE levels can be loaded or unloaded. To test the parser, we also add a few GameButton instances within a Row.
The helper function loadLevel is used to load and create the JSON level. When starting the game, we use the Component.onCompleted signal of the GameWindow to
initially load the level at startup.
If you export the complete RUBE level to assets/sidescroller.json and then start the game, you'll see a bunch of generic bodies with their correct fixtures and images attached. But those objects won't do
anything special. Pingi just follows the gravity. But instead, he should be able to fly. A special QML entity is required, that let's us add our custom game code.
Before we create the Felgo entity for our penguin, keep in mind that RUBE and Felgo don't automatically work together. In order to decide which RUBE object should be linked to which QML entity, we have to introduce a few new properties in RUBE. Felgo can then act based on the values we configure there.
penguin.rube or switch to its tab if it's still open.scene and then scene settings. Go to the custom properties tab, if it isn't already open.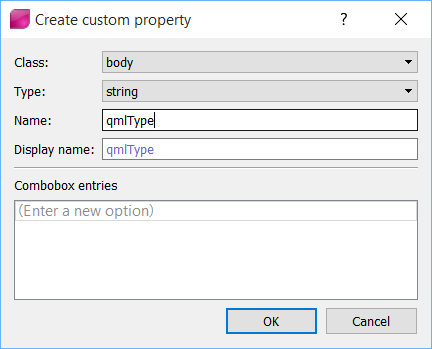
When Felgo loads the exported JSON of the penguin body, it sees the qmlType property and tries to create an entity from qml/entities/Penguin.qml for Pingi. Here is the implementation for this
file:
qml/entities/Penguin.qml
 import QtQuick 2.0
 import Felgo 4.0

 RubeBody {
   id: penguin
   entityType: "penguin"

     // force applied to the body, drives the penguin forward (always) and up (when touched)
   force: Qt.point(60, isMouseDown ? -300 : 0)

   // torque to achieve the target rotation = deltaRotation * factor
   // this is like a proportional controller (see PID controller)
   torque: (targetRotation - rotation) * 60

   // target rotation depends on the vertical velocity
   property real targetRotation: linearVelocity.y / 6

   // current touch state
   property bool isMouseDown: false

   onXChanged: {
     // move "camera" of scene so that the penguin is 1/3 from the left screen border
     scene.level.x = -x + scene.width / 3
   }

   Connections {
     target: scene.mouseArea
     onPressed: penguin.isMouseDown = true
     onReleased: penguin.isMouseDown = false
   }
 }
To control the penguin, also add a MouseArea to the Scene in your Main.qml:
qml/Main.qml
 import Felgo 4.0
 import QtQuick 2.0

 Scene {
   // ...
   property alias mouseArea: mouseArea

   // ...

   MouseArea {
     id: mouseArea
     anchors.fill: scene.gameWindowAnchorItem
   }

   Row { }
 }
Our penguin is derived from the RubeBody, which gives you a simplified access to its fixture's contact signals RubeBody::beginContact, RubeBody::contactChanged, RubeBody::endContact and the RubeBody::initialized signal. Additionally, it gives direct access to its underlying ColliderBase.
Pingi always accelerates forward. He also accelerates upward if you touch the screen or press the left mouse button. Pingi's rotation depends on his vertical velocity.
Pingi now reacts to inputs from the player but it doesn't react to contact with the saws. To change this, we need another QML type for the saws and check for collision with the penguin. Let us add the same custom property
qmlType for saw.rube. Set the qmlType to Saw and add this tiny QML file to your project:
qml/entities/Saw.qml
 import QtQuick 2.0
 import Felgo 4.0

 RubeBody {
   id: saw
   entityType: "saw"
 }
With this piece of code, we mark the saw as a saw entity. When checking for collisions in our penguin entity, we can then access the entityType and react accordingly.
qml/entities/Penguin.qml
 import QtQuick 2.0
 import Felgo 4.0

 RubeBody {

   //...

   onXChanged: {
     // move "camera" of scene so that the penguin is 1/3 from the left screen border
     scene.level.x = -x + scene.width / 3

     // test until endless scrolling is enabled
     if (x > 3200){
       reset();
     }
   }

   onInitialized: {
     reset()
   }

   onBeginContact: (other, contactNormal) => {
     var entityType = other.getBody().target.entityType
     if (entityType === "saw") {
       reset()
     }
   }

   function reset(){
     var resetPos = Qt.point(0, 0);

     // only one startPos can exist
     var startPosEntities = entityManager.getEntityArrayByType("startPos")
     if (startPosEntities.length > 0 && startPosEntities[0]) {
       resetPos = Qt.point(startPosEntities[0].x, startPosEntities[0].y)
     }

     x = resetPos.x
     y = resetPos.y
     linearVelocity = Qt.point(0,0)

     rotation = 0
     angularVelocity = 0
   }

   // ...
 }
We now introduced collision checking and a new reset() function, it is called:
The function moves Pingi to to the position of a certain StartPos entity (we will add this entity later) and resets its rotation, angular and linear velocity to 0. The StartPos entity is just a hidden object. We will use it to define the starting point of our penguin in the level.
Let us open RUBE again and add the StartPos object:
qmlType for the bodies of sidescroller.rube.qmlType to StartPos.Then add this code as StartPos.qml:
qml/entities/StartPos.qml
 import QtQuick 2.0
 import Felgo 4.0

 RubeBody {
   id: startPos
   entityType: "startPos"
 }
If you try your game again it might already be fun by now. If not, try tweaking the force values of the penguin in its QML file, change its damping or move / scale the saws.
Do you still see that big unpainted area in the middle of the screen? Or are you already used to it? I think we should fill this hole with a nice background.
sidescroller.rube. Don't attach it to any body.qmlType for the image, and set it to BGImage.Then add the entity BGImage.qml:
qml/entities/BGImage.qml
 import QtQuick 2.0
 import Felgo 4.0

 RubeImage{
   id: bgImage
   objectName: "bgImage"

   onInitialized: {
     parent = scene;
     anchors.fill = parent;
   }
 }
This image is derived from the RubeImage. This is why the RubeBody::initialized signal can be used. When its creation is finished it attaches itself to the scene and fills it completely.
You might see that the background image is actually in front of everything. You can change this by modifying the render order property of images in RUBE. This is a nice opportunity to improve a few things. Try
these settings for the render order:
sidescroller.rube should be behind everything else.Export everything again and you're all done!
Congratulations, you have followed this tutorial till the end and hopefully created a simple but fun game. But what now - can you still improve the game? Here are some ideas:
And I've got one last pro tip for your work with RUBE: always make sure that the width of the tiles is exactly one.
Visit Felgo Games Examples and Demos to gain more information about game creation with Felgo and to see the source code of existing apps in the app stores.
If you are interested in the full source code of this demo game, see R.U.B.E. Editor - Side Scroller.