More Resources for Internationalization
Additionally to this tutorial, you can also have a look at the following resources:
Overview
In this tutorial, you will learn how to prepare your app or game for multiple languages step by step. If you are new to Felgo, it may help to see the Getting Started with Felgo Apps
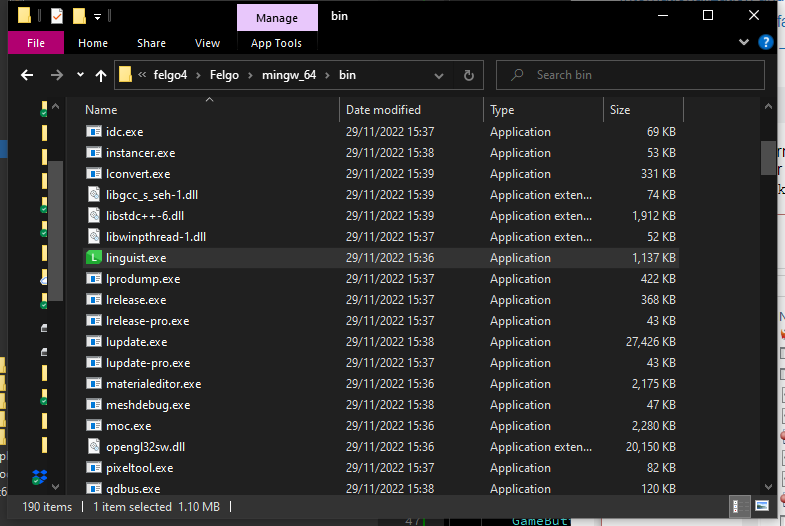
before proceeding with this tutorial. You will use Qt Linguist for your translations which comes with the Qt SDK. Qt Linguist is automatically installed along with
Felgo. You will find it as linguist.exe in the folder <Path to your Felgo SDK>\Felgo\[any-desktop-platform]\bin.
Localize your App or Game
First off, here is a short code example that shows how easy it is to localize Felgo apps or games:
import Felgo
import QtQuick
App {
NavigationStack {
AppPage {
title: qsTr("Hello World")
Column {
anchors.centerIn: parent
spacing: dp(6)
Text {
anchors.horizontalCenter: parent.horizontalCenter
text: qsTr("Hello World") + translation.language
}
AppButton {
readonly property bool isEnglish: settings.language === "en_EN"
anchors.horizontalCenter: parent.horizontalCenter
text: "Switch to " + (isEnglish ? "German" : "English")
onClicked: settings.language = isEnglish ? "de_DE" : "en_EN"
}
}
}
}
}
Use following directions to localize your app or game with Felgo in QML.
Prepare Texts
Wrap any string you want to translate in your QML files with the qsTr() function. If no translation is found during runtime, the text you provide within this function will be displayed directly.
It is recommended to use English as default values.
 Button {
   text: qsTr("Hello")
 }
The qsTr() function also supports string arguments, plurals and more. For more information, see Internationalization with Qt.
Translation Files
You can define translations for all qsTr() calls in your project. They are defined in *.ts source files. You can store them outside of your qml and assets directories.
At compile time, Cmake will automatically bundle them into your app.
You can use Cmake to geneerate these files from your source code. Then Qt Linguist helps you add the translations for each language.
Add Translation Files to your Project
Translation files can be automatically generated for all your qsTr() function calls. In order for the generator tool to place them in the correct folders, add the following lines to your main
CMakeLists.txt file:
 # Add a .ts file for every language your app supports:
 set(TsFiles i18n/de_DE.ts i18n/de_AT.ts i18n/en_EN.ts i18n/cn_CN.ts i18n/fr_FR.ts)

 qt_add_executable(appTranslation
     main.cpp
     ${QmlFiles}
     ${AssetsFiles}
     ${TsFiles} # also show the .ts files in Qt Creator
 )

 # Register the .ts files and create Cmake lupdate/lrelease targets:
 find_package(Qt6 COMPONENTS Linguist REQUIRED)
 qt_add_translations(appTranslation TS_FILES ${TsFiles})
With this setup, your project supports five different translations. Similarly, you can add files for each language you want so support to the TsFiles.
The first two letters of the language file are lowercase and express the target language. The last two letters express the target country. This is important when using different language files for the same language in
different countries. For instance, the language German is de but there is a difference in German between Germany (DE) and Austria (AT). This means there are two different language files
de_DE for German and de_AT for Austrian German.
Generate Translation Source Files
To generate the translation files, you run the lupdate tool from the Qt framework. Cmake will generate a target to run this tool during build time.
You can enable the target in QtCreator's project tab. Then it will automatically run during normal build.
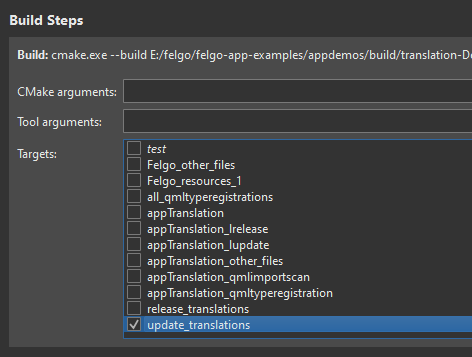
With this enabled, the build creates or updates the *.ts files you specified in your CMakeLists.txt file.
If you add a new qsTr() call to your code, this step adds empty translations to all *.ts files. You can later fill them in using Qt Linguist.
Prepare Translation Files
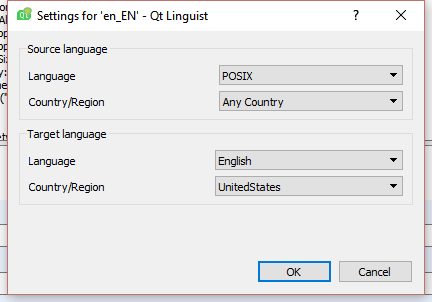
Open all the *.ts files in Qt Linguist. When you open the new *.ts files you have to select the correct language settings for the source file. You can edit them anytime
in Edit -> Translation File Settings. You should adjust them for every file.
Translate Texts
Translate the strings using Qt Linguist. For more information about Qt Linguist see the guide to using
Qt Linguist.
Release Translation Binaries
When you have finished translating, you can use the lrelease target to compile the translations into your app.
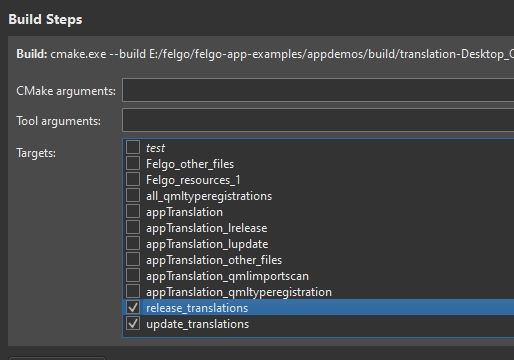
This will generate a *.qm file in your build folder during build time and include it in your app. The .qm files contain the compiled translations in binary.
You can always enable both lupdate and lrelease. This way your *.ts source files are always up-to-date with new qsTr() calls in your code. Also, changes made in Qt Linguist are always integrated in your app build automatically.
Note: The translations binaries require to be compiled along with your application. Translations are thus not available when using Felgo QML Hot Reload with the Felgo Developer App, as no compilation
step is involved for the preview application. To test your app with translations when using QML Hot Relaod, integrate the Felgo Hot Reload library to your project and compile your own Preview Client. It then also includes
your translations. The steps to do so are described in this guide: How to Build your own Hot Reload Client with Custom
C++ and Native Code.
Default Language
When starting the app or game, the language of the operating system is used as default language e.g.: de_DE on a german device. If this exact language is not available, any file with the same
language but different country is used. If no translation file of the system language is available, Felgo will use English (en_EN) instead. Therefore, you should always provide an English version of
your app or game. If en_EN.qm is also not available the texts will be displayed as you have stated them in your qml file.
The operating system language that is used when the app is started the first time is stored and will be overwritten only when the according AppItem::settings value is changed.
It also won't change when the system language changes. If you want the application to start always with the currently active operating system language you can use the property translation.useSystemLanguage.
Language Change
You can change the language which is used during application startup by changing the according AppItem::settings value. The string provided here correlates to the name of the
language files. The language of all your translated texts will be updated after an app restart.
settings.language = "en_EN";
Dynamic Language Change
It is possible to change the application language during runtime. This requires extra setup so texts update automatically. You can use a binding to translation.language to accomplish this.
 AppButton {
   text: qsTr("Hello") + translation.language
 }
It is an empty property that yields a changed-signal any time the app language changes. Thus properties bound to it will then contain the new translated text.
When you change the language during runtime as seen below the binding will reevaluate the string and the new language will be used.
settings.language = "fr_FR";


