Introduction
This game idea is from the multi million hit Flappy Bird http://en.wikipedia.org/wiki/Flappy_Bird.
This tutorial is for advanced Felgo users and assumes that you already had a look at Getting Started with Felgo and Qt Creator or How to make a
simple BalloonPop game with Felgo. They provide you with the very basics which will not be fully explained in this tutorial.
This tutorial is structured a little bit different than usually, because the project is rather big compared to our other tutorial projects. You will be handed the full source code, and I will explain it file by file for you
to fully understand how such a game is built up using Felgo.
New Project
Start off by creating a new project using our Arcade - Flappy Bird template in the wizard of Qt Creator. Assign it a name of your choice and choose the kits to build it for the platforms of your
choice.
Before we hop into the code, let's do a quick brainstorming. What major components do we need to create this game?
- We will need the Player that will be pulled down by gravity, and fly up when the screen is tapped.
- There will be pipes moving across the screen from right to left.
- We need to have detect if the player leaves the screen so we need "borders" on top and bottom of the screen.
- Also there has to be the main menu, a get ready screen and the game over scoreboard.
- Furthermore we need to display the points while playing.
That's about it, on to the code!
Common Components
In Qt Creator, navigate to the qml folder of your project. First of all, we have a look at the common folder.
SceneBase.qml
import QtQuick 2.0
import Felgo 4.0
Scene {
id: sceneBase
width: 320
height: 480
opacity: 0
visible: opacity === 0 ? false : true
enabled: visible
Behavior on opacity { NumberAnimation{duration: 250} }
signal enterPressed
Keys.onPressed: {
if(event.key === Qt.Key_Return) {
enterPressed()
}
}
Keys.onReturnPressed: {
enterPressed()
}
}
The SceneBase.qml is our base class for all the scenes. It holds properties, signals and other content that are the same for every scene. For example, we are defining a Behavior on opacity, making every change in opacity smooth. Also we are handling the desktop backspace key as well as the Android hardware back button.
Background.qml
 import Felgo 4.0
 import QtQuick 2.0

 Item {
   width: bg.width
   height: bg.height
   MultiResolutionImage {
     id: bg
     source: "../../assets/img/bg.png"
   }
   MultiResolutionImage {
     id: rotor
     source: "../../assets/img/rotor.png"
     x: 178
     y: 318
   }

   MovementAnimation {
     target: rotor
     property: "rotation"
     velocity: 90
     running: true
   }
 }
Since we have a little animation in the background, we made a reusable component, containing the background image as well as the animated rotor. The MovementAnimation modifies the
defined property with a constant velocity.
AudioManager.qml
import Felgo 4.0
import QtQuick 2.0
Item {
id: audioManager
property int idDIE: 11
property int idHIT: 22
property int idPOINT: 33
property int idSWOOSHING: 44
property int idWING: 55
function play(clipID) {
switch(clipID) {
case idDIE:
die.play()
break
case idHIT:
hit.play()
break
case idPOINT:
point.play()
break
case idSWOOSHING:
swoosh.play()
break
case idWING:
wing.play()
break
}
}
GameSoundEffect {
id: die
source: "../../assets/audio/sfx_die.wav"
}
GameSoundEffect {
id: hit
source: "../../assets/audio/sfx_hit.wav"
}
GameSoundEffect {
id: point
source: "../../assets/audio/sfx_point.wav"
}
GameSoundEffect {
id: swoosh
source: "../../assets/audio/sfx_swooshing.wav"
}
GameSoundEffect {
id: wing
source: "../../assets/audio/sfx_wing.wav"
}
}
The AudioManager handles all the sounds in our game. You just have to call the play(clipID) function to play any sound.
Ground.qml
 import Felgo 4.0
 import QtQuick 2.0

 Item {
   width: spriteSequence.width
   height: spriteSequence.height

   GameSpriteSequence {
     id: spriteSequence
     anchors.centerIn: parent

     GameSprite {
       name: "running"

       frameCount: 3
       frameRate: 4

       frameWidth: 368
       frameHeight: 90
       source: "../../assets/img/landSprite.png"

     }
   }

   function reset() {
     spriteSequence.running = true
   }

   function stop() {
     spriteSequence.running = false
   }
 }
Just like in the real Flappy Bird game, we are using a simple animated ground, containing 3 images that are constantly switched.
The Entities
Now we have a look at the entities folder of our project.
Player.qml
 import Felgo 4.0
 import QtQuick 2.0

 EntityBase {
   id: player
   entityType: "player"

   property int upwardforce: -280
   property int resetX: 0
   property int resetY: 0

   signal gameOver()

   Component.onCompleted: reset()

   onGameOver: {
     spriteSequence.running = false
   }

   GameSpriteSequence {
     id: spriteSequence

     anchors.centerIn: parent

     GameSprite {
       name: "idle"
       frameCount: 3
       frameRate: 10

       frameWidth: 34
       frameHeight: 24
       source: "../../assets/img/birdSprite.png"
     }
     rotation: wabbleX.running ? 0 : collider.linearVelocity.y/10
   }

   CircleCollider {
     id: collider

     radius: spriteSequence.height/2
     anchors.centerIn: parent

     bodyType: Body.Dynamic
   }

   function reset() {
     player.x = resetX
     player.y = resetY
     collider.body.linearVelocity = Qt.point(0,0)
     activateWabbling()
     spriteSequence.running = true
   }

   function push() {
     wabbleX.stop()
     wabbleY.stop()
     audioManager.play(audioManager.idWING)
     collider.body.linearVelocity = Qt.point(0,0)
     var localForwardVector = collider.body.toWorldVector(Qt.point(0,upwardforce));
     collider.body.applyLinearImpulse(localForwardVector, collider.body.getWorldCenter());
   }

   NumberAnimation on x {running: false; id: wabbleX; duration: 4000; loops: Animation.Infinite; easing.type: Easing.CosineCurve}
   NumberAnimation on y {running: false; id: wabbleY; duration: 4000; loops: Animation.Infinite; easing.type: Easing.SineCurve}

   function activateWabbling() {
     var wableVal = 25
     var rand = Math.random()
     var dir = (rand < 0.5 ? -wableVal/4*rand : wableVal/4*rand )
     wabbleX.from = player.x+dir
     wabbleX.to = player.x-dir
     wabbleX.start()
     rand = Math.random()
     dir = (rand < 0.5 ? -wableVal*rand : wableVal*rand )
     wabbleY.from = player.y+dir
     wabbleY.to = player.y-dir
     wabbleY.start()
   }
 }
Let's have a closer look at this one. First of all we have a GameSpriteSequence element, just like we had in Ground.qml. This is our animated
character, flapping his wings. But there is an interesting property binding on its rotation property. In the original Flappy Bird, the bird tilts, meaning it rushes down nose first, and looks up
again if it flies up. This can be achieved simply by rotation the player depending on the vertical velocity. This is only applied if the player is not in the wabble state, like in the main menu. This is done by having 2 random
animations, one for the x and one for the y value.
The push() function is called when you tap the screen, and it uses an linear impulse to make the player fly up.
Also the player has a gameOver signal that we can call and listen to from outside, as you will see in the next component.
BorderElement.qml
 import Felgo 4.0
 import QtQuick 2.0

 EntityBase {
   entityType: "border"

   BoxCollider {
     width: parent.width
     height: parent.height
     bodyType: Body.Static
     fixture.onBeginContact: {
       player.gameOver()
     }
   }
 }
This is the element we use at the top and the bottom of our screen, if something comes in contact (this can only be the player so we do not have to check what it is), we emit the gameOver() signal of the player entity.
Pipes.qml
 import Felgo 4.0
 import QtQuick 2.0

 EntityBase {
   id: pipeElement
   width: spriteUpperPipe.width
   height: spriteUpperPipe.height+pipeGateway+spriteBottomPipe.height

   property int pipeGateway: 90
   property int variationDistance: 70
   property double delay: 0

   MultiResolutionImage {
     id: spriteUpperPipe
     source: "../../assets/img/pipe_green.png"
     mirrorY: true
   }

   BoxCollider {
     id: collider
     width: spriteUpperPipe.width
     height: spriteUpperPipe.height
     anchors.centerIn: spriteUpperPipe
     bodyType: Body.Static
     collisionTestingOnlyMode: true
     fixture.onBeginContact: {
       player.gameOver()
     }
   }

   BoxCollider {
     width: 10
     height: pipeGateway
     y: spriteBottomPipe.height
     x: spriteBottomPipe.width/2
     bodyType: Body.Static
     collisionTestingOnlyMode: true
     fixture.onBeginContact: {
       gameScene.score++

       audioManager.play(audioManager.idPOINT)
     }
   }

   MultiResolutionImage {
     id: spriteBottomPipe
     y: height+pipeGateway
     source: "../../assets/img/pipe_green.png"
   }

   BoxCollider {
     id: colliderBottomPipe
     width: spriteBottomPipe.width
     height: spriteBottomPipe.height
     anchors.centerIn: spriteBottomPipe
     bodyType: Body.Static
     collisionTestingOnlyMode: true
     fixture.onBeginContact: {
       player.gameOver()
     }
   }

   MovementAnimation {
     id: animation
     target: parent
     property: "x"
     velocity: -150
     running: false
     minPropertyValue: scene.gameWindowAnchorItem.x-pipeElement.width*1.5
     onLimitReached: {
       reset()
     }
   }

   function generateRandomValueBetween(minimum, maximum) {
     return Math.random()*(maximum-minimum) + minimum
   }

   function reset() {
     pipeElement.x = scene.gameWindowAnchorItem.width+pipeElement.width/2
     pipeElement.y = generateRandomValueBetween(-variationDistance, variationDistance)-scene.height/3
   }

   function start() {
     delayTimer.restart()
   }

   function stop() {
     animation.stop()
     delayTimer.stop()
   }

   Timer {
     id: delayTimer
     interval: delay*1000
     repeat: false
     onTriggered: {
       animation.start()
     }
   }

   Component.onCompleted: {
     reset()
   }
 }
The pipes consist of an upper pipe, a lower pipe, and an invisible collider in between to check if the player successfully passed the pipes. If this is the case, we increase the score. There are several ways to design your
level, to create the pipes and move them across the screen. We decided to use a fairly simple one: We have 2 pipes in the level, and each of them starts after a different delay. They are constantly moved with a MovementAnimation and their position is simply reseted after leaving the left hand side of the screen.
Scenes and General Structure of the Game
Before we have a look at the individual scenes, we will see how the game is structured. Have a look at the 2 files in the qml folder:
FlappyBirdMain.qml
import Felgo 4.0
import QtQuick 2.0
import "scenes"
import "common"
GameWindow {
id: window
screenWidth: 320
screenHeight: 480
property alias window: window
activeScene: splash
Component.onCompleted: {
splash.opacity = 1
mainItemDelay.start()
}
Timer {
id: mainItemDelay
interval: 500
onTriggered: {
mainItemLoader.source = "MainItem.qml"
}
}
Loader {
id: mainItemLoader
onLoaded: {
if(item) {
hideSplashDelay.start()
}
}
}
Timer {
id: hideSplashDelay
interval: 200
onTriggered: {
splash.opacity = 0
}
}
SplashScene {
id: splash
}
}
The smaller your initial scene is, the faster your game will load. That is why we are starting with nothing but a small SplashScene and then load the rest of the game (MainItem.qml) dynamically with a Loader element.
SplashScene.qml
 import Felgo 4.0
 import QtQuick 2.0
 import "../common"

 SceneBase {
   MultiResolutionImage {
     anchors.centerIn: parent
     source: "../../assets/img/splash.png"
   }
 }
MainItem.qml
import Felgo 4.0
import QtQuick 2.0
import "scenes"
import "common"
Item {
id: mainItem
property alias audioManager: audioManager
property alias entityManager: entityManager
property alias gameNetwork: felgoGameNetworkScene.gameNetwork
property int highscore: gameNetwork.userHighscoreForCurrentActiveLeaderboard
property int coins
AudioManager {
id: audioManager
}
MenuScene {
id: menuScene
onGamePressed: {
mainItem.state = "game"
}
onNetworkPressed: {
felgoGameNetworkScene.initialStateBeforeShow = "menu"
mainItem.state = "gameNetwork"
}
onBackButtonPressed: {
NativeUtils.displayMessageBox("Really quit the game?", "", 2);
}
Connections {
target: window.activeScene === menuScene ? NativeUtils : null
onMessageBoxFinished: {
if(accepted) {
Qt.quit()
}
}
}
}
GameScene {
id: gameScene
onMenuPressed: {
mainItem.state = "menu"
}
onNetworkPressed: {
felgoGameNetworkScene.initialStateBeforeShow = "game"
mainItem.state = "gameNetwork"
}
onUseCoinsPressed: {
}
}
FelgoGameNetworkScene {
id: felgoGameNetworkScene
onBackButtonPressed: {
mainItem.state = felgoGameNetworkScene.initialStateBeforeShow
}
}
EntityManager {
id: entityManager
entityContainer: gameScene.entityContainer
}
state: "menu"
states: [
State {
name: "menu"
PropertyChanges {target: menuScene; opacity: 1}
PropertyChanges {target: window; activeScene: menuScene}
StateChangeScript {
script: {
audioManager.play(audioManager.idSWOOSHING)
}
}
},
State {
name: "gameNetwork"
PropertyChanges {target: felgoGameNetworkScene; opacity: 1}
PropertyChanges {target: window; activeScene: felgoGameNetworkScene}
},
State {
name: "game"
PropertyChanges {target: gameScene; opacity: 1}
PropertyChanges {target: window; activeScene: gameScene}
StateChangeScript {
script: {
gameScene.enterScene()
audioManager.play(audioManager.idSWOOSHING)
}
}
}
]
}
The MainItem.qml holds the real game, with all the scenes and a state machine to switch between them.
We introduced a new aspect to the game, we replaced the medal achievement that are displayed at the game over screen with coins. After each round, the score will be added to the users amount of coins, this could be used e.g.
for some kind of in-game currency.
For our Menus, we added 2 reusable components the ImageButton.qml and the Menu.qml:
ImageButton.qml
 import Felgo 4.0
 import QtQuick 2.0

 Item {
   id: button

   signal clicked
   signal pressed
   signal released

   width: sprite.width
   height: sprite.height

   property alias source: sprite.source

   MultiResolutionImage {
     id: sprite
   }

   MouseArea {
     id: mouseArea
     enabled: button.enabled
     anchors.fill: button
     hoverEnabled: true

     onClicked: button.clicked()
     onPressed: button.pressed()
     onReleased: button.released()
   }

   onClicked: {
   }

   onPressed: {
     opacity = 0.5
   }

   onReleased: {
     opacity = 1.0
   }
 }
Just a simple button with an image and signals that are emitted if the player interacts with it.
Menu.qml
 import Felgo 4.0
 import QtQuick 2.0

 Row {
   signal playPressed()
   signal networkPressed()

   spacing: 18
   anchors.horizontalCenter: parent.horizontalCenter
   height: menuItem.height

   ImageButton {
     id: menuItem
     onClicked: {
       playPressed()
     }
     source: "../../assets/img/playAgain.png"
   }

   ImageButton {
     onClicked: {
       networkPressed()
     }
     source: "../../assets/img/scores.png"
   }
 }
This is the 2-button menu that is displayed in the main menu as well as at game over. It also has 2 signals indicating which of the 2 buttons was selected.
Now let's have a look at the scenes themselves:
MenuScene.qml
 import QtQuick 2.0
 import Felgo 4.0
 import "../common"
 import "../entities"

 SceneBase {
   id: scene

   signal gamePressed()
   signal networkPressed()

   Background {
     anchors.horizontalCenter: scene.gameWindowAnchorItem.horizontalCenter
     anchors.bottom: scene.gameWindowAnchorItem.bottom
   }

   MultiResolutionImage {
     anchors.top: parent.top
     anchors.topMargin: 60
     anchors.horizontalCenter: scene.gameWindowAnchorItem.horizontalCenter
     source: "../../assets/img/logo.png"
   }

   Ground {
     id: ground
     anchors.horizontalCenter: scene.gameWindowAnchorItem.horizontalCenter
     anchors.bottom: scene.gameWindowAnchorItem.bottom
   }

   Player {
     resetX: scene.gameWindowAnchorItem.width/2
     resetY: scene.gameWindowAnchorItem.height/2
   }

   Menu {
     anchors.bottom: ground.top

     onNetworkPressed: parent.networkPressed()
     onPlayPressed: gamePressed()
   }

   onEnterPressed: {
     gamePressed()
   }
 }
This is the main menu scene, that is displayed at the start of the game, after the splash screen disappeared. It consists only of components that we already had a look at. We set the players resetX and resetY positions to
the center of the screen, where he will then wabble around.
FelgoGameNetworkScene.qml
import QtQuick 2.0
import Felgo 4.0
import "../common"
SceneBase {
id: scene
property alias gameNetwork: gameNetwork
property alias initialStateBeforeShow: gameNetworkView.initialStateBeforeShow
GameNetworkView {
id: gameNetworkView
anchors.fill: scene.gameWindowAnchorItem
showAchievementsHeaderIcon: false
onBackClicked: {
scene.backButtonPressed()
}
}
FelgoGameNetwork {
id: gameNetwork
gameId: 105
secret: "flappyBirdDevPasswordForVPlayGameNetwork"
gameNetworkView: gameNetworkView
onNewHighscore: {
if(!isUserNameSet(userName)) {
NativeUtils.displayTextInput("Congratulations!", "You achieved a new highscore. What is your player name for comparing your scores?", "")
}
}
}
Connections {
target: NativeUtils
onTextInputFinished: {
if(accepted) {
var validUserName = gameNetwork.updateUserName(enteredText)
}
}
}
}
This is more or less the most basic usage of the Felgo Game Network, without any visual customization.
Now it's finally time to inspect the game scene. Just like in the original Flappy Bird it will start off with a screen to get ready, then the actual game, and a game over screen after the player crashed.
GameScene.qml
import Felgo 4.0
import QtQuick 2.0
import "../game"
import "../common"
import "../entities"
SceneBase {
id: scene
property int score: 0
property bool gameIsRunning: false
property double gravityValue: 9.81*3
property alias entityContainer: level
signal menuPressed()
signal networkPressed()
signal useCoinsPressed()
PhysicsWorld {
id: physicsWorld
z: 1
gravity.y: gravityValue
updatesPerSecondForPhysics: 60
velocityIterations: 5
positionIterations: 5
debugDrawVisible: false
}
Level {
id: level
anchors.fill: parent
}
Player {
id: player
resetX: parent.width/10*3
resetY: parent.height/10*4
onGameOver: {
if(scene.state === "gameOver")
return
coins+=score
scene.state = "gameOver"
audioManager.play(audioManager.idDIE)
audioManager.play(audioManager.idHIT)
}
}
Numbers {
anchors.horizontalCenter: parent.horizontalCenter
y: 30
number: score
}
MouseArea {
id: mouseControl
anchors.fill: scene.gameWindowAnchorItem
onPressed: {
if(gameIsRunning) {
player.push()
}
}
}
GameOverScreen {
id: gameOverStats
onPlayPressed: scene.state = "wait"
onNetworkPressed: parent.networkPressed()
onUseCoinsPressed: parent.useCoinsPressed()
}
WaitScreen {
id: waitToPlay
onClicked: {
scene.state = "play"
player.push()
}
}
onBackButtonPressed: {
if(scene.state == "gameOver") mainItem.state = "menu"
scene.state = "gameOver"
}
function enterScene() {
state = "wait"
}
function exitScene() {
menuPressed()
}
function initGame() {
player.reset()
level.reset()
score = 0
}
function startGame() {
level.start()
}
function stopGame() {
level.stop()
}
function gameOver() {
stopGame()
if(score > 0) {
gameNetwork.reportScore(score)
}
}
state: "wait"
states: [
State {
name: "wait"
PropertyChanges {target: waitToPlay; opacity: 1}
PropertyChanges {target: physicsWorld; gravity: Qt.point(0,0)}
StateChangeScript {
script: {
initGame()
}
}
},
State {
name: "play"
PropertyChanges {target: scene; gameIsRunning: true}
PropertyChanges {target: physicsWorld; gravity: Qt.point(0,gravityValue)}
StateChangeScript {
script: {
startGame()
}
}
},
State {
name: "gameOver"
PropertyChanges {target: gameOverStats; opacity: 1}
PropertyChanges {target: physicsWorld; gravity: Qt.point(0,gravityValue*3)}
StateChangeScript {
script: {
gameOver()
}
}
}
]
}
Again we use a state machine to switch between the 2 screens that i mentioned above. Also we have a PhysicsWorld that takes care of pulling the player down with gravity.
The parts of which the game scene consists can be found in the game folder of your project.
Level.qml
 import Felgo 4.0
 import QtQuick 2.0
 import "../entities"
 import "../common"

 Item {
   id: level

   Background {
     anchors.horizontalCenter: parent.horizontalCenter
     y: scene.gameWindowAnchorItem.y+scene.gameWindowAnchorItem.height-height
   }

   BorderElement {
     x: scene.gameWindowAnchorItem.x
     y: scene.gameWindowAnchorItem.y-20
     width: scene.gameWindowAnchorItem.width
     height: 20
   }

   BorderElement {
     y: ground.y
     x: scene.gameWindowAnchorItem.x
     width: scene.gameWindowAnchorItem.width
     height: 20
   }

   Pipes {
     id: pipes1
     delay: 0
   }

   Pipes {
     id: pipes2
     delay: 1.5
   }

   Ground {
     id: ground
     anchors.horizontalCenter: parent.horizontalCenter
     y: scene.gameWindowAnchorItem.y+scene.gameWindowAnchorItem.height-height
   }

   function reset() {
     pipes1.reset()
     pipes2.reset()
     ground.reset()
   }

   function stop() {
     pipes1.stop()
     pipes2.stop()
     ground.stop()
   }

   function start() {
     pipes1.start()
     pipes2.start()
   }
 }
Here you can see that the pipes have a different delay, causing them to start one after the other with an offset between them. Furthermore we added function to start, stop and reset the pipes, used for game over and
restarting the game.
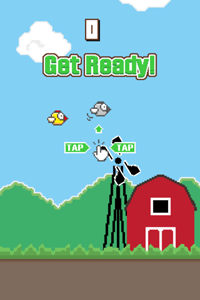
WaitScreen.qml
 import Felgo 4.0
 import QtQuick 2.0

 Item {
   width: parent.width
   height: parent.height
   y: -30
   opacity: 0
   visible: opacity === 0 ? false : true
   enabled: visible

   signal clicked()

   MultiResolutionImage {
     source: "../../assets/img/getReady.png"
     anchors.bottom: tutorial.top
     anchors.horizontalCenter: parent.horizontalCenter
     anchors.bottomMargin: 30
   }

   MultiResolutionImage {
     id: tutorial
     anchors.centerIn: parent
     source: "../../assets/img/tutorial.png"
   }

   MouseArea {
     anchors.fill: parent
     onClicked: {
       parent.clicked()
     }
   }
 }
This is the first screen of the game scene, with the little tutorial shown. As soon as the player taps it, the game scene switches to the "play" state and starts the game.
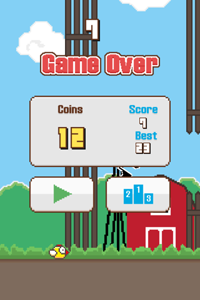
GameOverScreen.qml
 import Felgo 4.0
 import QtQuick 2.0
 import "../scenes"
 import "../common"

 Item {
   width: parent.width
   height: parent.height
   y: -30
   opacity: 0
   visible: opacity === 0 ? false : true
   enabled: visible

   signal playPressed()
   signal networkPressed()
   signal useCoinsPressed()

   MultiResolutionImage {
     source: "../../assets/img/gameOver.png"
     anchors.bottom: scoreBoard.top
     anchors.horizontalCenter: parent.horizontalCenter
     anchors.bottomMargin: 30
   }

   MultiResolutionImage {
     id: scoreBoard
     anchors.centerIn: parent
     source: "../../assets/img/scoreBoard.png"
   }

   Numbers {
     anchors.right: scoreBoard.right
     anchors.rightMargin: -10
     anchors.top: scoreBoard.top
     anchors.topMargin: 35
     scale: 0.5
     number: gameScene.score
   }

   Numbers {
     anchors.right: scoreBoard.right
     anchors.rightMargin: -10
     anchors.top: scoreBoard.top
     anchors.topMargin: 75
     scale: 0.5
     number: highscore
   }

   Numbers {
     color: "_gold"
     anchors.left: scoreBoard.left
     anchors.leftMargin: 30
     anchors.top: scoreBoard.top
     anchors.topMargin: 50
     number: coins
   }

   Menu {
     anchors.top: scoreBoard.bottom
     anchors.topMargin: 15
     onPlayPressed: parent.playPressed()
     onNetworkPressed: parent.networkPressed()
   }

 }
This screen shows the score of the last round, the overall highscore as well as the total number of coins that the player gathered already.
The only file that is left, is the Numbers.qml. Since the numbers that are displayed are no font, but custom images instead, we build this component to handle displaying any number using those
images.
Numbers.qml
import Felgo 4.0
import QtQuick 2.0
import "../entities"
Item {
id: numbers
width: row.width
height: row.heigth
property string color
property int number: 0
property string imagePath: "../../assets/img/"
function truncate(_value)
{
if (_value<0) return Math.ceil(_value);
else return Math.floor(_value);
}
onNumberChanged: {
if(number > 9999) number = 9999
var trailingZero = true
var unit = truncate((number / 1000) % 10)
if((trailingZero && unit <= 0) || unit >= 10) {
position1000.source = imagePath + "empty_big.png"
} else {
trailingZero = false
position1000.source = imagePath + unit+"_big"+color+".png"
}
unit = truncate((number / 100) % 10)
if((trailingZero && unit <= 0) || unit >= 10) {
position100.source = imagePath + "empty_big.png"
} else {
trailingZero = false
position100.source = imagePath + unit+"_big"+color+".png"
}
unit = truncate((number / 10) % 10)
if((trailingZero && unit <= 0) || unit >= 10) {
position10.source = imagePath + "empty_big.png"
} else {
position10.source = imagePath + unit+"_big"+color+".png"
}
unit = truncate(number % 10)
if(number % 10 && ((trailingZero && unit <= 0) || unit >= 10)) {
position1.source = imagePath + "empty_big.png"
} else {
position1.source = imagePath + unit+"_big"+color+".png"
}
if(number <= 0) {
position1.source = imagePath + "0_big"+color+".png"
}
}
Row {
id: row
height: position1.height
x: number >= 1000 ? -12 : number >= 100 ? -24 : number >= 10 ? -36 : -48
MultiResolutionImage {
id: position1000
source: imagePath + "empty_big.png"
}
MultiResolutionImage {
id: position100
source: imagePath + "empty_big.png"
}
MultiResolutionImage {
id: position10
source: imagePath + "empty_big.png"
}
MultiResolutionImage {
id: position1
source: imagePath + "0_big"+color+".png"
}
}
}
This is some rather complicated stuff at first sight, but mostly is only selecting the right image for the right digit of the number display.
Recap
So that's it for now, enjoy the gaming experience!
Visit Felgo Games Examples and Demos to gain more information about game creation with Felgo and to see the source code of existing apps in the app stores.