
Introduction
This game idea is from the multi million hit Flappy Bird http://en.wikipedia.org/wiki/Flappy_Bird.
In this tutorial I will strip up basic things like creating menus and switching scenes, instead this is an in-depth explanation of how to create the mechanics of the Flappy Bird game with Felgo. It features sprite sequences,
multiple devices & aspect ratios support, animations, physics, touch input and property bindings.
We also provide the full source code of Flappy Bird made with Felgo on GitHub.
For an overview of the game features, see Flappy Bird Game.
Resources
I prepared a small template project where I already included the assets that we need for our game, go ahead and dowload it here.
The Project Template
Extract the downloaded project to your preferred destination and then open it with Qt Creator. Let me first quickly show you the project structure: Any non source code files are found under Other
files in the project tree on the left hand side. Go to Other files\assets, that's where our images are.
As you can see, we provide only one size for each image and not distinct versions for higher resolutions. This means on high resolution devices, the graphics will be simply scaled up and won't look crispy clear. But for our
pixel style graphics, this is not such a huge deal, so we are fine with that. However if you are only using one size of images, you must disable the File Selectors which select the right asset folder (root folder, +hd, +hd2) depending on the device resolution. Use the project tree to navigate to Sources\main.cpp. As we only want
to use the images from the root folder, we need to add one line to the main.cpp file:
int main(int argc, char *argv[])
{
felgo.setContentScaleAndFileSelectors(1);
engine.load(QUrl(felgo.mainQmlFileName()));
return app.exec();
}
Alright, everything is prepared, let's get the party started!
Player
Use the project tree to navigate to QML\qml, this is where all the qml files are. Now create a new Player.qml file with the following content:
 import QtQuick 2.0
 import Felgo 4.0

 EntityBase {
   id: player
   entityType: "player"
   width: 26
   height: 26

   GameSpriteSequence {
     id: bird
     anchors.centerIn: parent

     GameSprite {
       frameCount: 3
       frameRate: 10
       frameWidth: 34
       frameHeight: 24
       source: "../assets/bird.png"
     }
   }
 }
The EntityBase is the base class of all Felgo entities and enables them to be controlled by the EntityManager. Then we got a GameSpriteSequence to create an animated sprite of the flying bird. All we need to do is specify the image file, provide the size of one frame, and the number of frames that the animation
has. In our case it is 3 frames for the different wing positions.

Add the player to the Scene in main.qml
import QtQuick 2.0
import Felgo 4.0
GameWindow {
Scene {
id: scene
Player {
id: player
x: 147
y: 167
}
}
}
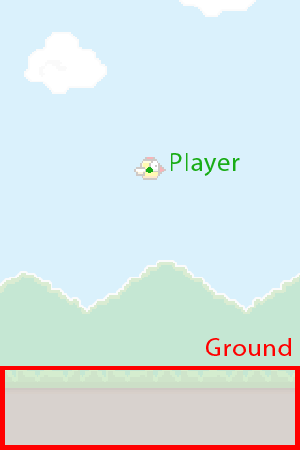
If you run the project, you already can see the flying bird.
Background
Add a background image to the Scene main.qml. Make sure to put it before the Player item to have the right z-ordering. (You could also define the z-ordering
manually via the z property, but it's more clear if you put them in the right order in the first place)
 Image {
   id: bg
   source: "../assets/bg.png"
 }
B-e-a-u-t-i-f-u-l!
Ground
Create a Ground.qml file and add the following content:
 import QtQuick 2.0
 import Felgo 4.0

 EntityBase {
   id: ground
   entityType: "ground"
   width: sprite.width
   height: sprite.height

   GameSpriteSequence {
     id: sprite

     GameSprite {
       frameCount: 2
       frameRate: 4
       frameWidth: 368
       frameHeight: 90
       source: "../assets/land.png"
     }
   }
 }
Pretty much like the Player, our Ground is made of an animated sprite. Notice that we define a width and a height here so we will be able to position the ground correctly by anchoring it in the next step. In contrast the
player entity will logically be just a point, which is fine as we only need to know the center of the player to put him in his starting position. The rest will be handled by the physics system as you will see later.
Add it to the Scene in main.qml, between the background image and the Player item.
 Ground {
   anchors.bottom: scene.bottom
 }
If you run the project, we got a ground anchored to the bottom of the scene, yay! But since this game is for mobile devices, we got to support a huge range of different screen resolutions and aspect ratios. We already took
care of the resolutions (kind of), by effectively not caring about them and using the same images for every one of them. Now it's time to worry about the aspect ratios.
You can modify the game window at runtime, by moving to the edge of it and resizing the application window, or just press the shortcut keys Ctrl + 1-7 to switch to popular resolutions.
The first thing that you will see is that we get white borders (the default background color of a Qt application is white and not black). Also the layout gets pretty messed up. But you maybe also notice that the images are
bigger than the initial window size. Because we were thinking ahead when designing the images, just like we teach you in this tutorial. It's a really important tutorial, you
definitely should have a look at it right now, if you haven't done so already. But promise to come back to this tutorial. ;)
Alignment of Components
To support multiple display resolutions and aspect ratios of different devices, we need to think about the exact positioning of the components.
To master this challenge, Felgo provides you with the following set of tools.
It highly depends on your game to find the right way of designing and aligning your components to make it look nice and equally playable on any device. I recommend to run the game after each of the following adaptions, and
resize the application window to see the change in the behavior of the game at different aspect ratios. Of course you can produce pretty weird aspect ratios on the desktop, which you won't encounter on real devices.
Apply the following fixes in main.qml:
 Image {
   id: bg
   source: "../assets/bg.png"
   anchors.horizontalCenter: scene.horizontalCenter
   anchors.bottom: scene.gameWindowAnchorItem.bottom
 }
 Ground {
   anchors.horizontalCenter: scene.horizontalCenter
   anchors.bottom: scene.gameWindowAnchorItem.bottom
 }
Scene {
id: scene
sceneAlignmentY: "bottom"
}
Now we got everything horizontally centered, and vertically anchored to the ground. This makes it not only look flawless on any device, it also provides us with a constant ground height, perfect for displaying an ad banner
like in the original Flappy Bird.
Now that we have one thing less to worry about, we can focus on the gameplay.
Physics
Oh my god physics, even worse than maths right? But physics makes a real bird fly. And we also need physics to make our bird fly. Fortunately, this is a no-brainer with Felgo, so let's go.
General
Add a PhysicsWorld to the Scene in main.qml
PhysicsWorld {
debugDrawVisible: true
z: 1000
}
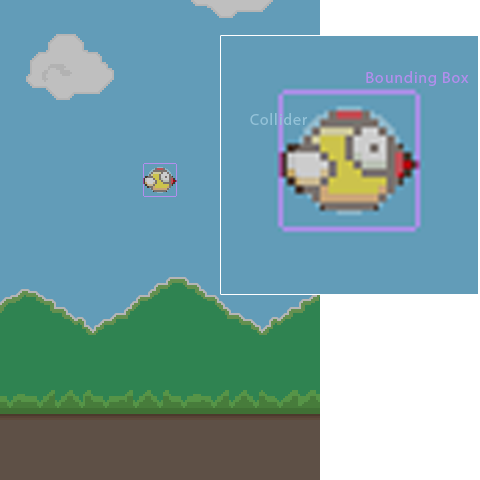
Now add a collider to the Player.qml entity to turn it into a physical object.
import QtQuick 2.0
import Felgo 4.0
EntityBase {
id: player
entityType: "player"
width: 26
height: 26
GameSpriteSequence {
}
CircleCollider {
id: collider
radius: 13
}
}
If you run the game now, you will see an overlay displaying the PhysicsWorld and the physics objects.
The next step is to add gravity, to make the player drop.
PhysicsWorld {
debugDrawVisible: true
gravity.y: 27
}
Now the player immediately starts to fall when the game starts. To prevent the player from falling endlessly, we will also add a collider to the EntityBase in Ground.qml
 BoxCollider {
   anchors.fill: parent
   bodyType: Body.Static
 }
Notice that we declare the BoxCollider::bodyType property to Body.Static, to prevent the ground from any form of displacement due to
collisions, forces or gravity.
Time to Fly!
If we touch the screen, we want the bird to get pushed up. So the first step is to add a push function to the EntityBase in Player.qml
 function push() {
   collider.body.linearVelocity = Qt.point(0,0)
   var localForwardVector = collider.body.toWorldVector(Qt.point(0,-280));
   collider.body.applyLinearImpulse(localForwardVector, collider.body.getWorldCenter());
 }
This function mimics the original Flappy Bird movement pretty well. First of all it stops the movement of the player, then creates a vector pointing up (in negative y-direction) and applies it as impulse to the player.

Now we only need to check if there is a touch on the screen, and call the push function. Add this to the Scene in main.qml
 MouseArea {
   anchors.fill: scene.gameWindowAnchorItem
   onPressed: {
     player.push()
   }
 }
We let the MouseArea fill the Scene::gameWindowAnchorItem instead of just the
Scene, to make sure it fills the whole screen of the device.
To complete the player movement, we will also add the bird tilt mechanism. We want the nose of the bird to follow the direction and speed of its flight. So the faster it moves up, the higher the nose should be, and the
faster it drops, the lower it should get. That sounds complex to code, but is it?
Add this plain awesome property binding to the Player.qml
GameSpriteSequence {
id: bird
rotation: collider.linearVelocity.y/10
}
That's it, every time the vertical speed of the player is changed, we change the rotation of the bird accordingly. Aren't property bindings cool?
Pipes
Time to add obstacles and turn this flight simulator into a challenging game!
Create a new Pipe.qml file containing this code:
 import QtQuick 2.0
 import Felgo 4.0

 EntityBase {
   id: pipe
   entityType: "pipe"

   height: 90
   width: 1

   Image {
     id: lowerPipe
     source: "../assets/pipe.png"
     anchors.top: pipe.bottom
     anchors.horizontalCenter: pipe.horizontalCenter
   }

   Image {
     id: upperPipe
     source: "../assets/pipe.png"
     mirror: true
     rotation: 180
     anchors.bottom: pipe.top
     anchors.horizontalCenter: pipe.horizontalCenter
   }
 }
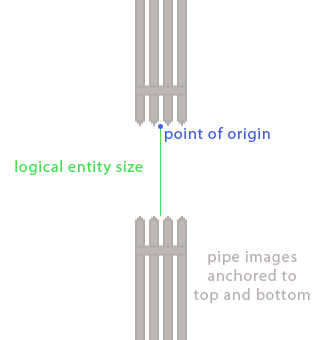
The pipe entity itself will logically be only the gateway (1 x 90 pixels in size). The pipe images are anchored on top and bottom of it. This makes the positioning of the pipes in the game very easy, as you only have to care
about the correct position of the gateway, and the pipe images will be aligned automatically.
Then add the pipe to the Scene in main.qml, between the background image and the Ground item.
 Pipe {
   id: pipe1
   x: 400
   y: 30+Math.random()*200
 }
As the pipe is now positioned far enough outside of the screen (you can resize the game horizontally at runtime to see the pipe), it's time to move it across the screen.
Add this to the EntityBase in Pipe.qml
 MovementAnimation {
   id: movement
   target: pipe
   property: "x"
   minPropertyValue: -80
   velocity: -120
   running: true
   onLimitReached: {
     pipe.x = 400
     pipe.y = 30+Math.random()*200
   }
 }
This will move the pipe horizontally from 400 to -80 (480 pixels total) and then reset it back to 400 and continue the movement.
Next, we will add physics to the pipes, put this in the EntityBase in Pipe.qml
 EntityBase {
     BoxCollider {
       anchors.fill: pipe
       bodyType: Body.Static
       collisionTestingOnlyMode: true
     }

     BoxCollider {
       anchors.fill: lowerPipe
       bodyType: Body.Static
       collisionTestingOnlyMode: true
     }

     BoxCollider {
       anchors.fill: upperPipe
       bodyType: Body.Static
       collisionTestingOnlyMode: true
     }
 }
The colliders will be in collisionTestingOnlyMode, as we only need them to detect collisions, without actually affecting the player movement. We got 3 colliders
total, 2 for the upper and lower pipes, and one for the gateway between the pipes, to check if the player successfully passed them.
Before we implement the actual game logic, we will add another pipe to make the game a little more challenging. Add this next to the first pipe in main.qml
 Pipe {
   id: pipe2
   x: 640
   y: 30+Math.random()*200
 }
We position the 2nd pipe by 240 pixel (half of the total travel width) left of the first pipe (400 + 240 = 640 in total). The 2nd pipe will then reach the reset point later and from that point on they will keep crossing the
screen one after the other.
Game Logic
The game will have 3 states:
wait: Pipes will not move, game starts after the first touch on the screen.play: Actual game.gameOver: Player hits a pipe or the ground and falls down to the ground. The next touch on the screen will reset the game.
Add a custom property to the Scene in main.qml like this:
property string gameState: "wait"
We will begin with the wait state, by setting it as default value.
Then we can use this state to control the gravity, with a property binding
gravity.y: scene.gameState != "wait" ? 27 : 0
To actually start the game, we create a function (we could also set the state directly, but this is little bit cleaner and could come in handy when extending the project) and then call this function when touching the screen,
both in the Scene in main.qml
 function startGame() {
   scene.gameState = "play"
 }
 MouseArea {
   anchors.fill: scene.gameWindowAnchorItem
   onPressed: {
     if(scene.gameState == "wait") {
       scene.startGame()
       player.push()
     } else if(scene.gameState == "play") {
       player.push()
     }
   }
 }
Now we also need to stop the game if the player hits a pipe or the ground, so we add another function to Scene in main.qml
 function stopGame() {
   scene.gameState = "gameOver"
 }
Then change the colliders of the pipes and the ground to listen for contacts.
Ground.qml
 BoxCollider {
   anchors.fill: parent
   bodyType: Body.Static
   fixture.onBeginContact: {
     scene.stopGame()
   }
 }
Pipe.qml
import QtQuick 2.0
import Felgo 4.0
EntityBase {
BoxCollider {
anchors.fill: lowerPipe
bodyType: Body.Static
collisionTestingOnlyMode: true
fixture.onBeginContact: {
scene.stopGame()
}
}
BoxCollider {
anchors.fill: upperPipe
bodyType: Body.Static
collisionTestingOnlyMode: true
fixture.onBeginContact: {
scene.stopGame()
}
}
}
We can also use the gameState to stop the flap and ground animation on game over. Add this to the GameSpriteSequence of Player.qml and Ground.qml
running: scene.gameState != "gameOver"
To complete the gameplay, we need to add a reset function to the Scene in main.qml and call it in our MouseArea as well
 function reset() {
   scene.gameState = "wait"
   pipe1.x = 400
   pipe1.y = 30+Math.random()*200
   pipe2.x = 640
   pipe2.y = 30+Math.random()*200
   player.x = 160
   player.y = 180
 }
 MouseArea {
   anchors.fill: scene.gameWindowAnchorItem
   onPressed: {
     if(scene.gameState == "wait") {
       scene.startGame()
       player.push()
     } else if(scene.gameState == "play") {
       player.push()
     } else if(scene.gameState == "gameOver") {
       scene.reset()
     }
   }
 }
Score
Add a new custom property to the Scene in main.qml,
property int score: 0
reset it to 0 in the reset() function,
scene.score = 0
and add a Text element to display the score with a simple property binding
 Text {
   text: scene.score
   color: "white"
   anchors.horizontalCenter: scene.horizontalCenter
   y: 30
   font.pixelSize: 30
 }
The only thing missing is to increase the score, which should happen when the player passes the pipe gateway, so change this collider in Pipe.qml
 BoxCollider {
   anchors.fill: pipe
   bodyType: Body.Static
   collisionTestingOnlyMode: true
   fixture.onBeginContact: {
     scene.score++
   }
 }
Now your hunt for a highscore can start!
Where to go from here
Did you notice that the player can still leave the top of the screen? You will need a ceiling with a collider, and stop the game on collision, just like the Ground item does. Also the original game has menus and a nice game
over screen with stats like your current highscore and a leaderboard. This is very easy to implement using the Felgo Game Network.
Also visit Felgo Games Examples and Demos to gain more information about game creation with Felgo and to see the source code of existing apps in the app stores.


