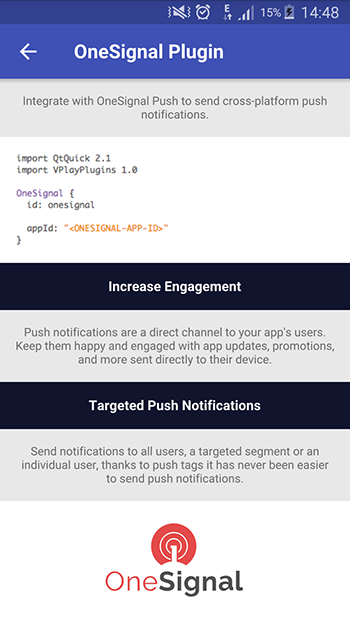
Integrate with OneSignal Push to send cross-platform push notifications.
Increase Engagement
Push notifications are a direct channel to your app's users. Keep them happy and engaged with app updates, promotions, and more sent directly to their device.
Targeted Push Notifications
Send notifications to all users, a targeted segment or an individual user, thanks to push tags it has never been easier to send push notifications.
Overview
Push Notifications are a great way to keep users engaged and inform users about updates in your app.
In comparison to local notifications push notifications are triggered from a server-side logic. To make things easier OneSignal provides a push backend for delivering notifications from a
custom web-service or with the help of their Push Notification Dashboard.
Therefore push notifications are ideally suited for applications where you want to inform your users about externally triggered status updates, like sports live ticker apps, social messaging apps or any other app which
should inform your users about an update.
Note: If you only need scheduled local notifications that don't require any external logic to be triggered have a look at our Notification Plugin.
OneSignal Examples
Plugin Demo App
To try the plugin or see an integration example have a look at the Felgo Plugin Demo app.
Please also have a look at our plugin example project on GitHub: https://github.com/FelgoSDK/PluginDemo.
Example Usage
Push notifications can either be sent to all registered devices or targeted by setting "tags".
To use push notifications in your app add the following item to your QML code:
 import QtQuick
 import Felgo

 OneSignal {
   id: onesignal

   appId: "<ONESIGNAL-APP-ID>"
 }
Note: You can retrieve the <ONESIGNAL-APP-ID> from your OneSignal Dashboard, for more information have a look at the section OneSignal Account.
To set specific tag called key with value value for a user, you can call the OneSignal::sendTag() method:
onesignal.sendTag("key", "value")
You can disable all push notifications independently from tags by setting the enabled property to false:
OneSignal {
enabled: false
}
To handle an incoming push notification implement the OneSignal::notificationReceived signal handler:
 OneSignal {

   onNotificationReceived: (message) => {
     console.debug("Received notification with message:", message)
   }

 }
The additionalData parameter is a map containing a JSON object content with all parameters of the push notification payload sent over OneSignal.
The signal is emitted in following cases:
Sending Push Notifications
The OneSignal Plugin supports receiving simple text-based push messages or more advanced JSON payload messages, sent over the OneSignal Push API.
To test push notifications on your device you can use any library or tool which supports HTTP POST requests. Here is an example how to send a push notification with the help of curl:
curl --include \
--request POST \
--header "Content-Type: application/json" \
--header "Authorization: Basic <ONESIGNAL-REST-API-KEY>" \
--data-binary '{
"app_id": "<ONESIGNAL-APP-ID>",
"contents": { "en": "Message" }
}' \
https:
Note: You can retrieve the <ONESIGNAL-REST-API-KEY> and <ONESIGNAL-APP-ID> from your OneSignal Dashboard, for
more information have a look at the section OneSignal Account.
You can define the text which should be shown within the notification in the contents block. The text is provided within the OneSignal::notificationReceived handler as message parameter.
If you want to target your push notifications to a specific tag you can add it to the payload in an array like:
curl --include \
--request POST \
--header "Content-Type: application/json" \
--header "Authorization: Basic <ONESIGNAL-REST-API-KEY>" \
--data-binary '{
"app_id": "<ONESIGNAL-APP-ID>",
"contents": { "en": "Message" },
"tags": [{"key": "userId", "relation": "=", "value": "1"}]
}' \
https:
This push notification is only sent to users with a userId tag set to 1.
Beside the "=" relation it's also possible to use ">", "<", and "=". "<" means that the value of the user's tag must be less than the value supplied in the "value" field of the hash.
By default users must match all of the hashes specified in the tags array to receive the notification. You may add {"operator": "OR"} between the entries to allow any of the tag conditions. A maximum of 200 tags and
operators can be used at a time.
Here are advanced examples of combining different tags:
Example 1: level='10' AND madePurchase='true':
 [
   {"key": "level", "relation": ">", "value": "10"},
   {"key": "madePurchase", "relation": "=","value": "true"}
 ]
Example 2: level='10' OR level='20'
 [
   {"key": "level", "relation": "=", "value": "10"},
   {"operator": "OR"},
   {"key": "level", "relation": "=", "value": "20"}
 ]
As stated it is also possible to combine different tags.
Advanced Usages
Beside sending simple text messages within the contents block you can also send a more advanced payload for the following use-cases:
Navigating to a Specific Screen From Push Notifications
It's possible to send additional key/values beside your content payload. As an example you can send a screen code which you can navigate to when a user opens your app from a push notification. For this use case append
additional keys to the JSON payload. The following example defines an additional key named screen:
curl --include \
--request POST \
--header "Content-Type: application/json" \
--header "Authorization: Basic <ONESIGNAL-REST-API-KEY>" \
--data-binary '{
"app_id": "<ONESIGNAL-APP-ID>",
"contents": { "en": "Message" },
"data": { "screen": "Inbox" }
}' \
https:
In you QML code you can then read the key by referencing it in the additionalData parameter:
OneSignal {
onNotificationReceived: (message, additionalData, actionId, actionButtons, isActive) => {
var screen = additionalData["screen"]
}
}
Note: Please keep in mind that the payload's length for push notifications is restricted by Apple's and Google's push notification payload. Therefore make sure that you keep your information reasonable small and
postpone loading additional data after your user opens your app again.
Available QML Items
|
OneSignal
|
Item provides remote push notifications for iOS & Android over the OneSignal service
|
Adding and Activating Plugins
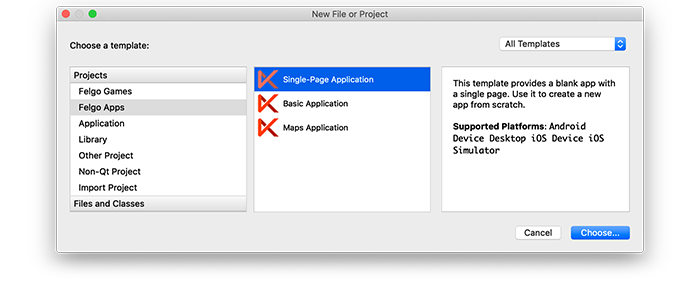
How to Add a Felgo Plugin to your App or Game
When you create a new project, you can choose to add example plugin integrations as well. Open Qt Creator and choose “File / New File or Project”, then choose Single-Page Application in the Felgo Apps section or any
other wizard. For Felgo Games, you can also find an own Game with Plugins project template as an own wizard.
Then select the platforms you want to run your application on. The plugins are available for both iOS & Android. There is a fallback functionality in place on Desktop platforms so your project still works when you call
methods of the plugins. This allows you to do the main development on your PC, and for testing the plugin functionality you can run the project on iOS and Android.
After the Kit Selection, you can choose which of the plugins you’d like to add to your project:

Then complete the wizard, your project is now set up with all the correct plugin dependencies for Android & iOS automatically. This includes:
- Setting up the
.gradle file for Android.
- Setting up the
.plist file for iOS.
- Setting up the
CMakeLists.txt file to include the plugin libraries for iOS.
Note: Additional integration steps are still required for most plugins, for example to add the actual plugin libraries for iOS to your project. Please have a look at the integration steps described in the
documentation for each of the used plugins.
If you have an existing Felgo application, follow these steps to include a plugin to your app or game:
In Qt Creator, select “File / New File or Project” and choose either Felgo Games or Felgo Apps from Files and Classes. Then select Felgo Plugin and press Choose.
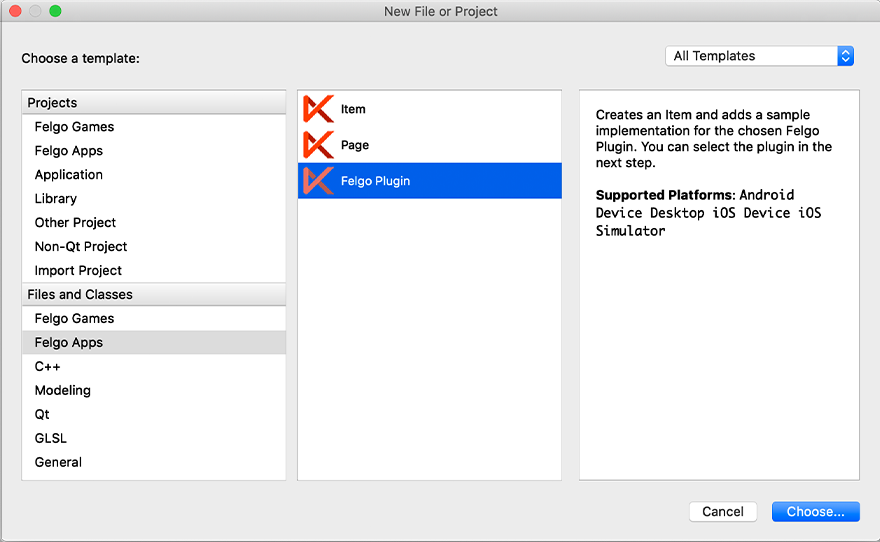
You can now select the plugin you want to add:

The plugin item, which contains the chosen plugin and a short usage example, is now added to your project. To use the item in your project, simply perform these steps:
- Include the created item (use the name you entered in the template before) in your
main.qml file.
- Modify the
CMakeLists.txt file & .plist file for iOS usage. See the iOS integration guide of the chosen plugin for more information.
- Modify the the
.gradle file for Android usage. See the Android integration guide of the chosen plugin for more information.
Note: If you have an existing Qt application, you can also add Felgo Plugins to your app! See here
how to do this.
Activating Plugins with a License Key
You can test all plugins as soon as the required integration steps and plugin configuration are completed.
However, the plugins are only available as Trial Versions if they are not activated with a valid license. When you are using unlicensed plugins, a dialog is shown and a watermark overlays your application to notify you about
the testing state of the plugin.
All monetization plugins are free to use in all licenses, other plugins are only fully usable if you have purchased the Startup or Business license. To activate plugins and enable
their full functionality it is required to create a license key. You can create such a key for your application using the license creation page.
This is how it works:
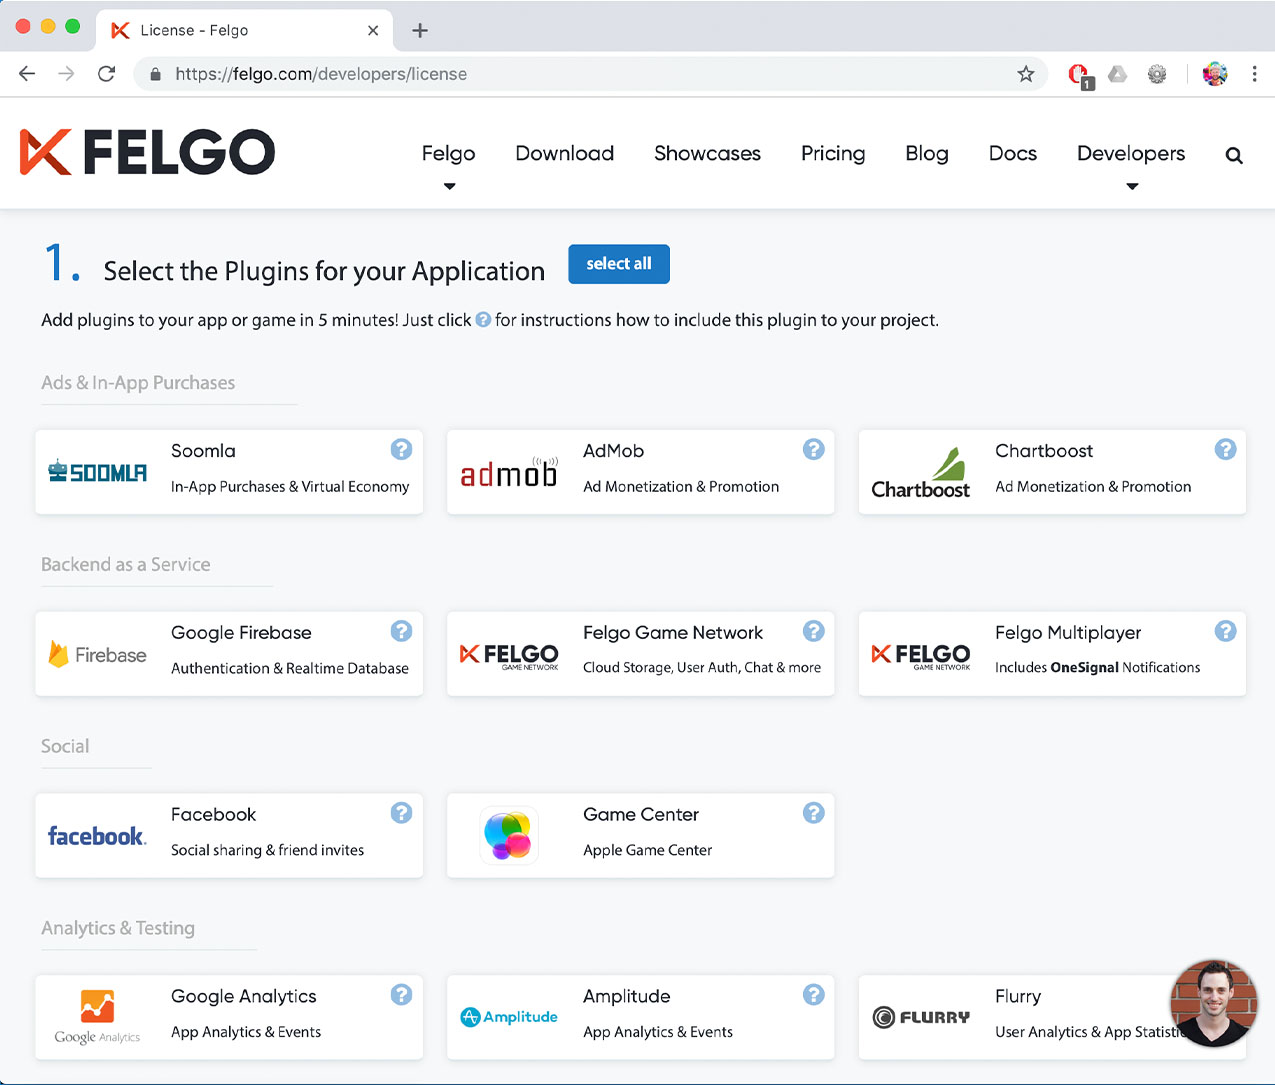
- Choose the plugins you want to include in your license key:
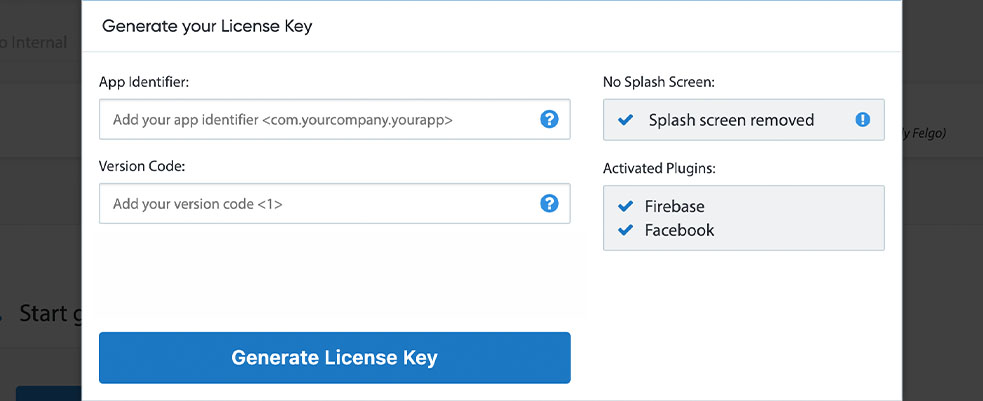
- Click on “Generate License Key” and set the app identifier & version code of your application. You can see that the AdMob plugin was enabled in this license key:
- Copy the generated licenseKey to your GameWindow or App component.
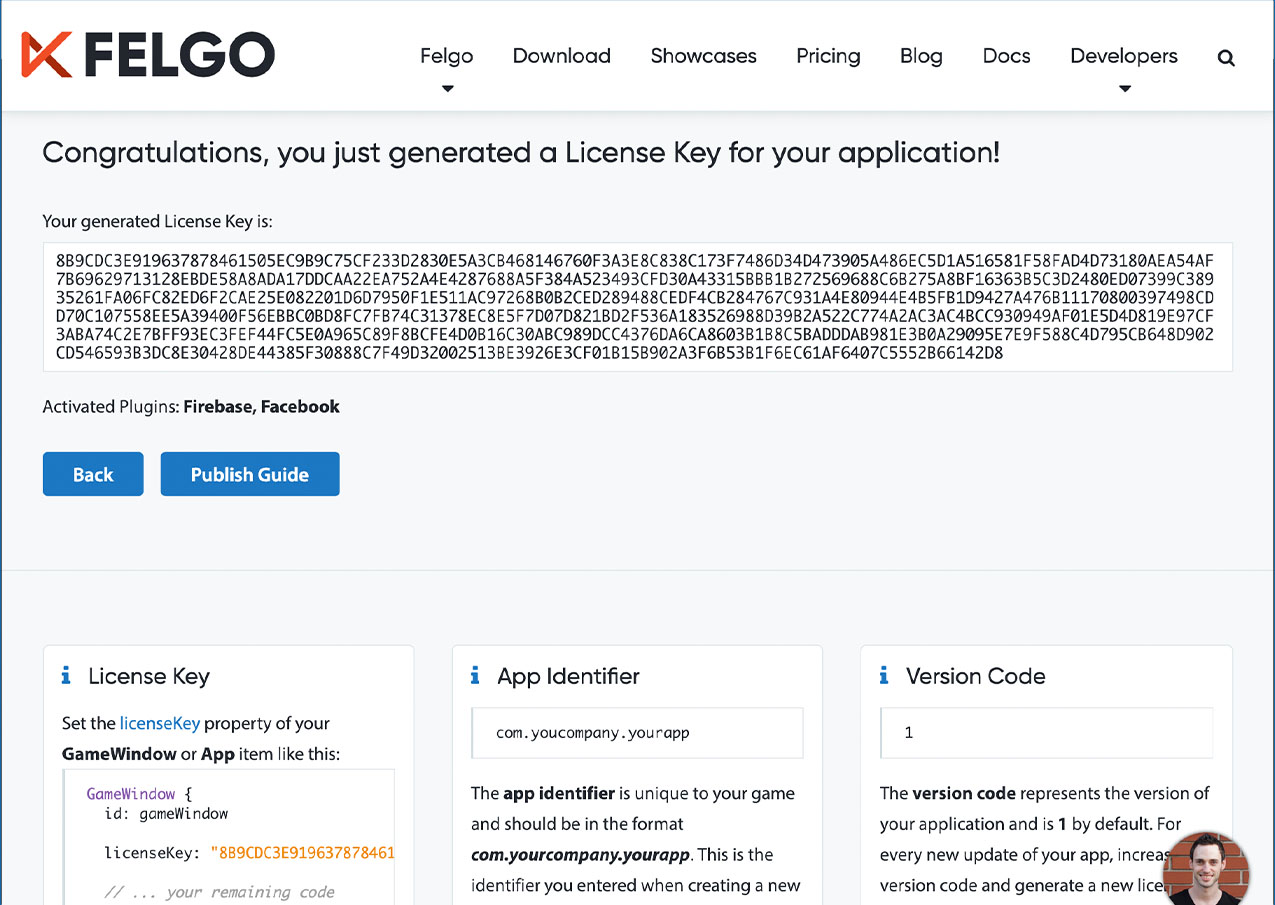
- You can now fully use the selected plugins!
Integration
To use the OneSignal plugin you need to add the platform-specific native libraries to your project, described here:
Project Configuration
Add the following lines of code to your CMakeLists.txt file:
 set(FELGO_PLUGINS
    onesignal
 )
Note: Make sure to declare the FELGO_PLUGINS before calling felgo_configure_executable, which links the required Frameworks based on your settings.
iOS Integration Steps
- Download our PluginDemo from https://github.com/FelgoSDK/PluginDemo/archive/master.zip and unzip it.
- Copy
OneSignal.framework from the ios sub-folder to a sub-folder called ios within your project directory.
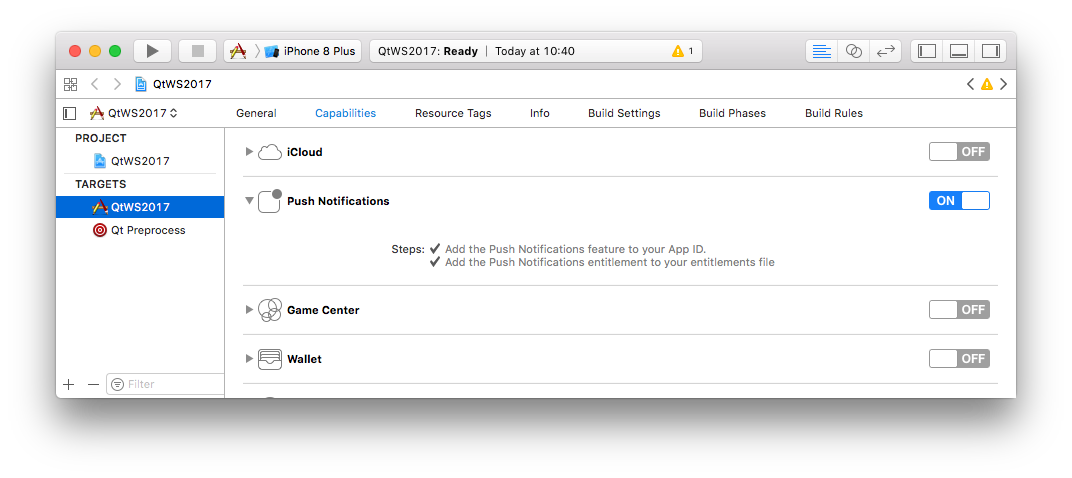
- In addition to correctly setting up your Apple certificates and App Id for push notifications, it is important to also add the Push Notification entitlement for your iOS app.
To activate the entitlement for your app with Xcode, open the *.xcodeproj in your build directory and activate Push Notifications in the capabilities tab.
Note: It is required to again activate this setting whenever Qt Creator uses qmake to re-create the Xcode project each time you build your app.
To avoid this, you can manually set an iOS entitlements file for your project in Qt Creator. Add the following settings to your CMakeLists.txt configuration to use a custom entitlements file:
 if(CMAKE_SYSTEM_NAME STREQUAL "iOS")
   set_target_properties(TargetApp PROPERTIES
       XCODE_ATTRIBUTE_CODE_SIGN_ENTITLEMENTS
       "${CMAKE_CURRENT_SOURCE_DIR}/ios/TargetApp.entitlements")

   target_sources(TargetApp PRIVATE "${CMAKE_CURRENT_SOURCE_DIR}/ios/TargetApp.entitlements")
 endif()
Android Integration Steps
- Open your
build.gradle file and add the following lines to the dependencies block:
 dependencies {
   implementation 'com.felgo.plugins:plugin-onesignal:4.+'
 }
- Check if that your
build.gradle file includes the following line within the android block (replace 'Identifier' with your project's package identifier, as given in
AndroidManifest.xml):
 android {
   defaultConfig.applicationId = 'Identifier'
 }
Note: If you did not create your project from any of our latest wizards, make sure that your project uses the Gradle Build System like described here.
- By default, the app's launcher icon will be used as notification icon within the status bar. Starting with Android 5, the OS forces notification icons to be all white when your app targets Android API 21 and above.
It is therefore recommended to provide a distinct notification icon of size 24x24px (mdpi) with the name ic_stat_onesignal_default.png within your Android app's resources.
OneSignal Account
You finally need to set up a OneSignal account at https://www.onesignal.com. Then open your OneSignal dashboard
and add a new app. There you can also find your application id and REST API keys in the app's settings.
To receive push notifications on iOS you also have to create a new developer and distribution push certificate (with a push-enabled iOS app id) at https://developer.apple.com/account/ios/certificate/certificateList.action
and upload them to the app's push settings.
Used OneSignal SDK Versions
| iOS |
SDK 2.11.1 |
| Android |
SDK 4.8.4 |
Note: Other SDK versions higher than the stated ones might also be working but are not actively tested as of now.


