This document describes how to create a macOS bundle and make sure that the application finds the resources it needs at run-time. We demonstrate the procedures in terms of deploying the Plug & Paint example application that comes with the Qt source package.
The Qt installers for macOS include a deployment tool that automates the procedures described here.
The Bundle
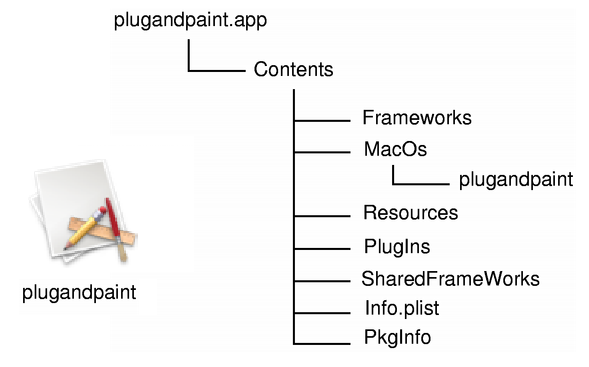
On macOS, a GUI application must be built and run from a bundle, which is a directory structure that appears as a single entity when viewed in the Finder. A bundle for an application typically contains the executable and all
the resources it needs. Here is the snapshot of an application bundle structure:
The bundle provides many advantages to the user:
- It is easy to install as it is identified as a single entity.
- Information about a bundle is accessible from code.
This is specific to macOS and beyond the scope of this document. For more information about bundles, see Apple's Developer
Website.
To build your application as a bundle with CMake, set the MACOSX_BUNDLE property on your executable target:
set_target_properties(plugandpaint PROPERTIES
    MACOSX_BUNDLE TRUE
)
qmake automatically generates a bundle for your application. To disable this, add the following statement to your application's project file (.pro):
CONFIG-=app_bundle
Static Linking
If you want to keep things simple and only have a few files to deploy, you can build your application with statically linked libraries.
Building Qt Statically
Start by installing a static version of the Qt library. Remember that you cannot use plugins and that you must build the dependent libraries such as image formats, SQL drivers, and so on with static linking.
cd /path/to/Qt
./configure -static <other parameters>
You can check the various options that are available by running configure -help.
Linking the Application to the Static Version of Qt
Once Qt is built statically, the next step is to regenerate the build files and rebuild the application.
Using CMake
Make sure to use the qt_add_executable wrapper command, which provides additional logic such as linking Qt plugins in static Qt builds.
To build for Apple platforms you need to set cmake_minimum_required() to 3.21.1 or newer:
cmake_minimum_required(VERSION 3.21.1)
Go into the directory that contains the application:
cd /path/to/Qt/examples/widgets/tools/plugandpaint/app
Next, set the CMAKE_PREFIX_PATH variable to point to your installation prefix. If you have a Cmake build already, delete the CMakeCache.txt file. Then, rerun CMake:
cmake -DCMAKE_PREFIX_PATH=path/to/Qt/6.8.3/your_platform -S <source-dir> -B <build-dir> -G Ninja
Alternatively, use the convenience script qt-cmake, which sets the CMAKE_PREFIX_PATH variable for you.
path/to/Qt/6.8.3/your_platform/bin/qt-cmake -S <source-dir> -B <build-dir> -G Ninja
Finally, go into your build directory and run your preferred build system. In this example, we're using Ninja.
cd path/to/build/dir
ninja
Now, provided that everything compiled and linked without any errors, you should have a plugandpaint.app bundle ready for deployment. Try installing the bundle on a machine running macOS that does
not have Qt or any Qt applications installed.
Using qmake
First, go into the directory that contains the application:
cd /path/to/Qt/examples/widgets/tools/plugandpaint/app
Then, run qmake to create a new makefile for the application, and do a clean build to create the statically linked executable:
make clean
qmake -config release
make
You probably want to link against the release libraries, and you can specify this when invoking qmake. You may want to take advantage of "dead code stripping" to reduce the size of your binary
even more. You can do this by passing LIBS+= -dead_strip to qmake in addition to the -config release parameter.
Again, provided that everything compiled and linked without any errors, you should have a plugandpaint.app bundle ready for deployment. Try installing the bundle on a machine running macOS that
does not have Qt or any Qt applications installed.
Checking linked libraries
You can check what other libraries your application links to using the otool:
otool -L plugandpaint.app/Contents/MacOs/plugandpaint
Here is what the output looks like for the statically linked Plug & Paint:
plugandpaint.app/Contents/MacOS/plugandpaint:
/System/Library/Frameworks/Carbon.framework/Versions/A/Carbon
        (compatibility version 2.0.0, current version 128.0.0)
/System/Library/Frameworks/QuickTime.framework/Versions/A/QuickTime
        (compatibility version 1.0.0, current version 10.0.0)
/usr/lib/libz.1.dylib
        (compatibility version 1.0.0, current version 1.2.3)
/System/Library/Frameworks/ApplicationServices.framework/Versions/A/ApplicationServices
        (compatibility version 1.0.0, current version 22.0.0)
/usr/lib/libstdc++.6.dylib
        (compatibility version 7.0.0, current version 7.3.0)
/usr/lib/libgcc_s.1.dylib
        (compatibility version 1.0.0, current version 1.0.0)
/usr/lib/libmx.A.dylib
        (compatibility version 1.0.0, current version 92.0.0)
/usr/lib/libSystem.B.dylib
        (compatibility version 1.0.0, current version 88.0.0)
If you see Qt libraries in the output, it probably means that you have both dynamic and static Qt libraries installed on your machine. The linker always chooses dynamic linking over static. If you want to use only
static libraries, you can either:
- move your Qt dynamic libraries (
.dylibs) away to another directory while you link the application and then move them back,
- or edit the
Makefile and replace link lines for the Qt libraries with the absolute path to the static libraries.
For example, replace the following:
-lQtGui
with this:
/where/static/qt/lib/is/libQtGui.a
The Plug & Paint example consists of several components: The core application (Plug & Paint), and the
Basic Tools and Extra Filters plugins. As we cannot deploy plugins using the static linking approach, the bundle we
have prepared so far is incomplete. The application will run, but the functionality will be disabled due to the missing plugins. To deploy plugin-based applications we should use the framework approach, which is specific to
macOS.
Frameworks
In this approach, ensure that the Qt runtime is redistributed correctly with the application bundle, and that the plugins are installed in the correct location so that the application finds them.
There are two ways to distribute Qt with your application in the frameworks approach:
- Private framework within your application bundle.
- Standard framework (alternatively use the Qt frameworks in the installed binary).
The first option is good if you have Qt built in a special way, or want to make sure the framework is there. It just comes down to where you place the Qt frameworks.
The second option is good if you have many Qt applications and you want them to use a single Qt framework rather than multiple versions of it.
Building Qt as Frameworks
We assume that you already have installed Qt as frameworks, which is the default when installing Qt, in the /path/to/Qt directory. For more information on how to build Qt without Frameworks, visit the Qt for macOS - Specific Issues documentation.
When installing, the identification name of the frameworks is set. This name is used by the dynamic linker (dyld) to find the libraries for your application.
Linking the Application to Qt as Frameworks
After building Qt as frameworks, we can build the Plug & Paint application.
Using CMake
To build for Apple platforms you need to set cmake_minimum_required() to 3.21.1 or newer:
cmake_minimum_required(VERSION 3.21.1)
Go into the directory that contains the application:
cd /path/to/Qt/examples/widgets/tools/plugandpaint/app
Next, set the CMAKE_PREFIX_PATH variable to point to your installation prefix. If you have a Cmake build already, delete the CMakeCache.txt file. Then, rerun CMake:
cmake -DCMAKE_PREFIX_PATH=path/to/Qt/6.8.3/your_platform -S <source-dir> -B <build-dir> -G Ninja
Alternatively, use the convenience script qt-cmake, which sets the CMAKE_PREFIX_PATH variable for you.
path/to/Qt/6.8.3/your_platform/bin/qt-cmake -S <source-dir> -B <build-dir> -G Ninja
Finally, go into your build directory and run your preferred build system. In this example, we're using Ninja.
cd path/to/build/dir
ninja
Now, provided that everything compiled and linked without any errors, you should have a plugandpaint.app bundle ready for deployment. Try installing the bundle on a machine running macOS that does
not have Qt or any Qt applications installed.
Using qmake
First, go into the directory that contains the application:
cd /path/to/Qt/examples/widgets/tools/plugandpaint/app
Run qmake to create a new makefile for the application, and do a clean build to create the dynamically linked executable:
make clean
qmake -config release
make
This builds the core application. Use the following to build the plugins:
cd ../plugandpaint/plugins
make clean
qmake -config release
make
Now run the otool for the Qt frameworks, for example Qt Gui:
otool -L QtGui.framework/QtGui
You would get the following output:
QtGui.framework/QtGui:
/path/to/Qt/lib/QtGui.framework/Versions/4.0/QtGui
        (compatibility version 4.0.0, current version 4.0.1)
/System/Library/Frameworks/Carbon.framework/Versions/A/Carbon
        (compatibility version 2.0.0, current version 128.0.0)
/System/Library/Frameworks/QuickTime.framework/Versions/A/QuickTime
        (compatibility version 1.0.0, current version 10.0.0)
/path/to/Qt/QtCore.framework/Versions/4.0/QtCore
        (compatibility version 4.0.0, current version 4.0.1)
/usr/lib/libz.1.dylib
        (compatibility version 1.0.0, current version 1.2.3)
/System/Library/Frameworks/ApplicationServices.framework/Versions/A/ApplicationServices
        (compatibility version 1.0.0, current version 22.0.0)
/usr/lib/libstdc++.6.dylib
        (compatibility version 7.0.0, current version 7.3.0)
/usr/lib/libgcc_s.1.dylib
        (compatibility version 1.0.0, current version 1.0.0)
/usr/lib/libmx.A.dylib
        (compatibility version 1.0.0, current version 92.0.0)
/usr/lib/libSystem.B.dylib
        (compatibility version 1.0.0, current version 88.0.0)
For the Qt frameworks, the first line (i.e. path/to/Qt/lib/QtGui.framework/Versions/4/QtGui (compatibility version 4.0.0, current version 4.0.1)) becomes the framework's identification name which
is used by the dynamic linker (dyld).
But when you are deploying the application, your users may not have the Qt frameworks installed in the specified location. For that reason, you must either provide the frameworks in an agreed location, or store the
frameworks in the bundle. Regardless of which solution you choose, you must make sure that the frameworks return the proper identification name for themselves, and that the application looks for these names. Luckily we can
control this with the install_name_tool command-line tool.
The install_name_tool works in two modes, -id and -change. The -id mode is for libraries and frameworks, and
allows us to specify a new identification name. We use the -change mode to change the paths in the application.
Let's test this out by copying the Qt frameworks into the Plug & Paint bundle. Looking at otool's output for the bundle, we can see that we must copy both the QtCore and QtGui frameworks into the bundle. We will assume that we are in the directory where we built the bundle.
mkdir plugandpaint.app/Contents/Frameworks
cp -R /path/to/Qt/lib/QtCore.framework
        plugandpaint.app/Contents/Frameworks
cp -R /path/to/Qt/lib/QtGui.framework
       plugandpaint.app/Contents/Frameworks
First we create a Frameworks directory inside the bundle. This follows the macOS application convention. We then copy the frameworks into the new directory. As frameworks contain symbolic links,
we use the -R option.
install_name_tool -id @executable_path/../Frameworks/QtCore.framework/Versions/4.0/QtCore
       plugandpaint.app/Contents/Frameworks/QtCore.framework/Versions/4.0/QtCore
install_name_tool -id @executable_path/../Frameworks/QtGui.framework/Versions/4.0/QtGui
       plugandpaint.app/Contents/Frameworks/QtGui.framework/Versions/4.0/QtGui
Then we run install_name_tool to set the identification names for the frameworks. The first argument after -id is the new name, and the second argument is the framework
that we want to rename. The text @executable_path is a special dyld variable telling dyld to start looking where the executable is located. The
new names specifies that these frameworks are located in the directory directly under the Frameworks directory.
install_name_tool -change path/to/Qt/lib/QtCore.framework/Versions/4.0/QtCore
        @executable_path/../Frameworks/QtCore.framework/Versions/4.0/QtCore
        plugandpaint.app/Contents/MacOs/plugandpaint
install_name_tool -change path/to/qt/lib/QtGui.framework/Versions/4.0/QtGui
        @executable_path/../Frameworks/QtGui.framework/Versions/4.0/QtGui
        plugandpaint.app/Contents/MacOs/plugandpaint
Now, the dynamic linker knows where to look for QtCore and QtGui. We must ensure that the application also knows where to find the library, using
install_name_tool's -change mode. This basically comes down to string replacement, to match the identification names that we set earlier to the frameworks.
Finally, the QtGui framework depends on QtCore, so we must remember to change the reference for QtGui:
install_name_tool -change path/to/Qt/lib/QtCore.framework/Versions/4.0/QtCore
        @executable_path/../Frameworks/QtCore.framework/Versions/4.0/QtCore
        plugandpaint.app/Contents/Frameworks/QtGui.framework/Versions/4.0/QtGui
After this, we run otool again and see that the application can find the libraries.
The plugins for the Plug & Paint example makes it interesting. The basic steps we need to follow with plugins are:
- put the plugins inside the bundle,
- run the
install_name_tool to check whether the plugins are using the correct library,
- and ensure that the application knows where to look for the plugins.
We can put the plugins anywhere we want in the bundle, but the best location is to put them under Contents/Plugins. When we built the Plug & Paint plugins, based on the DESTDIR variable in their
.pro file, the plugins' .dylib files are in the plugins subdirectory under the plugandpaint directory. We just have
to move this directory to the correct location.
mv plugins plugandpaint.app/Contents
For example, If we run otool on the Basic Tools plugin's
.dylib file, we get the following information.
libpnp_basictools.dylib:
libpnp_basictools.dylib
       (compatibility version 0.0.0, current version 0.0.0)
/path/to/Qt/lib/QtGui.framework/Versions/4.0/QtGui
       (compatibility version 4.0.0, current version 4.0.1)
/System/Library/Frameworks/Carbon.framework/Versions/A/Carbon
       (compatibility version 2.0.0, current version 128.0.0)
/System/Library/Frameworks/QuickTime.framework/Versions/A/QuickTime
       (compatibility version 1.0.0, current version 10.0.0)
/path/to/Qt/lib/QtCore.framework/Versions/4.0/QtCore
       (compatibility version 4.0.0, current version 4.0.1)
/usr/lib/libz.1.dylib
       (compatibility version 1.0.0, current version 1.2.3)
/System/Library/Frameworks/ApplicationServices.framework/Versions/A/ApplicationServices
       (compatibility version 1.0.0, current version 22.0.0)
/usr/lib/libstdc++.6.dylib
       (compatibility version 7.0.0, current version 7.3.0)
/usr/lib/libgcc_s.1.dylib
       (compatibility version 1.0.0, current version 1.0.0)
/usr/lib/libmx.A.dylib
       (compatibility version 1.0.0, current version 92.0.0)
/usr/lib/libSystem.B.dylib
       (compatibility version 1.0.0, current version 88.0.0)
Then we can see that the plugin links to the Qt frameworks it was built against. As we want the plugins to use the framework in the application bundle, we change them the same way as we did for the application. For example
for the Basic Tools plugin:
install_name_tool -change /path/to/Qt/lib/QtCore.framework/Versions/4.0/QtCore
        @executable_path/../Frameworks/QtCore.framework/Versions/4.0/QtCore
        plugandpaint.app/Contents/plugins/libpnp_basictools.dylib
install_name_tool -change /path/to/Qt/lib/QtGui.framework/Versions/4.0/QtGui
        @executable_path/../Frameworks/QtGui.framework/Versions/4.0/QtGui
        plugandpaint.app/Contents/plugins/libpnp_basictools.dylib
We must also modify the code in tools/plugandpaint/mainwindow.cpp to cdUp() to ensure that the application finds the plugins. Add the following code to the
mainwindow.cpp file:
#elif defined(Q_OS_MAC)
if (pluginsDir.dirName() == "MacOS") {
    pluginsDir.cdUp();
}
#endif
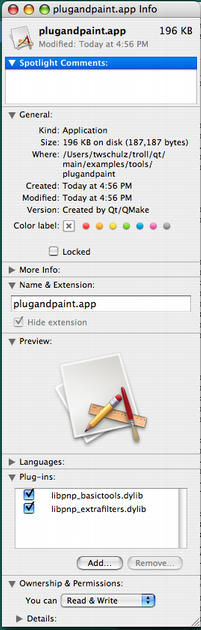 |
The additional code in tools/plugandpaint/mainwindow.cpp also enables us to view the plugins in the Finder, as shown in the image.
We can also add plugins extending Qt, for example adding SQL drivers or image formats. We just need to follow the directory structure outlined in plugin documentation, and make sure they are included in the QCoreApplication::libraryPaths(). Let's quickly do this with the image formats, following the procedure outlined earlier.
Copy Qt's image format plugins into the bundle:
cp -R /path/to/Qt/plugins/imageformats
        pluginandpaint.app/Contents/plugins
Use install_name_tool to link the plugins to the frameworks in the bundle:
install_name_tool -change /path/to/Qt/lib/QtGui.framework/Versions/4.0/QtGui
        @executable_path/../Frameworks/QtGui.framework/Versions/4.0/QtGui
        plugandpaint.app/Contents/plugins/imageformats/libqjpeg.dylib
install_name_tool -change /path/to/Qt/lib/QtCore.framework/Versions/4.0/QtCore
        @executable_path/../Frameworks/QtCore.framework/Versions/4.0/QtCore
        plugandpaint.app/Contents/plugins/imageformats/libqjpeg.dylib
Update the source code in tools/plugandpaint/main.cpp to look for the new plugins. After constructing the QApplication, we add the following code:
QDir dir(QCoreApplication::applicationDirPath());
dir.cdUp();
dir.cd("plugins");
QCoreApplication::setLibraryPaths(QStringList(dir.absolutePath()));
First, we tell the application to only look for plugins in this directory. In our case, we want the application to look for only those plugins that we distribute with the bundle. If we were part of a bigger Qt
installation we could have used QCoreApplication::addLibraryPath() instead.
|
Warning: While deploying plugins, we make changes to the source code and that resets the default identification names when the application is rebuilt. So you must repeat the process of making your application link
to the correct Qt frameworks in the bundle using install_name_tool.
Now you should be able to move the application to another macOS machine and run it without Qt installed. Alternatively, you can move your frameworks that live outside of the bundle to another directory and see if the
application still runs.
If you store the frameworks in another location outside the bundle, the technique of linking your application is similar; you must make sure that the application and the frameworks agree where to be looking for the Qt
libraries as well as the plugins.
Creating the Application Package
When you are done linking your application to Qt, either statically or as frameworks, the application is ready to be distributed. For more information, refer to the Apple Developer
website.
Although the process of deploying an application do have some pitfalls, once you know the various issues you can easily create packages that all your macOS users will enjoy.
Application Dependencies
Qt Plugins
All Qt GUI applications require a plugin that implements the Qt Platform Abstraction (QPA) layer in Qt. For macOS, the name of the platform plugin is libqcocoa.dylib.
This file must be located within a specific subdirectory (by default, platforms) under your distribution directory. Alternatively, it is possible to adjust the search path Qt uses to find its
plugins, as described below.
Your application may also depend on one or more Qt plugins, such as the JPEG image format plugin or a SQL driver plugin. Be sure to distribute any Qt plugins that you need with your application. Similar to the platform
plugin, each type of plugin must be located within a specific subdirectory (such as imageformats or sqldrivers) in your distribution directory.
The search path for Qt plugins (as well as a few other paths) is hard-coded into the QtCore library. By default, the first plugin search path will be hard-coded as /path/to/Qt/plugins. But using pre-determined paths has certain disadvantages. For example, they may not exist on the target machine. So you must check various alternatives to ensure that the Qt plugins are
found:
The How to Create Qt Plugins document outlines the issues you need to pay attention to when building and deploying plugins for Qt applications.
Additional Libraries
You can check which libraries your application is linking against by using otool. Run this with the application path as an argument:
otool -L MyApp.app/Contents/MacOS/MyApp
Compiler-specific libraries rarely have to be redistributed with your application. But there are several ways to deploy applications, as Qt can be configured, built, and installed in several ways on macOS. Typically your
goals help determine how you are going to deploy the application. The last sections describe a few things that you must be aware of while deploying your application.
The Mac deployment tool can be found in QTDIR/bin/macdeployqt. It is designed to automate the process of creating a deployable application bundle that contains the Qt libraries as private frameworks.
The mac deployment tool also deploys the Qt plugins, according to the following rules (unless -no-plugins option is used):
- The platform plugin is always deployed.
- Debug versions of the plugins are not deployed.
- The designer plugins are not deployed.
- The image format plugins are always deployed, except the SVG image format plugin which is only deployed if the application uses the Qt SVG module.
- The icon engine plugins are always deployed.
- The print support plugin is always deployed.
- SQL driver plugins are deployed if the application uses the Qt SQL module.
- The accessibility plugin is always deployed.
- The style plugin is always deployed.
Important: If you choose to not use the Mac Deployment Tool, you must ensure that your deployment package includes these plugins.
To include a 3rd party library in the application bundle, copy the library into the bundle manually, after the bundle is created.
macdeployqt supports the following options:
| Option |
Description |
-verbose=<0-3> |
0 = no output, 1 = error/warning (default), 2 = normal, 3 = debug |
-no-plugins |
Skip plugin deployment |
-dmg |
Create a .dmg disk image |
-no-strip |
Don't run 'strip' on the binaries |
-use-debug-libs |
Deploy with debug versions of frameworks and plugins (implies -no-strip) |
-executable=<path> |
Let the given executable also use the deployed frameworks |
-qmldir=<path> |
Deploy imports used by .qml files in the given path |
-qmlimport=<path> |
Add the given path to the QML imports search locations |
-always-overwrite |
Copy files even if the target file exists |
-codesign=<ident> |
Run codesign with the given identity on all executables |
-hardened-runtime |
Enable Hardened Runtime when code signing |
-timestamp |
Include a secure timestamp when code signing (requires internet connection) |
-sign-for-notarization=<ident> |
Activate the necessary options for notarization (requires internet connection). The activated options are -hardened-runtime, -timestamp and -codesign=<ident> |
-appstore-compliant |
Skip deployment of components that use private API |
-libpath=<path> |
Add the given path to the library search path |
-fs=<filesystem> |
Set the filesystem used for the .dmg disk image (defaults to HFS+) |
Note: macOS High Sierra introduced the new Apple File System (APFS). Older versions of macOS cannot read .dmg files that are formatted with APFS. By default, macdeployqt uses the older
HFS+ file system for compatibility with all versions of macOS currently supported by Qt. Use the -fs option to specify a different file system.
Volume Name
The volume name of a disk image (the text displayed in the window title of an opened .dmg file) created with -dmg is based on the path to the application when
macdeployqt is run. For example, consider the following command that creates a disk image for a Qt Quick application:
macdeployqt /Users/foo/myapp-build/MyApp.app -qmldir=/Users/foo/myapp/qml -dmg
The resulting volume name will be:
/Users/foo/myapp-build/MyApp.app
To ensure that the volume name only contains the application name and not the path on the deployment machine, run macdeployqt in the same directory:
cd /Users/foo/myapp-build
macdeployqt MyApp.app -qmldir=/Users/foo/myapp/qml -dmg
The resulting volume name will then be:
MyApp.app
Entitlements
When signing, macdeployqt will automatically use the first .entitlements file it finds in the Contents/Resources/ subdirectory in the application bundle if present. To
prevent errors, ensure that there is at maximum one .entitlements file in this folder.


