QML App Architecture Best Practices
Why care about separation of concerns?
Felgo utilizes QML + Javascript as the main coding language. This allows to save up to 90% of code compared to other languages and frameworks. The simplicity of QML speeds up development, but the
customizability and extensibility make it so powerful.
You also don’t need to worry about keeping the UI up-to-date. With the power of property bindings, QML Items and their properties stay updated automatically. If you don’t know yet what QML can do, please see the
Getting Started with Felgo Apps guide.
While all these features are super useful, the easiness and flexibility of QML can also lead to problems. Behind the scenes, properties emit signals when they change. Thus, other properties that rely on the now changed
values will handle this signal and update their value as well. This is also possible across multiple QML Items:
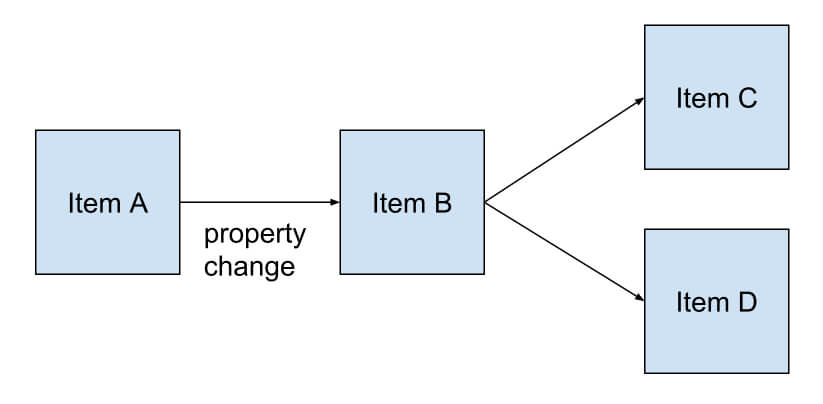
This doesn’t look complex now, but imagine that a few new components with different properties and cross-dependencies are added:
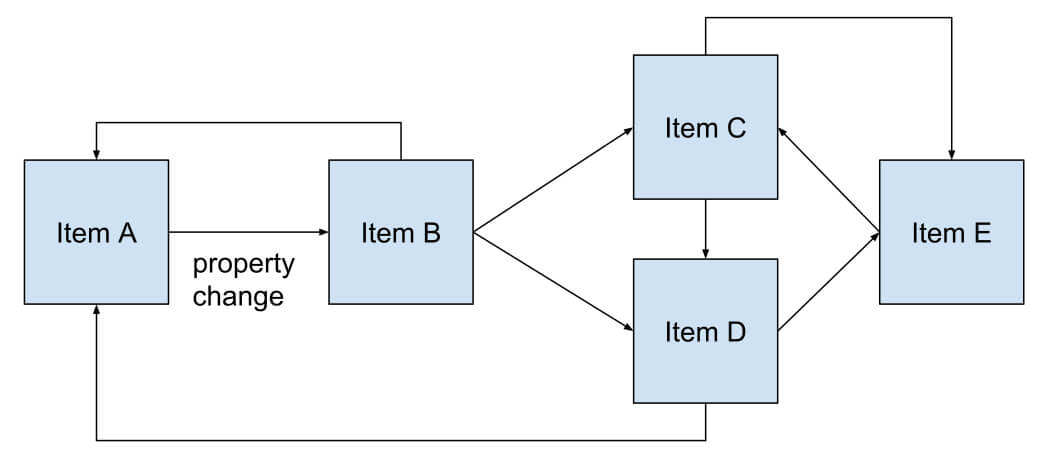
Different connections between all the items form. You can no longer say for sure what effect a single property change may have for directly or indirectly connected components. In the worst case, this can result in circular
dependencies or loops. If you face such issues, this is probably an indicator for bad component architecture.
This problem gets bigger and bigger the more your project grows. Each component should thus have a clean interface and only manage its own data. This is what separation of concerns means.
Design Patterns like MVC, MVVM or Flux
At the core of each application lies its data. Every app retrieves, processes, stores and displays some kind of domain- and use-case specific information. Thus, it is of highest importance to manage and store your data in a
clean way.
A bad component architecture can quickly lead to unwanted side-effects or corrupted data. Imagine lots of signals firing and event handlers running in unknown order. Your code at different parts of the app changes data
seemingly random or with duplicated code. This is a nightmare for debugging, maintenance or refactoring.
It thus makes sense to split data-related tasks from your UI code. To achieve this, many apps incorporate an architecture based on the MVC (Model-View-Controller) or MVVM (Model-View-ViewModel) design patterns. The actual
implementation of such patterns can vary, but they all share a main principle: Keep the code that displays data (view) separate from the code that reads or modifies data (model).
Model-View Separation in QML
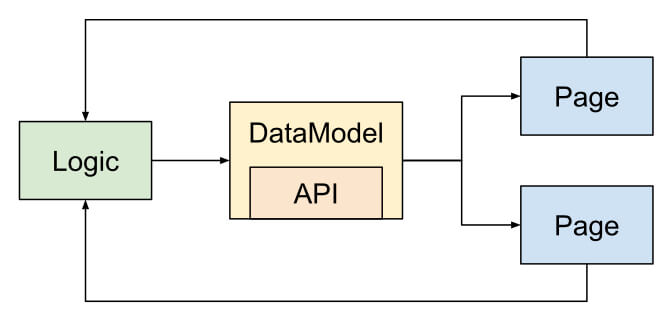
Each content view of your Felgo app is usually composed as a AppPage. The AppPage type is a view controller, which provides and displays data for the
user:
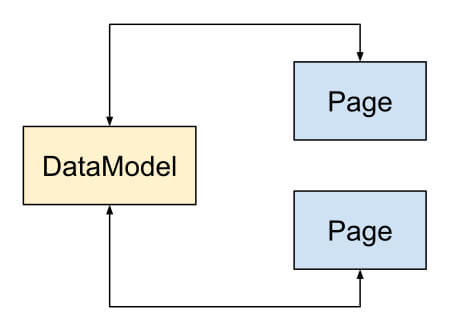
The DataModel is your central storage for application data. Pages can only access application data with the DataModel. It manages your data in a way that makes sense for your use-case and views.
With this architecture, the data flow between model and page is bi-directional. This means, pages do not only show model data, but can also write to the model directly.
QML allows to add application logic using JavaScript, so you will quickly add inline Javascript code to different pages. E.g. a property-changed handler:
onPropertyChanged: {
}
The result is a lot of fragmented code spread across view items. Once your application gets more complicated, it gets more difficult to maintain your code clean and testable. It also makes it hard to decide where to perform
which action, and duplicate code spread across pages is inevitable.
Create a Clean Data Flow: QML Architecture inspired by Flux
Modern application frameworks like React Native use a different approach. For example, the Flux architecture designed by Facebook favors an unidirectional data flow. Each user interaction only propagates the
action through a central dispatcher, to various stores that hold application data and business logic:

You can read more about a quite sophisticated implementation of such a pattern for QML in this post by Ben Lau: Revised
QML Application Architecture Guide with Flux
It’s hard to say if the overhead of a complex solution is worth the effort. For most mobile app projects, a more relaxed implementation with the same advantages is sufficient. The following sections show an easy way to
implement a one-directional data flow in Felgo.
The full example is available for you on GitHub:
You can also find the MVC Architecture Demo App in the Felgo SDK and as a project wizard in Qt Creator.

It shows a list of todo entries from a REST service and demonstrates offline caching, app navigation and user login features.
Simple Flux-like MVC Example for QML
Application Logic
We can apply the principle to create a one-directional data flow and introduce a dedicated Logic component, which forwards user actions to a DataModel:
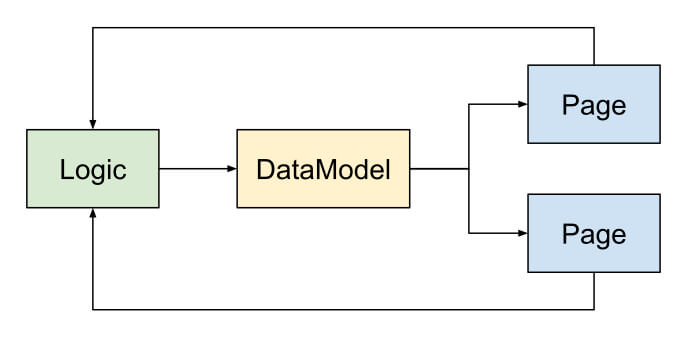
The Logic component represents your business logic API. It holds a set of actions, which the pages activate for different user interactions. It forwards each action to the DataModel, which processes
it in turn. Whenever data changes as a result, the model notifies all affected pages.
This is how an example Logic component can look like:
import QtQuick
Item {
signal fetchTodos()
signal storeTodo(var todo)
}
We can take advantage of QML’s built-in signal mechanism to define logic actions. A page may then call logic.fetchTodos(), which triggers the signal and notifies the subscribed components.
Some user actions might include multiple operations on different data sets of your model. For example, user registration requires to create the user account in your model, as well as to log the new user in. In your page,
you’d have a button like this:
 AppButton {
   text: "Register"
   onClicked: {
     logic.createUser(user)
     logic.setCurrentUser(user)
   }
 }
Multiple operations in one signal handler indicate that you are dealing with an independent use case, which requires an own action signal:
 AppButton {
   text: "Register"
   onClicked: {
     logic.registerUserAndLogin(user)
   }
 }
It is best practice to match each user interaction with a single logic action. If some calculation is involved, which does not depend on data model internals, you can provide a business logic function. For example to
calculate the elapsed time between two dates in your Logic item:
import QtQuick
Item {
signal storeElapsedTime(int time)
function storeElapsedTimeBetween(date1, date2) {
var elapsed = getElapsedTime(date1, date2)
storeElapsedTime(elapsed)
}
}
This helps to only keep necessary view logic in your pages. If different pages use the logic function, you also avoid duplicate code.
Use the Logic to:
- Dispatch user actions to the model. Add a signal for each action and trigger them from your pages.
- Keep the model and view components clean. Move data-processing and business logic away from your pages.
DataModel and Storage
The DataModel manages all data. It will most probably also store data persistently, or communicate with a REST service. To handle user actions from the Logic, you can add a Connections component in the following way:
import QtQuick
import Felgo
Item {
property alias dispatcher: logicConnection.target
readonly property alias todos: _.todos
signal fetchTodosFailed(var error)
signal storeTodoFailed(var todo, var error)
signal todoStored(int id)
Connections {
id: logicConnection
onFetchTodos: {
api.getTodos(
function(data) {
_.todos = data
},
function(error) {
fetchTodosFailed(error)
})
}
onStoreTodo: todo => {
api.addTodo(todo,
function(data) {
_.todos.unshift(data)
todosChanged()
todoStored(data.id)
},
function(error) {
storeTodoFailed(todo, error)
})
}
}
RestAPI {
id: api
}
Item {
id: _
property var todos: []
}
}
This example model also defines its data properties in a private sub-item. Such a setup helps to ensure that the public interface of the model only allows to read data. It is not possible to directly execute an action on the
data model or change data from the outside. The data model has full control over how to process and store the data.
The code above also uses an exemplary RestAPI item. This item can then e.g. use the HttpRequest type to implement communication with a REST service. You can also use a
different API solution to store data, for example with the Firebase Plugin.
The DataModel can also cache the current data internally. In case an API request fails, you can make the locally stored app state
available for the views instead.
Why Split Model and Logic?
As the DataModel itself decides which logic actions to handle, it is possible to split your domain data into several models. With the flexible signal approach, you could even add an own component for logging to
track your user actions:
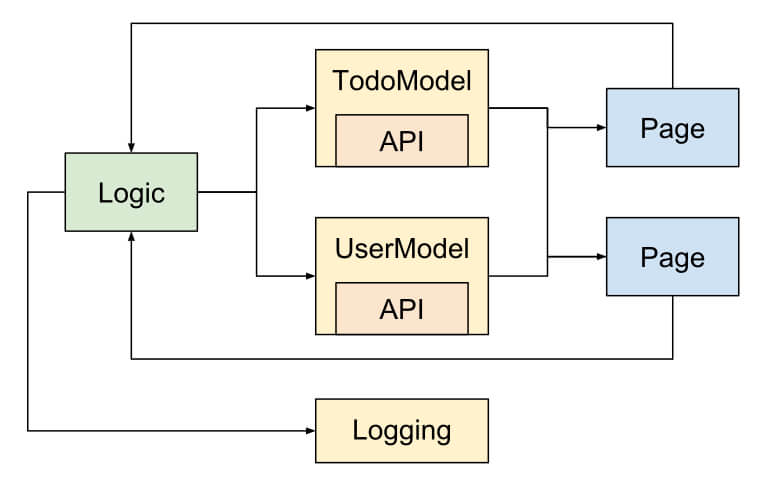
Even if the TodoModel and UserModel use the same API, the separation is useful to avoid a bloated and complex model. Each model can handle the actions that are relevant, and provides the data of its
domain.
You can also use multiple models to mirror data in a backup storage or add logging features. A simple Logging component could look like this:
import QtQuick
Item {
property alias dispatcher: logicConnection.target
property alias logicLogging: logicConnection.enabled
Connections {
id: logicConnection
onFetchTodos: console.log("Action - fetchTodos")
onStoreTodo: todo => console.log("Action - storeTodo: todo="+JSON.stringify(todo))
}
}
This logger uses the console to print user actions and the passed data. By subscribing to the logic signals, the Logging component gets notified for every data-related user action on a page. Enable or disable console logging
from your Main.qml with the logicLogging property:
import Felgo
import QtQuick
App {
Logic {
id: logic
}
Logging {
dispatcher: logic
logicLogging: true
}
}
You could also create another logger with the Amplitude Plugin to track and analyze user behavior:
import VPlayPlugins
import QtQuick
Item {
property alias dispatcher: logicConnection.target
Amplitude {
id: amplitude
apiKey: "<key>"
}
Connections {
id: logicConnection
onFetchTodos: amplitude.logEvent("fetchTodos")
onStoreTodo: todo => amplitude.logEvent("storeTodo", todo)
}
}
Similar to the models for application data, a logger could provide data for a page as well. For example to aggregate and visualize data for analytics purposes.
The loose coupling between Logic and Model is a big advantage. Thanks to the signal approach, you can move business logic, data storage, logging and view pages into dedicated components. Separation of concerns at its
best!
Pages and View Logic
To work with the Logic and DataModel types in your pages, simply add them both in your Main.qml, and connect the model to the logic:
import Felgo
import QtQuick
App {
DataModel {
id: dataModel
dispatcher: logic
onFetchTodosFailed: error => NativeUtils.displayMessageBox("Unable to load todos", error, 1)
onStoreDraftTodoFailed: todo => NativeUtils.displayMessageBox("Failed to store "+todo.title)
}
Logic {
id: logic
}
NavigationStack {
initialPage: TodoListPage { }
}
Component.onCompleted: {
logic.fetchTodos()
}
}
You can use the Component.onCompleted handler of the App for initialization purposes, e.g. to fetch data you require.
The TodoListPage of the example shows all todo items and allows to add new entries:
import Felgo
import QtQuick
ListPage {
id: page
title: qsTr("Todos")
rightBarItem: IconButtonBarItem {
iconType: IconType.plus
onClicked: {
var todo = {
completed: false,
title: "New Todo",
userId: 1
}
logic.storeTodo(todo)
}
}
model: dataModel.todos
delegate: SimpleRow {
text: modelData.title
}
}
When the user presses the button to add a todo, the page only dispatches logic.storeTodo(todo). The DataModel gets notified, stores the item and updates the dataModel.todos property.
The property binding model: dataModel.todos also replaces the ListPage model. The new todo item thus shows up in the list.
While this is a very simple example, the pages can also get quite complex. Data often requires to be processed for display in the view. For example, you might print a pretty formatted and localized date instead of a
timestamp. You should add such view logic to the pages, never to the business logic or model, which are data-oriented components. To avoid duplicate code for data processing across pages, you can create additional helper
components:
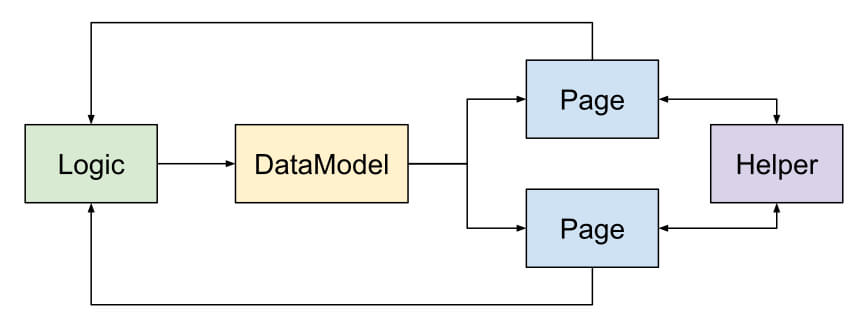
With this component architecture and knowledge in mind, you can make sure to write clean and well-structured code.
How can I Cache Data in a Local Storage?
Offline capabilities are most important for any mobile app that relies on web services and APIs. Users expect the application to work and want to browse the latest state of data - also when being offline.
For this, we have a full example for separation of model, view and logic available. It accesses a dummy rest-service and also includes an offline cache with the Storage component. You can
find the full source of the example on GitHub:
You can also find the MVC Architecture Demo App in the Felgo SDK and as a project wizard in Qt Creator.
It shows a list of todo entries from a REST service and demonstrates app navigation and user login features.
More Frequently Asked Development Questions
Find more examples for frequently asked development questions and important concepts in the following guides:


