A drag and drop button for placing game entities with the LevelEditor. More...
| Import Statement: | import Felgo 3.0 |
| Inherits: |
The BuildEntityButton allows to set an entity type that should be draggable into the game with the LevelEditor. This component works together with the EntityBaseDraggable, the base class for entities that should be create-able from the LevelEditor. The BuildEntityButton takes care of the creation of the entity at the dragged position, if it does not collide with other entities.
The collision check is possible, because an instance of the entity defined with toCreateEntityType is added. It is marked as invisible, until the button gets pressed. Thus it is important to set a button size, so the internal MouseArea knows when the entity dragging should start. It then activates the colliders and reports whether the dragged position is available based on the collider information.
Every game has different requirements to display the entity that should be draggable into the level. Thus you can add any QML element you want your button to look like, as child of the BuildEntityButton. In most cases, displaying an Image will be sufficient, but you could also add an animation of the entity with a SpriteSequence for example.
This example shows how to define a button for creating the entity type Obstacle.qml. Its base class is EntityBaseDraggable, and performs collision checks if the entity
is dragged to a free space in the level automatically. The visual appearance of the button is added with the Image element. However, you could use any element, for example a SpriteSequence. The visual representation is decoupled from the actual entity that is built, which makes it more flexible.
 import QtQuick 2.0
 import Felgo 3.0

 BuildEntityButton {

   width: 50
   height: 50

   // an instance of this entity is created when the entity is dragged to a free spot in the level
   toCreateEntityType: "entities/Obstacle.qml"

   // this is decoupled from the entity, can be set to any QML element that should be displayed
   Image {

     // make it the size of the parent
     anchors.fill: parent
     source: "obstacle-creationbutton.png"
   }
 }
You can add all your game entities that should be draggable into a level as buttons. In the following example, the base component MyGameBuildEntityButton.qml adds an Image element for the visual appearance of the dragging item. From the HUD.qml file, this component is then added multiple times and placed in a row for all the entities that should be draggable into the level:
MyGameBuildEntityButton.qml:
 BuildEntityButton {

   width: 50
   height: 50

   // an instance of this entity is created when the entity is dragged to a free spot in the level
   toCreateEntityType: "entities/Obstacle.qml"

   Image {
     anchors.fill: parent
     // there are multiple images, based on the variationType
     // e.g. obstacle-chocolate.png, obstacle-teddy.png, etc.
     source: "obstacle-" + variationType + ".png"
   }
 }
HUD.qml:
 Row {
   // place the buttons next to each other in a Row

   MyGameBuildEntityButton {
     variationType: "teddy"
   }

   MyGameBuildEntityButton {
     variationType: "chocolate"
   }

   MyGameBuildEntityButton {
     variationType: "pillow"
   }

   // ... add soccerball, toys and book here as well
 }
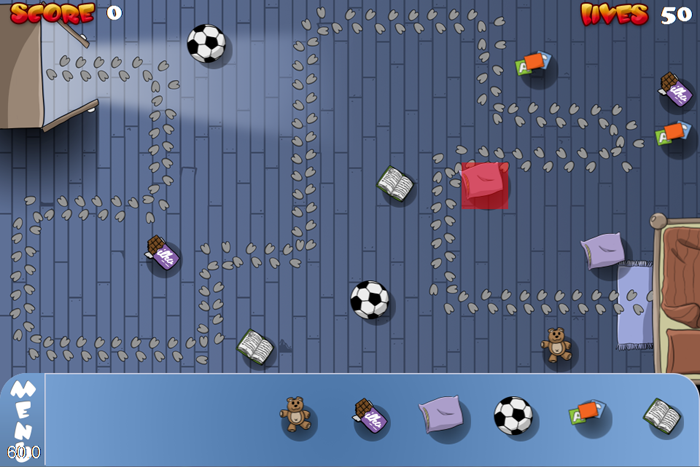
The above example will then look like the following image:

In this image, the pillow was dragged into the level, and a collision with the path was detected. Thus the collider turned red. This behavior is also customizable, in the EntityBaseDraggable.
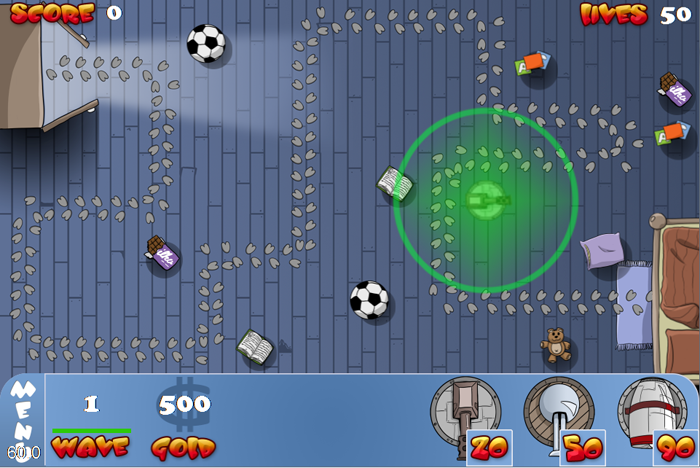
Note: The BuildEntityButton can also be used as part of the game design - for example a tower defense game, has the ability to drag entities (the towers) into the scene. This image is a screenshot from the Squaby Demo, where this approach is used:

Also see the Platformer with Level Editor for an example of the LevelEditor.
|
createdEntity : variant |
This property holds the entity instance that got created internally based on the toCreateEntityType. You can use it to modify any properties or call functions on it.
|
creationProperties : variant |
You can set this property to change the initial properties of the entity that should be created. This might be useful, when the entity should look or behave differently when it gets created for dragging into the level. By default, the properties are empty.
For example, you could change the image when dragging from the level with the following code:
 BuildEntityButton {
   creationProperties: { "levelDraggingMode" : true }
   toCreateEntityType: "Fish.qml"
 }
Fish.qml:
 EntityBaseDraggable {
   // if normally created, this is false
   // if it is created for dragging into the level, it gets set to true from BuildEntityButton
   property bool levelDraggingMode: false

   Image {
     // either use the normal fish image, or another one when it is dragged for level creation
     source: levelDraggingMode ? "fish-levelmode.png" : "fish.png"
   }
 }
|
entityManagerItem : variant |
Set this property to the entityManager in your game. This is a required property to store and load entities with a level.
By default, it will be set to the id entityManager if one is found in the main qml file, or it is null if no such id is found.
This property was introduced in Felgo 2.3.0.
|
initialEntityPosition : point |
With this property you can manually set the initial position of the createdEntity. By default this is the location of this BuildEntityButton.
This property was introduced in Felgo 2.6.2.
|
toCreateEntityTypeString : string |
The entityType string of the entity that should be created when it is released on an available spot in the level. This or toCreateEntityTypeUrl is a required property for this component to work.
If you use this property to define the entityType that should be created, make sure the entity was created once so its type is known. You can set it as EntityManager::dynamicCreationEntityList to create and then remove the entity again after application start.
See also toCreateEntityTypeUrl and EntityManager::dynamicCreationEntityList.
|
toCreateEntityTypeUrl : url |
The url of the entity that should be created when it is released on an available spot in the level. This or toCreateEntityTypeString is a required property for this component to work.
See also toCreateEntityTypeString.
|
variationType : string |
This property lets you define the variationType of the entity that should be created. The variationType is optional.
See also EntityBase::variationType.
This handler is called when the BuildEntityButton is clicked
Note: The corresponding handler is onClicked.
This handler is called when the entity got pressed. That happens when dragging is started.
Note: The corresponding handler is onEntityPressed.
This handler is called when the entity got released. That happens when dragging is stopped.
Note: The corresponding handler is onEntityReleased.
This handler is called when the entity got released and successfully created. In case the entity could not be created, because it collided with another entity, this handler is not called.
You can use this function for example for playing a construction sound when the entity was built.
In Felgo version 1.3.8 and above, this signal also contains a parameter builtEntityId with the entityId of the created entity. Example usage:
 BuildEntityButton {
   //...
   onEntityWasBuilt: {
     console.log("created entityId: "+builtEntityId)
     // get the entity with the given entityId from the entityManagerItem
     var newEntity = entityManagerItem.getEntityById(builtEntityId)
   }
 }
Note: The corresponding handler is onEntityWasBuilt.
This handler is called when the BuildEntityButton is clicked
Note: The corresponding handler is onPressed.
This handler is called when the BuildEntityButton is clicked
Note: The corresponding handler is onReleased.