Overview
Felgo allows local development and deployment for the Web with WebAssembly. WebAssembly is a bytecode representation generated from C++ code that is executed inside a virtual machine in web browsers. Most of the recent
browser versions of Chrome, Firefox and Safari support running WebAssembly code.
This allows you to target your mobile users via the app stores while running the very same app from a single source code on the Web for the desktop.
Note: Due to mobile browser support of WebAssembly, running the WebAssembly target on mobile devices is currently not intended.
This guide describes how to deploy Felgo apps & games for the Web.
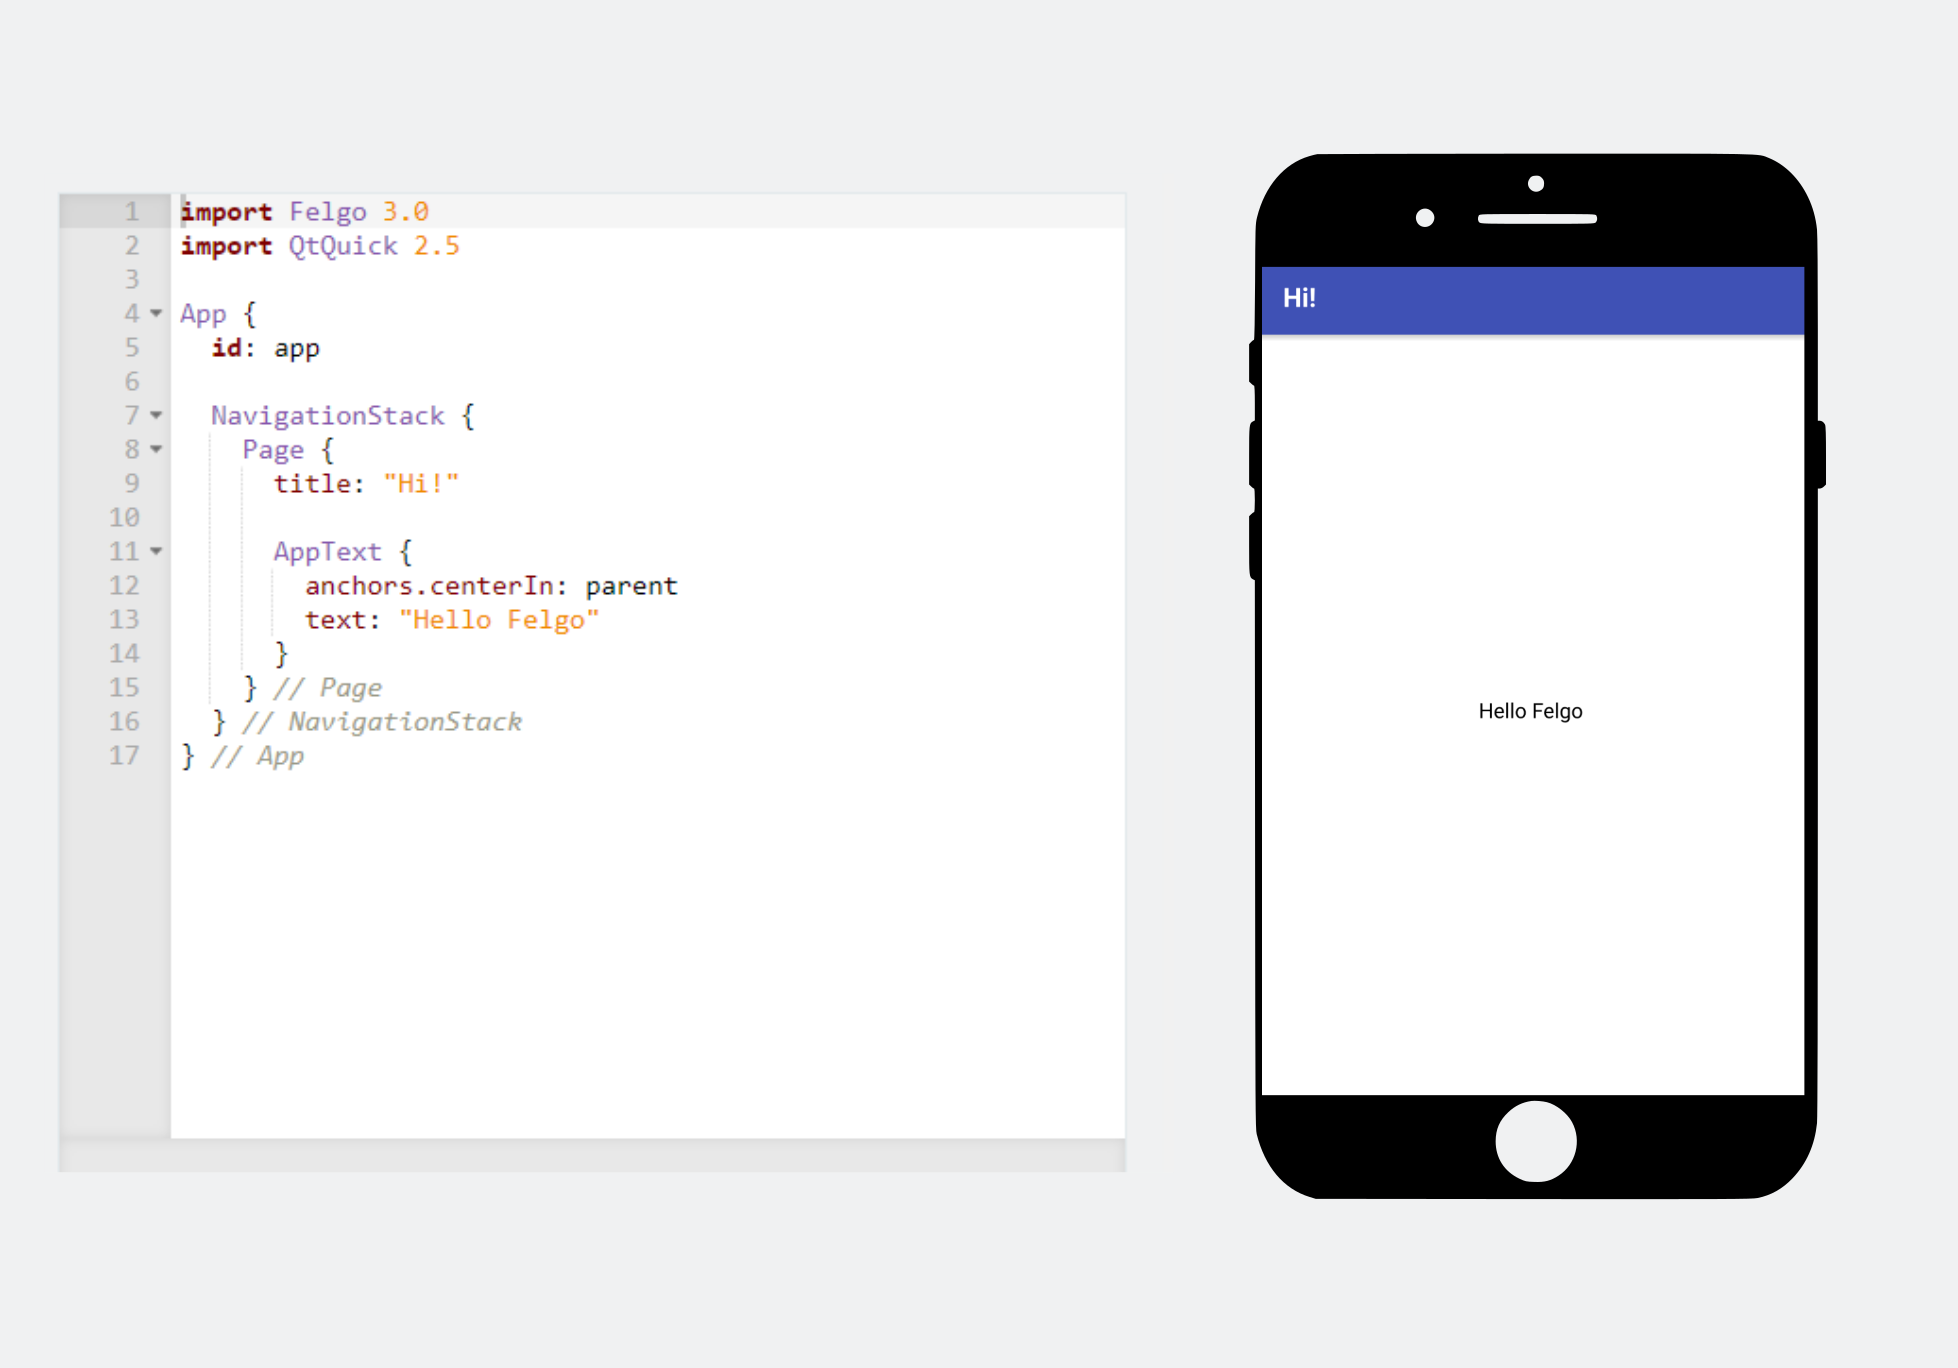
Live Code Reloading on Web During development
You can test your code on the browser without any additional setup, using the QML Hot Reload preview client for Web. You can open the Web Preview Client with the "Web Client" tab within the Felgo Hot Reload application.
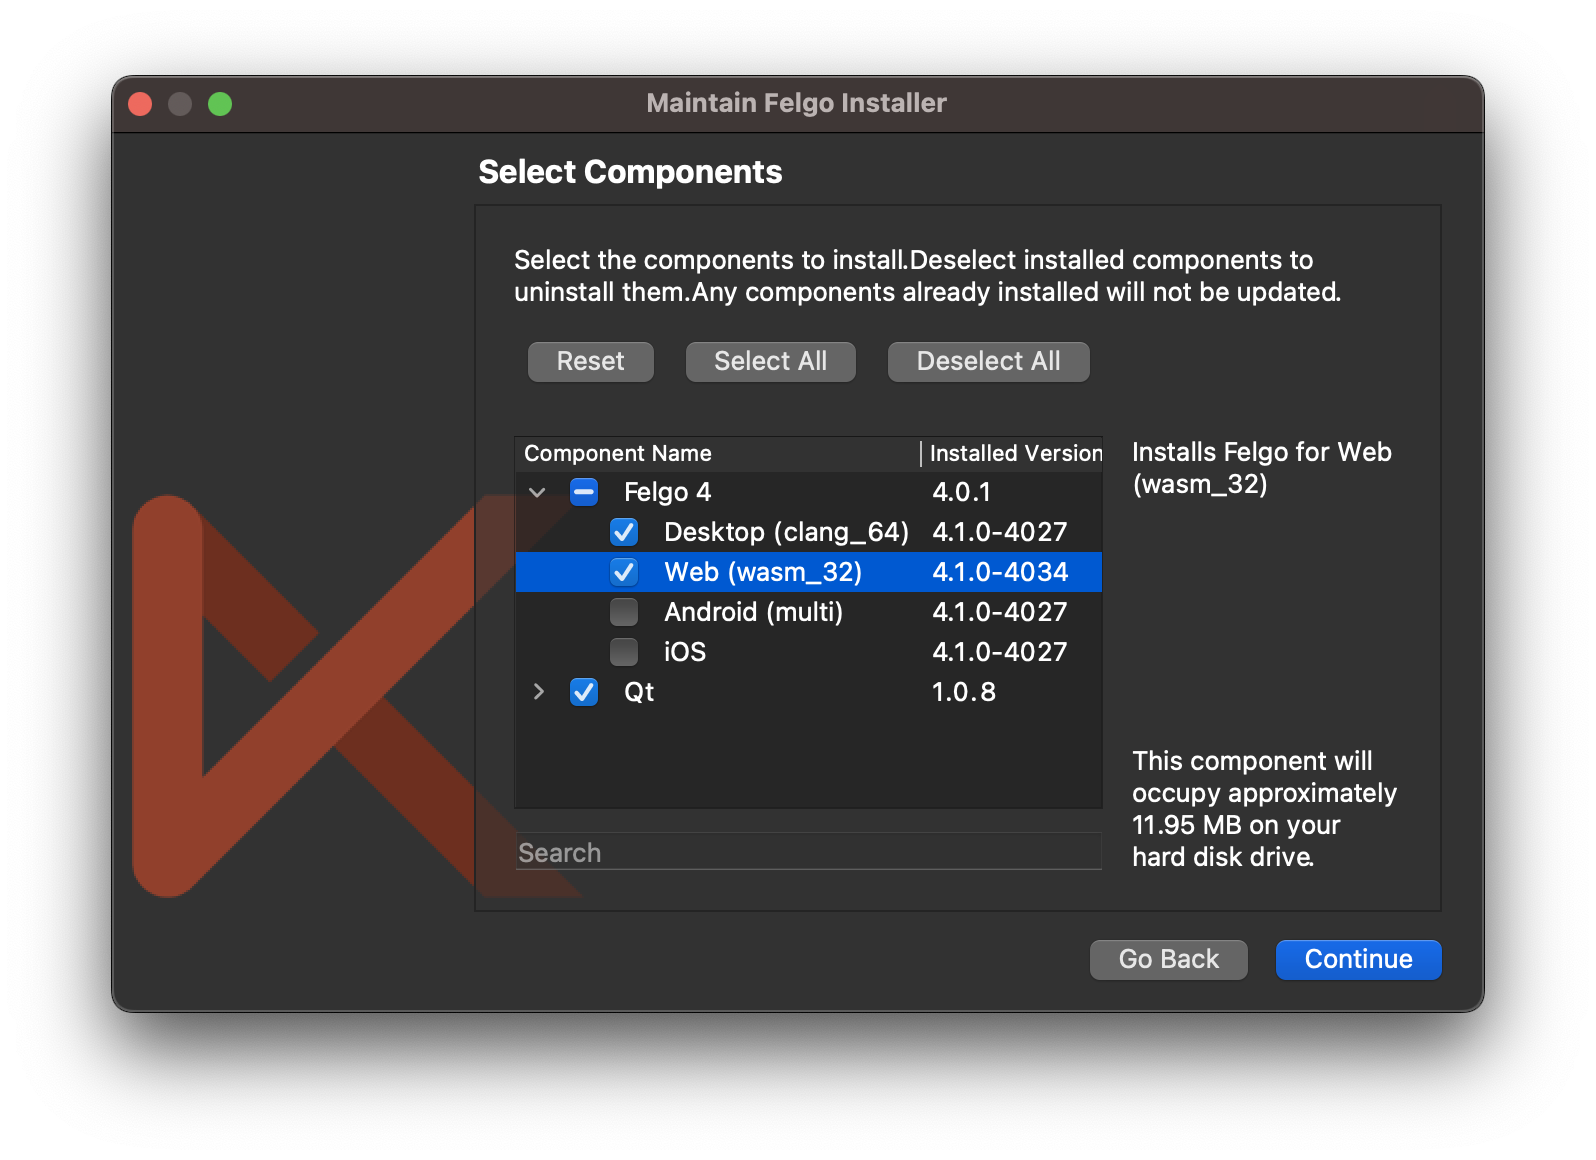
The Felgo installer only installs the packages for your desktop system initially. You can add other packages via the Maintenance Tool. Please note you'll need a Qt commercial license to distribute your application with Qt
for WASM. Contact us here to get access to the Felgo for WASM package first.
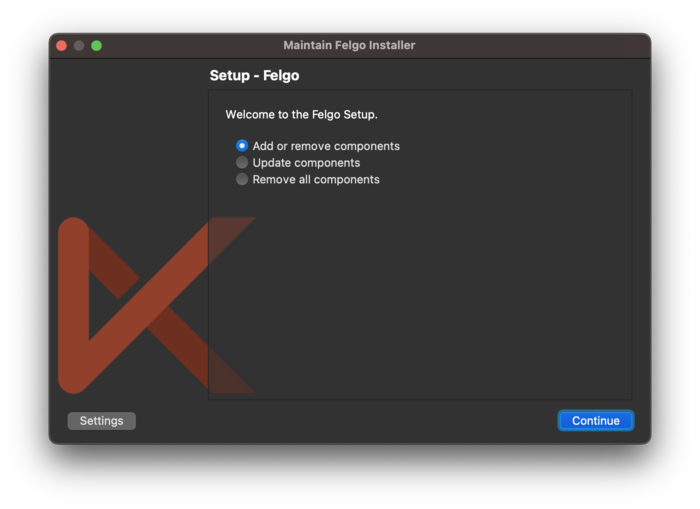
To install the web platform packages you need to first add your Felgo-registered email address and password to the Maintenance Tool. The executable is located within the installation directory of your Felgo SDK and called
MaintenanceTool. Run this application and click the Settings button at the bottom-left:
Open the Repositories tab, choose the User defined repositories entry and click Add.
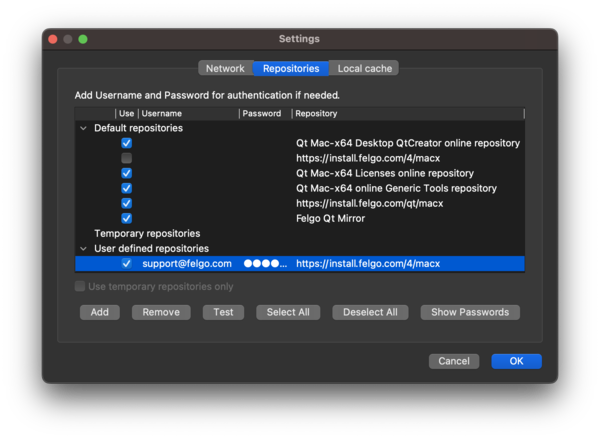
Provide your Felgo username (email) and password as shown in the above image. Set the Repository url depending on your platform:
- https://install.felgo.com/authenticated/4/windows
- https://install.felgo.com/authenticated/4/macx
- https://install.felgo.com/authenticated/4/linux
If a click on Test does not show any error everything works correctly.
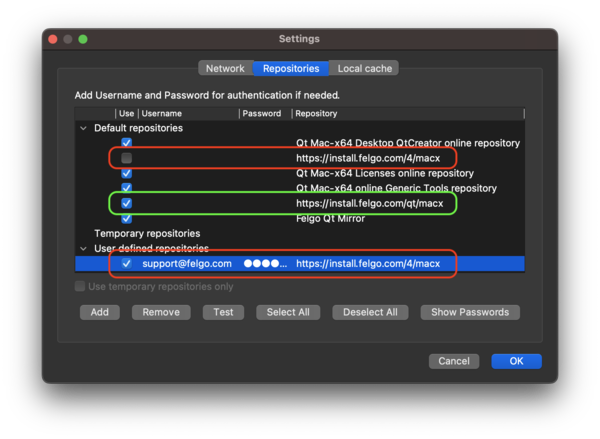
Note: In the Default repositories section, you can also disable the anonymous entry that was previously used. For example https://install.felgo.com/4/macx on macOS. Make sure to not
accidentally deactivate the "qt" repository!
Close the settings with OK. You can now proceed with the installer. Select Add or remove components and choose the platforms you want to add:
Build Your App or Game
Felgo for WebAssembly uses the Emscripten compiler to build C++ portable applications to target browsers with WebAssembly
support.
Prepare your Project
WebAssembly builds are created statically, which means all libraries and files required by your app are packaged within the binary format for WebAssembly (.wasm).
WASM apps can only access files that are bundled via the qrc file system. In contrast to building for Desktop or the mobile platforms, you also have to add your asset files (images, fonts, etc) to the qrc file.
Therefore, make sure to add all your QML & JavaScript files and assets to your qrc file before building your project. To learn how to do that, have a look at the publishing guide.
Important: Enable QML_FILES and RESOURCES in the qt_add_qml_module() call in your CMakeLists.txt file. Then load the main qml file from resources (i.e.
qrc:/qml/Main.qml) in your main.cpp file. deploy_resources() is not supported and RESOURCES are mandatory. If you see an empty, white page in the browser, check if you have
prepared your project accordingly.
Example:
 # Add QML files and resources to QML module to included them via QRC automatically:
 qt_add_qml_module(appBasic
     URI BasicApp
     VERSION 1.0
 # uncomment for web deployment:
     QML_FILES ${QmlFiles}
     RESOURCES ${AssetsFiles}
     NO_RESOURCE_TARGET_PATH
 )
Build Your Project
After installation, WebAssembly Kit shows up in Qt Creator similar to your other Build Kits. You can enable the WASM Kit for your project and start the application by pressing the Run button.
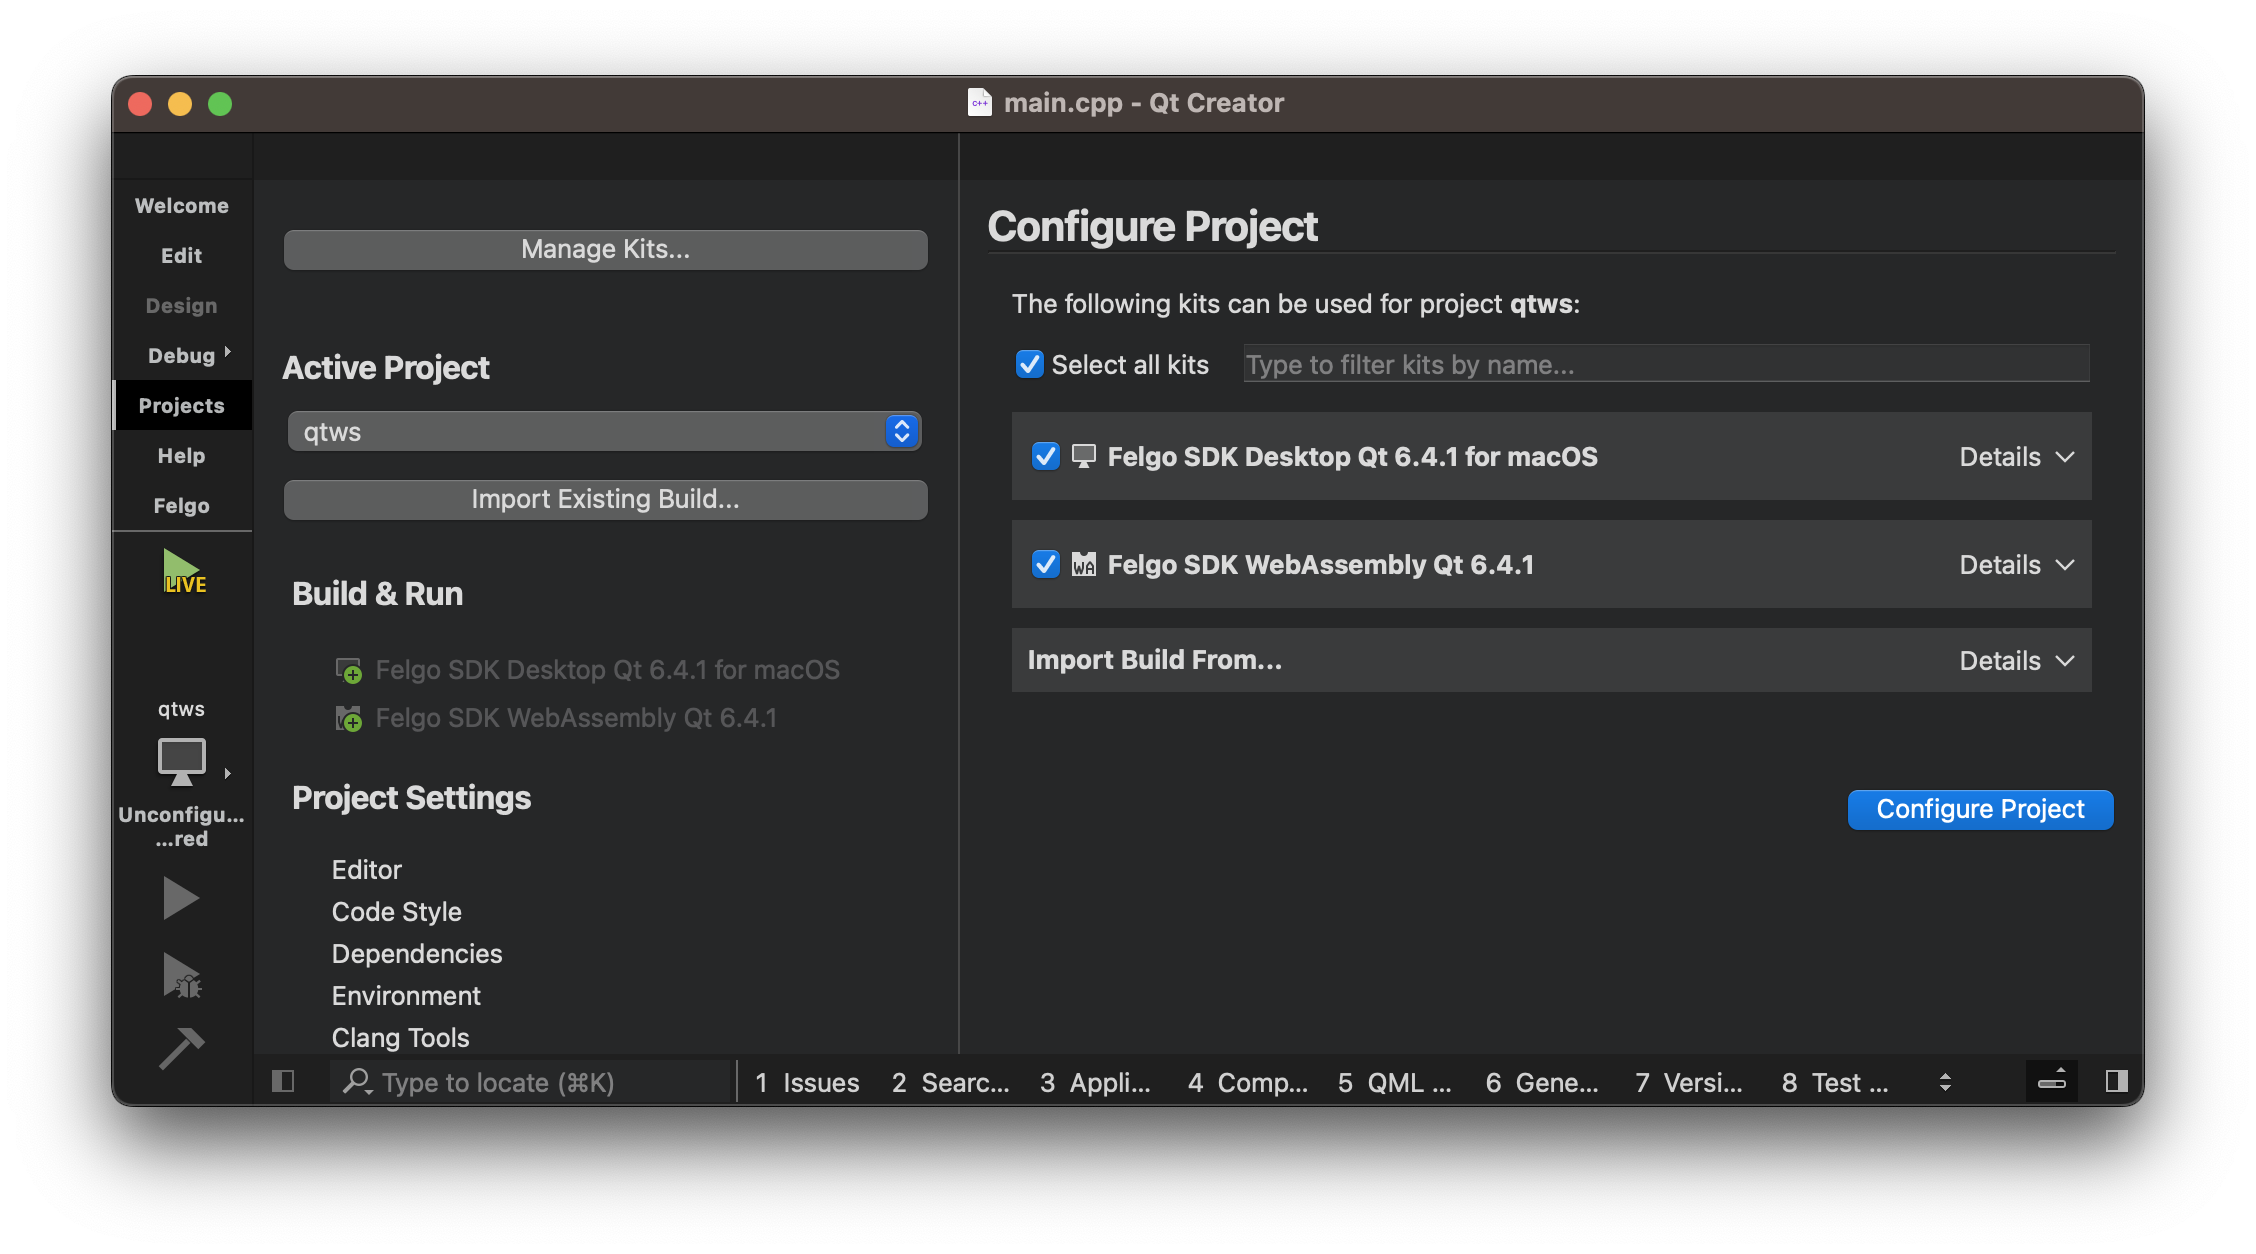
Qt Creator will build the project, start a local web server, deploy your app, and open the the browser to run it.
Build Output
The build process will generate multiple files:
- index.html: The default Felgo entry point of your application for the browser. You can customize the HTML to your needs
- index.js: This file contains the WebAssembly module corresponding to your application.
- index.wasm: The actual WebAssembly binary of your application, including all files that you added to the qrc file, i.e. QML & JavaScript files and assets like images or fonts.
- qtloader.js: Provides APIs for application life-cycle management like the loading screen or crash and process exit handling.
- felgo-logo.png: Splash image used for the default HTML.
JavaScript Environments
It is important to note that there are two different JavaScript environments in place, the one provided by the browser your app is running on and the one implemented in the QML JavaScript engine. All of your QML/JavaScript
code runs inside the WebAssembly sandbox and can interact with the browser-side JavaScript using the WebChannel API.
The WebChannel API enables Qt objects to be shared from QML/C++ applications to standard JavaScript runtimes, such as Browser or Node.js, and even other QML engines. The WebChannel API follows the Server-Client model. The Qt
application runs as the server exposing objects to the client. It uses a WebChannel transport mechanism to send and receive data between the two environments.
Sharing data with the Browser
Felgo provides a WebChannel transport implementation that you can use from your App component. You can add custom QtObjects to be shared by adding them to the App::webObjects.
The objects in this list are then automatically registered with the WebChannel.
The App::webObject property is exposed by default, this object shares the `title` from QML to the browser updating the browser's title on changes, as well as the `url` property
set from the browser during the initialization of the WebAssembly module.
import Felgo
import QtQuick
App {
AppText {
anchors.centerIn: parent
text: webObject.url
}
webObject.onClientInitialized: {
console.log("Client ready", message)
}
}
Sharing custom objects can be done by instantiating them into the App::webObjects property, WebChannel requires an identifier to be explicitly set to every registered objects,
Felgo's implementation automatically picks one from the object properties on the following order: objectName, webChannelId (custom) or the object id set in QML. If no suitable id is found, the object won’t be registered to the
WebChannel, if this happens you will get a warning on the console.
 import Felgo
 import QtQuick

 App {

   webObjects: [
     QtObject {
       id: qmlDefinedObject
       property int count
       property string myString: "Hello!"

       function qmlMethod() {
         console.log("I was called from the browser!")
         return "You can return anything!"
       }

       onMyStringChanged: {
         console.log("myString was updated", myString)
       }
     }
   ]

   AppButton {
     anchors.centerIn: parent
     text: "Increment count"
     onClicked: {
       qmlDefinedObject.count++;
     }
   }
 }
On the browser side you can handle value changes via connections, read or write properties and call methods of your shared objects. Look for "felgoInitWebTransport" in the shell html and add the following code to your web
channel:
function felgoInitWebTransport() {
new QWebChannel(wasmTransport, function(channel) {
let qmlDefinedObject = channel.objects.qmlDefinedObject;
qmlDefinedObject.countChanged.connect(function(){
console.log("[at js] Count updated!", qmlDefinedObject.count)
})
qmlDefinedObject.myString = "Hi! I was updated from the browser";
qmlDefinedObject.qmlMethod( result => {
console.log("qmlMethod returned", result)
});
})
}
The felgoInitWebTransport function is set to the Module.felgoInitialized property on the statusChanged of the argument to the QtLoader call. If this method exists, it will be called by
the Felgo code from WebAssembly once the whole application has completely initialized and it's ready to start interacting with the browser.
Note: Currently only serializable objects can be shared via the WebChannel API, most UI components can not be shared using the WebChannel API since serialization might fail due to the complexity of UI objects.
How to share an API token with QML
Lets say your website already has an API authentication token for your users, and of course you would not want them to log in again from within your Felgo WebAssembly application.
You can add a new QtObject to the webShared objects list with a token property, this property can be updated in both directions:
App {
webObjects: [
QtObject {
id: authObject
property string token
onTokenChanged: {
console.log("token was updated", token)
if (token == "") {
} else {
}
}
}
]
}
On your browser-side JavaScript:
 let authObject;
 function felgoInitWebTransport() {
   ...
   new QWebChannel(wasmTransport, function(channel) {
     ...
     authObject = channel.objects.authObject;
     authObject.token = localStorage.getItem('authToken');
     ...
   })
   ...
 }
How to trigger actions in QML from HTML and JavaScript
You can directly call a method defined in your shared objects. You can pass JavaScript variables as parameters and return values from QML to the browser.
In the following example, handlerObject.qmlDefinedMethod can be called from the browser, any data passed to the method will be stored in the App property outOfWebObject, and the method will return
the previous value set to that property.
Note that explicit signals can not be emitted directly from the browser, rather a proxy method shall be used. Property updates from the browser will trigger property changed signals.
App {
property var outOfWebObject
webObjects: [
QtObject {
id: handlerObject
function qmlDefinedMethod(data) {
console.log("Received in QML:", JSON.stringify(data))
let returnData = outOfWebObject
outOfWebObject = data
return returnData
}
function emitQmlSignal(data) {
qmlSignal(data)
}
signal qmlSignal(var data)
onQmlSignal: data => {
console.log("qmlSignal emitted in QML:", JSON.stringify(data))
}
}
]
}
 <button onclick="triggerQMLHandler()">Trigger!</button>

 <script>
 let handlerObject
 function triggerQMLHandler() {
   let previousValue = handlerObject.qmlDefinedMethod({
     foo: "Foo",
     bar: "Bar"
   })

   console.log("qmlDefinedMethod returned", previousValue)

   handlerObject.emitQmlSignal({
     baz: "baz"
   })
 }

 function felgoInitWebTransport() {
   ...
   new QWebChannel(wasmTransport, function(channel) {
     ...
     handlerObject = channel.objects.handlerObject;
     ...
   })
   ...
 }
 </script>
How to use notifications with WebAssembly Felgo Apps
Felgo notification plugins are not supported on WebAssembly, nonetheless implementing notifications is straightforward, simply follow the documentation for the web from the notification service you are using. If you need to
proxy data messages to your Felgo WebAssembly application you can use the WebChannel integration to seamlessly share data from the browser.
Test Your App
Opening the generated index.html file directly in your web browser won’t work because loading WASM modules is only supported via a web server. To run your app, you therefore need to load it from a (local) web server. Qt
Creator already covers this task when you run the project.
For manual testing, you can run the included web server by executing the command emrun --browser chrome index.html from within the dist folder in your terminal.
Note: You can also use Python or Ruby in your build directory to serve your build:
 [[ "$(python --version)" == "2."* ]] && python -m SimpleHTTPServer 8000 || python -m http.server 8000 -d dist
 ruby -run -e httpd -- -p 8000 dist
Publish Your App or Game to the Web
In order to publish your app or game, you need to use a static web server. Most common servers do just fine, but there are a few considerations to deliver the best user experience:
In order for browsers to download and compile your binary files quicker, they can take advantage of streamed compilation. This only works if browsers know that they are dealing with a WebAssembly binary in
advance. To tell them, you need to set the Content-Type: application/wasm header.
Enable Caching
Make sure that your server is sending the ETag and Cache-Control headers. This way, subsequent opens of the website load the wasm files from cache. A new download is only triggered if you have
updated your .wasm file (you can set the highest max-age value possible for your wasm files).
Enable gzip Compression
Qt .wasm files might be a bit larger than what most users would expect. To reduce download time, enable compression on your server configuration. We suggest using gzip but you can also try brotli (bear in mind that is less
widely supported). You can also compress the .wasm file beforehand using gzip, this reduces the download size up to half the original file size and therefore greatly improves the download time.
CORS
Cross Origin restrictions apply to all requests made by your application, just like those to browser-side JavaScript requests. Make sure your backend and
media servers are set accordingly to your website host domain serving your app.
HTML Canvas
With the default HTML, the target canvas uses the full size of the browser window. You can modify the HTML to your needs to define a canvas that coexists with different HTML elements, like in the example illustrated
below.
In order to change your HTML shell file to a custom one, you can set the WASM_SHELL_HTML_TEMPLATE_FILE variable in your CMakeLists.txt file. You can use the already provided shell file from Felgo
located in <FELGO_INSTALL_FOLDER>/Felgo/wasm_32/mkspecs/features/wasm/wasm_shell_felgo.html as a reference.
set_property(TARGET projectname PROPERTY WASM_SHELL_HTML_TEMPLATE_FILE "${CMAKE_SOURCE_DIR}/wasm/wasm_shell.html")
Protect your app to only run from your domain
In order to protect your app and content, you can enable domain checks during runtime, so your app will only run if it was served from an authorized domain. Using emscripten::val you can read the domain reported
by the browser. This method is really hard to tamper with since it's a read-only value provided directly by the browser and there is no easy way to change it by the user or a third party. Make sure your app is served via HTTPS
to mitigate the risk of a DNS spoofing attack.
Add the following lines to your main.cpp file
 #ifdef Q_OS_WASM
 #include <emscripten/val.h>
 #endif

 ...

 int main(int argc, char *argv[])
 {
 ...

 #ifdef Q_OS_WASM
   emscripten::val browserWindow = emscripten::val::global("window");
   QString currentHostname = QString::fromStdString(browserWindow["location"]["hostname"].as<std::string>());

   if(!(currentHostname.endsWith("<your-domain>") ^ (currentHostname.compare("localhost") == 0))) {
     qFatal("Unauthorized domain");
   }
 #endif

 ...
 }
Current Limitations
File System and Networking
Your app runs in a sandboxed environment inside the browser that has the same restrictions as the rest of your website, such as:
- Mixed content: If your website is hosted using HTTPS, browsers might block or warn about mixed content requests. To prevent such warnings, make sure to use HTTPS instead of HTTP for your network requests.
-
File system access:
- There is no direct file system access to the host machine, you can access files or download from your application using the QFileDialog::getOpenFileContent() and QFileDialog::saveFileContent() C++ APIs.
- The WebAssembly compiler provides alternatives for applications that make use of the file system:
- MEMFS: There is an in-memory file system used for temporary file access. This API is synchronous and can be accessed with the default Qt File implementation anywhere outside the /home/web_user directory, e.g.
/tmp. Saved files are not peristent. There is is a lot of ongoing development and file management will be improved in future Qt versions.
- IDBFS: There is also support for persistent file storage on top of the “Browser Indexed DB”. This file system is asynchronous and full synchronization is done before the application starts, as well as write
synchronization at the end of application execution. You can use persistent storage in the /home/web_user directory provided by the IDBFS.
- Note that MEMFS and IDBFS are emulations of a Linux/POSIX file system and do not correspond in any way to the underlying host FS, as you might expect.
- The QSettings, Settings and Felgo Storage types do not rely on the virtual
file system and are the recommended way to persistently store local data.
-
Qt Multimedia: Audio and video playback using MediaPlayer is not properly working yet. Playing raw audio files with the SoundEffect type is supported.
Felgo
Following NativeUtils QML APIs are not supported with WebAssembly:
Qt Modules
The WebAssembly platform currently does not ship with the following Qt modules and QML components:
- DataVisualization
-
WebView
- Multimedia: No playback of audio/video within WebAssembly
Following Qt modules can be used but functionality is not implemented for WebAssembly:
- Location & Positioning
- Sensors
Others
Due to the current implementation of Qt, WebAssembly applications report the platform as “unix” in the platform.os string. Instead of that you can use the “system.isPlatform(System.Wasm)” check in your QML code to get to
know if you are running your app as a WebAssembly build.
Destructors are not called on app exit, due to the way WebAssembly main loop is implemented, C++ destructors execution is not not guaranteed on application exit.
Since the WebAssembly platform is single threaded, the implementation for the QML/JS Engine WorkerScript component is synchronous.
Nested event loops are not supported. Applications should not call e.g. QDialog::exec() or create a new QEventLoop object. Otherwise the app stops execution and you need to reload your browser.
Applications do not have access to system fonts. Font files must be distributed with the app in qrc files.
Qt renders application content to a canvas element, and does not use native DOM elements. Therefore, accessibility tools like screen readers are not supported and text inputs do not necessarily trigger virtual keyboards.
Official WebAssembly Guides


