This tutorial guides you step-by-step on the way to create the slot game Flask of Rum.
A Slot Game?
When you enter the world of casinos and take a look at the available games, one of the most popular type are the slot games. Even in online casinos, that you can access through the Internet or by mobile apps, these games
definitely belong to the top. Just have a look at well-known slot game producers like Slotomania, Slotpark or Greentube to see them in action!
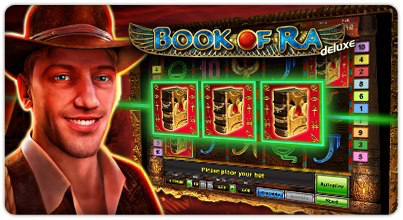
A typical design of a slot machine. The Book of Ra is a classic
slot game example, but all different kinds of games are available.
Though the amount of slot games out there is incredible, most of them share the same basic game mechanics:
- The main game window is composed of multiple columns that contain symbols. Due to the historical background of mechanical slot machines, these columns are also called reels.
- The player chooses the amount he wants to bet and starts the slot machine.
- Each time, the slot machine is started, the players credit is reduced by the bet amount.
- If the same symbols line up in a row when the machine stops, the player wins credits based on the amount he bet before.
- How much credits the player actually wins depends on the type of the slot machine game, the available symbols and how the win factors for each symbol are configured.
That already sounds fun, right? But most of the games have some specials that make them even more interesting: For example, The Book of Ra is not only the game title but also a symbol on the reels with a special power. It
can take the place of any other symbol in the game to form a line of matching symbols. Such wildcard symbols already boost the chances to win, but that's not all. If the player manages to get three or more books into one line,
he receives ten free games with some twists that further increase the chances to win. So like the real explorers of Egypt dungeons, the players who find the Book of Ra are extremely lucky and can expect big win amounts.
Most slot machines have special symbols that boost your chances to win.
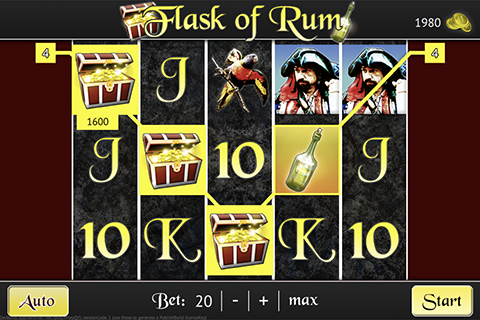
Wildcard symbols, symbols that give free spins or even symbols that start mini-games are a major fun factor and occur in most of the modern slot games. In this tutorial, we will make a pirate themed slot game similar to such
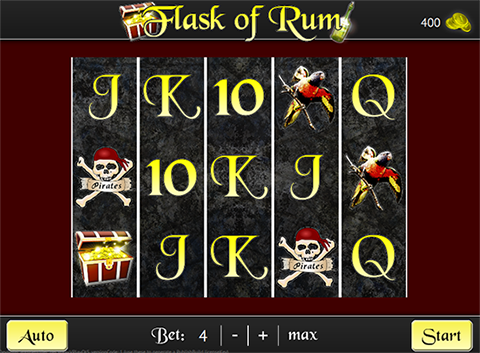
games! And I am sure you know what a pirates greatest treasure is ... correct, a Flask of Rum! This is what the final version is going to look like, yarrrrr!
You are going to make this awesome slot machine.
Scope of the Tutorial
After you complete this tutorial, you should be well-prepared to create your own slot machine game with Felgo in record time. This tutorial covers:
- Using the SlotMachine component to create a custom slot machine.
- Filling the slot machine reels with randomly ordered symbols with the special SlotMachineModel.
- Detecting matching symbols on 9 different winning lines.
- Using the Flask of Rum as a special symbol that may take the place of every other symbol.
- Defining a singleton object to hold configuration data for a game. (e.g. available symbols, win factors, ...)
- Communicating events using signals.
However, if you just started with Felgo and don't know how to work with Qt Creator or QML, please consider taking a look at the following tutorial:
Also, in order to keep this game simple and leave some room for improvement, we did not add the feature of winning ten free games when three or more flasks of rum form a line. It's up to you to transform the slot machine of
this sample game into a full-fledged slot machine that perfectly fits your needs.
In case you prefer to directly look at the source code of the Flask of Rum demo game - you can find it along with the other demos in the Felgo SDK. See here where to
find the demo in your SDK directory.
For an overview of the game features, see Flask of Rum - Slot Game.
Resources
The only additional resources that you need for this tutorial are some images. They should be placed within the assets directory of the Qt Creator project you are going to create. You can download the images here.
Setting Up the Project
The first step is to create a new empty project in Qt Creator. We want the game to be in landscape orientation, so make sure to select this mode during the project setup. When you're done, just add the downloaded images to
the assets folder of your project. They should also appear in the Other files\assets directory of the project tree in Qt Creator. Please take care not to add an additional subdirectory that might be
created when you unpack the resources archive.
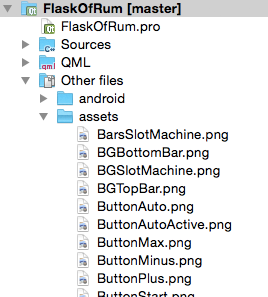
This is how your project tree should look like.
If you are all set, we can finally start to add some code!
Basic Game Layout
First, we want to create the basic game layout that fills the space around the actual slot machine in the middle of the screen. It includes:
- A simple version of the games main scene. All the elements we see in the game will placed here.
- The Flask of Rum logo and the total credits available for playing. A bar at the top of the game window will hold these elements.
- The buttons to start the slot machine or change the bet amount. These buttons are placed in a bar at the bottom of the game window.
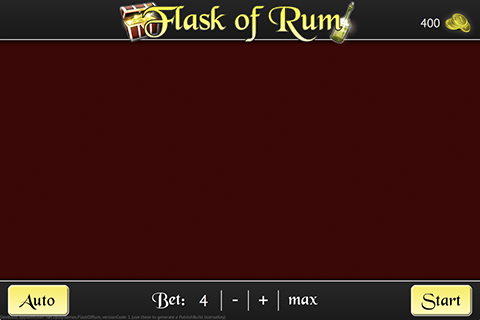
The basic game layout consists of a bar at the top, one at the bottom and a beautiful dark red background.
A Simple Scene
Let us start with a simple game scene, that only defines a few properties and a colored rectangle for our red background. Just replace the current Main.qml file in your qml folder with the following
implementation.
qml/Main.qml:
import Felgo 4.0
import QtQuick 2.0
GameWindow {
id: gameWindow
activeScene: scene
width: 960
height: 640
Scene {
id: scene
width: 480
height: 320
property int betAmount: 4
property int creditAmount: 400
Rectangle {
anchors.fill: scene.gameWindowAnchorItem
color: "#400000"
}
}
}
With these few lines, we set up our game window to be 960 x 640 px. This is the default window size when you play the game on your computer. On mobile devices, the game window size is different for each
device.
We then add a Scene to the game window and configure it as the active scene by stating activeScene: scene. The value scene in this expression refers to the
id that we set for our Scene element. The scene in this example has a logical size of 480 x 320 px. All the elements within the scene are scaled up along with the scene
to match the game window size. This makes it very easy to add elements, that have a fixed position and size, without worrying about them being smaller on displays with higher resolutions.
Note: There are different scaling modes available in Felgo. The default mode fits the scene to the game window, which may leave empty areas at the side of the screen. To learn more about scaling modes, visit the
tutorial How to create mobile games for different screen sizes and resolutions.
The two properties betAmount and creditAmount are global properties for handling the current bet amount and total credit amount of the game. We already set the initial values 4 and
400, so each spin of the slot machine reduces the initial credit amount of 400 by 4 credits. The last element of the scene is the rectangle, that sets our background color. We configure the rectangle to fill up the
whole game window and not only the scene. This ensures that the background covers the whole screen on every device.
Creating the Top Bar
The top bar is a very distinct element of the scene, that contains additional items like the game logo and the credit amount. It is a good idea to create a separate QML item for such elements to keep your code clean and well
structured. Create a new file TopBar.qml in your qml folder and fill it with this code:
qml/TopBar.qml:
import Felgo 4.0
import QtQuick 2.0
Item {
id: topBar
height: 50
Image {
anchors.fill: parent
source: "../assets/BGTopBar.png"
}
Image {
width: 241
height: 46
anchors.top: parent.top
anchors.horizontalCenter: parent.horizontalCenter
source: "../assets/Logo.png"
}
Image {
id: goldImage
width: 36
height: 30
anchors.top: parent.top
anchors.right: parent.right
anchors.topMargin: 8
anchors.rightMargin: 4
source: "../assets/Coins.png"
}
Text {
anchors.verticalCenter: goldImage.verticalCenter
anchors.right: goldImage.left
text: scene.creditAmount
color: "white"
font.pixelSize: 12
}
}
The topbar has a height of 50 px, which matches the height of the background Image. But we do not set a fixed width for the top bar at this point.
Instead, we configure the background image to fill the whole topbar, so it is possible to set any width for the topbar at a later point and the background image always covers all of it. We will use this behavior to match width
of the bar with width of the game screen.
The other elements of the top bar have fixed sizes, but are not placed at a fixed point of the bar. Instead, we anchor the items relatively to the topbar or to one another. This ensures the same relative positions on any
device width. For example, the logo is always vertically and horizontally centered.
The icon for the credits is a pile of gold coins that we place 4 px from the left and 8 px from the top of the bar. We then anchor the credit amount text directly to the left of the gold coins and
center it vertically. By using scene.creditAmount as the text value, we display the corresponding property of our scene. Furthermore, any changes that occur in the creditAmount property are
automatically applied to the text as well. This is possible due to the concept of property binding and erases any worries about keeping the text and
the actual credit amount in sync.
And that kids, is how you create the top bar. ;-)
The bottom bar is very similar to the top bar in terms of the basic principles for aligning and sizing the elements. But in contrast to the top bar, a few additional features are needed:
- The bottom bar mainly consists of buttons in form of clickable images. For all of these buttons, we define signals for when they are clicked. Any other component can then add handler functions for these signals and
execute code whenever a click event occurs.
- To be able to listen to click events in the images, we are going to add a MouseArea to all of the buttons.
- The start- and the auto-button are special buttons because they have two states: They can either be active or inactive. For each of these states, we show a different image that shows the button in a normal or a pressed
condition. We then provide two additional properties for the bottom bar, that let the user of the bar decide when the states should be changed.
Now let's add the BottomBar.qml file to our qml folder and fill it with code.
qml/BottomBar.qml:
import Felgo 4.0
import QtQuick 2.0
Item {
id: bottomBar
height: 50
property bool autoActive
property bool startActive
signal autoClicked()
signal startClicked()
signal decreaseBetClicked()
signal increaseBetClicked()
signal maxBetClicked()
Image {
anchors.fill: parent
source: "../assets/BGBottomBar.png"
}
Image {
width: 61
height: 31
anchors.bottom: bottomBar.bottom
anchors.left: bottomBar.left
anchors.bottomMargin: 4
anchors.leftMargin: 8
source: bottomBar.autoActive ? "../assets/ButtonAutoActive.png" : "../assets/ButtonAuto.png"
MouseArea {
anchors.fill: parent
onClicked: autoClicked()
}
}
Image {
width: 61
height: 31
anchors.bottom: bottomBar.bottom
anchors.right: bottomBar.right
anchors.bottomMargin: 4
anchors.rightMargin: 8
source: bottomBar.startActive ?
            "../assets/ButtonStartActive.png" : "../assets/ButtonStart.png"
enabled: !bottomBar.startActive
MouseArea {
anchors.fill: parent
onClicked: startClicked()
}
}
Row {
anchors.bottom: bottomBar.bottom
anchors.horizontalCenter: bottomBar.horizontalCenter
anchors.bottomMargin: 8
height: 23
Image {
width: 35
height: 19
anchors.verticalCenter: parent.verticalCenter
source: "../assets/TextBet.png"
}
Text {
width: 35
horizontalAlignment: Text.AlignHCenter
anchors.verticalCenter: parent.verticalCenter
text: scene.betAmount
color: "white"
font.pixelSize: 16
}
Image {
width: 27
height: 23
anchors.verticalCenter: parent.verticalCenter
source: "../assets/ButtonMinus.png"
MouseArea {
anchors.fill: parent
onClicked: decreaseBetClicked()
}
}
Image {
width: 30
height: 23
anchors.verticalCenter: parent.verticalCenter
source: "../assets/ButtonPlus.png"
MouseArea {
anchors.fill: parent
onClicked: increaseBetClicked()
}
}
Image {
width: 50
height: 23
anchors.verticalCenter: parent.verticalCenter
source: "../assets/ButtonMax.png"
MouseArea {
anchors.fill: parent
onClicked: maxBetClicked()
}
}
}
}
We again only set a fixed height and add a background image that fills the whole bar. The start- and auto-buttons are quite similar to each other. They define an Image that is aligned at the right or the left side of the bar and include some additional features. With the line source: bottomBar.startActive ?
"../assets/ButtonStartActive.png" : "../assets/ButtonStart.png", the start-button shows a different image based on the startActive property. Also, when the MouseArea detects a click, we trigger the matching signal. For the auto-button, we use the corresponding properties and signals in the same way.
The buttons to control the bet amount are horizontally centered within the bottom bar and aligned next to each other. For this purpose, we use the Row component,
that places all of its child elements in a horizontal row. We can then set the position of the Row component within the bar without worrying about the horizontal
alignment of the buttons themselves. For the buttons, we only define an Image that is vertically centered and contains a MouseArea that triggers the correct signal.
That looks like a lot of code, but it's mainly for displaying all the elements correctly and for listening to the events and triggering the signals.
Adding the Bars to the Scene
I am sure that at this point, you are eager to see both the top and the bottom bar in action. Just add both of them to the main scene and we can see how it looks like.
qml/Main.qml:
import Felgo 4.0
import QtQuick 2.0
GameWindow {
id: gameWindow
Scene {
id: scene
TopBar {
id: topBar
width: scene.gameWindowAnchorItem.width
anchors.top: scene.gameWindowAnchorItem.top
anchors.horizontalCenter: scene.gameWindowAnchorItem.horizontalCenter
}
BottomBar {
id: bottomBar
width: scene.gameWindowAnchorItem.width
anchors.bottom: scene.gameWindowAnchorItem.bottom
anchors.horizontalCenter: scene.gameWindowAnchorItem.horizontalCenter
onStartClicked: scene.startSlotMachine()
onAutoClicked: scene.autoPlaySlotMachine()
onIncreaseBetClicked: scene.increaseBetAmount()
onDecreaseBetClicked: scene.decreaseBetAmount()
onMaxBetClicked: scene.maxBetAmount()
}
function increaseBetAmount() {
if(bottomBar.startActive)
return
if (betAmount < 5 && creditAmount >= 5)
betAmount = 5
else if (betAmount < 8 && creditAmount >= 8)
betAmount = 8
else if (betAmount < 10 && creditAmount >= 10)
betAmount = 10
else if (betAmount < 15 && creditAmount >= 15)
betAmount = 15
else if (betAmount < 20 && creditAmount >= 20)
betAmount = 20
}
function decreaseBetAmount() {
if(bottomBar.startActive)
return
if (betAmount > 15 && creditAmount >= 15)
betAmount = 15
else if (betAmount > 10 && creditAmount >= 10)
betAmount = 10
else if (betAmount > 8 && creditAmount >= 8)
betAmount = 8
else if (betAmount > 5 && creditAmount >= 5)
betAmount = 5
else if (betAmount > 4)
betAmount = 4
}
function maxBetAmount() {
if(bottomBar.startActive)
return
if(creditAmount >= 20)
betAmount = 20
else if(creditAmount >= 15)
betAmount = 15
else if(creditAmount >= 10)
betAmount = 10
else if(creditAmount >= 8)
betAmount = 8
else if(creditAmount >= 5)
betAmount = 5
else if(creditAmount >= 4)
betAmount = 4
}
function autoPlaySlotMachine() {
bottomBar.autoActive = !bottomBar.autoActive
if(bottomBar.autoActive)
startSlotMachine()
}
function startSlotMachine() {
}
}
}
The two bars are quickly added with just a few lines. Because we prepared the bars to work with any width we want, we can set the width to the actual width of the game window. They then use the whole screen width on every
device. For the bottom bar, we also already link the signals to the handler functions, that we added in our scene. Most of the functions can already be implemented:
increaseBetAmount() - Increases the bet amount to the next bigger step, that the player can afford with his current credit amount. The possible steps are 4, 5, 8, 10, 15 and 20 credits.decreaseBetAmount() - Decreases the bet amount to the next smaller step, that the player can afford with his current credit amount.maxBetAmount() - Sets the maximum bet amount the player can afford.autoPlaySlotMachine() - Activates or deactivates the auto-button. When you activate the button, the game automatically starts the slot machine. If the button isn't active, the player can start every spin
manually. When the player activates the auto-button, we also directly start the slot machine. It is not necessary to additionally press the start-button in this case.startSlotMachine() - For the moment, we do nothing here. After we add our slot machine to the game, we will start it with this function.
All of the functions that change the bet amount immediately return when the slot machine is currently running. That's because we want to prevent any changes in the bet amount during a slot machine run. We use the
startActive property of the bottom bar for this check. When we start the slot machine, we will activate the start-button and thus also disable bet changes.
That's all for now! You can hit run, play around with the buttons and look at the awesome bars, that always fit the screen!
We Need a Slot Machine
We can finally come to the fun part: The actual slot machine! Felgo offers a special SlotMachine component, that really helps us to get the main tasks done. We don't have to take care of
positioning the symbols on multiple reels, spinning the reels or stopping them one after another. This is what we will do:
- Set the data model for the items we want to show. In our case, we set the different symbols for our reels.
- Define the appearance of these items based on our data configuration.
- Configure the slot machine to use up the whole available window height and scale all elements accordingly.
I suggest we start with the definition of the symbols. Our game uses these ten symbols:

From the left: Flask of Rum, the poker card symbols 10, J, Q, K and A, the parrot, skull, treasure and the captain.
For each of these symbols, we want to define its frequency on the reels. The queen symbol should appear five times on each reel. The captain only exists once. That's why the player wins big when a line of captains appear on
the slot machine. We want our slot machine to have five reels, and if three or more symbols form a line at the end of a spin, the player receives credits based on the amount he bet. This table shows you the return factors for
each symbol if they form a line of 3, 4 or 5 symbols.
| symbols |
3x |
4x |
5x |
| 10, J, Q |
1:1 |
1:5 |
1:20 |
| K, A |
1:1 |
1:8 |
1:30 |
| parrot, skull |
1:6 |
1:20 |
1:150 |
| rum |
1:1 |
1:20 |
1:200 |
| treasure |
1:8 |
1:80 |
1:400 |
| captain |
1:20 |
1:200 |
1:1000 |
These values are just a configuration setting that you could also choose differently. It would be wise to have a configuration file to store these settings, so it is possible to easily change the symbols and win factors at a
later point. We don't want to adapt any code just when some symbol settings change. There are several ways to achieve this. For example, we could add a global configuration property or include a JavaScript file that holds the
configuration data. We decided to implement a configuration object as a singleton to show you yet another way how you can add global settings.
Are You a Singleton?
In programming languages, singletons are a very common way to implement objects, that should be unique within the application. There can and will be only one instance of a singleton class. They are used for many different
tasks. In our case, we define a configuration object as a singleton. We only want one global configuration setting in the application. Also, we do not need to add the singleton to our scene or anywhere else. We can conveniently
access the configuration object, with all its properties, signals and functions, directly in other files.

A singleton is forever alone.
It takes two steps to implement a singleton in QML:
- Create a new QML object and mark it as a singleton.
- Add a "qmldir" file that declares a type for the singleton object. This makes the singleton directly available as a type in other files.
We are going to use the SlotMachineModel element to initialize the SlotMachine component with symbol data. This SlotMachineModel can also store additional custom configuration data you might need for each symbol. So how about we take advantage of that and use it to set up our configuration object? Let's
create a new folder config in your qml directory and add the file SymbolConfig.qml.
qml/config/SymbolConfig:
pragma Singleton
import Felgo 4.0
import QtQuick 2.0
SlotMachineModel {
symbols: {
"rum": {
frequency: 1,
data: {
source: "SymbolRum.png",
winFactor: [1, 20, 200]
}
},
"ten": {
frequency: 5,
data: {
source: "Symbol10.png",
winFactor: [1, 5, 20]
}
},
"J": {
frequency: 5,
data: {
source: "SymbolJ.png",
winFactor: [1, 5, 20]
}
},
"Q": {
frequency: 5,
data: {
source: "SymbolQ.png",
winFactor: [1, 5, 20]
}
},
"K": {
frequency: 4,
data: {
source: "SymbolK.png",
winFactor: [1, 8, 30]
}
},
"A": {
frequency: 4,
data: {
source: "SymbolA.png",
winFactor: [1, 8, 30]
}
},
"parrot": {
frequency: 3,
data: {
source: "SymbolParrot.png",
winFactor: [6, 20, 150]
}
},
"skull": {
frequency: 3,
data: {
source: "SymbolSkull.png",
winFactor: [6, 20, 150]
}
},
"treasure": {
frequency: 2,
data: {
source: "SymbolTreasure.png",
winFactor: [8, 80, 400]
}
},
"captain": {
frequency: 1,
data: {
source: "SymbolCaptain.png",
winFactor: [20, 200, 1000]
}
}
}
function getSymbolData(symbol) {
if(symbols[symbol] === undefined)
return null
else
return symbols[symbol].data
}
function getWinFactor(symbol, length) {
var symbolData = getSymbolData(symbol)
if(symbolData === null)
return 0
var index = length - 3
if(symbolData.winFactor === undefined || symbolData.winFactor[index] === undefined)
return 0
return symbolData.winFactor[index]
}
}
This class is just like any other QML class that you define, except for the line pragma Singleton, which marks it as a singleton object. The base class for our object is the SlotMachineModel, which is why we can also use our configuration object to initialize the SlotMachine component. The important property for this
initialization is the symbols property. It is required that this property holds a JavaScript object that defines all our symbols as properties, which themselves contain
the frequency setting for that symbol and some custom data.
The custom data for each symbol is the place where we can add our additional configuration data like the win factors for each symbol. We decided to not only add the win factors as custom data, but also the source of the
image that should be displayed for the symbol. This way, you can easily remove or add symbols later with the desired and symbol image and win factors. In addition, we can add some functions to our class that help us to access
our configuration data.
- The
getWinFactor() function returns the win factor configuration for a certain symbol and a specific line length.
- The
getSymbolData() function may be used to access the custom data for a certain symbol.
That was already the first step to create a singleton. What's left is to declare a QML type for our singleton object. For this we add a new file qmldir to our qml/config directory. Make sure that
this file doesn't have any file type extension like *.qml or *.txt.
qml/config/qmldir:
singleton SymbolConfig 1.0 SymbolConfig.qml
This declares that the type SymbolConfig with version 1.0 is implemented in the file SymbolConfig.qml. With this, we configured all the data we need to set up our SlotMachine.
Model, Delegate and the Slot Machine
We want to create a custom slot machine based on the configuration we just added. As mentioned before, the SlotMachine component helps us to easily set up a slot machine. The main part
to get a SlotMachine to work is to specify its model and delegate properties.
- The
model is responsible for providing the data for filling the reels of the slot machine with items. We already used the SlotMachineModel to configure our symbols.
If we then feed the slot machine with this configuration, the reels will be filled with these symbols in a random order, based on their frequency setting.
- The
delegate defines the appearance of each symbol on the reel. We want to show an image for each symbol, that uses the image source we set in the configuration object.
As we use the SlotMachineModel to set the data for our slot machine, we can move on to defining the appearance of our symbols. Create a new folder slotmachine in your
qml directory and add the following Symbol.qml definition.
qml/slotmachine/Symbol.qml:
import Felgo 4.0
import QtQuick 2.0
Item {
property alias imageSource: image.source
Image {
id: image
anchors.fill: parent
anchors.topMargin: 5
anchors.bottomMargin: 5
}
}
The symbol item is quite simple: It contains an Image and allows to set the image source using a property alias. We fill the whole item with the Image and add a
margin at the top and the bottom.
Note: We do not set a fixed width for the item at this point. This is because we want to set the total size of the slot machine with the symbols based on the available screen size. To be able to do that, we don't
specify a width and height for the items initially. The SlotMachine component then automatically sets the item size, if we configure some properties for the default width and height of the
items.
As we now have our model and delegate ready, we can create the slot machine in a new file qml/slotmachine/FlaskOfRumMachine.qml.
qml/slotmachine/FlaskOfRumMachine.qml:
import Felgo 4.0
import QtQuick 2.0
import "../config"
SlotMachine {
id: slotMachine
rowCount: 3
reelCount: 5
model: SymbolConfig
delegate: Symbol { imageSource: "../../assets/"+modelData.data.source }
Image {
anchors.fill: slotMachine
source: "../../assets/BGSlotMachine.png"
}
Image {
anchors.fill: slotMachine
source: "../../assets/BarsSlotMachine.png"
z: 1
}
}
The line import "../config" allows us to use our configuration object in this file. But we do not need to import our Symbol QML item, because it is located in the same folder with our FlaskOfRumMachine
component. We then base our custom slot machine on the SlotMachine component and set it up to display three rows and five reels. For the model, we can simply pass our singleton
configuration object. The slot machine then creates the symbol items, that are defined by the delegate property, with the data of our model. Within the delegate, you can use some special properties to access the
data of the SlotMachineModel you created:
modelData.type - contains the symbol name, e.g. "rum", "parrot", "captain", ...modelData.frequency - holds the frequency value of the symbol.modelData.data - contains the custom user data of the symbol. We can use this to access the image source configuration of our symbols.
After the model and delegate definitions, we also add two images. One that fills the slot machine with a background, another shows white lines as a border between the reels. This image is placed above the background and the
created symbols by setting the z property.
Putting Everything Together
By adding this slot machine to our scene, we can check if everything looks good:
qml/Main.qml:
import Felgo 4.0
import QtQuick 2.0
import "slotmachine"
GameWindow {
Scene {
Rectangle {
}
FlaskOfRumMachine {
anchors.centerIn: parent
defaultItemHeight: 80
defaultReelWidth: 67
}
}
}
After we state import "slotmachine", we can add the component. We anchor it in the center of the scene and specify the default width and height for the items and reels. As we didn't set a specific height for our
symbols, the default values are used for all of them. When you hit play, this already look quite good. But at a closer look, the fixed height allows blank areas above or below the slot machine.
The slot machine is displayed correctly, but the fixed height might lead to blank areas.
Let's correct that! And while we're at it, we can also bring everything to life by adding a handler to the spinEnded signal and implementing the startSlotMachine() function.
qml/Main.qml:
import Felgo 4.0
import QtQuick 2.0
import "slotmachine"
GameWindow {
Scene {
FlaskOfRumMachine {
id: slotMachine
anchors.horizontalCenter: scene.horizontalCenter
anchors.top: topBar.bottom
anchors.topMargin: -10
height: scene.gameWindowAnchorItem.height - (topBar.height + anchors.topMargin) - (bottomBar.height - 10)
defaultItemHeight: Math.round(slotMachine.height / slotMachine.rowCount)
defaultReelWidth: Math.round(defaultItemHeight / 80 * 67)
spinVelocity: Math.round(defaultItemHeight / 80 * 750)
onSpinEnded: scene.spinEnded()
}
function startSlotMachine() {
if(!slotMachine.spinning && scene.creditAmount >= scene.betAmount) {
bottomBar.startActive = true
scene.creditAmount -= scene.betAmount
var stopInterval = utils.generateRandomValueBetween(500, 1000)
slotMachine.spin(stopInterval)
}
}
function spinEnded() {
bottomBar.startActive = false
if(bottomBar.autoActive)
startSlotMachine()
}
}
}
We start with aligning the whole slot machine below the top bar. But the topbar image also includes a shadow at the bottom. So we move the slot machine 10px upwards to let the topbar and the slotmachine overlap a bit.
Because the top bar is placed on top of the slot machine, it casts its shadow upon it. The same applies to the bottom bar. Only that in this case, the height of the slot machine is set accordingly to let it overlap with the
bottom bar.
After setting a dynamic height for the slot machine based on the available space, we also calculate the width and height of the symbols accordingly. And as the last step we also scale the spin velocity along with the item
height. If we didn't set a dynamic movement velocity, a slot machine with smaller symbols would appear faster.
For the startSlotMachine() function, we only execute a new spin if the player has enough credits and the slot machine is not currently running. We also set bottomBar.startActive = true to switch the
image for the button and prevent changes to the bet amount. We then reduce the player credits and start a new spin. To stop the slot machine, we pass a random interval between 500 and 1000 ms to the spin()
function. The slot machine automatically stops after that time has passed and the spinEnded signal is fired.
After every spin, we deactivate the start button again and restart the slot machine if we're on autoplay.
If you run the game at this point, you can already watch the symbols line up and your credits decline for every spin. I know what you are thinking now: "What? I got three captains in a row and didn't win anything?!", but
relax, we'll take care of that now!
This Time, I Will Win!
Before we go into the details of how to check if the player has won, you should know about the concept of multiple winning lines. In modern slot machine games, there is not only one line on which the player can win. Having
multiple lines, that span from the left side of the slot machine to the right side, increases the chances that some symbols form a line of three or more. That is why, also in this game, we have a total amount of 9 lines on
which the player can win.
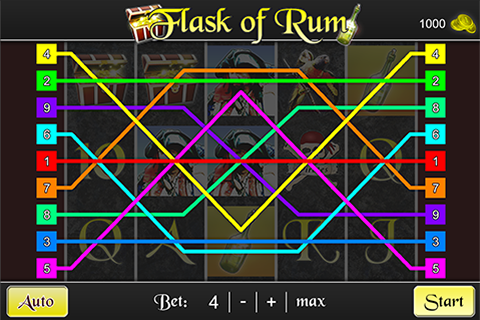
Our game uses 9 winning lines. Each of them draws a path from
the left side of the slot machine to the right.
Our goal is implement a winning line on a general level and then easily add the different lines just by specifying some variables like the path of this line, that can be described as a list of positions on the slot machine.
Each specific line instance should have all the data and features to check if the player has won on that line.
Displaying a Winning Line
The implementation of the winning lines is the most complex part of this tutorial so be sure to get yourself some coffee and activate your brain cells! ;-)
Well, to be honest, it is not that hard to define the positions of the slot machine, that are part of the line, or to check if there are matching symbols on that positions. The part that is a bit tricky, is how to show the
user that he won on a line, how much he has won, and which symbols on that line are responsible for the win.
It is possible to change the symbols in the slot machine to display them as winners, but all the changes of a symbol within the slot machine may also affects the slot machine itself. This is especially problematic if you
change the width or height of an item within the slot machine, as all the animations and the positioning of the symbols are based on the assumption that all the items are the same size. In addition, we want to draw the winning
line above the whole slot machine component, but display the symbols that won as a part of the line.
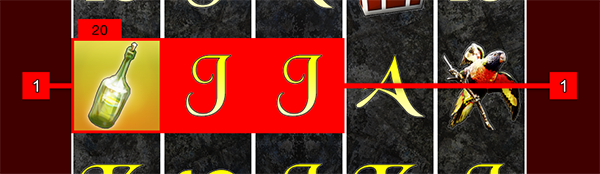
Each winning line is displayed above the slot machine and contains the winning symbols and the win amount.
That is why we won't make any changes to the slot machine itself. We are going to show the line above the slot machine and dynamically draw the symbols that make up the line whenever a win occurs. And to top all of that, the
line itself and the symbols we draw, should perfectly fit above the slot machine, that has a different size on every device.
Your brain hurts already? Don't be afraid, we are going to add all of this step-by-step until everything works the way we want it to. There are two main problems to solve:
- How can we display the lines perfectly above the slot machine?
- How do we dynamically add winning symbols to the line?
The first question couldn't be answered easier: We already created the images for each line in a way that perfectly fits the slot machine. This is something we took care of during the design of the game. If the image of a
line has the same height as the slot machine, the line is perfectly aligned and fits the rows and columns of the slot machine.
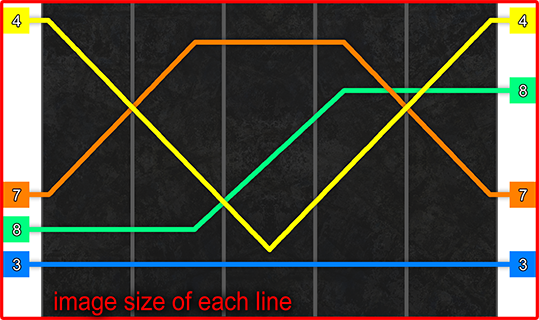
Each line image covers the whole slot machine height.
As for the second question, we will take several steps to realize the dynamic creation of the winning symbols:
- We validate if the player has won by checking all the slot positions of the line.
- During this check, we memorize the positions and symbols on the line, that are responsible for a win.
- After that, we dynamically create line symbols based on what we memorized and place them on top of the line.
Let us skip the validation step for now and focus on step three. To create the basic QML structure to correctly display a line, we add a new file WinningLine.qml to our qml/slotmachine folder.
qml/slotmachine/WinningLine.qml:
import Felgo 4.0
import QtQuick 2.0
Item {
id: winningLine
anchors.fill: parent
property alias image: lineImage
property string color
property var positions: []
property int winAmount
property var __winningPositions: []
property var __winningTypes: []
property var __lineSymbols: []
Image {
id: lineImage
anchors.fill: parent
}
Item {
id: symbolArea
anchors.horizontalCenter: parent.horizontalCenter
anchors.verticalCenter: parent.verticalCenter
Text {
id: winText
x: 15
color: "black"
text: winAmount
font.pixelSize: 10
z: 2
}
Rectangle {
width: winText.width + 20
height: winText.height + 4
anchors.centerIn: winText
color: winningLine.color
z: 1
}
}
function drawLineSymbols(machine) {
removeLineSymbols()
symbolArea.width = machine.width
symbolArea.height = machine.height
var yOffset = 5
for(var i = 0; i < winningLine.__winningPositions.length; i++) {
var properties = {
color: winningLine.color,
x: Math.round((machine.defaultReelWidth * winningLine.__winningPositions[i].reel)),
y: Math.round((machine.defaultItemHeight * winningLine.__winningPositions[i].row) + yOffset),
width: machine.defaultReelWidth,
height: machine.defaultItemHeight - 10,
type: winningLine.__winningTypes[i]
}
var component = Qt.createComponent(Qt.resolvedUrl("LineSymbol.qml"))
var symbol = component.createObject(symbolArea, properties)
winningLine.__lineSymbols.push(symbol)
}
if(__winningPositions[0].row === 0) {
winText.y = winningLine.__lineSymbols[0].y + winningLine.__lineSymbols[0].height
}
else {
winText.y = winningLine.__lineSymbols[0].y - winText.height
}
}
function removeLineSymbols() {
for(var i = 0; i < winningLine.__lineSymbols.length; i++) {
winningLine.__lineSymbols[i].destroy()
}
winningLine.__lineSymbols = []
}
}
The item for a winning line is configured to automatically fill the size of its parent item. Because of this setup, we can add all the different lines to one container item, that matches the height of the slot machine. Every
winning-line item then also perfectly fits above slot machine.
We then declare some properties, that allow us to configure each line or memorize data for internal usage. The internal properties all start with two underscores to avoid misunderstandings.
- The property alias
image allows to access the line image for each line.
- The property
color specifies the line color, which is then used to correctly color the dynamically created line symbols. The symbols of a red line should have a red background and border, the symbols on a
green line should have a green one, and so on ...
- The
positions array stores the slot positions of the line as JavaScript objects that hold the reel and row index.
- If the player wins on the line, the total credits he won are stored in the
winAmount property.
- The properties
__winningPositions and __winningTypes hold the positions and types of the symbols that won on the line. You can assume that these properties are filled with correct positions and
types for now. When we add the validation step, we will also correctly set these properties.
- The
__lineSymbols array will hold the line symbol objects we create dynamically.
We then only add two elements to our line. The line image, that we configure for each line, and a special area that we use as the container item for the line symbols we create. The reason for this item is the requirement of
a container that matches the size of the slot machine. The line item itself only matches the slot machines height, but not its width. We want to position the text for the win amount and the line symbols correctly above the slot
machine, which is why we need this container. The win amount is already part of the container from the beginning. The symbols are then added whenever the drawLineSymbols() function is called.
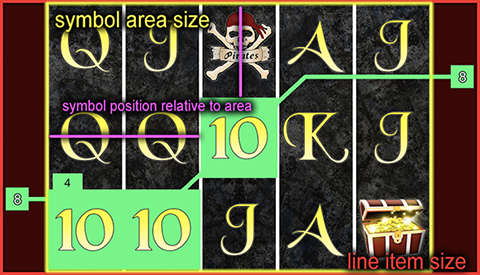
We place the line symbols relative to the symbol area, which matches the slot machine size.
The drawLineSymbols() function takes care of the following tasks:
- First, we remove the previous line symbols with the
removeLineSymbols() function.
- We then correctly set the size of the symbol container based on the slot machine reference, that we get as a function parameter.
- After that, we create all line symbols based on the
__winningPositions property, the __winningTypes property and the actual size of the slot machine items.
- As the last step, we correctly set the y-position of the win text based on the position of the first symbol.
The dynamic creation of objects is possible with the Qt.createComponent command. We use this command to load the LineSymbol.qml component, which we are going to create at the next step of this
tutorial. We then create each object by passing the property configuration and the target container to the createObject method of the component we loaded. Of course, all the properties that we set for the
line-symbols are also going to be part of LineSymbol QML component. Let us create the component by adding a new file LineSymbol.qml to the slotmachine folder.
qml/slotmachine/LineSymbol.qml:
import Felgo 4.0
import QtQuick 2.0
import "../config"
Item {
id: lineSymbol
property string color
property string type
Rectangle {
anchors.fill: parent
color: lineSymbol.color
}
Image {
id: image
anchors.fill: parent
source: "../../assets/"+SymbolConfig.getSymbolData(type).source
Rectangle {
anchors.fill: parent
color: "transparent"
border.width: 2
border.color: lineSymbol.color
}
}
}
Luckily, nothing really complex happens within this component. We define a Rectangle, to set the a background, and add an Image to show the symbol image. The image also contains a Rectangle to realize a colored border. The
color property defines the color for both the background and the border rectangle. To display the correct image, we add a type property and then use our symbol configuration to get the image source for
the desired symbol type. That's all the magic. With this, you already finished the code to display a winning line.
Checking for Matching Symbols
Next up is the part we left out before: Validating a line to check if there is a group of matching symbols. Typical slot games implement this check in the following way:
- Each line of symbols starts at the first reel of the slot machine.
- Every symbol on the following reels, that has the same type, counts to the line.
- A wildcard symbol can take the place of any other symbol as a part of a line.
- A symbol that is no wildcard and has a different type interrupts the line.
After you check the current symbols in that way, you can decide how to handle the result. To keep it simple, we are only going to give a reward in form of credits to the player when the line contains at least three symbols.
The win factor, that determines the credit amount that is won, is already part of our symbol configuration.
Let's add the validate() function to the WinningLine.qml component:
qml/WinningLine.qml:
import Felgo 4.0
import QtQuick 2.0
import "../config"
Item {
function validate(machine) {
var length = 0
var currentType = null
__winningPositions = []
__winningTypes = []
for(var i = 0; i < positions.length; i++) {
var pos = positions[i]
if(pos === null)
return false
var symbol = machine.getItemData(pos.reel, pos.row)
if(symbol === null)
return false
if(i == 0) {
currentType = symbol.type
length = 1
}
else {
if(currentType !== symbol.type && symbol.type !== "rum" && currentType !== "rum") {
break;
}
if(currentType === "rum")
currentType = symbol.type
length++;
}
__winningPositions.push(pos)
__winningTypes.push(symbol.type)
}
if(length < 3)
return false
var winFactor = SymbolConfig.getWinFactor(currentType, length)
winAmount = scene.betAmount * winFactor
winningLine.drawLineSymbols(machine)
return true
}
}
Besides the function itself, we also added an import to load our symbol configuration with all the win factors. After checking the line symbols, the function returns false if it finds less than three matching
symbols. Otherwise, it calculates and sets the winAmount property, triggers the drawLineSymbols() function and then returns true. During the check for matching symbols, we also store the
winning positions and types of the line in the __winningPositions and __winningTypes properties. These properties define the symbols and positions for the drawLineSymbols() function. The
function parameter machine will hold a reference to the slot machine component. We use this reference to access the currently visible symbols of the slot machine. Also, we pass it to the
drawLineSymbols() function, where it is used to correctly set the size of the container item, that holds the dynamically created symbols.
Adding all the Lines
Now you can relax! In the previous step, you prepared a generic component, that can calculate and then visualize any winning line. And all the effort, that you put into creating this component, will now pay off. What we are
going to do next, is to create a new validator component, that will contain all of the winning lines we want in our game. And after that, we can trigger the validation of all the lines with a single command. Sounds good? Then
let us create a new file WinValidator.qml within the slotmachine folder. Then add the following code that sets up the very first winning line of our game.
qml/slotmachine/WinValidator.qml:
import Felgo 4.0
import QtQuick 2.0
Item {
id: winValidator
WinningLine {
id: line1
visible: false
image.source: "../../assets/Line1.png"
color: "#ff0000"
positions: [
{reel: 0, row: 1},
{reel: 1, row: 1},
{reel: 2, row: 1},
{reel: 3, row: 1},
{reel: 4, row: 1}
]
}
}
If you look at these few lines, you can definitely be proud. Our validator component now contains a fully usable winning line. We just set the source of the line image, the background color for the symbols we draw on the
line, and the slot positions that make up the line. And by a simple call to the validate() function, the line can check the slot positions, calculate the win amount and draw the symbols that make up the win. Note
that we hide the lines with visible: false initially. We are going to show them after we determined that they have won. You can now add the other eight winning lines in the same manner.
qml/slotmachine/WinValidator.qml:
import Felgo 4.0
import QtQuick 2.0
Item {
id: winValidator
WinningLine {
id: line2
visible: false
image.source: "../../assets/Line2.png"
color: "#00ff00"
positions: [
{reel: 0, row: 0},
{reel: 1, row: 0},
{reel: 2, row: 0},
{reel: 3, row: 0},
{reel: 4, row: 0}
]
}
WinningLine {
id: line3
visible: false
image.source: "../../assets/Line3.png"
color: "#0080ff"
positions: [
{reel: 0, row: 2},
{reel: 1, row: 2},
{reel: 2, row: 2},
{reel: 3, row: 2},
{reel: 4, row: 2}
]
}
WinningLine {
id: line4
visible: false
image.source: "../../assets/Line4.png"
color: "#ffff00"
positions: [
{reel: 0, row: 0},
{reel: 1, row: 1},
{reel: 2, row: 2},
{reel: 3, row: 1},
{reel: 4, row: 0}
]
}
WinningLine {
id: line5
visible: false
image.source: "../../assets/Line5.png"
color: "#ff00ff"
positions: [
{reel: 0, row: 2},
{reel: 1, row: 1},
{reel: 2, row: 0},
{reel: 3, row: 1},
{reel: 4, row: 2}
]
}
WinningLine {
id: line6
image.source: "../../assets/Line6.png"
visible: false
color: "#00ffff"
positions: [
{reel: 0, row: 1},
{reel: 1, row: 2},
{reel: 2, row: 2},
{reel: 3, row: 2},
{reel: 4, row: 1}
]
}
WinningLine {
id: line7
visible: false
image.source: "../../assets/Line7.png"
color: "#ff8000"
positions: [
{reel: 0, row: 1},
{reel: 1, row: 0},
{reel: 2, row: 0},
{reel: 3, row: 0},
{reel: 4, row: 1}
]
}
WinningLine {
id: line8
visible: false
image.source: "../../assets/Line8.png"
color: "#00ff80"
positions: [
{reel: 0, row: 2},
{reel: 1, row: 2},
{reel: 2, row: 1},
{reel: 3, row: 0},
{reel: 4, row: 0}
]
}
WinningLine {
id: line9
visible: false
image.source: "../../assets/Line9.png"
color: "#8000ff"
positions: [
{reel: 0, row: 0},
{reel: 1, row: 0},
{reel: 2, row: 1},
{reel: 3, row: 2},
{reel: 4, row: 2}
]
}
}
These nine lines describe the images, colors and positions for the nine lines, that we decided on during the design of the game. The color and image of the line are irrelevant for the calculations. You can easily swap the
image or change the color at a later point. Also, you could easily create a slot machine that uses other dimensions than 5 reels and 3 rows. Just configure the positions property the right way and everything will
be fine.
We just added all nine lines of the game.
Now let's add the code that allows us to validate all the lines and display the winners.
qml/slotmachine/WinValidator.qml:
import Felgo 4.0
import QtQuick 2.0
Item {
id: winValidator
property var currentLines
property int visibleIndex
Timer {
id: showTimer
interval: 1000
onTriggered: {
if(currentLines.length > 0) {
var index = (visibleIndex + 1) % currentLines.length
showLine(index)
showTimer.restart()
}
}
}
function validate(machine) {
currentLines = []
var winAmount = 0
if(line1.validate(machine)) {
currentLines.push(line1)
winAmount += line1.winAmount
}
if(line2.validate(machine)) {
currentLines.push(line2)
winAmount += line2.winAmount
}
if(line3.validate(machine)) {
currentLines.push(line3)
winAmount += line3.winAmount
}
if(line4.validate(machine)) {
currentLines.push(line4)
winAmount += line4.winAmount
}
if(line5.validate(machine)) {
currentLines.push(line5)
winAmount += line5.winAmount
}
if(line6.validate(machine)) {
currentLines.push(line6)
winAmount += line6.winAmount
}
if(line7.validate(machine)) {
currentLines.push(line7)
winAmount += line7.winAmount
}
if(line8.validate(machine)) {
currentLines.push(line8)
winAmount += line8.winAmount
}
if(line9.validate(machine)) {
currentLines.push(line9)
winAmount += line9.winAmount
}
scene.creditAmount += winAmount
return currentLines.length > 0
}
function reset() {
showTimer.stop()
hideLines()
}
function showWinningLines() {
if(currentLines.length > 0) {
showLine(0)
showTimer.start()
}
}
function showLine(index) {
if(index < 0 || index >= currentLines.length)
return
hideLines()
currentLines[index].visible = true
visibleIndex = index
}
function hideLines() {
line1.visible = false
line2.visible = false
line3.visible = false
line4.visible = false
line5.visible = false
line6.visible = false
line7.visible = false
line8.visible = false
line9.visible = false
}
}
The functions take care of these tasks:
- The
validate() function validates all the lines, and if the player won, we memorize the line and increment the total win amount with the win amount of the line. We then increase the actual player credit by
the total win amount and return true if the player won on at least one line.
- The
reset() function prepares the validator for a new slot machine spin. For our validator, it is enough to simply hide all the lines and stop the Timer that shows the lines.
- The
showWinningLines() function shows the first winning line and starts the Timer, that will show the other lines after some time passed.
- The
showLine function() displays a line that won based on the index parameter. Also, we memorize the index of the currently visible line.
- The
hideAllLines() function simply sets the visible property of all lines to false.
To sum it all up, we just added a Timer and two properties that allow us to alternate the display of all the lines that won. For this purpose, we memorize the lines that won when we validate the lines. We can use the
showWinningLines() function to start displaying the lines after the validation step. And when we start a new game, the reset() function allows us to hide everything again. All that is left now, is to
add the validator to our scene and call these functions at the right places.
qml/Main.qml:
import Felgo 4.0
import QtQuick 2.0
import "slotmachine"
GameWindow {
id: gameWindow
Scene {
FlaskOfRumMachine {
}
WinValidator {
id: winValidator
height: slotMachine.height
width: Math.round(height / 240 * 408)
anchors.centerIn: scene.gameWindowAnchorItem
}
function startSlotMachine() {
if(!slotMachine.spinning && scene.creditAmount >= scene.betAmount) {
bottomBar.startActive = true
scene.creditAmount -= scene.betAmount
winValidator.reset()
var stopInterval = utils.generateRandomValueBetween(500, 1000)
slotMachine.spin(stopInterval)
}
}
function spinEnded() {
bottomBar.startActive = false
var won = winValidator.validate(slotMachine)
if(won)
winValidator.showWinningLines()
else if(bottomBar.autoActive)
startSlotMachine()
}
}
}
We add the code for the validator component below the slot machine component of the scene, so the lines are shown above the slot machine. We also set the size of the validator component to fit the slot machine. The height of
the validator should match the slot machine height. We then calculate the width based on width/height-ratio of our line images. All the lines of the validator use up the whole validator size, and thus also fit the slot machine.
Every time we start the slot machine, we reset the validator to hide all the lines. When a spin has ended, we call the validate() function to check if the player has won. And if he wins, we show the winning
lines.
Hit play and see if you can get some big wins! But don't worry, you won't lose any real money in this demo game! ;-)
Some Minor Improvements
As you can see, the game is quite cool by now. But there are still some things we can work on. In terms of animations, it would be nice to see the player credits increase and decrease fluently. For this purpose, you can just
add a Behavior to the scene, that animates the credit amount whenever it is changed.
qml/Main.qml:
import Felgo 4.0
import QtQuick 2.0
import "slotmachine"
GameWindow {
id: gameWindow
Scene {
Behavior on creditAmount {
PropertyAnimation { duration: scene.betAmount * 50 }
}
Rectangle {
}
}
}
As of now, whenever we reduce the credit amount to start the slot machine, or when we increase it in case of a win, we can watch the amount change over time. We base the duration for this animation on the current bet amount.
The animations for a higher bet, that also lead to higher wins, will take longer. The animation duration in our case spans from 200 ms to 1000 ms for the bet amounts of 4 to 20.
Another cool thing would be to add some additional randomness by changing the delay time for stopping each reel. Per default, the slot machine stops each of its reels 250 ms after the previous one. The property
reelStopDelay lets us change this value. If we choose a random value whenever a new spin is started, our slot machine stops its reels with a random delay.
qml/Main.qml:
import Felgo 4.0
import QtQuick 2.0
import "slotmachine"
GameWindow {
Scene {
FlaskOfRumMachine {
onSpinStarted: {
slotMachine.reelStopDelay = utils.generateRandomValueBetween(350, 700)
}
}
}
}
If you want to execute some code every time the slot machine starts a spin, one possibility is to use the spinStarted signal of the slot machine. We use this signal to set a random delay for every spin. Another
possibility would be to change the reelStopDelay property within the startSlotMachine() function of our scene.
This was the last feature we cover in this tutorial, but feel free to add some improvements yourself!
What Comes Next?
In case you need some suggestions for additional features, this is what you can do:
- Add background music and sound effects with the BackgroundMusic and GameSoundEffect components.
- Add some twists to the game, e.g. special symbols for free spins.
- Let the player choose the lines he wants to play on. He may play on all or only on some of the nine lines.
- Allow the player to change real money into credits with in-app purchases by using the Soomla Plugin for Felgo.
Also visit Felgo Games Examples and Demos to gain more information about game creation with Felgo and to see the source code of existing apps in the app stores.
If you are interested in the full source code of this demo game, see Flask of Rum - Slot Game.
Congratulations, you completed the tutorial and created your own slot game!


