Add Google's Firebase for user authentication and access to the Firebase Realtime Database.
Firebase Realtime Database
Store and retrieve user-specific data from the Firebase Realtime Database. Data is synced across all clients in realtime, and remains available when your app goes offline.
Firebase Storage Cloud
Upload binary files to the Firebase Storage Cloud. Uploaded files are then available at a public HTTPS URL.
Firebase User Authentication
Allow your app to know the identity of a user, securely save user data in the cloud and provide the same personalized experience across all of the user's devices.
Firebase Analytics
Provide insights into your app's usage with Google Analytics 4.
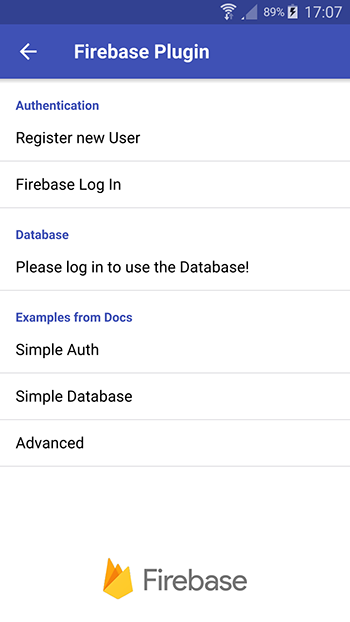
Overview
The Firebase plugin allows using the Firebase backend services. FirebaseAuth provides e-mail authentication to create user accounts, log in and log out. You can access the FirebaseDatabase and store and retrieve user-specific data with and without authentication. Use FirebaseStorage to upload binary files to the cloud.
Provide insights into your app's usage with Google Analytics 4 using FirebaseAnalytics.
Use Cases
User Authentication
Most apps need to know the identity of a user. Knowing a user's identity allows an app to securely save user data in the cloud and provide the same personalized experience across all of the user's devices.
Firebase Authentication provides backend services to authenticate users to your app. The plugin currently supports the following authentication methods:
- Anonymous
- E-mail and password
- Token
- Google
Users can log in anonymously to start using your app without creating an account. For this, you can call FirebaseAuth::loginUserAnonymously(). This method
creates a new temporary anonymous user account. The user can then enter their e-mail and password at a later time. This way, they can link the anonymous account to their credentials to use their data from any device.
Use FirebaseAuth::registerUser() for e-mail and password authentication. This creates a new account with e-mail and password if the user is not yet logged in. If the
user is already logged in anonymously, it links the anonymous account with the provided credentials.
Note: Anonymous accounts are temporary. If the user logs out before providing their credentials, any user-data on this account is lost.
Additionally, Firebase comes with a "forgot password" feature out of the box, which you can easily use in your application without tedious setup. Call FirebaseAuth::sendPasswordResetEmail() to send an e-mail with recovery information to a provided address.
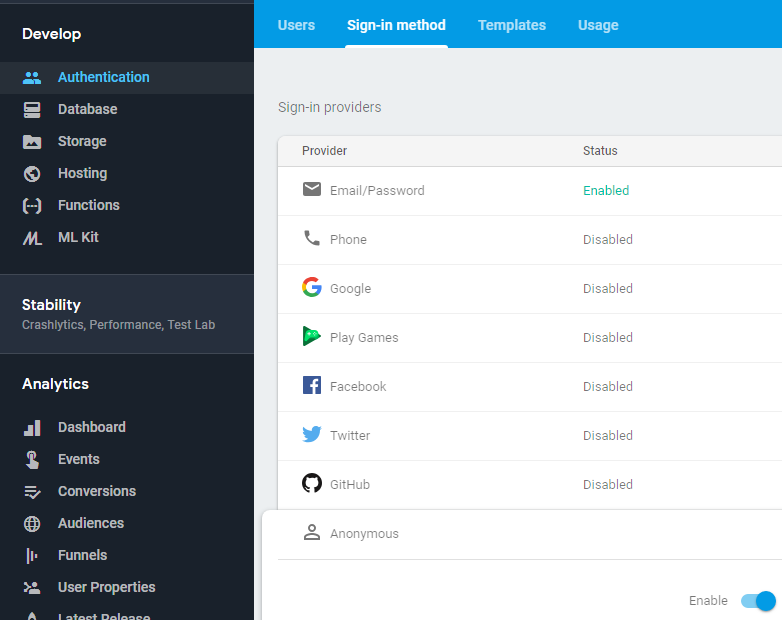
Note: You can enable each authentication method you would like to use in your app in the Firebase backend console. E-mail authentication is enabled by default. To use anonymous accounts, you can enable the sign-in
method under Authentication -> Sign-in method:
Support for popular federated identity providers like Google, Facebook and Twitter can be added to the plugin on request. Please contact us for more information.
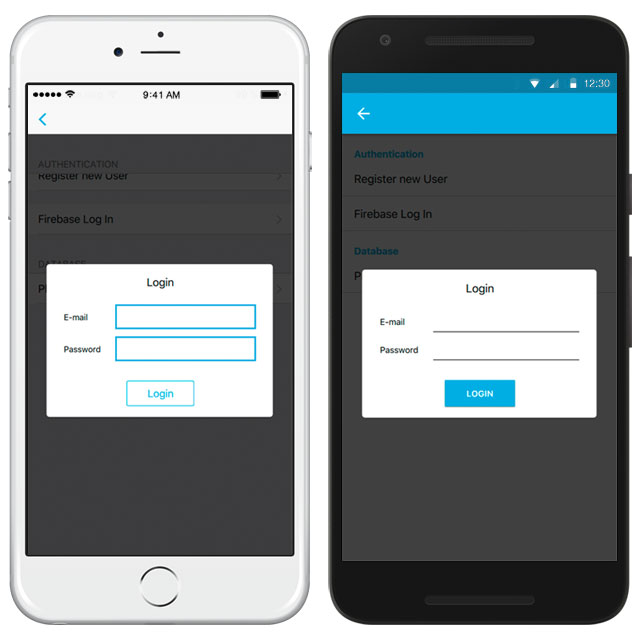
You can design the login screen completely customized for your app. If you don't want to do that, we've got you covered as well: You can easily create a login page template using our wizard. Just click File
-> New File or Project -> Felgo Apps -> Page and in the next step, select Login Page as Page Type.
Realtime Database
Store and sync data with the Firebase NoSQL cloud database. Data is synced across all clients in realtime, and remains available when your app goes offline.
The Firebase Realtime Database is a cloud-hosted database. Data is stored as JSON and internally synchronized in realtime to every connected client.
When you build cross-platform apps with the Realtime Database, all of your clients share one Realtime Database instance. The Firebase backend automatically receives updates with the newest data as soon as the database is
changed by one of the clients. Additionally, changes to the database are propagated to other clients and can be read by the clients in real time.
The plugin currently supports reading the Realtime Database using FirebaseDatabase::getValue(). Additionally, you can receive realtime updates for values in your
database by adding their keys to the FirebaseDatabase::realtimeValueKeys or FirebaseDatabase::realtimeUserValueKeys.
The Firebase database stores data in JSON format. Firebase and the Felgo Plugin support the primitive data types string, number and boolean. You can structure data using nested objects
and arrays.
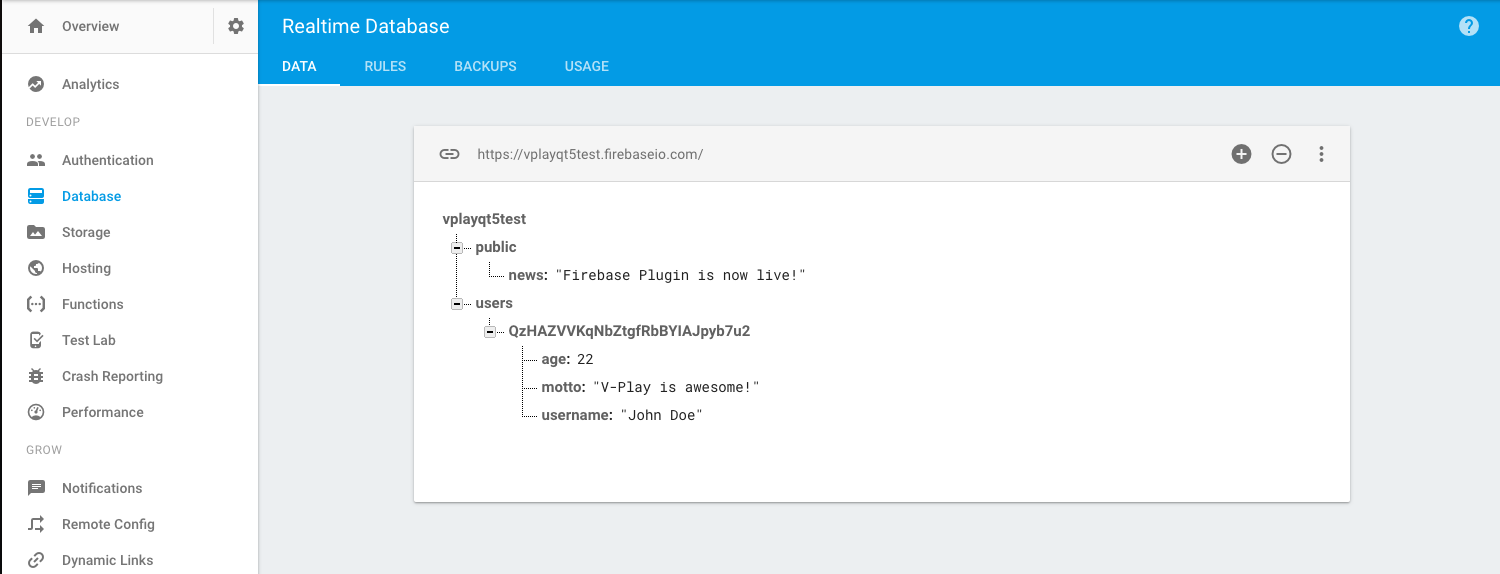
Retrieve data using a path into the JSON tree. For example, if your database looks like the one in the picture, calling firebaseDb.getValue("public/news") obtains the string "Firebase Plugin is now
live".
Additionally, you can query data using an optional second parameter to FirebaseDatabase::getValue(). The parameter is a JSON object specifying which kinds of queries
to use. This way, you can filter objects by their keys and values or limit the number of keys to obtain in an object.
To obtain the queried data, you have two options. A callback function can be used as third parameter to FirebaseDatabase::getValue(). You can also connect to the
FirebaseDatabase::readCompleted signal. Both of these options get called when the data has been retrieved.
For example, the following code obtains the database object at the path "public/bigqueryobject". The query returns only keys alphabetically between "c" and "m" and limits the object to
contain at most 5 keys.
firebaseDb.getValue("public/bigqueryobject", {
orderByKey: true,
startAt: "c",
endAt: "m",
limitToFirst: 5,
}, function(success, key, value) {
if(success) {
console.debug("Read user value for key", key, "from DB:", value)
}
})
For more information about querying data, see the documentation of FirebaseDatabase::getValue() and the official Firebase docs.
Firebase Storage Cloud
Firebase Storage hosts a virtual file system where you can upload any binary files. You can then download them from anywhere using a public URI.

You can upload binary files using the FirebaseStorage QML item. After the upload, you retrieve a public HTTPS URL where the file is available. You can use these cloud URLs from
anywhere.
For example, this lets you allow your users to upload a profile picture from the device or the camera. You can take pictures with NativeUtils::displayCameraPicker(). You can select local pictures with NativeUtils::displayImagePicker().
Afterwards, you can upload the image file and display it on this user's profile.
FirebaseStorage can upload local files from the device to the cloud. Call FirebaseStorage::uploadFile() with a path to the
local file you wish to upload, and with a filename to store it at in the cloud.
The following code uploads the local file local-image.png and stores it at images/remote-image.png in the cloud:
FirebaseStorage {
id: storage
config: FirebaseConfig {}
Component.onCompleted: {
var uploadFileUrl = Qt.resolvedUrl("local-image.png")
var remoteFilePath = "images/remote-image.png"
storage.uploadFile(uploadFileUrl, remoteFilePath,
function (progress, finished, success, downloadUrl) {
if(!finished) {
console.log("Upload progress:", progress, "%")
} else if(success) {
console.log("Upload finished! Download URL:", downloadUrl)
} else {
console.log("Upload failed!")
}
}
)
}
}
Firebase Analytics
Firebase Analytics lets you measure user interactions for your mobile and desktop apps. It allows to track screen views and custom events to gain insights into your app's usage.
The two main methods for using the Firebase Analytics plugin and reports are FirebaseAnalytics::logScreen() and FirebaseAnalytics::logEvent().
FirebaseAnalytics uses the native Firebase SDKs to send analytics data on Android and iOS. On desktop platforms, it uses the GTAG API to send analytics data to a web stream.
Example usage:
import QtQuick
import Felgo
App {
FirebaseAnalytics {
id: ga
measurementId: "G-GB8PY1E0JT"
onPluginLoaded: {
logScreen("Main")
logEvent("AppStarted", { startTime: new Date().getTime() })
}
}
}
Firebase Examples
Plugin Demo App
To try the plugin or see an integration example have a look at the Felgo Plugin Demo app.
Please also have a look at our plugin example project on GitHub: https://github.com/FelgoSDK/PluginDemo.
Example Usage
The Firebase items can be used like any other QML item. Here are two simple and one more advanced example of how to integrate the plugin into your Felgo app or game.
These examples show off some of the use-cases of the Firebase plugin. The first and second examples demonstrate the authentication and database functions. The third example is more advanced and shows how to use the FirebaseAuth and FirebaseDatabase items in combination to store user-specific values in the database. It also shows how to use the built-in
password-reset mechanism.
Firebase Authentication Simple Example
This is a very simple e-mail login example with FirebaseAuth. It uses a public database, so the test e-mail of this example will already be registered at the time you test it. You can
change the e-mail in this example to test the registration as well.
import Felgo
import QtQuick
App {
NavigationStack {
AppPage {
title: "Firebase Auth"
backgroundColor: firebaseAuth.authenticated ? Qt.lighter("green", 1.8) : Qt.lighter("red", 1.8)
FirebaseAuth {
id: firebaseAuth
onAuthenticatedChanged: {
console.debug("Authenticated changed " + authenticated)
}
onUserRegistered: (success, message) => {
console.debug("User registered: " + success + " - " + message)
}
onLoggedIn: (success, message) => {
console.debug("User login: " + success + " - " + message)
}
}
Column {
anchors.fill: parent
AppButton {
text: "Register User"
onClicked: firebaseAuth.registerUser("test@test.com", "thebestpassword")
}
AppButton {
text: "Log in"
onClicked: firebaseAuth.loginUser("test@test.com", "thebestpassword")
}
AppButton {
text: "Log out"
onClicked: firebaseAuth.logoutUser()
}
AppText {
text: firebaseAuth.email + " " + firebaseAuth.authenticated
}
}
}
}
}
Firebase Authentication Advanced Example
This example uses FirebaseAuth to authenticate users. The user has the option to log in with e-mail and password or anonymously. When logged in anonymously, they can link their e-mail
and password later.
When the user is authenticated, FirebaseAuth::authenticated is true. You can then use FirebaseAuth::userId to
identify this user. When the user is logged in with the same e-mail and password, this user ID will be the same on each device.
The other parts of the Firebase plugin also automatically work with authentication. With FirebaseDatabase, you can access private user data when authenticated. FirebaseStorage can use authentication to restrict access to uploaded files to specific users.
import QtQuick
import Felgo
App {
FirebaseAuth {
id: auth
config: FirebaseConfig {
id: fbConfig
projectId: "plugindemo-5fdd9"
apiKey: Qt.platform.os === "android"
? "AIzaSyD2gYC4s21kOJLwvuNUKizaB4ZR7Ma3rHg"
: "AIzaSyDeCTZXfMbDT_nE6eHxvxVVHKO82wvYico"
applicationId: Qt.platform.os === "android"
? "1:944930955116:android:f4bdedd28961caf0"
: "1:944930955116:ios:f4bdedd28961caf0"
}
onLoggedIn: (success, message) => NativeUtils.displayMessageBox("Logged in", "Login successful: " +
(success ? "Yes." : "No: " + message))
onUserRegistered: (success, message) => NativeUtils.displayMessageBox("Registered", "Registration successful: " +
(success ? "Yes." : "No: " + message))
onUserDeleted: (success, message) => NativeUtils.displayMessageBox("Deleted", "Deletion successful? " +
(success ? "Yes." : "No: " + message))
}
NavigationStack {
FlickablePage {
title: "Firebase Auth"
flickable.contentHeight: contentColumn.height
Column {
id: contentColumn
width: parent.width
anchors.margins: dp(12)
spacing: dp(12)
AppText {
text: "Logged in: " + (auth.authenticated
? "Yes, e-mail: " + (auth.authenticatedAnonymously
? "(anonymous)"
: auth.email)
: "No")
}
AppTextField {
id: emailInput
placeholderText: "E-mail address"
}
AppTextField {
id: pwInput
placeholderText: "Password"
echoMode: TextInput.Password
}
AppButton {
text: "Log in with email and password"
enabled: !auth.authenticated
onClicked: auth.loginUser(emailInput.text, pwInput.text)
}
AppButton {
text: "Register with email and password"
enabled: !auth.authenticated || auth.authenticatedAnonymously
onClicked: auth.registerUser(emailInput.text, pwInput.text)
}
AppButton {
text: "Log in anonymously"
enabled: !auth.authenticated
onClicked: auth.loginUserAnonymously()
}
AppButton {
text: "Log out"
enabled: auth.authenticated
onClicked: auth.logoutUser()
}
AppButton {
text: "Delete user"
enabled: auth.authenticated
onClicked: auth.deleteUser()
}
}
}
}
}
Firebase Realtime Database Example
This example shows how to read and write public data with the FirebaseDatabase item. If you want only authenticated users to access your database, have a look at the Private Database Example
You can try this example right from the browser here: Use Firebase Realtime Storage to Store Data in the Cloud
import Felgo
import QtQuick
App {
FirebaseDatabase {
id: firebaseDb
config: FirebaseConfig {
projectId: "v-play-live-client-test-db"
databaseUrl: "https://v-play-live-client-test-db.firebaseio.com"
storageBucket: "v-play-live-client-test-db.appspot.com"
apiKey: Qt.platform.os === "android" ? "AIzaSyD3Pmw89NHhdG9nGIQWwaOB55FuWjcDSS8" : "AIzaSyCheT6ZNFI4mUwfrPRB098a08dVzlhZNME"
applicationId: Qt.platform.os === "android" ? "1:40083798422:android:ed7cffdd1548a7fa" : "1:40083798422:ios:ed7cffdd1548a7fa"
}
property string testValue: ""
property string realtimeTestValue: ""
realtimeValueKeys: ["public/testValue"]
onRealtimeValueChanged: (success, key, value) => {
if(success && key === "testValue") {
realtimeTestValue = value
}
}
onReadCompleted: (success, key, value) => {
if(success) {
console.debug("Read value " + value + " for key " + key)
testValue = value
} else {
console.debug("Error: " + value)
}
}
onWriteCompleted: (success, key, value) => {
if(success) {
console.debug("Successfully wrote to DB")
} else {
console.debug("Write failed with error: " + message)
}
}
}
NavigationStack {
AppPage {
title: "Realtime Database"
Column {
anchors.fill: parent
spacing: dp(15)
AppButton {
text: "Update Value"
anchors.horizontalCenter: parent.horizontalCenter
onClicked: firebaseDb.setValue("public/testValue", "test-" + Date.now())
}
AppButton {
text: "Get Value"
anchors.horizontalCenter: parent.horizontalCenter
onClicked: firebaseDb.getValue("public/testValue")
}
AppText {
width: parent.width
horizontalAlignment: AppText.AlignHCenter
text: "Manual TestValue: " + firebaseDb.testValue
}
AppText {
width: parent.width
horizontalAlignment: AppText.AlignHCenter
text: "Realtime TestValue: " + firebaseDb.realtimeTestValue
}
}
}
}
}
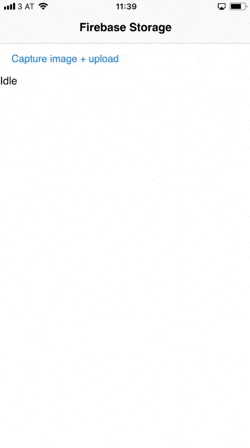
Firebase Storage example
The following QML example shows how to upload a picture directly from the device camera. The picture is taken using NativeUtils::displayCameraPicker(). After
NativeUtils::cameraPickerFinished() is emitted, the stored picture is uploaded using FirebaseStorage::uploadFile(). The uploaded file is then displayed using the downloadUrl in an AppImage item.
While uploading, the status is displayed in an AppText item. The upload can be canceled with a button using FirebaseStorageUploadTask::cancel().
import QtQuick
import Felgo
App {
NavigationStack {
FlickablePage {
title: "Firebase Storage"
flickable.contentHeight: column.height
FirebaseStorage {
id: storage
config: FirebaseConfig {
projectId: "v-play-live-client-test-db"
databaseUrl: "https://v-play-live-client-test-db.firebaseio.com"
storageBucket: "v-play-live-client-test-db.appspot.com"
apiKey: Qt.platform.os === "android" ? "AIzaSyD3Pmw89NHhdG9nGIQWwaOB55FuWjcDSS8" : "AIzaSyCheT6ZNFI4mUwfrPRB098a08dVzlhZNME"
applicationId: Qt.platform.os === "android" ? "1:40083798422:android:ed7cffdd1548a7fa" : "1:40083798422:ios:ed7cffdd1548a7fa"
}
}
Column {
id: column
width: parent.width
anchors.margins: dp(12)
AppButton {
text: "Capture image + upload"
onClicked: NativeUtils.displayCameraPicker()
}
AppText {
id: status
text: "Idle"
}
AppImage {
id: img
width: parent.width
fillMode: AppImage.PreserveAspectFit
autoTransform: true
}
}
}
}
Connections {
target: NativeUtils
onCameraPickerFinished: (accepted, path) => {
if(accepted) {
storage.uploadFile(path, "test-image" + Date.now() + ".png", function(progress, finished, success, downloadUrl) {
if(!finished) {
status.text = "Uploading... " + progress.toFixed(2) + "%"
} else if(success) {
img.source = downloadUrl
status.text = "Upload completed."
} else {
status.text = "Upload failed."
}
})
}
}
}
}
Firebase Database Filtering Example
This example shows how to query only parts of the data with the FirebaseDatabase item. Using the queryProperties parameter to FirebaseDatabase::getValue(), only the newest 20 items of the database, ordered by timestamps, are returned. A click on a button creates a new item with the current time as
timestamp.
import Felgo
import QtQuick
App {
readonly property int maxListEntries: 20
property int numListEntries
property bool loading: false
FirebaseDatabase {
id: firebaseDb
config: FirebaseConfig {
projectId: "v-play-live-client-test-db"
databaseUrl: "https://v-play-live-client-test-db.firebaseio.com"
storageBucket: "v-play-live-client-test-db.appspot.com"
apiKey: Qt.platform.os === "android" ? "AIzaSyD3Pmw89NHhdG9nGIQWwaOB55FuWjcDSS8" : "AIzaSyCheT6ZNFI4mUwfrPRB098a08dVzlhZNME"
applicationId: Qt.platform.os === "android" ? "1:40083798422:android:ed7cffdd1548a7fa" : "1:40083798422:ios:ed7cffdd1548a7fa"
}
realtimeValueKeys: ["public/numListEntries"]
onRealtimeValueChanged: (success, key, value) => {
if(success && key === "numListEntries") {
numListEntries = value
}
}
onPluginLoaded: loadData()
}
NavigationStack {
AppPage {
title: "Firebase Filtering"
AppListView {
id: listView
anchors.left: parent.left
anchors.right: parent.right
anchors.top: parent.top
anchors.bottom: actionBar.top
anchors.topMargin: Theme.statusBarHeight
delegate: SimpleRow {}
model: [
{ text: "Loading data from database..." }
]
}
Flow {
id: actionBar
anchors.left: parent.left
anchors.right: parent.right
anchors.bottom: parent.bottom
spacing: dp(12)
AppButton {
text: "Add new item"
onClicked: addItem()
enabled: !loading
}
AppActivityIndicator {
visible: loading
}
}
}
}
function loadData() {
loading = true
console.debug("loading data")
firebaseDb.getValue("public/listEntries", {
limitToLast: maxListEntries,
orderByChild: "timestamp"
}, function(success, key, value) {
if(success) {
listView.model = value
}
loading = false
})
}
function addItem() {
loading = true
var date = new Date()
var timestamp = date.getTime()
var text = "Item created at " + date.toString()
var dbItem = { timestamp: timestamp, text: text }
var index = numListEntries
firebaseDb.setValue("public/numListEntries", numListEntries + 1)
firebaseDb.setValue("public/listEntries/" + index, dbItem, function(success, message) {
if(success) loadData()
})
}
}
Multiple Firebase Accounts Example
It is also possible to use more than one Firebase account in a single app. Use the QML type FirebaseConfig to specify custom Firebase account details and override the default account
specified with google-services.json and GoogleService-info.plist.
Example:
FirebaseAuth {
id: customAuth
config: FirebaseConfig {
projectId: "projectabc-1234"
databaseUrl: "https://projectabc-1234.firebaseio.com/"
apiKey: Qt.platform.os === "android" ? "android-key" : "ios-key"
applicationId: Qt.platform.os === "android" ? "1:abcdef:android:1234" : "1:abcdef:ios:1234"
}
onFirebaseReady: loginUser("username", "pw")
}
To be able to use the database with authentication and custom Firebase account details, be sure to use the same FirebaseConfig instance for both these types, as in the following
example.
App {
FirebaseConfig {
id: customConfig
projectId: "projectabc-1234"
databaseUrl: "https://projectabc-1234.firebaseio.com/"
apiKey: Qt.platform.os === "android" ? "android-key" : "ios-key"
applicationId: Qt.platform.os === "android" ? "1:abcdef:android:1234" : "1:abcdef:ios:1234"
}
FirebaseAuth {
id: defaultAuth
onFirebaseReady: loginUser("username", "pw")
}
FirebaseAuth {
id: customAuth
config: customConfig
onFirebaseReady: loginUser("username", "pw")
}
FirebaseDatabase {
id: defaultDb
onFirebaseReady: getValue("public/myDbValue")
}
FirebaseDatabase {
id: customDb
config: customConfig
onFirebaseReady: getValue("public/myDbValue")
}
}
Firebase Authorization and Private Database Example
This example demonstrates advanced usage of the Firebase plugin. The users can authenticate themselves via a simple login form. When authorized, private per-user values are stored to and retrieved from the database.
Additionally, it shows how to use the "Forgot Password" functionality of Firebase.
import Felgo
import QtQuick
App {
NavigationStack {
AppPage {
title: "Private Database"
FirebaseAuth {
id: firebaseAuth
onUserRegistered: (success, message) => {
console.debug("User registered: " + success + " - " + message)
output.text = message
}
onLoggedIn: (success, message) => {
console.debug("User login: " + success + " - " + message)
output.text = message
}
onPasswordResetEmailSent: (success, message) =>{
console.debug("Email Sent: " + success + " - " + message)
output.text = message
}
}
FirebaseDatabase {
id: firebaseDb
onReadCompleted: (success, key, value) => {
if(success) {
console.debug("Read value " + value + " for key " + key)
output.text = value
} else {
console.debug("Error: " + value)
}
}
onWriteCompleted: (success, key, value) => {
if(success) {
console.debug("Successfully wrote to DB")
output.text = "Successfully wrote to DB"
} else {
console.debug("Write failed with error: " + message)
output.text = "Write failed with error: " + message
}
}
}
Column {
spacing: dp(20)
width: parent.width
AppTextField {
id: email
width: parent.width - dp(30)
anchors.horizontalCenter: parent.horizontalCenter
visible: !firebaseAuth.authenticated
text: "E-Mail"
showClearButton: true
}
AppTextField {
id: pw
width: parent.width - dp(30)
anchors.horizontalCenter: parent.horizontalCenter
visible: !firebaseAuth.authenticated
text: "Password"
showClearButton: true
echoMode: TextInput.PasswordEchoOnEdit
}
AppButton {
text: "Log in"
visible: !firebaseAuth.authenticated
onClicked: {
if(email.text.length > 0 && pw.text.length > 0) {
firebaseAuth.loginUser(email.text, pw.text)
} else {
output.text = "Please enter an e-mail address and a password!"
}
}
}
AppButton {
text: "Register"
visible: !firebaseAuth.authenticated
onClicked: {
if(email.text.length > 0 && pw.text.length > 0) {
firebaseAuth.registerUser(email.text, pw.text)
} else {
output.text = "Please enter an e-mail address and a password!"
}
}
}
AppButton {
text: "Send Password Link"
visible: !firebaseAuth.authenticated
onClicked: {
if(email.text.length > 0) {
firebaseAuth.sendPasswordResetMail(email.text)
} else {
output.text = "Please enter an e-mail address!"
}
}
}
AppButton {
visible: firebaseAuth.authenticated
text: "Save Private Value"
onClicked: firebaseDb.setUserValue("teststring", "test")
}
AppButton {
visible: firebaseAuth.authenticated
text: "Get Private Value"
onClicked: firebaseDb.getUserValue("teststring")
}
AppButton {
visible: firebaseAuth.authenticated
text: "Log out"
onClicked: firebaseAuth.logoutUser()
}
AppText {
id: output
text: ""
}
}
}
}
}
For the full source code, see the plugin example project on GitHub: https://github.com/FelgoSDK/PluginDemo
Available QML Items
|
FirebaseAnalytics
|
Firebase Analytics item provides insights into your app's usage
|
|
FirebaseAuth
|
Item allows user registration and authentication with the email/password authentication provider
|
|
FirebaseConfig
|
Item allows to define account properties for FirebaseAuth and FirebaseDatabase
|
|
FirebaseDatabase
|
Item allows to read and write user-specific and public data from and to the Firebase Realtime Database. Data is synced across all clients in realtime, and remains available when your app goes offline. As soon as the
user goes online again, the changes are synced up to the Firebase cloud backend
|
|
FirebaseStorage
|
Item allows uploading files to the Firebase Storage cloud. It uploads local files to the cloud file system and returns the public download URL
|
|
FirebaseStorageUploadTask
|
Returned by FirebaseStorage::uploadFile()
|
Adding and Activating Plugins
How to Add a Felgo Plugin to your App or Game
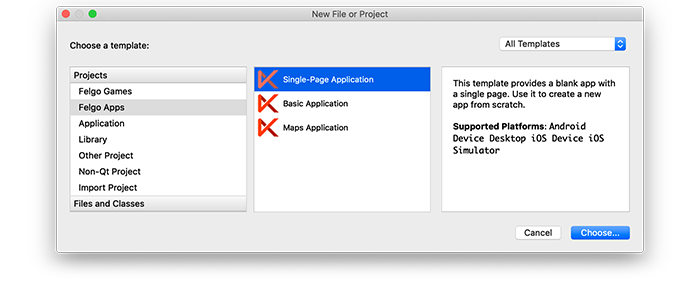
When you create a new project, you can choose to add example plugin integrations as well. Open Qt Creator and choose “File / New File or Project”, then choose Single-Page Application in the Felgo Apps section or any
other wizard. For Felgo Games, you can also find an own Game with Plugins project template as an own wizard.
Then select the platforms you want to run your application on. The plugins are available for both iOS & Android. There is a fallback functionality in place on Desktop platforms so your project still works when you call
methods of the plugins. This allows you to do the main development on your PC, and for testing the plugin functionality you can run the project on iOS and Android.
After the Kit Selection, you can choose which of the plugins you’d like to add to your project:

Then complete the wizard, your project is now set up with all the correct plugin dependencies for Android & iOS automatically. This includes:
- Setting up the
.gradle file for Android.
- Setting up the
.plist file for iOS.
- Setting up the
CMakeLists.txt file to include the plugin libraries for iOS.
Note: Additional integration steps are still required for most plugins, for example to add the actual plugin libraries for iOS to your project. Please have a look at the integration steps described in the
documentation for each of the used plugins.
If you have an existing Felgo application, follow these steps to include a plugin to your app or game:
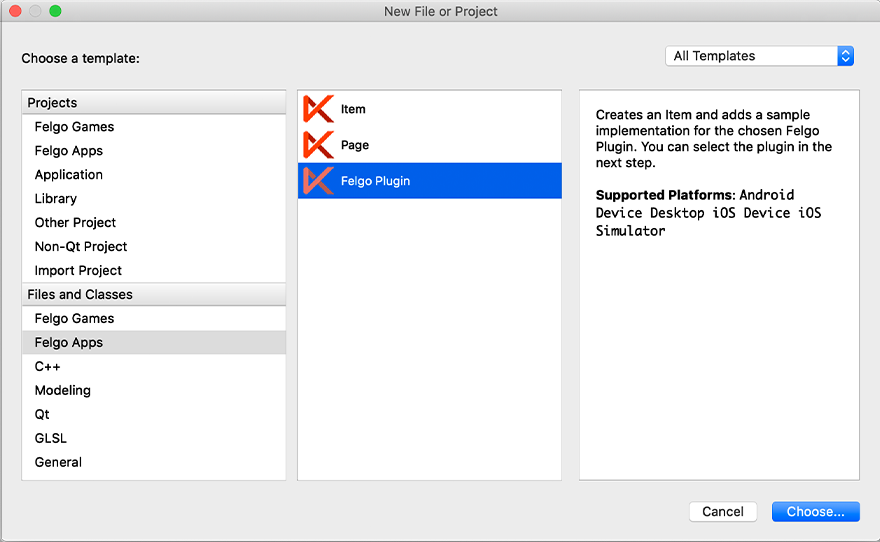
In Qt Creator, select “File / New File or Project” and choose either Felgo Games or Felgo Apps from Files and Classes. Then select Felgo Plugin and press Choose.
You can now select the plugin you want to add:

The plugin item, which contains the chosen plugin and a short usage example, is now added to your project. To use the item in your project, simply perform these steps:
- Include the created item (use the name you entered in the template before) in your
main.qml file.
- Modify the
CMakeLists.txt file & .plist file for iOS usage. See the iOS integration guide of the chosen plugin for more information.
- Modify the the
.gradle file for Android usage. See the Android integration guide of the chosen plugin for more information.
Note: If you have an existing Qt application, you can also add Felgo Plugins to your app! See here
how to do this.
Activating Plugins with a License Key
You can test all plugins as soon as the required integration steps and plugin configuration are completed.
However, the plugins are only available as Trial Versions if they are not activated with a valid license. When you are using unlicensed plugins, a dialog is shown and a watermark overlays your application to notify you about
the testing state of the plugin.
All monetization plugins are free to use in all licenses, other plugins are only fully usable if you have purchased the Startup or Business license. To activate plugins and enable
their full functionality it is required to create a license key. You can create such a key for your application using the license creation page.
This is how it works:
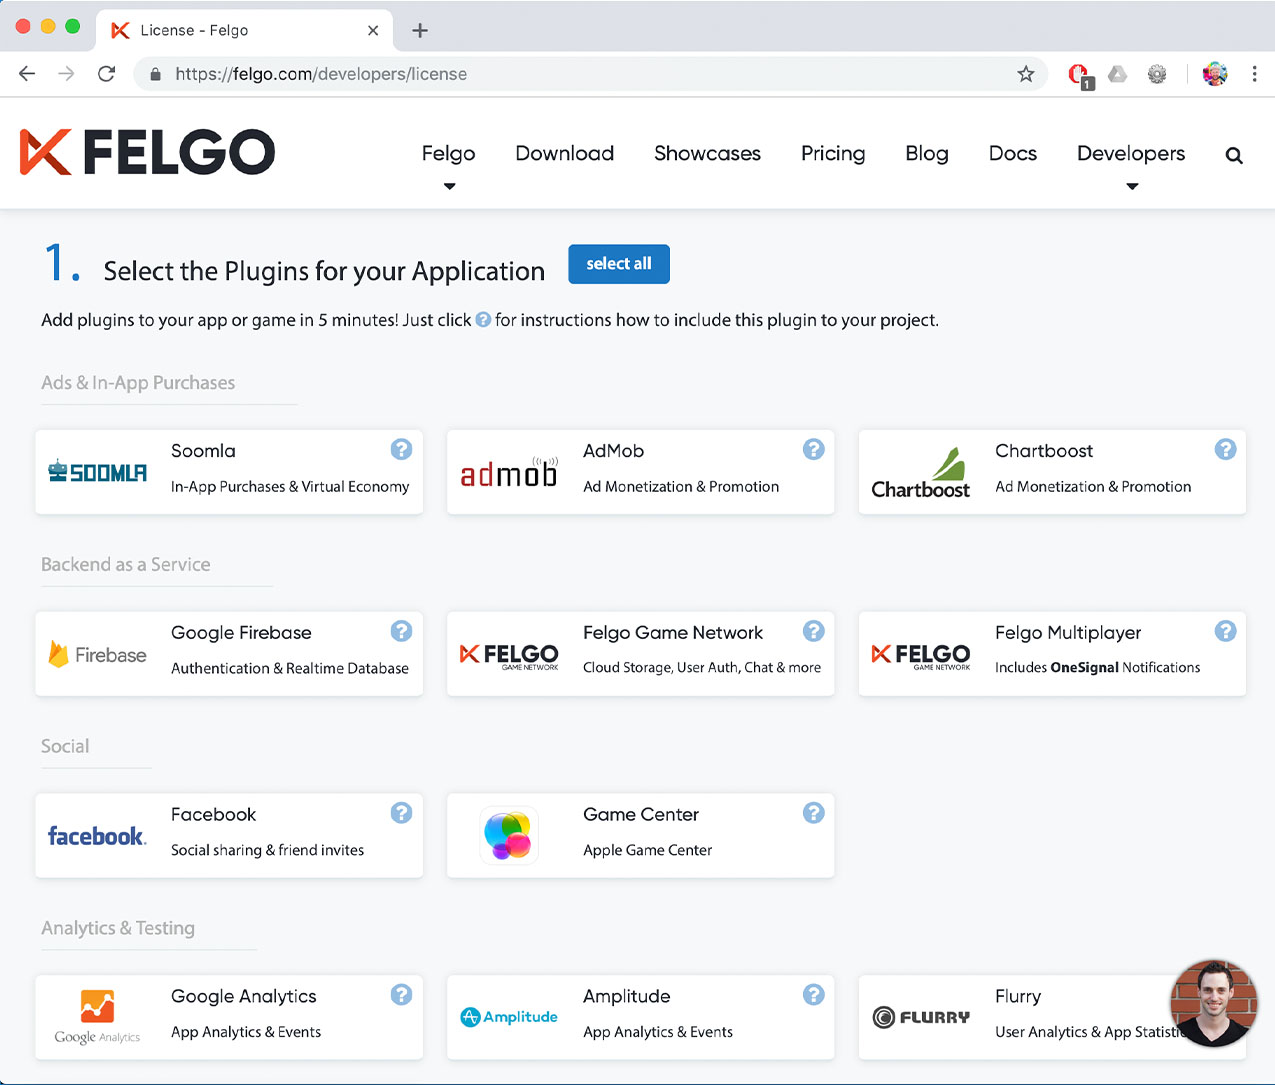
- Choose the plugins you want to include in your license key:
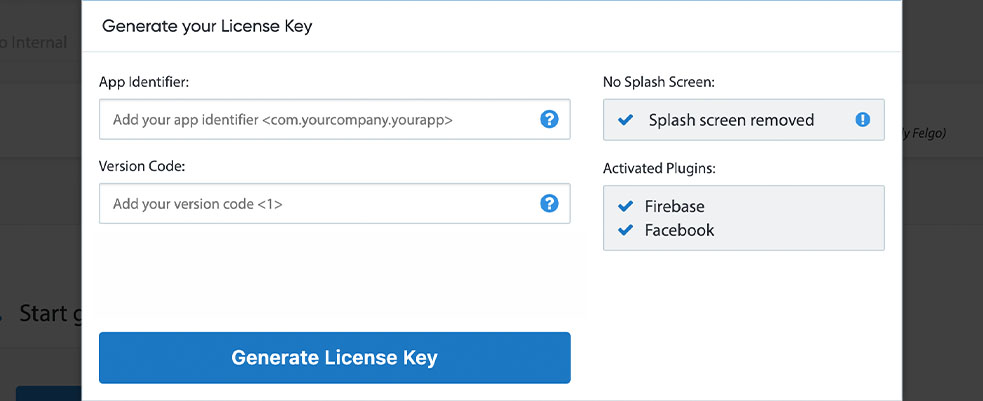
- Click on “Generate License Key” and set the app identifier & version code of your application. You can see that the AdMob plugin was enabled in this license key:
- Copy the generated licenseKey to your GameWindow or App component.
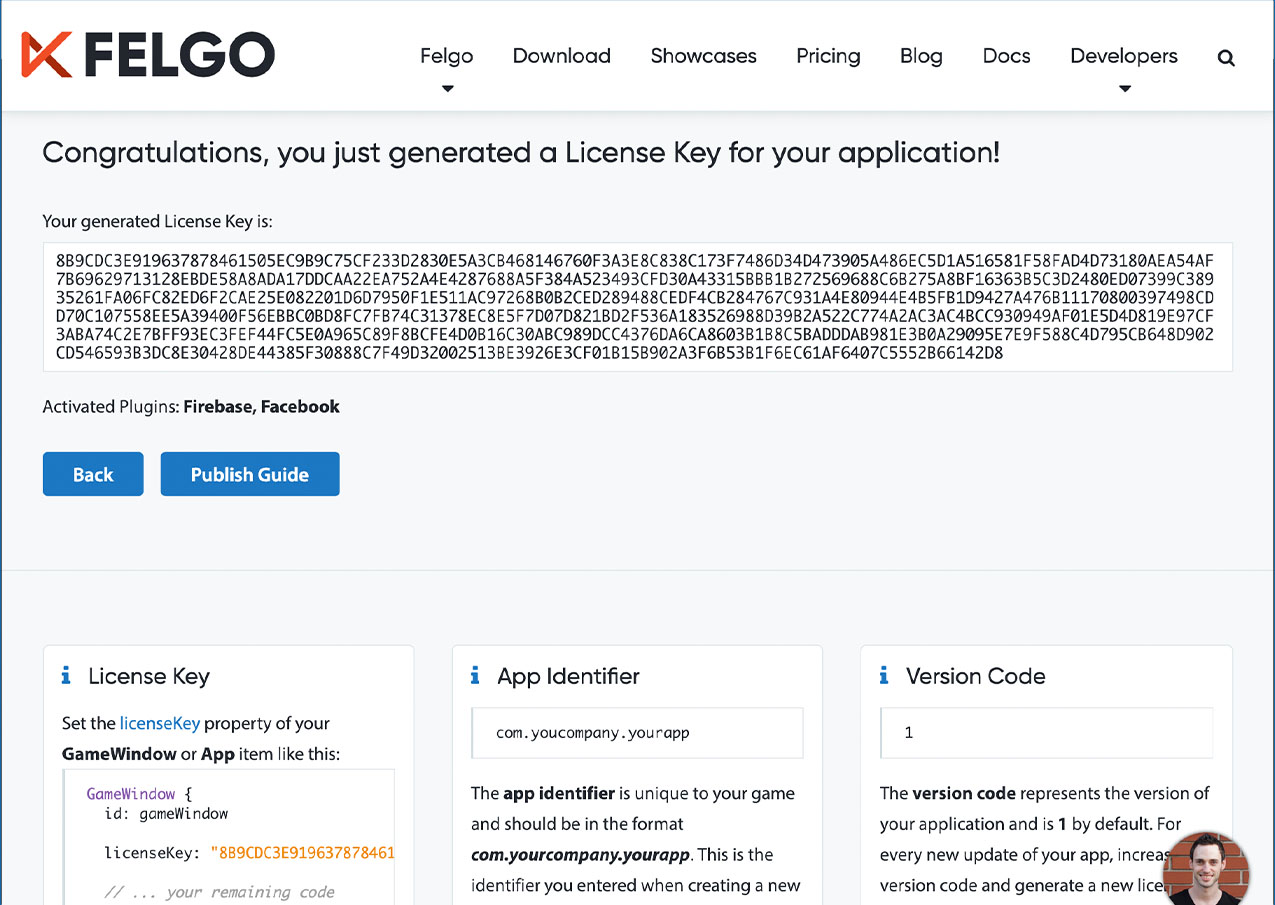
- You can now fully use the selected plugins!
Integration
To use the Firebase plugin in your project, add the platform-specific native libraries for each platform to your project.
Project Configuration
Add the following lines of code to your CMakeLists.txt file:
 set(FELGO_PLUGINS
    firebase
 )
Note: Make sure to declare the FELGO_PLUGINS before calling felgo_configure_executable, which links the required Frameworks based on your settings.
iOS Integration Steps
- Download our PluginDemo from https://github.com/FelgoSDK/PluginDemo/archive/master.zip and unzip it.
- Copy the following frameworks and resource bundles from the
ios sub-folder to a sub-folder called ios within your project directory.
- AppAuth.framework
- FBLPromises.framework
-
FirebaseAnalytics.framework
- FirebaseAppCheckInterop.framework
-
FirebaseAuth.framework
- FirebaseAuthInterop.framework
- FirebaseCore.framework
- FirebaseCoreExtension.framework
- FirebaseCoreInternal.framework
-
FirebaseDatabase.framework
- FirebaseInstallations.framework
- FirebaseSharedSwift.framework
-
FirebaseStorage.framework
- GoogleAppMeasurement.framework
- GoogleAppMeasurementIdentitySupport.framework
- GoogleDataTransport.framework
- GoogleSignIn.bundle
- GoogleSignIn.framework
- GoogleUtilities.framework
- GTMAppAuth.framework
- GTMSessionFetcher.framework
- leveldb.framework
- nanopb.framework
- RecaptchaInterop.framework
Android Integration Steps
- Open your
build.gradle file and add the following lines to the dependencies block within the buildscript block:
 dependencies {
     ...
     classpath 'com.google.gms:google-services:4.4.2'
 }
- Open your
build.gradle file and add the following lines to the dependencies block:
 dependencies {
   implementation 'com.felgo.plugins:plugin-firebase:4.+'
 }
- Add the following line after the existing "apply plugin" line in your
build.gradle file:
apply plugin: 'com.android.application'
apply plugin: 'com.google.gms.google-services'
Note: If you did not create your project from any of our latest wizards, make sure that your project uses the Gradle Build System like described here.
Firebase Account
In order to use Firebase in your project, set up a Firebase project at https://firebase.google.com/ for your app or game.
Note: Create a Google account first if you don't have one yet.
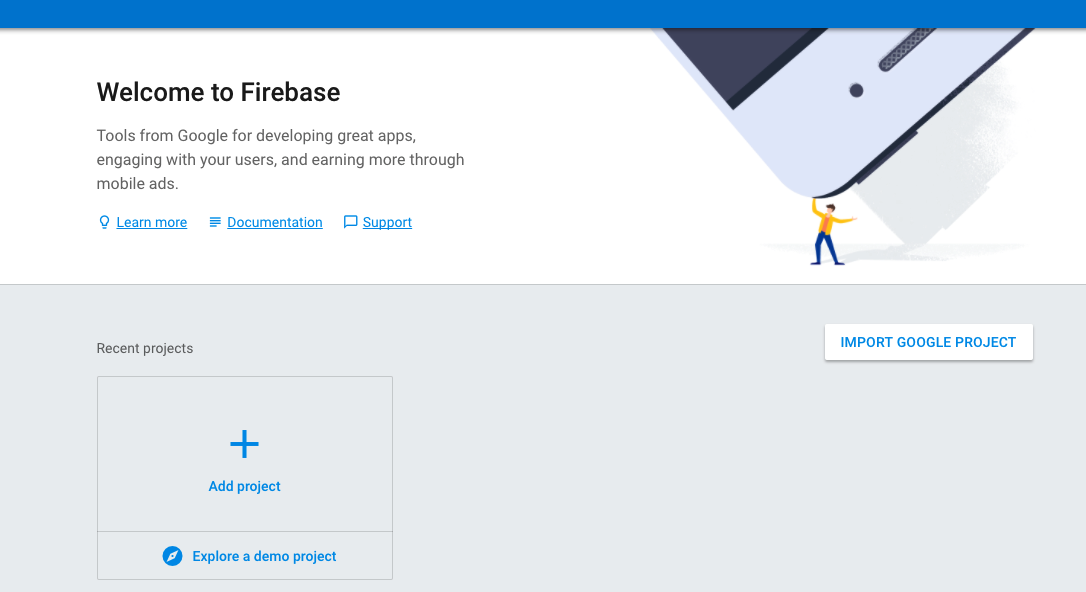
Go the Firebase console (https://console.firebase.google.com/). You will be greeted with the welcome screen.
Now, you can create your first Firebase project. Proceed with the following steps:
- Click "Add Project"
- Enter a name for your project and select your preferred region
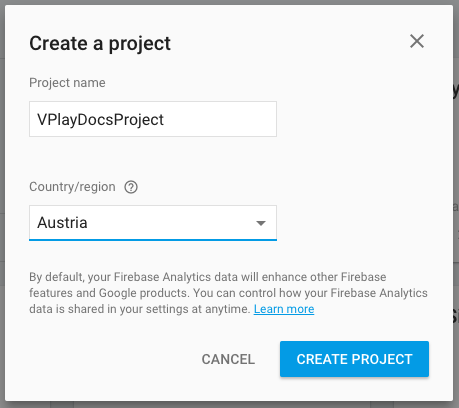
- Click "Create Project"
Back on the Dashboard for your Firebase project, proceed with adding the platforms you want to use.
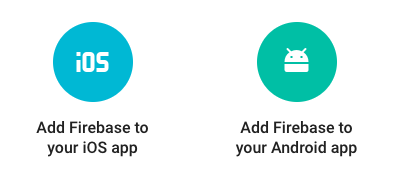
iOS
- Click "Add Firebase to your iOS app" or "Add another app" if you already created one for Android.
- Enter the iOS Bundle ID. It is equal to the "App Identifier" which you entered when creating your Felgo project.
- Click "Register App" and download the
GoogleService-Info.plist on the next page.

- Copy the
GoogleService-Info.plist into the ios subfolder of your project. This file defines the Firebase project ID, app ID, API key and database URL to use in for FirebaseAuth and FirebaseDatabase. You can also use multiple Firebase accounts from within the same app by setting a FirebaseConfig instance for FirebaseAuth::config and FirebaseDatabase::config.
- You can ignore the next steps of the wizard, we already did those steps for you. Just click "Continue" and "Finish".
Android
- Click "Add Firebase to your Android app" or "Add another app" if you already created one for iOS.
- Enter the package name. It is equal to the "App Identifier" which you entered when creating your Felgo project.
- Click "Register App" and download the
google-services.json.

- Copy the
google-services.json into the android subfolder of your project. This file defines the Firebase project ID, app ID, API key and database URL to use in for FirebaseAuth and FirebaseDatabase. You can also use multiple Firebase accounts from within the same app. For this, additional accounts can be
configured using the FirebaseConfig type and assigning FirebaseAuth::config and FirebaseDatabase::config.
- You can ignore the next steps of the wizard, we already did those steps for you. Just click "Continue" and "Finish".
Firebase Realtime Database Setup
By default, anyone can access your Firebase database. This is not desirable in many cases. Therefore, you should restrict your database so your users can only access data that is allowed for them.
To change the Realtime Database rules, select "Database" in the Firebase Console.
Then, select the "Rules" tab in the top. You will see the Firebase default rules.
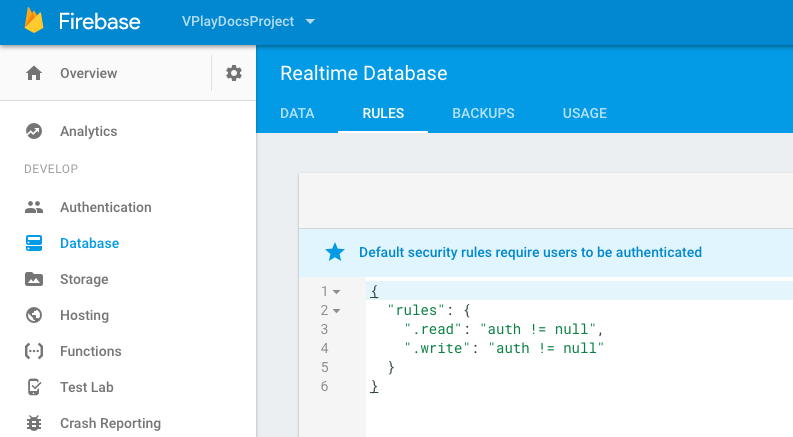
Now, you can replace the default rules with the following code:
{
"rules": {
"users": {
"$uid": {
".read": "$uid === auth.uid",
".write": "$uid === auth.uid"
}
},
"public": {
"$uid": {
".read": true,
".write": true
}
}
}
}
These rules grant everyone access to all child nodes of the public branch. In addition, with these rules, an authenticated user can access data that is stored in the users/<individual-user-id>
branch of the database.
To learn more on Database Rules, we recommend to read up on the topic in the Firebase Docs.
Used Firebase SDK Versions
| iOS |
10.29.0 |
| Android |
21.1.1 |
Note: Other SDK versions higher than the stated ones might also be working but are not actively tested as of now.


