Integrate with Parse Push to increase your users' engagement.

Note: The Parse plugin is deprecated and no longer available with Felgo 4. It is recommended to use the OneSignal Plugin instead.
Integrate with Parse Push to increase your users' engagement.

Push notifications are a direct channel to your app's users. Keep them happy and engaged with app updates, promotions, and more sent directly to their device.
Send notifications to all users, a targeted segment or an individual user, thanks to push channels it has never been easier to send push notifications.
Push Notifications are a great way to keep users engaged and inform users about updates in your app.
In comparison to local notifications push notifications are triggered from a server-side logic. To make things easier Parse provides a push backend for delivering notifications from a custom web-service or with the help of their Push Notification Dashboard.
Therefore push notifications are ideally suited for applications where you want to inform your users about externally triggered status updates, like sports live ticker apps, social messaging apps or any other app which should inform your users about an update.
Note: If you only need scheduled local notifications that don't require any external logic to be triggered have a look at our Notification Plugin.
Push notifications can either be sent to all registered devices or targeted by subscribing to "channels".
To use push notifications in your app add the following item to your QML code:
 import QtQuick
 import Felgo

 Parse {
   applicationId: "<PARSE-APP-ID>"
   clientKey: "<PARSE-CLIENT-ID>"
 }
Note: You can retrieve the <PARSE-APP-ID> and <PARSE-CLIENT-ID> from your Parse Dashboard, for more information have a look at the section Parse Account.
To subscribe to a specific channel add it to the list of channels:
 Parse {
   ...
   channels: [ "channel-1" ] // Subscribe to channel "channel-1"
   ...
 }
You can disable all push notification channels independent from the channels property by setting the enabled property to false:
 Parse {
   ...
   enabled: false // Disables all push notifications to the subscribed channels
   ...
 }
To handle an incoming push notification implement the notificationReceived signal handler:
 Parse {
   ...
   onNotificationReceived: data => {
     console.debug("Received notification payload is", JSON.stringify(data))
   }
   ...
 }
The data parameter is a map containing the JSON object content with all parameters of the push notification payload sent over Parse.
The signal is emitted in following cases:
For a full demo project please also have a look at our example on GitHub: https://github.com/FelgoSDK/PluginDemo
The Parse Plugin supports receiving simple text-based push messages or more advanced JSON payload messages, sent over the Parse Push API.
To test push notifications on your device you can use any library or tool which supports HTTP POST requests. Here is an example how to send a push notification with the help of curl:
 curl -X POST \
   -H "X-Parse-Application-Id: <PARSE-APPLICATION-ID>" \
   -H "X-Parse-REST-API-Key: <PARSE-REST-API-KEY>" \
   -H "Content-Type: application/json" \
   -d '{
         "channels": [ "channel-1" ],
         "data": {
           "alert": "This is a Felgo Parse Plugin Test"
         }
       }' \
   https://api.parse.com/1/push
Note: You can retrieve the <PARSE-APPLICATION-ID> and <PARSE-REST-API-KEY> from your Parse Dashboard, for more information have a look at the
section Parse Account.
You can define the text which should be shown within the notification in the alert block. The data block is provided within the Parse::notificationReceived handler.
There are also other Parse API SDKs which allow sending push notifications, you can have a closer look here: https://parse.com/docs/api_libraries
Note: You can also send test notifications when opening the Push panel within your app's Parse Dashboard:
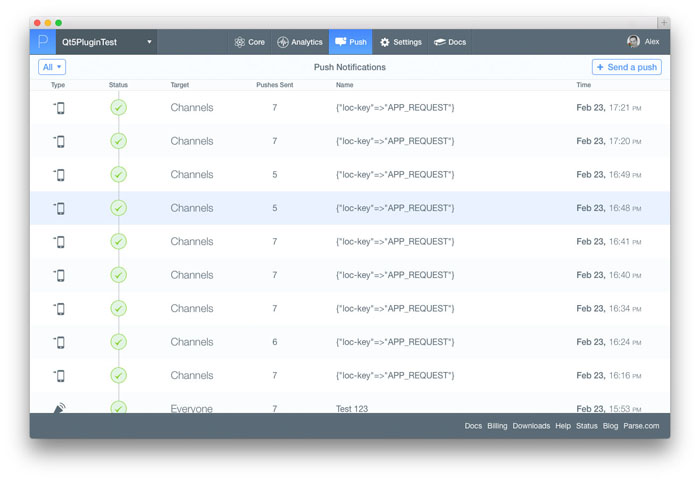
Beside sending simple text messages within the alert block you can also send a more advanced payload for the following use-cases:
Sending push notifications to a localized app often means that you have to keep track of the language which is installed on the users' devices and send the alert payload depending on that
settings.
To make your life easier it's also possible to send predefined localization keys, which are then replaced with localized strings bundled within your app.
To send a push notification with a localized key use a payload like the following, adding the loc-key parameter to the alert JSON block:
 curl -X POST \
   -H "X-Parse-Application-Id: <PARSE-APPLICATION-ID>" \
   -H "X-Parse-REST-API-Key: <PARSE-REST-API-KEY>" \
   -H "Content-Type: application/json" \
   -d '{
         "channels": [ "channel-1" ],
         "data": {
           "alert": { "loc-key" : "NEW_HIGHSCORE" }
         }
       }' \
   https://api.parse.com/1/push
Localizable.strings file in a subfolder named <language>.lproj for each language you want to add, where <language>
is a valid language abbreviation (e.g. en for English or de for German). Put all the language subfolders into your project's ios subfolder.Localizable.strings files:
 // file en.lproj/Localizable.strings
 "NEW_HIGHSCORE" = "New highscore";

 // file de.lproj/Localizable.strings
 "NEW_HIGHSCORE" = "Neuer Highscore";
.pro file to make sure that the Localizable.strings files are copied to your app
bundle:
 ios {
   # Localization files, copied one by one
   locfile1.files = ios/en.lproj/Localizable.strings
   locfile1.path = en.lproj
   locfile2.files = ios/de.lproj/Localizable.strings
   locfile2.path = de.lproj
   QMAKE_BUNDLE_DATA += locfile1 locfile2
 }
strings.xml file in a subfolder named values-<language> for each language you want to add, where <language>
is a valid language abbreviation (e.g. en for English or de for German). Put all the language subfolders into your project's android/res subfolder.
Note: You can also provide default texts in a strings.xml file in a subfolder named values (without the language postfix).
strings.xml files:
 // file android/res/values-en/strings.xml
 <resources>
     <string name="NEW_HIGHSCORE">New highscore</string>
 </resources>


 // file android/res/values-de/strings.xml
 <resources>
     <string name="NEW_HIGHSCORE">Neuer Highscore</string>
 </resources>
Note: If the translation can't be found in any of the strings.xml files the loc-key parameter is shown to the user in the notification.
Note: This approach is only suitable if all push notification texts are already defined at the time you're submitting your app to the app stores.
It's also possible to send additional key/values beside your alert payload. As an example you can send a screen code which you can navigate to when a user opens your app from a push notification. For this use case append
additional keys to the JSON payload. The following example defines an additional key named screen:
 curl -X POST \
   -H "X-Parse-Application-Id: <PARSE-APPLICATION-ID>" \
   -H "X-Parse-REST-API-Key: <PARSE-REST-API-KEY>" \
   -H "Content-Type: application/json" \
   -d '{
         "channels": [ "channel-1" ],
         "data": {
           "alert": "New highscore"
         },
         "screen": "highscores"
       }' \
   https://api.parse.com/1/push
In you QML code you can then read the key by referencing it in the data parameter:
 Parse {
   ...
   onNotificationReceived: data => {
     // Get the screen key from the data payload
     var screen = data["screen"]

     // TODO: Navigate user to the appropriate screen
   }
   ...
 }
Note: Please keep in mind that the payload's length for push notifications is restricted by Apple's and Google's push notification payload. Therefore make sure that you keep your information reasonable small and postpone loading additional data after your user opens your app again.
If an app relies on displaying up-to-date information every time the app starts, it can be useful to prepare and cache new content for the user even while the app is not running in the foreground. The Parse Plugin makes tasks like this really easy.
It enables you to download string data such as JSON or XML, cache it in the background and then process it as soon as the user opens your app again.
The following properties and signals can be used for that:
In this example, background messages are printed to the console. Up to 3 messages at a time will be stored.
 Parse {
   id: parse
   applicationId: "<PARSE-APPLICATION-ID>"
   clientKey: "<PARSE-REST-API-KEY>"

   channels: [ "channel-1" ]
   backgroundFetchUrl: "http://date.jsontest.com/"
   backgroundFetchEnabled: true
   backgroundFetchStackSize: 3

   onBackgroundFetchAvailable: content => {
     console.debug("New background data available:", content.length, "items:")
     for(var i = 0; i < content.length; i++) {
       console.debug(i + ":", content[i])
     }
   }
 }
Note: If you're using iOS 9 make sure that your Parse::backgroundFetchUrl meets Apple's App Transport Security (ATS) requirements.
After you have added the required properties to your QML code you can test it by sending a push notification that contains a content-available key with an integer value of 1, like the message below:
Note: Make sure you have set up your Parse Account properly and insert your Parse keys into the message below.
 curl -X POST  -H "X-Parse-Application-Id: <PARSE-APPLICATION-ID>" \
               -H "X-Parse-REST-API-Key: <PARSE-REST-API-KEY>" \
               -H "Content-Type: application/json" \
   -d '{
         "channels": [ "background-channel-1" ],
         "data": {
           "sound": "",
           "content-available": 1
         }
       }' \
   https://api.parse.com/1/push
You can add parameters to the URL using %% placeholders. Placeholders will be replaced by parameters sent in the payload of your push notification. You can put an indefinite number of placeholders
in your URL. Placeholders will be replaced in the order of the parameters you send.
Note: Make sure that the number of parameters and placeholders match. If you send too few parameters, the placeholders will be included in your URL. If you send too many parameters, not all of them will be used.
For example, the following push notification
 curl -X POST  -H "X-Parse-Application-Id: <PARSE-APPLICATION-ID>" \
               -H "X-Parse-REST-API-Key: <PARSE-REST-API-KEY>" \
               -H "Content-Type: application/json" \
   -d '{
         "channels": [ "background-channel-1" ],
         "data": {
           "sound": "",
           "content-available": 1,
           "params": [ "v", "net" ]
         }
       }' \
   https://api.parse.com/1/push
and the following URL in your QML
backgroundFetchUrl: "http://www.%%-play.%%/"
will result in the URL http://www.felgo.com/.
|
Item provides remote push notifications for iOS & Android over the Parse service |
When you create a new project, you can choose to add example plugin integrations as well. Open Qt Creator and choose “File / New File or Project”, then choose Single-Page Application in the Felgo Apps section or any other wizard. For Felgo Games, you can also find an own Game with Plugins project template as an own wizard.
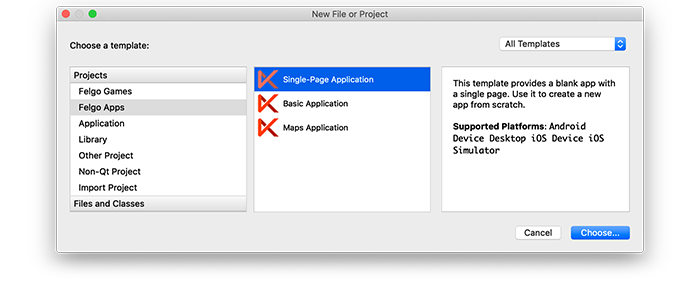
Then select the platforms you want to run your application on. The plugins are available for both iOS & Android. There is a fallback functionality in place on Desktop platforms so your project still works when you call methods of the plugins. This allows you to do the main development on your PC, and for testing the plugin functionality you can run the project on iOS and Android.
After the Kit Selection, you can choose which of the plugins you’d like to add to your project:
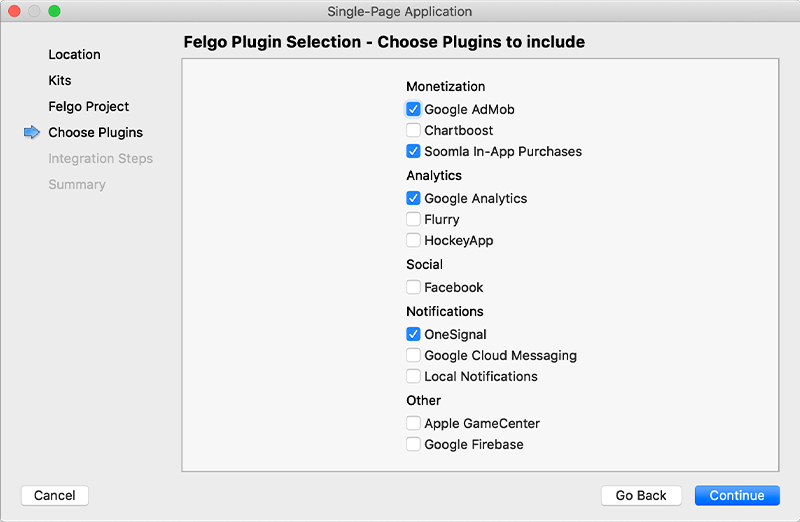
Then complete the wizard, your project is now set up with all the correct plugin dependencies for Android & iOS automatically. This includes:
.gradle file for Android..plist file for iOS.CMakeLists.txt file to include the plugin libraries for iOS.Note: Additional integration steps are still required for most plugins, for example to add the actual plugin libraries for iOS to your project. Please have a look at the integration steps described in the documentation for each of the used plugins.
If you have an existing Felgo application, follow these steps to include a plugin to your app or game:
In Qt Creator, select “File / New File or Project” and choose either Felgo Games or Felgo Apps from Files and Classes. Then select Felgo Plugin and press Choose.
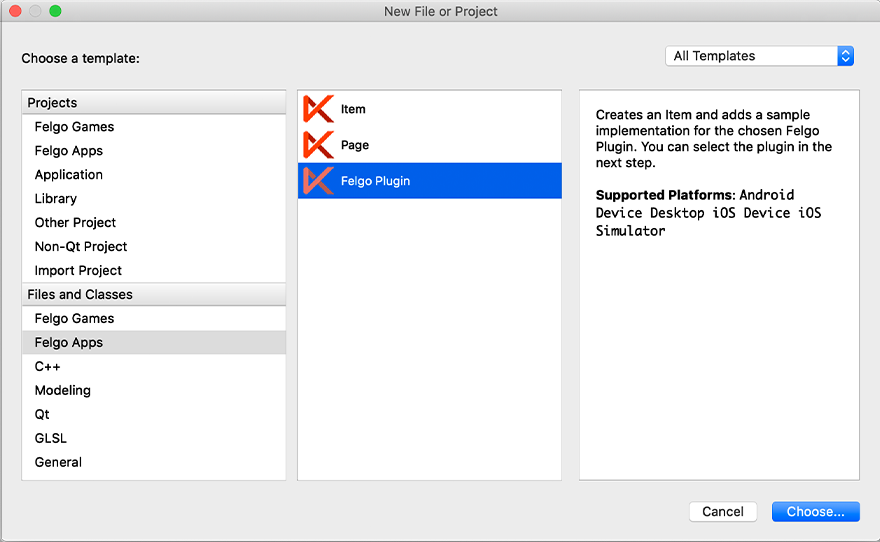
You can now select the plugin you want to add:
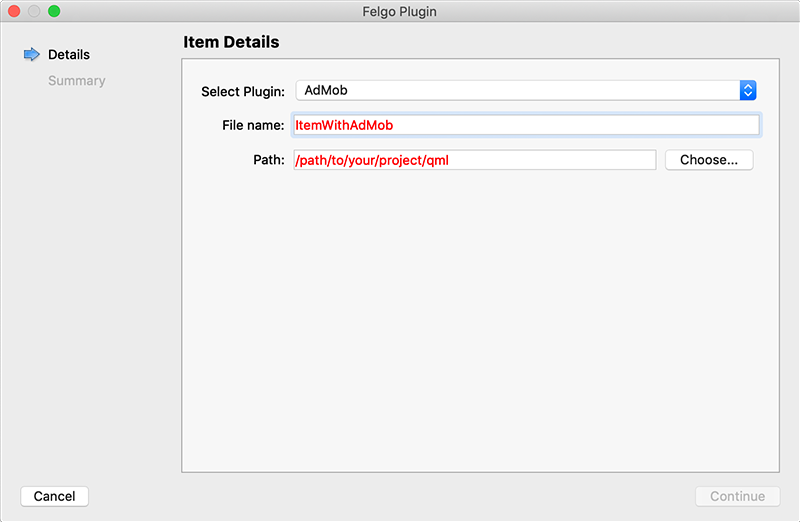
The plugin item, which contains the chosen plugin and a short usage example, is now added to your project. To use the item in your project, simply perform these steps:
main.qml file.CMakeLists.txt file & .plist file for iOS usage. See the iOS integration guide of the chosen plugin for more information..gradle file for Android usage. See the Android integration guide of the chosen plugin for more information.Note: If you have an existing Qt application, you can also add Felgo Plugins to your app! See here how to do this.
You can test all plugins as soon as the required integration steps and plugin configuration are completed.
However, the plugins are only available as Trial Versions if they are not activated with a valid license. When you are using unlicensed plugins, a dialog is shown and a watermark overlays your application to notify you about the testing state of the plugin.
All monetization plugins are free to use in all licenses, other plugins are only fully usable if you have purchased the Startup or Business license. To activate plugins and enable their full functionality it is required to create a license key. You can create such a key for your application using the license creation page.
This is how it works:
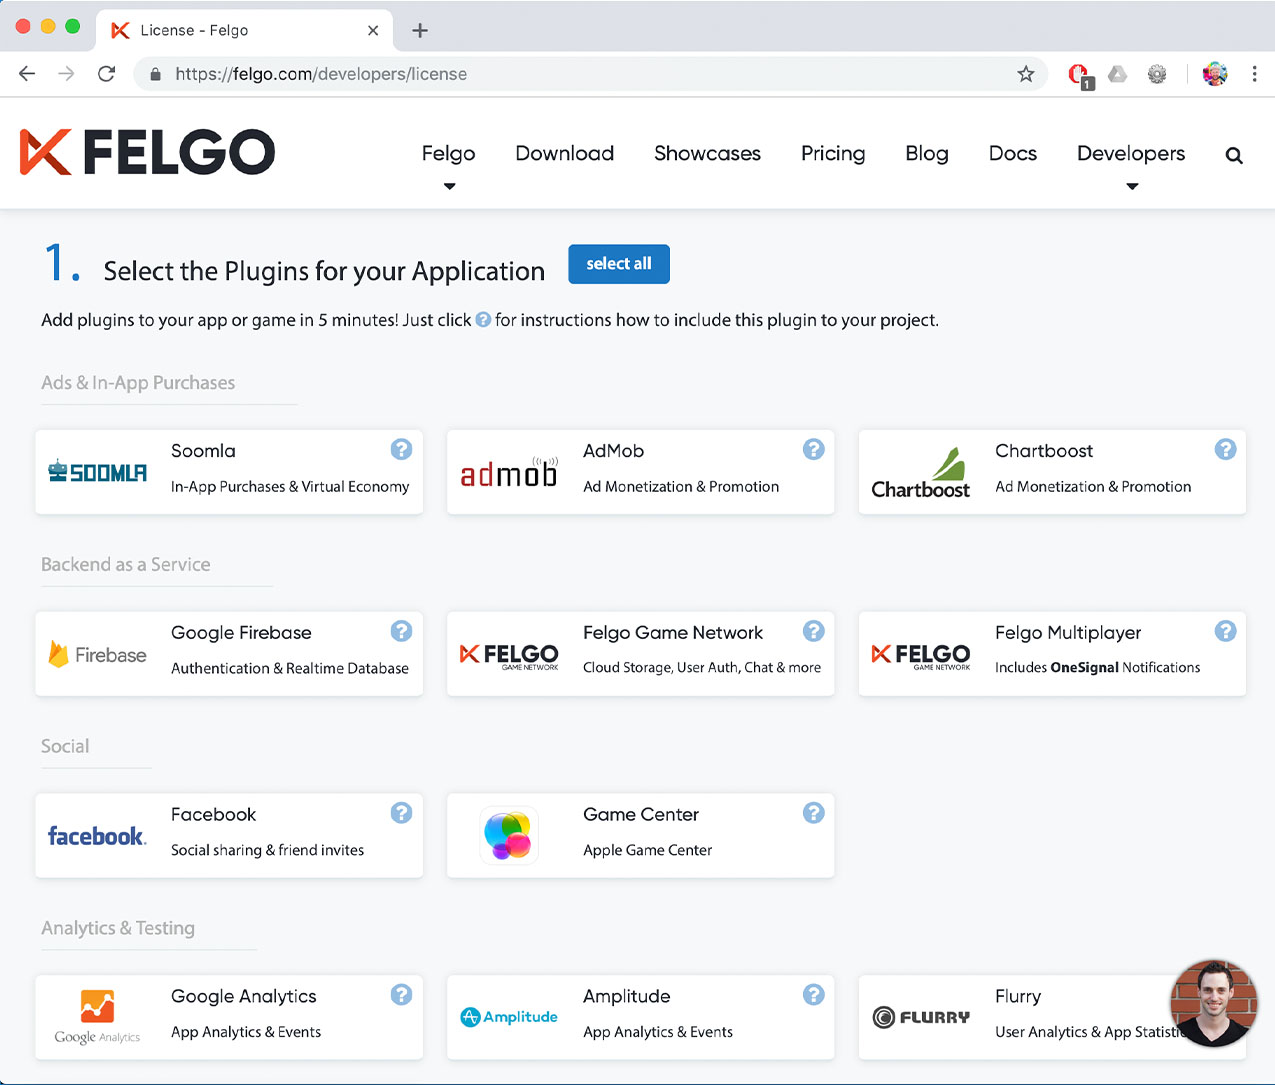
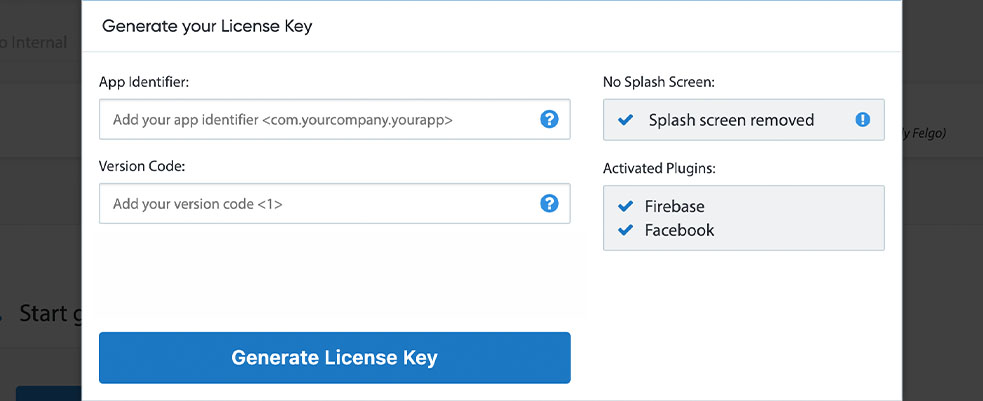
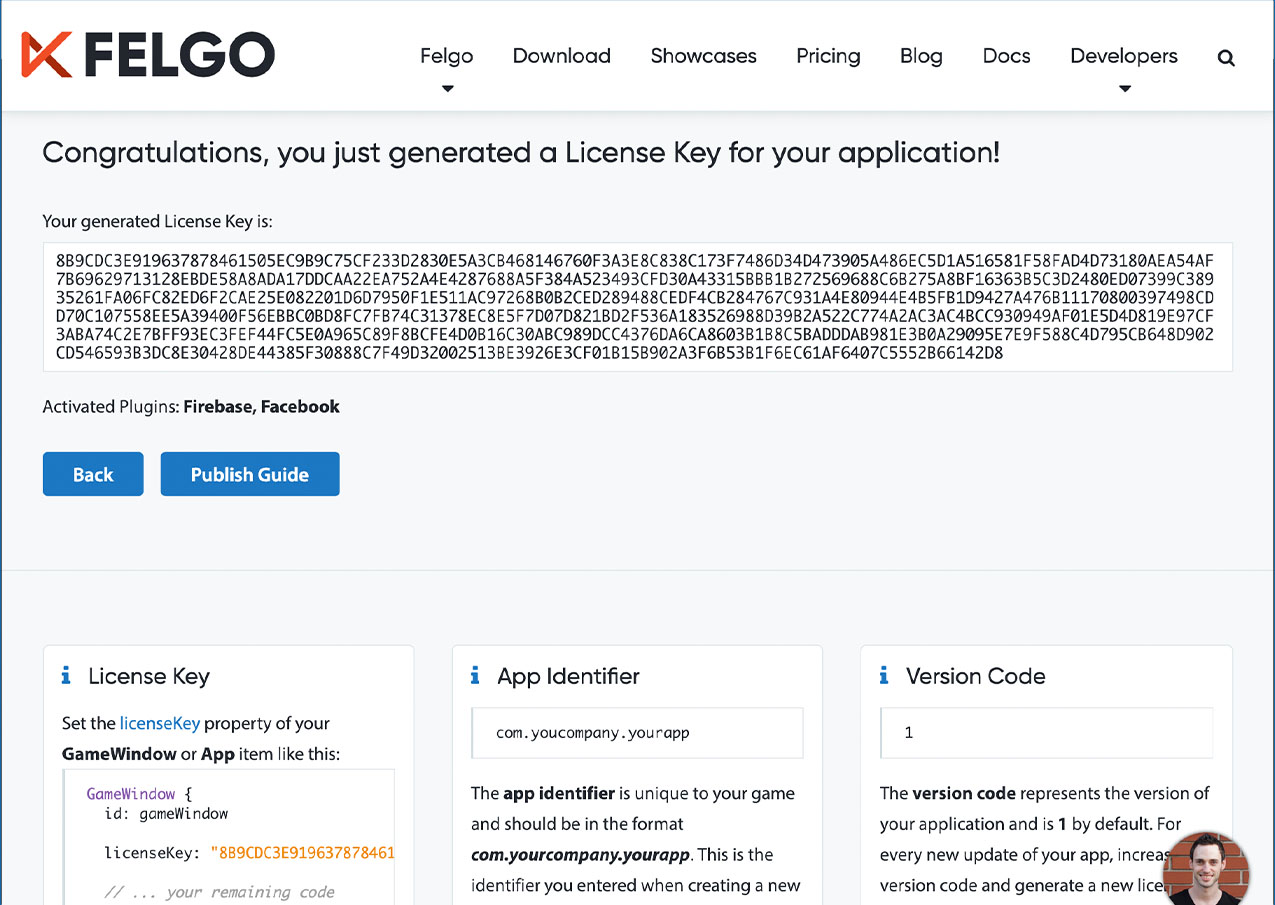
To use the Parse plugin you need to add the platform-specific native libraries to your project, described here:
Add the following lines of code to your .pro file:
FELGO_PLUGINS += parse
Parse.framework and Bolts.framework from the ios sub-folder to a sub-folder called ios within your
project directory.Project-Info.plist file within the ios subfolder of your project:
 <key>UIBackgroundModes</key>
 <array>
   <string>remote-notification</string>
 </array>
right before the closing tags:
 </dict>
 </plist>
build.gradle file and add the following lines to the dependencies block:
 dependencies {
   implementation 'com.felgo.plugins:plugin-parse:3.+'
 }
Note: If you did not create your project from any of our latest wizards, make sure that your project uses the Gradle Build System like described here.
You finally need to set up a Parse user account at https://www.parse.com. Then open your Parse dashboard and add a new app. There you can also find your application id and client key in the app's settings.
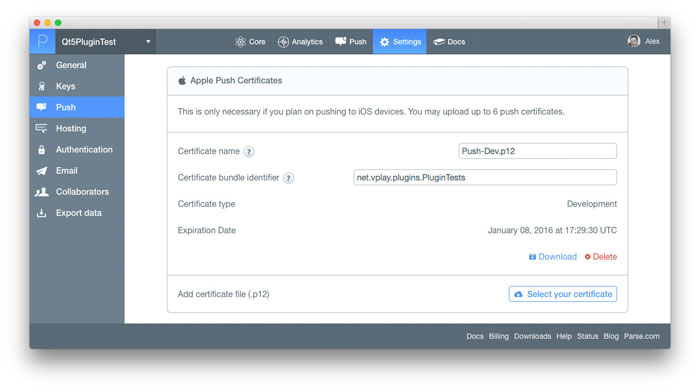
To receive push notifications on iOS you also have to create a new developer and distribution push certificate (with a push-enabled iOS app id) at https://developer.apple.com/account/ios/certificate/certificateList.action and upload them to the app's push settings:
| iOS | Parse SDK 1.12.0 |
| Android | Parse SDK 1.13.0 |
Note: Other SDK versions higher than the stated ones might also be working but are not actively tested as of now.