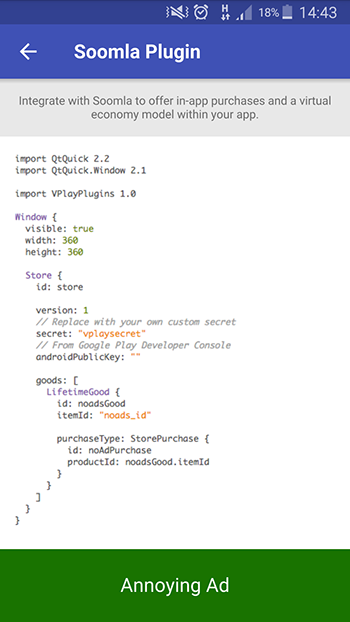
Integrate with Soomla to offer in-app purchases and a virtual economy model within your app.
Note: The Soomla Plugin is completely free and it does not require any Soomla account or license!

Integrate with Soomla to offer in-app purchases and a virtual economy model within your app.
Note: The Soomla Plugin is completely free and it does not require any Soomla account or license!
![]()
The Soomla Plugin fully supports in-app purchases for iOS App Store and Android in-app products on Google Play Store & Amazon AppStore.
Simply define your in-app purchases within your existing QML code and use the same API to trigger cross-platform purchases within your games & apps.
The Soomla Plugin is built around a freemium virtual economy model and in-game currencies ("soft currencies").
Your users can earn virtual currency by playing certain stages within your game or by using in-app purchases to exchange it against real money.
The Soomla plugin offers in-app purchases and a virtual economy model for iOS & Android. The plugin supports Apple iOS In-App Purchase on iOS and Google Play In-app Billing or Amazon In-App Purchasing on Android.
The Soomla libraries are open-sourced and distributed under Apache 2.0 license.
In-app purchases are probably the most utilized monetization strategy in today's app economy. In-app purchases implemented as a Freemium model provide a great opportunity for you to get your app into people's hands for free, and then capture some revenue from their enjoyment of playing or using your game.
Some ways to use in-app purchasing for revenue streams include:
Note: The following examples of a virtual store are built around a tower defense game called Squaby. Squaby uses a virtual currency "Gold" which can be used to buy new or upgrade existing towers. Gold can be earned by stopping Squabies or by buying currency packs within the game.
Using in-app purchases with our Soomla plugin has some key benefits you shouldn't miss:
Most of today's successful mobile games use a virtual economy model, which can be seen as a special type of a freemium model. The fundamental core of every virtual economy is the existence of an in-game currency ("soft currency") that a user of your game can either earn by playing (and mostly completing) certain stages within your game or by using in-app purchases to change real money to your in-game currency with an exchange rate defined within your game. Your players can then use this virtual currency to purchase other goods within your game, i.e. to purchase additional ammo, levels or characters.
Creating a virtual economy is not only for monetizing your game, more important it's to engage your players and giving them ways to advance in your game play, to measure their progress and to add an extra way of having fun in your game, independently from the game's actual genre.
The Felgo Store plugin already comes with a built-in virtual economic model especially designed for games, including items for virtual currencies, currency packs, single use goods, single use pack goods and lifetime goods.
Thanks to the use of QML's declarative language features (especially property bindings) you can boost the integration process of in-app purchases while making logical links more transparent and comprehensible, e.g. displaying or hiding an app banner within your game depending on the purchase state of a no-ad upgrade is as simple as:
 AdBanner {
   visible: !noadsGood.purchased
 }
Beside the declarative language features you can save a lot additional time while adding in-app purchases to your game thanks to a comprehensive documentation with code samples, integration into our open-sourced demo games and an export functionality that rescues you from the hassle of adding in-app purchases to different platform app stores multiple times by hand.
The Store plugin is built around the same API, independent from the underlying platform, meaning that you can use the same source code for Android and iOS. This will even be true for platforms supported by Felgo Plugins added in the future.
To try the plugin or see an integration example have a look at the Felgo Plugin Demo app.
Please also have a look at our plugin example project on GitHub: https://github.com/FelgoSDK/PluginDemo.
The Soomla plugin can be used after adding the following import statement to your QML source code:
import Felgo
The main item for using the Soomla plugin is the Store item. Therefore every app & game utilizing in-app purchases should have at most one Store item, best added to near the root item of your QML files.
The structure of your virtual economy and purchasable types is defined with the Store::currencies, Store::currencyPacks and Store::goods properties.
A very basic Store implementation with one lifetime good item looks like the following example:
 import QtQuick
 import QtQuick.Window

 import Felgo

 Window {
   visible: true
   width: 360
   height: 360

   Store {
     id: store

     version: 1
     // Replace with your own custom secret
     secret: "vplaysecret"
     // From Google Play Developer Console, when using Google Play billing service
     androidPublicKey: ""

     goods: [
       LifetimeGood {
         id: noadsGood
         itemId: "noads_id"

         purchaseType: StorePurchase { id: noAdPurchase; productId: noadsGood.itemId; }
       }
     ]
   }
 }
Following purchase type items are available:
| Component | Description |
|---|---|
| StorePurchase | The StorePurchase item is used to offer purchases through the platform's app store. |
| VirtualPurchase | The VirtualPurchase item allows purchases with other items like an in-game Currency. |
The Store plugin comes with a built-in virtual economic model especially designed for games. Depending on the type, an item can either be purchased as a StorePurchase or as a VirtualPurchase. Purchases with StorePurchase type are mainly used for non-consumable, app-wide items and virtual currency packs. StorePurchases typically open the platform's app store and ask the user to confirm the purchase with a specific price.
Purchases with VirtualPurchase type on the other hand allow a lot more flexibility on the game's design in comparison to purchases with StorePurchase type: Instead of providing each in-game good as dedicated in-app purchase through the platform app stores you can introduce a virtual currency, which can then be used by your gamers to buy your in-game goods. This approach has a variety of advantages:
Virtual goods are the core of every virtual economy. Virtual goods are game objects within your game you want to sell to your players. The Store plugins comes with different types of virtual goods, including virtual currencies and different purchase types for different needs within a game. The different types are described in more detail below.
Following good and currency items are available:
| Component | Description |
|---|---|
| Currency | The Currency item describes a single virtual currency you want to offer within your game. |
| CurrencyPack | The CurrencyPack item describes a purchasable collection of a specific virtual Currency within your game, buyable with StorePurchase. |
| SingleUseGood | The SingleUseGood item is a consumable good item with a specific balance. |
| SingleUsePackGood | The SingleUsePackGood item describes a purchasable collection with a specific amount of a specific SingleUseGood. |
| LifetimeGood | The LifetimeGood item can be used to offer items which are available as long as a player plays the game as a one-time purchase, purchasable either with virtual Currency or as a StorePurchase. |
Virtual currencies are used to provide a currency like coins or credits within your game play. Currencies can be purchased in volume (bundled within a CurrencyPack) by your players with a purchase type of StorePurchase.
Your game needs at least one Currency and one CurrencyPack defined in order to offer a virtual economy.
A simple example for a currency (named "Gold") and a purchaseable currency pack (named "10 Pieces of Gold") looks like the following:
 Store {
   currencies: [
     Currency { id: goldCurrency; itemId: "currency_gold_id"; name: "Gold"; }
   ]

   currencyPacks: [
     CurrencyPack {
       id: gold10Pack
       itemId: "gold_pack_10_id"
       name: "10 Pieces of Gold"
       currencyId: goldCurrency.itemId // The currency you want to use for this pack
       currencyAmount: 10
       purchaseType:  StorePurchase { id: gold10Purchase; productId: gold10Pack.itemId; }
     }
   ]
 }
Note: The virtual economic model allows to define multiple currencies within the same game. However, in most cases a single virtual currency should be sufficient.
A SingleUseGood item is the most basic kind of a virtual good. It is a virtual item that a player can only use once before he has to purchase more of the same kind again. SingleUseGood items can be purchased an unlimited number of times. These goods can normally be summed up and accumulated so that the user has a balance of them (e.g. 20 green balls). The balance of every virtual item is saved within an internal database and can be retrieved with SingleUseGood::balance property. Single use goods are commonly purchased with a virtual currency with the VirtualPurchase type.
A simple example for an additional one time usage weapon for a tower defense game looks like the following:
 Store {
   goods: [
     SingleUseGood {
       id: vacGood
       itemId: "vac_item_id"
       name: "Vacuum Cleaner"
       description: "All Squabies are sucked in by your mom's vacuum cleaner"
       purchaseType: VirtualPurchase { itemId: goldCurrency.itemId; amount: 50; }
     }
   ]
 }
In certain cases it's desirable to sell packs of single use goods, which can be achieved with SingleUsePackGood items. Therefore SingleUsePackGood items are just bundles of SingleUseGood items. Beside selling bundles of goods you can also use these items to give a discount on items purchased in volume, i.e. purchasing a truck of green bananas might in sum be cheaper than purchasing each single banana on its own.
SingleUsePackGood items can be purchased an unlimited number of times. This kind of item does not have an own balance, instead the balance of the associated SingleUseGood is updated according to the amount defined in the pack.
A simple example for an additional one time usage weapon for a tower defense game looks like the following:
 Store {
 goods: [
     SingleUseGood {
       id: vacGood
       itemId: "vac_item_id"
       name: "Vacuum Cleaner"
       description: "All Squabies are sucked in by your mom's vacuum cleaner"
       purchaseType: VirtualPurchase { itemId: goldCurrency.itemId; amount: 50; }
     },
     SingleUsePackGood {
       id: vacPackGood
       itemId: "vacpack_item_id"
       name: "5 Vacuum Cleaners"
       goodItemId: vacGood.itemId
       amount: 5
       purchaseType: VirtualPurchase { itemId: goldCurrency.itemId; amount: 200; }
     }
   ]
 }
In comparison to single use good items lifetime good items are virtual goods that are available for the playerer as long as he plays the game. So a LifetimeGood allows you to offer virtual goods that are bought only once and then kept forever. Furthermore your users can't buy more than one instance of the very same lifetime good item.
If your lifetime good is of type StorePurchase it can be restored with Store::restoreAllTransactions.
Race tracks, Game Upgrades and Buildings are good examples of Lifetime use Goods.
A simple example for a life time good looks like the following:
 Store {
 goods: [
     LifetimeGood {
       id: slowmotionGood
       itemId: "slowmotion_item_id"
       name: "Slow Motion"
       description: "Squabies move with less speed"
       purchaseType:  VirtualPurchase { itemId: goldCurrency.itemId; amount: 300; }
     }
   ]
 }
Further examples are no-ad upgrades or the removal of game restrictions of a free version of your game when using the StorePurchase purchase type. Here is an example for an in-app purchase for removing a possible app banner:
 Store {
   goods: [
     LifetimeGood {
       id: noadsGood
       itemId: "noads_id"

       purchaseType: StorePurchase { id: noAdPurchase; productId: noadsGood.itemId; }
     }
   ]
 }
StorePurchase supports two different types of purchase: regular purchase and subscriptions.
To enable subscription functionality, set the property StorePurchase::isSubscription to true.
 App {
   Store {
     goods: [
       LifetimeGood {
         id: myAppSub
         itemId: "my.app.app_subscription"

         purchaseType: StorePurchase {
           id: myAppSubPurchase
           productId: myAppSub.itemId
           isSubscription: true
         }
       }
     ]
   }
 }
Subscriptions are ongoing purchases that are renewed periodically. This way you can require regular payment from your users to keep some functionality active.
Users can buy subscriptions like any other virtual goods. StorePurchase::isSubscription must be used with goods of type LifetimeGood. The property LifetimeGood::purchased will stay true as long as the user keeps the subscription
active. If the user cancels the subscription or stops payment, LifetimeGood::purchased will become false.
You can use subscriptions for in-app products that provide ongoing value for the user. For example, add new content on a monthly basis in exchange for ongoing payments.
You can ask the user to purchase the subscription like any other virtual good, and initiate the purchase using the Store::buyItem() method.
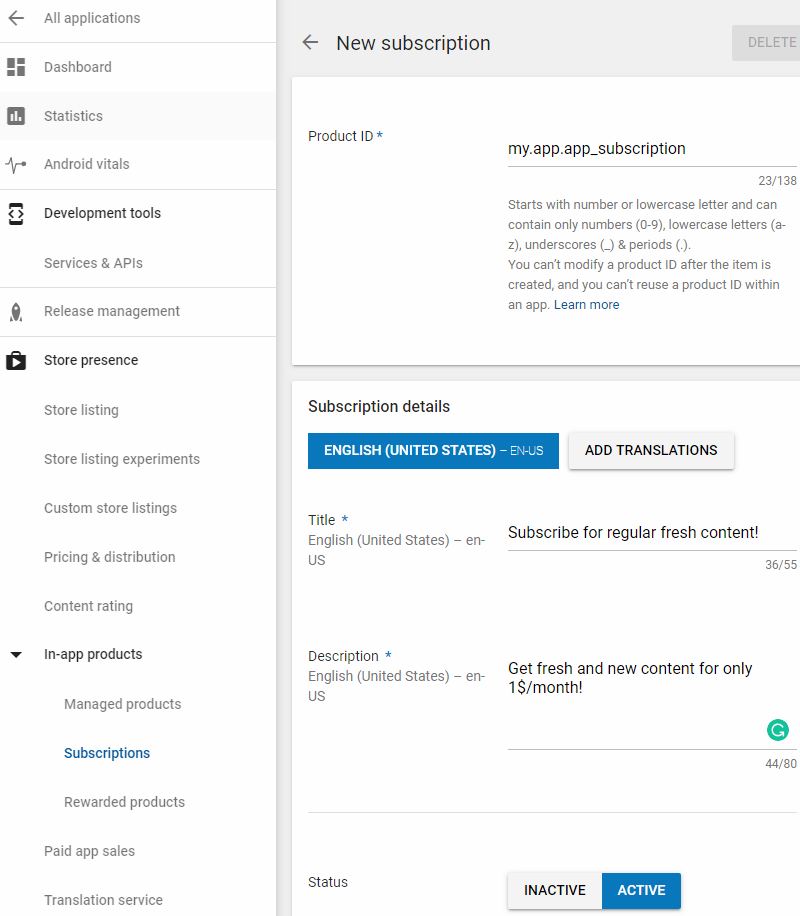
Like with any store good, you need to define subscriptions in the corresponding app stores. See section Set-up & Test In-App Purchases for more information.
Here is a full example usage of subscriptions:
 import Felgo

 App {
   Store {
     id: store

     version: 1
     secret: "<private secret>"

     // get this key from Google Play under Monetization Setup -> Licensing
     androidPublicKey: "<public key>"

     goods: [
       LifetimeGood {
         id: myAppSubscription
         itemId: "my.app.app_subscription"

         purchaseType: StorePurchase {
           id: myAppSubscriptionPurchase
           productId: myAppSubscription.itemId
           isSubscription: true
         }
       }
     ]
   }

   NavigationStack {
     AppPage {
       title: "Subscription example"

       Column {
         anchors.fill: parent
         anchors.margins: spacing
         spacing: dp(12)

         AppText {
           text: myAppSubscription.purchased
                 ? "You are subscribed! Enjoy your fresh content."
                 : qsTr("Subscribe for %1 / month for regular fresh content!")
                   .arg(myAppSubscriptionPurchase.marketPriceAndCurrency)
         }

         AppButton {
           text: "Subscribe"
           visible: !myAppSubscription.purchased
           onClicked: store.buyItem(myAppSubscription.itemId)
         }
       }
     }
   }
 }
The LifetimeGood myAppSubscription is defined with a StorePurchase. This item has its isSuscription property set to true. This means you also define the purchase as subscription in Google Play and the App Store. The example allows
the user to subscripe by pressing a button. It then queries LifetimeGood::purchased to check if the user is currently subscribed.
Calling Store::buyItem() opens the native purchase dialog:

Note: While using test accounts, the subscription period is shorter than in the production environment. This allows for better testing of expired subscriptions.
|
Item describes a single virtual currency you want to offer within your game |
|
|
Item describes a purchasable collection of a specific virtual Currency within your game, buyable with StorePurchase |
|
|
Item can be used to offer items which are available as long as a player plays the game |
|
|
Item is a consumable good item with a specific balance |
|
|
Item describes a purchasable collection with a specific amount of a specific single use good |
|
|
Item provides in-app purchases for iOS and Android |
|
|
Item is used to offer purchases through the platform's app store |
|
|
Item allows purchases with other items like an in-game Currency |
When you create a new project, you can choose to add example plugin integrations as well. Open Qt Creator and choose “File / New File or Project”, then choose Single-Page Application in the Felgo Apps section or any other wizard. For Felgo Games, you can also find an own Game with Plugins project template as an own wizard.
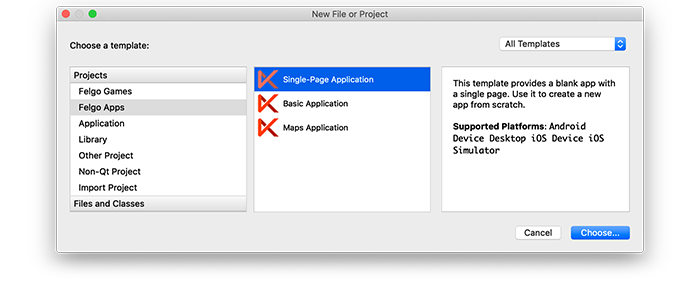
Then select the platforms you want to run your application on. The plugins are available for both iOS & Android. There is a fallback functionality in place on Desktop platforms so your project still works when you call methods of the plugins. This allows you to do the main development on your PC, and for testing the plugin functionality you can run the project on iOS and Android.
After the Kit Selection, you can choose which of the plugins you’d like to add to your project:

Then complete the wizard, your project is now set up with all the correct plugin dependencies for Android & iOS automatically. This includes:
.gradle file for Android..plist file for iOS.CMakeLists.txt file to include the plugin libraries for iOS.Note: Additional integration steps are still required for most plugins, for example to add the actual plugin libraries for iOS to your project. Please have a look at the integration steps described in the documentation for each of the used plugins.
If you have an existing Felgo application, follow these steps to include a plugin to your app or game:
In Qt Creator, select “File / New File or Project” and choose either Felgo Games or Felgo Apps from Files and Classes. Then select Felgo Plugin and press Choose.
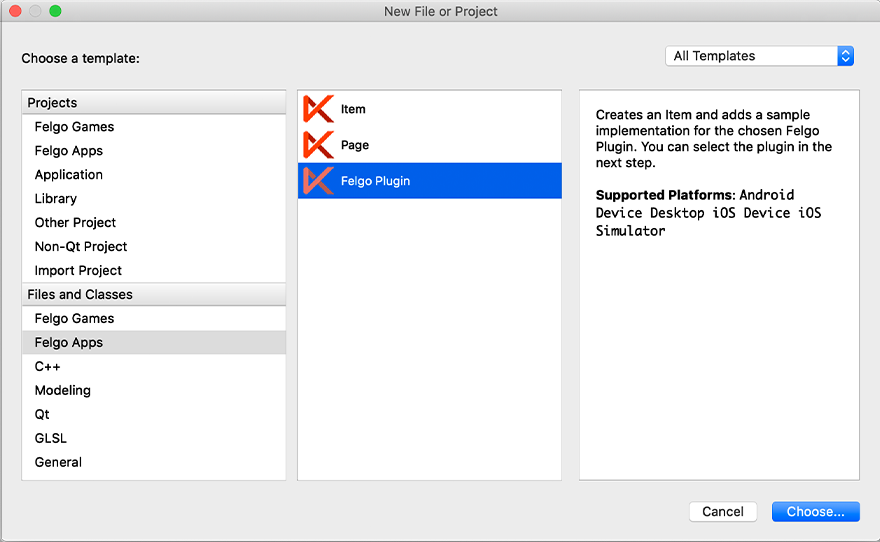
You can now select the plugin you want to add:

The plugin item, which contains the chosen plugin and a short usage example, is now added to your project. To use the item in your project, simply perform these steps:
main.qml file.CMakeLists.txt file & .plist file for iOS usage. See the iOS integration guide of the chosen plugin for more information..gradle file for Android usage. See the Android integration guide of the chosen plugin for more information.Note: If you have an existing Qt application, you can also add Felgo Plugins to your app! See here how to do this.
You can test all plugins as soon as the required integration steps and plugin configuration are completed.
However, the plugins are only available as Trial Versions if they are not activated with a valid license. When you are using unlicensed plugins, a dialog is shown and a watermark overlays your application to notify you about the testing state of the plugin.
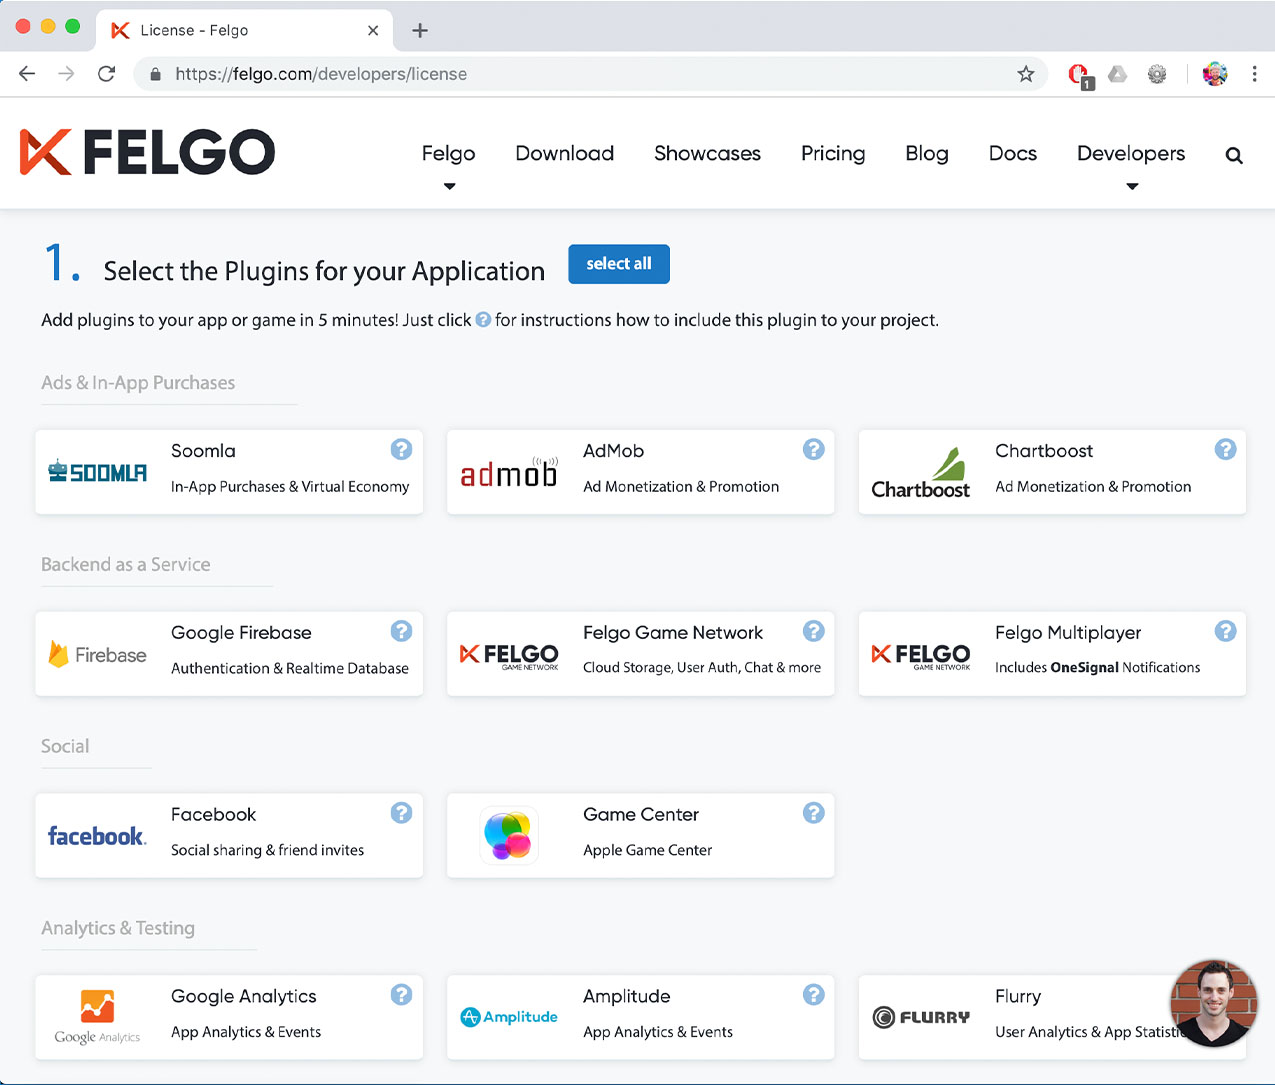
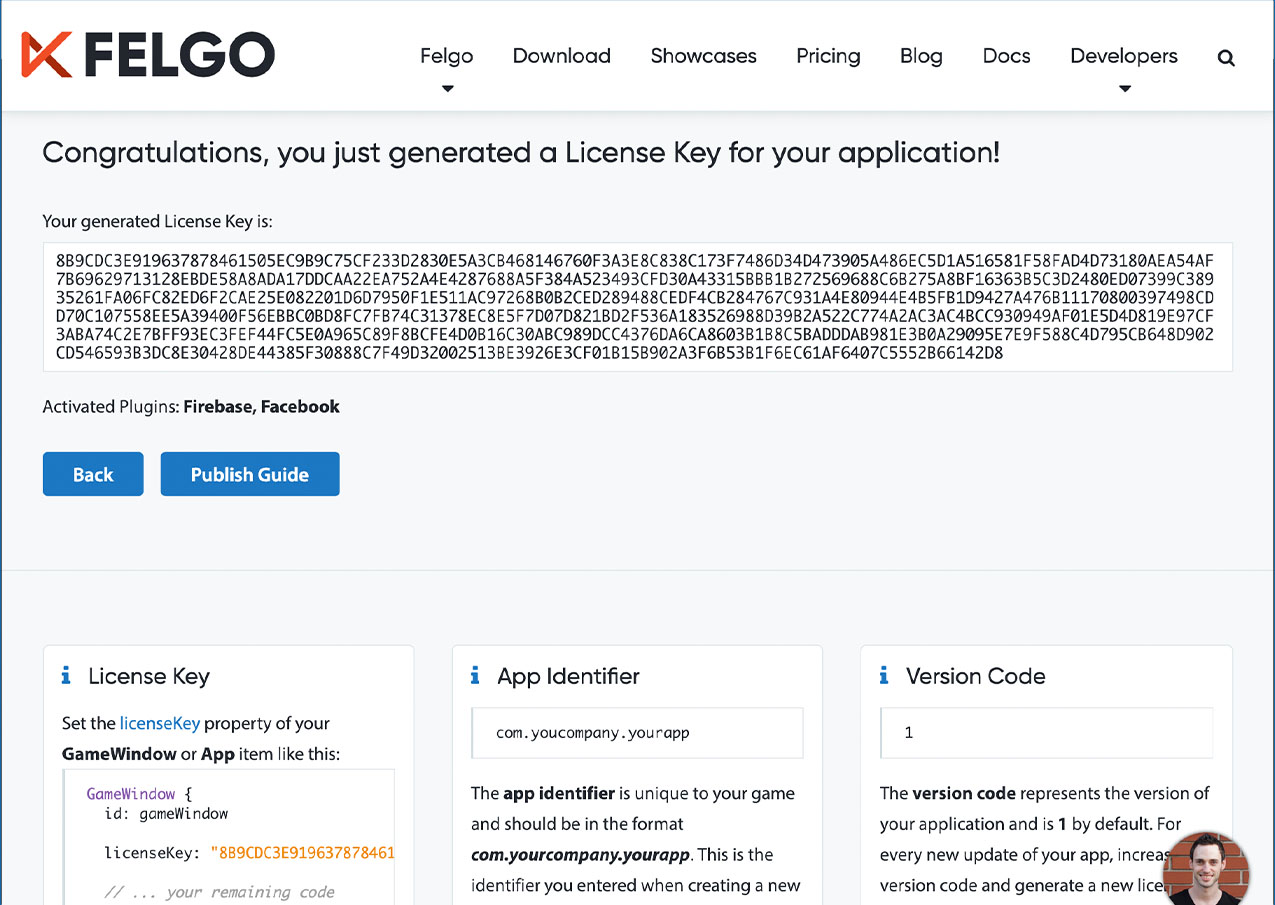
All monetization plugins are free to use in all licenses, other plugins are only fully usable if you have purchased the Startup or Business license. To activate plugins and enable their full functionality it is required to create a license key. You can create such a key for your application using the license creation page.
This is how it works:
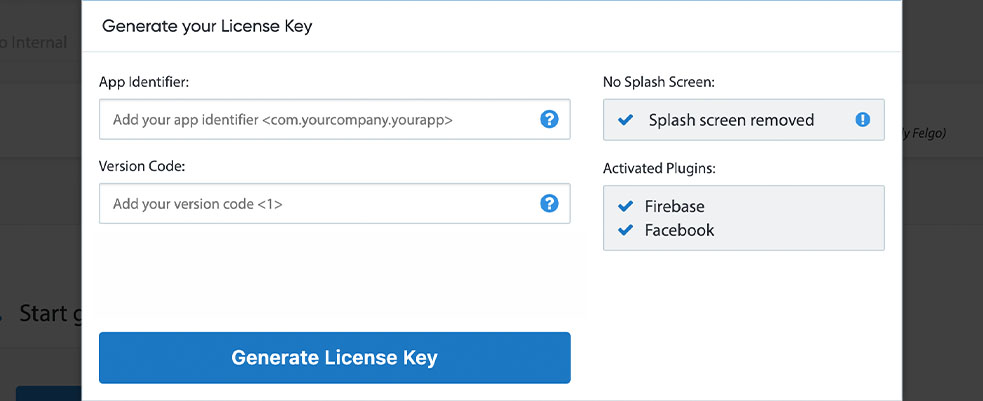
Note: The Soomla Plugin is completely free and it does not require any Soomla account or license!
Add the following lines of code to your CMakeLists.txt file:
 set(FELGO_PLUGINS
    soomla
 )
Note: Make sure to declare the FELGO_PLUGINS before calling felgo_configure_executable, which links the required Frameworks based on your settings.
ios subfolder to a sub-folder called ios within your project directory:
libSoomlaiOSStore.alibKeeva.alibcrypto.alibssl.aAppleIncRootCertificate.cerbuild.gradle file and add the following lines to the dependencies block:
 dependencies {
   implementation 'com.felgo.plugins:plugin-soomla:4.+'
 }
Note: If you did not create your project from any of our latest wizards, make sure that your project uses the Gradle Build System like described here.
Open the AndroidManifest.xml file and add the following lines as children of the <application> element to use Google Play:
<meta-data android:name="billing.service" android:value="google.GooglePlayIabService" />
Open the AndroidManifest.xml file and add the following lines as children of the <application> element to use Amazon:
<meta-data android:name="billing.service" android:value="amazon.AmazonIabService" />
Note: You can only choose one billing service.
| iOS | Custom version based on 3.6.22 |
| Android | Custom version based on 3.6.21 |
Testing your in-app purchases requires your app to be signed with a distribution certificate. All purchases need to be successfully set up in the corresponding app store.
Note: Make sure that in-app purchases are enabled for your App ID.
Define items of type CurrencyPack, SingleUseGood and SingleUsePackGood as consumable items. Define items of type LifetimeGood as non-consumable items.
Note: You only need to do this for items that use a purchaseType of StorePurchase. Items with type VirtualPurchase are managed entirely inside your app. See the sections Testing iOS In-App Purchases and Testing Google Play In-App Purchases for more information.
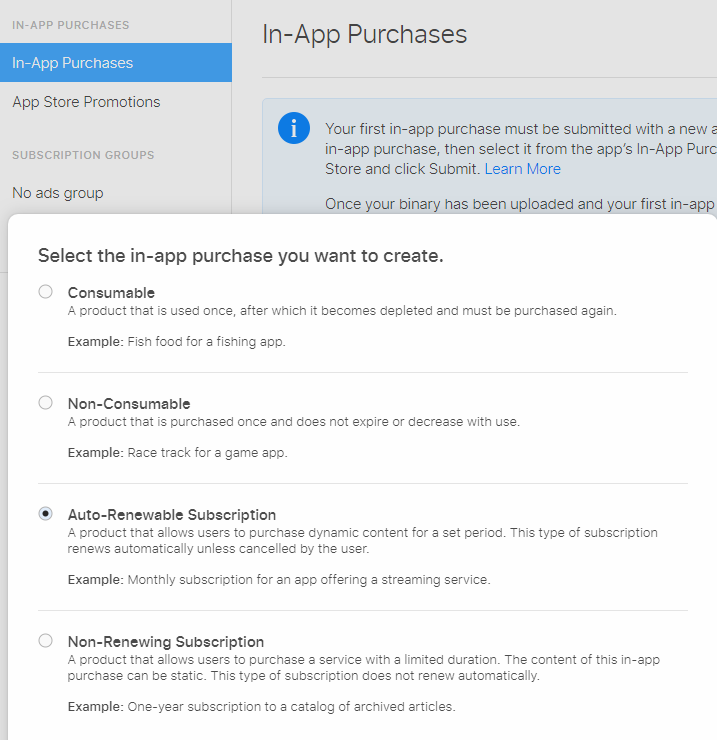
There are two types of subscriptions available: auto-renewing and non-renewing subscriptions.
Auto-renewing subscriptions allow you to set a subscription period. The subscription will automatically renew before the period ends, requiring new payment from the user. When the user cancels the subscription or no
payment occurs, the LifetimeGood::purchased property in your implementation becomes false automatically.
Non-renewing subscriptions offer no such automatic renewal. They don't allow you to define a subscription period. You can manage the lifetime and cancellation of the subscription yourself.
Note: Non-renewing subscriptions never set their LifetimeGood::purchased property to true. You can use the Store::storePurchased signal to react to a such a purchase and manage the subscription lifetime in your app yourself.
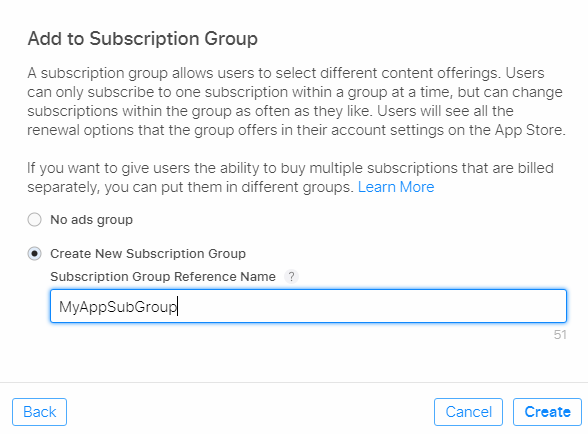
When you create a subscription, the App Store asks for a subscription group. With groups you can offer different subscription types for the same feature. Only one subscription in a group can be active at a time.
Note: You also need to create a group if you just use a single subscription.
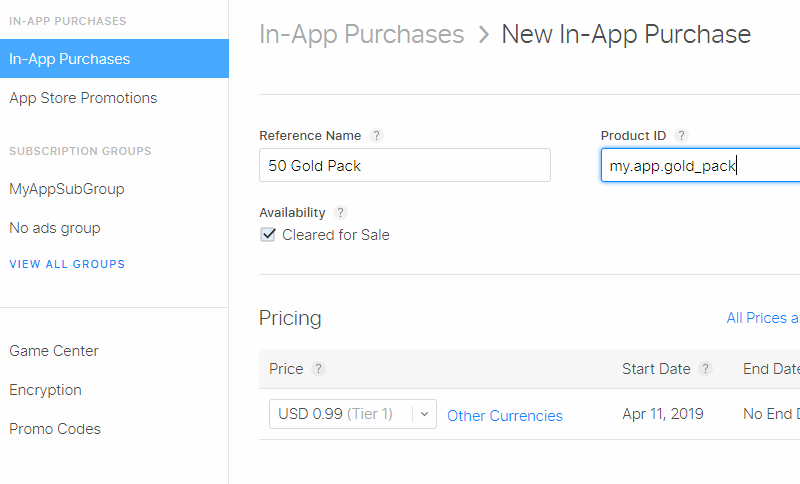
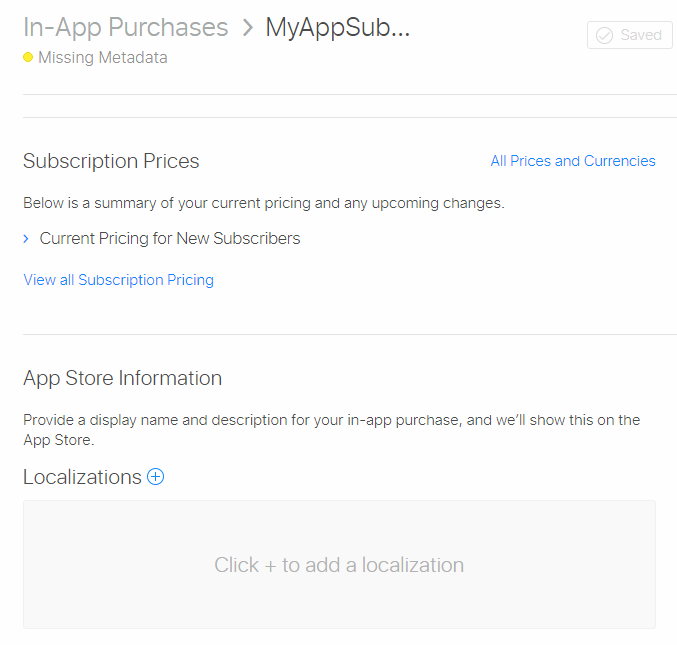
Before you can use an in-app product, it requires some meta data. This consists of the price, at least one localization and a screenshot how it is presented in your app (for the review process).
You can read more about in-app subscriptions on iOS at the official developer page.
On iOS, users can manage subscriptions from the device settings menu. You can let your app open the following link (with NativeUtils::openUrl()) to open the
corresponding settings item: https://buy.itunes.apple.com/WebObjects/MZFinance.woa/wa/manageSubscriptions
Note: You can also make use of Store::printStoreProductLists() which makes creating the in-app purchases a lot easier.
For more information on how to create and configure your app's products in App Store Connect please have a look at the official In-App Purchase Configuration Guide for App Store Connect.
Testing in-app purchases on iOS requires you to sign the app with a valid development certificate and an explicit development provisioning profile which is enabled for in-app purchases for your given app identifier. You can create one at the Apple Developer Portal here.
As soon as you have a valid provisioning profile you can proceed with the following steps:
Note: Make sure to log out from a test user account after testing your app again, if you try to use a test account for the production App Store the test user account automatically gets invalid.
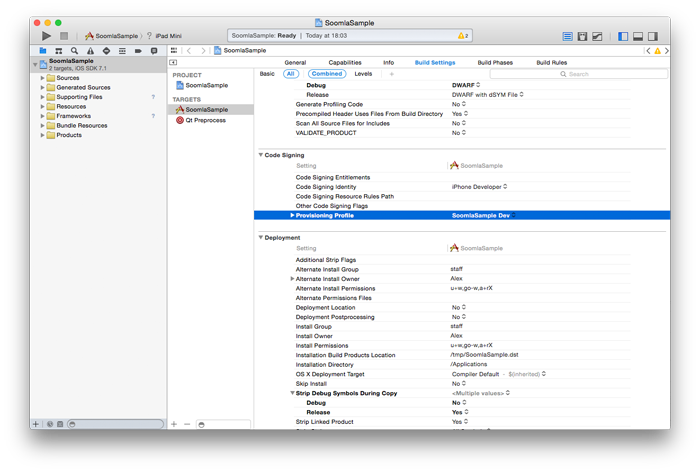
Note: Please also make sure that "iOS Device" (or the name of your device if you already connected it) target is selected in the upper left corner of Xcode like illustrated above. The minimum required Xcode version for the Soomla plugin is 10.2.1.
Note: All pop-ups should display a "sandbox" hint while you are in testing mode.
For more information on testing in-app purchases on iOS please have a look at the official Testing In-App Purchase Products guide.
Further Reading
For more information on in-app purchases on iOS please have a look at the official In-App Purchase Programming Guide.
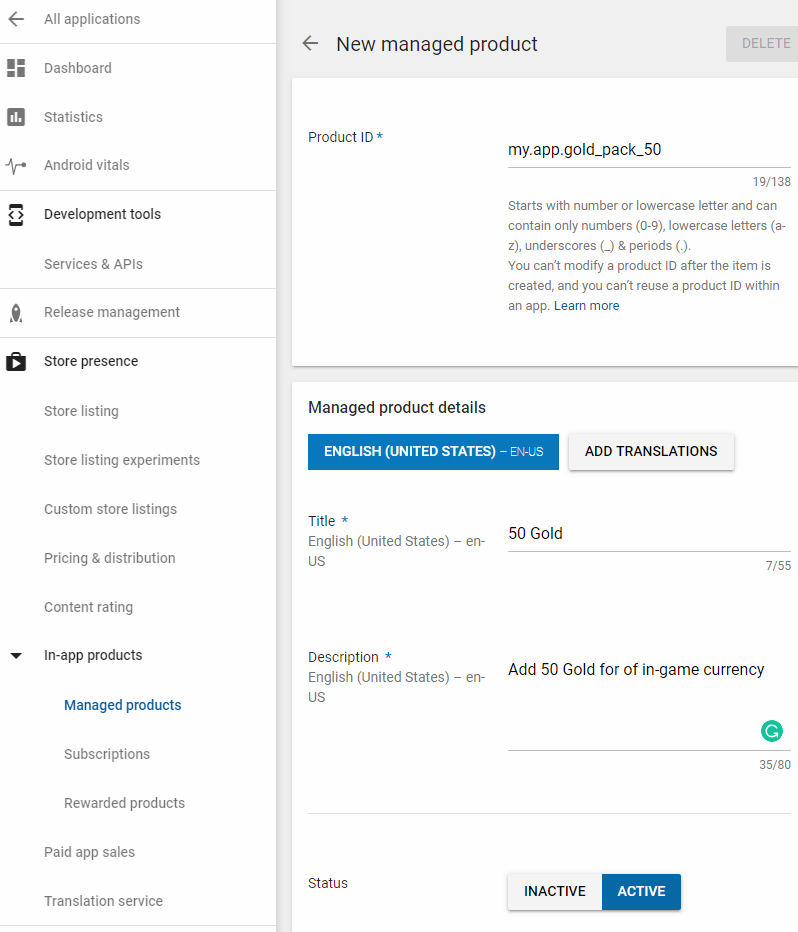
Choose either "Managed" product or "Subscription" as the type for your goods.
Users can buy "Managed" products once, and only again if they are consumed.
Note: For goods like CurrencyPack or SingleUseGood, the Store plugin handles consuming of such goods internally. This way your users are able to buy multiple instances of such goods.
Subscriptions require regular payment from the user. You can define a LifetimeGood as a subscription. If you do, set StorePurchase::isSubscription to true. See In-app Subscriptions for more infos.
Subscriptions allow you to set a subscription period. The subscription will automatically renew before the period ends, requiring new payment from the user. When the user cancels the subscription or no payment occurs,
the LifetimeGood::purchased property becomes false automatically.
Read more about in-app subscriptions on Android at the official developer page.
Users can manage subscriptions directly within the Google Play app. You can let your app open the following link (using NativeUtils::openUrl()) to open the
corresponding menu item: https://play.google.com/store/account/subscriptions
Note: You can also make use of Store::printStoreProductLists() which makes creating the in-app purchases a lot easier.
For more information on how to create and configure your app's products in Google Play Developer Console please have a look at the official Administering In-app Billing guide.
Testing in-app purchases on Google Play requires you to sign the app with the distribution certificate and upload it to Google Play as alpha or beta release. You also need to add your app's license key as Store::androidPublicKey property like described above.
For more information on testing in-app purchases on Google Play please have a look at the official Testing In-app Billing guide.

