GameWindowApplicationWindow
The root Felgo ApplicationWindow containing all other components and Scenes. More...
Properties
Signals
Methods
Detailed Description
This component inherits from ApplicationWindow and thus allows to set the title, menuBar, statusBar and toolBar from QML.
In addition it contains a AppItem component and forwards all properties to GameWindow to make content scaling available.
The size (width & height properties) of the GameWindow is automatically set to full-screen mode on mobile devices. During development on the desktop, it can be set to any size while the
application is running to quickly test the different screen sizes and aspect ratios. So you get an exact preview of how the application will look like on different devices. Change the GameWindow size by usual desktop-like resizing the window corners. Alternatively, the most important & popular screen sizes & different aspect ratios can be toggled by pressing the keyboard shortcuts
Ctrl (or Cmd on Mac) + 1-7.
Popular Screen Resolutions and Aspect Ratios
| Keyboard Shortcut |
Resolution |
Aspect Ratio |
Example Devices |
| 1 |
960x640 |
3:2 |
iPhone 4, iPhone 4S |
| 2 |
480x320 |
3:2 |
iPhone 3GS and lower, Android devices |
| 3 |
1136x640 |
16:9 |
iPhone 5, iPhone 5S |
| 4 |
1134x750 |
16:9 |
iPhone 6, iPhone 6S |
| 5 |
1280x720 |
16:9 |
Android devices like HTC One Mini or Galaxy S3 |
| 6 |
1920x1080 |
16:9 |
Android devices like Nexus 5 or Galaxy S5 |
| 7 |
1024x768 |
4:3 |
iPad 1, iPad 2 |
| 8 |
1280x800 |
16:10 |
Android tablets like Nexus 7 or Galaxy Tab 4 |
The default size for the GameWindow is 960x640 (typical for iPhone 4 and iPhone 4S). This can be changed to whatever the most important device will be. Just define a different width
& height, which specifies the default resolution. Also other aspect ratios could be set in the beginning like 1024x768 if the iPad is the main device to test. Note that the specified GameWindow size is irrelevant when deployed to mobile devices, because it gets set to the available full-screen size.
GameWindow & Scene Scaling
To be able to write a game only once for multiple screen sizes and aspect ratios, the GameWindow and Scene component provide content scaling. That
means you write your game logic for one logical scene size, and its contents (images, fonts, etc.) get scaled to the GameWindow size. The kind of scaling is set in the scaleMode. It can be set for every Scene individually, or once for all children Scene items in the
GameWindow. The default scaleMode is letterbox. See the guide How to create mobile games for different screen sizes and resolutions for a detailed guide about different scaleMode values and approaches for content scaling.
Storing User Settings
The GameWindow component also provides the functionality to store data permanently. Use the methods settings.setValue() and settings.getValue() for storing key/value-pairs into a local
SQLite database. This data will persist after the application is closed and can thus be used for storing settings about enabled sound, input controls or the logged in user.
Example Usage
The following example shows the simplest usage of the GameWindow element. The simplest Felgo application consists of a GameWindow and a Scene. To display anything, a Rectangle is added to the top left of the Scene for demonstration
purposes.
import QtQuick
import Felgo
GameWindow {
Scene {
Rectangle {
color: "green"
width: 100
height: 50
}
}
}
Also see the GameWindowSceneScaling Example for more information about different scaleModes.
Focus Handling with Multiple Scenes
For keyboard and button handling, Qt provides the Item::focus property and the FocusScope items.
As only one Scene can be active at a single time, the focus property of the activeScene is set to true by default. This
simplifies focus handling and allows an easy handling of the Android back button in Felgo.
Handling the back button is required for a good user experience of your game on Android. To simplify that, Felgo provides the Scene::backButtonPressed signal. For
advanced usage and global handling of the back button, see backButtonPressedGlobally.
Global Key Handling
In some cases, it is important to receive a keyPressed event no matter what Item currently has the focus. You can do that with keyPressedGlobally
and intercept all key presses of the application.
Example usage for back button handling and automatic focus handling with multiple Scenes:
import Felgo
import QtQuick
GameWindow {
id: gameWindow
activeScene: mainScene
Scene {
id: mainScene
SimpleButton {
text: "Game Scene"
onClicked: gameWindow.activeScene = gameScene
}
Keys.onPressed: console.debug("key pressed in mainScene:", event.key)
onBackButtonPressed: NativeUtils.displayMessageBox(qsTr("Really quit the game?"), "", 2)
}
Scene {
id: gameScene
Keys.onPressed: console.debug("key pressed in gameScene:", event.key)
onBackButtonPressed: gameWindow.activeScene = mainScene
}
Connections {
target: NativeUtils
onMessageBoxFinished: {
if(accepted)
Qt.quit()
}
}
}
Property Documentation
|
backButtonAutoAcceptGlobally : alias
|
Set this property to true if you use backButtonPressedGlobally to handle the back button globally.
The default value is false.
This property was introduced in Felgo 2.1.1.
This read-only property holds the physical diameter of the screen in inches.
You can use it for example to load different layouts based on the physical size.
Note: The tablet property gets true if this property is bigger than 5.3.
This property was introduced in Felgo 2.2.0.
See also widthInInches, heightInInches, and tablet.
This property holds the color of the FPS display. The default value is "#ffffff".
|
displayFpsEnabled : alias
|
Set this property to display the Frames per Second. The default value is false.
The scale factor all dp() values are multiplied with.
The default value is 1.
This property was introduced in Felgo 2.2.0.
See also dp(), spScale, and uiScale.
This property holds if the app is in fullscreen mode. The default value is false on Desktop platforms and true on mobile platforms.
Set this property to true, if you want to start your game in fullscreen mode also on Desktop.
Changing between fullscreen mode and windowed mode is only available on Desktop platforms Windows, Mac and Linux. On mobiles fullscreen is always true. If resolutionChangingWithKeysEnabled is true (which is the default value on desktop platforms), you can toggle fullscreen mode
with the keys Ctrl(Cmd) + F.
Starting games in fullscreen mode is best practice, while non-gaming apps shall be started in windowed mode or maximized mode. See this example for these use cases:
import Felgo
GameWindow {
fullscreen: true
maximized: true
}
On mobile platforms, a change in the platform-specific configuration files is required to specify if the status bar visibility. The required changes are:
- Android: Set the following attribute for the
<application> tag: android:theme="@android:style/Theme.NoTitleBar.Fullscreen" in your AndroidManifest.xml file.
- iOS: Set the key
<key>UIStatusBarHidden</key> to <true/> in your Project-Info.plist file.
Note: If you create a new Qt application from the Felgo project wizard with File/New Project/Felgo/Any project template, the app is configured to run in fullscreen mode on all mobile platforms. The
status bar is hidden by default with the Felgo wizards, because this is the most common setting for games.
This property was introduced in Felgo 2.3.0.
See also maximized and Window::visibility.
The AppItem item used internally for content scaling and resolution change at runtime.
This read-only property holds the physical height of the screen in inches.
You can use it for example to load different layouts based on the physical size.
This property was introduced in Felgo 2.2.0.
See also widthInInches and diameterInInches.
True if the device is connected to a network, false otherwise.
Note: Since Felgo 4.0, this property is only supported on Android and iOS. On other platforms, it will always contain true. This is because Qt 6 removed network state access through
QNetworkConfigurationManager. On mobile platforms, it uses native APIs for accessing network state instead.
Note: Being connected to a network does not mean that the network also provides internet access, or that the network signal and transmission rate is fast enough for your use-case. To determine if your target
server can be reached, send an HttpRequest to see if the request goes through and you get a valid response.
This property was introduced in Felgo 2.9.2.
Read-only property returning the current height of a keyboard. If there is currently no keyboard visible on screen, it is 0.
This property was introduced in Felgo 2.17.1.
See also keyboardVisible.
Read-only property returning true if a keyboard is currently visible on screen, false otherwise.
This property was introduced in Felgo 2.17.1.
See also keyboardHeight.
This read-only property gets true if the device is held in portrait mode. This means, the width is bigger than the height.
You can use it for example to load different layouts if the device is in landscape mode.
Note: If landscape is true, portrait will be false and vice versa.
This property was introduced in Felgo 2.2.0.
See also portrait and tablet.
This property holds if the app is maximized. The default value is false on all platforms. Instead, fullscreen is true on mobile and the
default behavior on Desktop platforms is to start with the window size specified for GameWindow.
Set this property to true, if you want to start your game maximized on Desktop.
Changing between maximized mode and windowed mode is only available on Desktop platforms Windows, Mac and Linux. On mobiles fullscreen is always true and maximized is always false. If resolutionChangingWithKeysEnabled is true (which is the default value on desktop platforms), you can toggle maximized mode with
the keys Ctrl(Cmd) + M.
This property was introduced in Felgo 2.3.0.
See also fullscreen and Window::visibility.
Whether the Felgo debug menu bar for resolution changing should be set for the game window. By default, the menu bar is only enabled for publishing builds on desktop platforms.
This property was introduced in Felgo 2.8.0.
This read-only property gets true if the device is held in portrait mode. This means, the height is bigger than the width.
You can use it for example to load different layouts if the device is in portrait mode.
Note: If portrait is true, landscape will be false and vice versa.
This property was introduced in Felgo 2.2.0.
See also landscape and tablet.
|
resolutionChangingWithKeysEnabled : bool
|
If enabled, toggling the resolution and the viewer through button preses ctrl(cmd)+1-7, foggling fullscreen through button preses ctrl(cmd)+F and exiting the application with the Escape key is
enabled. The focus will automatically set to this property value. The default is true on desktop platforms (Windows, macOS and Linux) and false on mobile ones (iOS, Android, Symbian and MeeGo).
This property specifies how a Scene gets scaled to the parent GameWindow. This technique is called content scaling, which allows creating a game only
once for different screen resolutions and aspect ratios.
There are 4 scaleModes available:
-
letterbox
The Scene gets scaled to the smaller side so no content is cropped. This Is the default setting. This setting results in remaining space on the borders depending on the aspect ratio of the device. If the logical
scene size is 480x320 for instance and the device resolution is 1024x640 (ratio 16:10), the used xScale and yScale is 2 and there are 64 pixels left on the left and right side together.
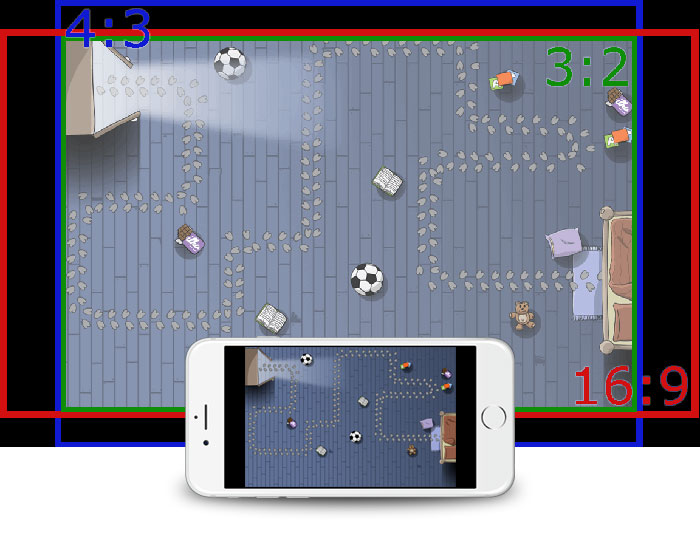
A background image with 3:2 ratio will have black borders on different ratios.
Instead of just letting this spare space black, it can be used for background images to display additional content that is outside of the logical area and thus only visible on devices that have a different aspect
ratio. Mention to only put graphics in the spare space that are not game-relevant, because they are not visible on devices with different ratios! So instead of creating a background in 3:2 ratio, rather create one to fit
the "worst-case" ratios 4:3 and 16:9.
See the guide How to create mobile games for different screen sizes and resolutions for detailed information how to create background images to support multiple aspect
ratios. With the correct background sizes, your game will work on all devices and all screen resolutions.
Background image with 1140x720 pixels for the hd versions used for the iPhone 4 for instance.
-
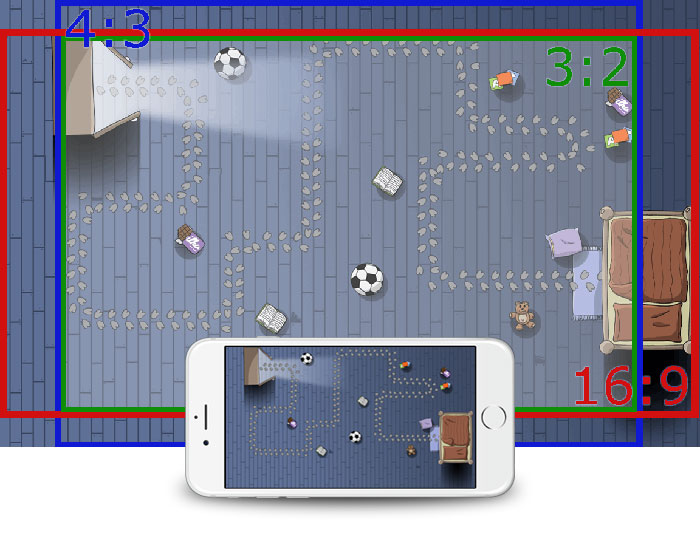
zoomToBiggerSide
This mode scales uniformly to the bigger value of the calculated Scene::xScaleForScene and Scene::yScaleForScene
properties. Parts of the logical scene will be outside of the screen when the device has a different aspect ratio than the logical scene. Mention that this is not suitable for games that require the whole logical scene to
be on-screen like tower defense games, because then you would not be able to build towers on the edges and thus have an unfair situation for players with different aspect ratios! If the logical scene size is 480x320 for
instance and the device resolution is 1024x640 (ratio 16:10), the used Scene::xScaleForScene and Scene::yScaleForScene is 2.13 because 1024/480=2.13 which is bigger than 640/320=2.

-
zoomNonUniform
With this scaleMode, your logical scene will be scaled to exactly match the screen, which leads to unequal scale factors for x and y if the screen has a different aspect ratio than the logical scene. The result is that
the background image and the content get distorted which will be visually distracting. In some rare cases, the distortion is not obvious (e.g. when only a gradient image is used as the background), but most of the time
you want to avoid this situation and rather use letterbox or zoomToBiggerSide scaleMode settings.
Visual distortions from scaling non-uniformly from an image with an original ratio of 3:2, scaled to a 4:3 and 16:9 ratio.
-
none
This mode does not perform any content scaling. So the displayed images and fonts will always be the size of the logical scene and will not be scaled to the screen size. This can be used if you want to roll your own
scale settings or load different layouts depending on the given screen size.
The scaleMode property of GameWindow is used as the default setting for all Scene elements that are children of the GameWindow. Also see Scene::scaleMode.
See also Scene::scaleMode and How to create mobile games for different screen sizes and resolutions.
Set this property together with screenWidth to specify the default size for the game window when running your application on desktop platforms. The
screenHeight specifies the height of the content area within the application window. You can use it to simulate resolutions of different devices, the default screen height is 640 px. Only use these properties for
initialization purposes, to change the width or height during runtime, use setScreenSize instead.
Note: The actual window may be bigger than the chosen screen size, for example if a menuBar, header or footer is used.
This property was introduced in Felgo 2.8.0.
See also screenWidth and setScreenSize.
Set this property together with screenHeight to specify the default size for the game window when running your application on desktop platforms. The
screenWidth specifies the width of the content area within the application window. You can use it to simulate resolutions of different devices, the default screen width is 960 px. Only use these properties for
initialization purposes, to change the width or height during runtime, use setScreenSize instead.
Note: The actual window may be bigger than the chosen screen size, for example if a menuBar, header or footer is used.
This property was introduced in Felgo 2.8.0.
See also screenHeight and setScreenSize.
The settings property allows persistent storing key-value pairs of data, that are also available when the user closes the app and restarts it.
The data is stored in a SQLite database with the Storage object, and can be accessed with setValue(key, value) and getValue(key).
As a convenience, often-needed properties are also put into the Settings object to store data needed by most games. That includes user preferences for sound, high score and the user name. These properties are stored
automatically to the database when you change them.
As the settings property is defined in the root object GameWindow, you can access it from all components in your game.
Note: The value stored to the database, is also available after the user updated the app.
List of Available Settings Properties
These are the properties and their default values that get synchronized with the database automatically:
bool soundEnabled: truebool musicEnabled: trueint maximumHighscore: 0string username: ""string language: <Current OS Language>
Example Usage
Here is an example how to use the settings object to store a custom property in your game called numberGameStarts.
import Felgo
GameWindow {
property int numberGameStarts
Component.onCompleted: {
var tempNumberGameStarts = settings.getValue("numberGameStarts")
if(!tempNumberGameStarts) {
settings.setValue("numberGameStarts", 0)
tempNumberGameStarts = 0
}
numberGameStarts = tempNumberGameStarts
}
}
Using the Internal Settings Properties
The Settings item provides an easy way to access often-needed properties in games. These contain user preferences for sound, high score and the user name. These properties are synchronized with the database automatically,
so they get stored when you change them, and loaded at application start.
The following example shows how to use the highscore property to calculate the maximum score the user reached in the whole game:
import Felgo
GameWindow {
Text: "Maximum Score:" + settings.maximumHighscore
function gameOverWithScore(newScore) {
if(newScore > settings.maximumHighscore) {
settings.maximumHighscore = newScore
console.debug("Congrats, you reached a new highscore!");
}
}
}
Using the Language Property
The Settings item provides an easy way to change the language of the game when multiple languages with translation files are used. The property is always up to date and is used to load the last saved language at
application start. For more information about translation files and multiple languages see Internationalization with Felgo.
The following example shows how to change the language of the application. Which is translated when the application starts next.
 import Felgo
 import QtQuick

 GameWindow {
   Scene {
     Button {
       text: "Current Language:" + settings.language
       onClicked: {
         settings.language = "fr_FR";
       }
     }
   }
 }
Prevent Synchronizing the Properties for Testing
In some cases, you may want to avoid the synchronization of the properties during development. For example, you may want to enable or disable the sound based on the debug or release build of the game. So you do not want to
store the setting to the database and load it initially, but set it initially to a custom value. The following example shows how to set the soundEnabled property to true in release build and false in debug build:
 import Felgo

 GameWindow {

    Component.onCompleted: {

      if(system.debugBuild) {
        settings.ignoredPropertiesForStoring = ["soundEnabled"]
        settings.soundEnabled = false
      }
    }
 }
See also Storage.
|
shutdownAppWithEscapeKeyEnabled : bool
|
This property holds whether an Escape key press closes the app.
The default value is true for Development Builds on Desktop platforms and false for Publish Builds or mobile platforms.
Thus you can quickly shutdown an app on Desktop with the Esc key during development, where closing and restarting an app is often needed.
Note: You can enable a publish build by setting the property "stage": "publish" in your config.json file.
The scale factor all sp() values are multiplied with.
The default value is 1.
This property was introduced in Felgo 2.2.0.
See also sp(), dpScale, and uiScale.
This property holds the name of the current state of the item.
See also Item::state.
This property holds the list of possible states for this item.
See also Item::states.
|
storeWindowGeometry : bool
|
Whether the previous Window position and size, uiScale and Theme::platform gets stored and then restored at
subsequent app starts.
By default, it has the same value as menuBarFelgoEnabled, which is only true on Desktop platforms and non-publish builds.
This property was introduced in Felgo 2.13.2.
This read-only property gets true if the screen's diameter is bigger than 6.9 inches.
You can use it for example to load different layouts if the device is a tablet.
This property was introduced in Felgo 2.2.0.
See also portrait and landscape.
The scale factor all dp() and sp() values are multiplied with.
The default value is 1.
This property was introduced in Felgo 2.2.0.
See also dp(), sp(), spScale, and dpScale.
This property is an instance of the Utils component, which allows easy access to often-needed JavaScript functionality.
You can access it from any element in your QML tree with the utils name, because it is contained in the root GameWindow element.
The following example shows how to call the Utils::generateRandomValueBetween() method from a TestEntity.qml file:
import Felgo
EntityBase {
Component.onCompleted: {
console.debug("random value between 10 and 15:", utils.generateRandomValueBetween(10, 15) )
}
}
Array of shared objects between this QML engine and a remote JavaScript engine via Qt WebChannel API, mainly used for WebAssembly in order to share data between the Felgo app and the website running it.
This property was introduced in Felgo 3.8.0.
This read-only property holds the physical width of the screen in inches.
You can use it for example to load different layouts based on the physical size.
This property was introduced in Felgo 2.2.0.
See also heightInInches and diameterInInches.
Signal Documentation
This signal is emitted when the application is paused. This occurs when the app is moved into the background after pressing the Home button. It is also called when the app is left because the user answers a phone call for
example, or when the user locks the screen.
The corresponding handler is onApplicationPaused.
Use this handler to store any game-related data you want to save persistently and should be available to the user after the app is resumed. You can use the AppItem::settings
property for storing data persistently.
If the app got destroyed after the pause, you can then restore the old game state when the application starts with Component.onCompleted() or in applicationResumed in case the app was not destroyed but still in the OS memory.
Note: For quick testing of the functionality on desktop systems, you can minimize the application.
As an example, you could put the game into a pause scene once the application is paused. The pause scene could contain a resume button, so the user has enough time to continue with the game after he left the
application.
By default, the game logic, all Timer, the BackgroundMusic and GameSoundEffect
elements will pause when the application is paused. They will all continue after the application is resumed, so to avoid the game being continued immediately you could switch to a pause screen when this signal occurs.
Note: The corresponding handler is onApplicationPaused.
See also applicationResumed.
This signal is emitted when the application is resumed after a previous applicationPaused call. It is not called when the application is
first started - for this initialization, use the Component.onCompleted() handler.
The corresponding handler is onApplicationResumed.
Use this handler for example to load a previously saved game state. The applicationResumed signal may be called multiple times in an application's lifetime.
Note: The corresponding handler is onApplicationResumed.
See also applicationPaused.
|
[since Felgo 2.1.1] backButtonPressedGlobally()
|
This signal is emitted when the back button (Qt.Key_Back) was pressed. Handling the back button is required for a good user experience of your game on Android.
This signal is emitted on a global level, and gets emitted after all children with focus and only if the event was not accepted by children before.
It is useful to handle this signal if you want to perform back button handling in one spot. However, you will then probably need to check the state your application is currently in or use a component like StackView which handles it.
Example for handling the back button globally:
import Felgo
import QtQuick
import QtQuick.Controls
GameWindow {
StackView {
id: stackView
}
backButtonAutoAcceptGlobally: true
onBackButtonPressedGlobally: {
stackView.pop()
}
}
For back button handling per scene, use Scene::backButtonPressed. Also see Advanced Example with Android Back Button and Focus Handling for non-global back button handling.
The corresponding handler is onBackButtonPressedGlobally.
Note: The corresponding handler is onBackButtonPressedGlobally.
This signal was introduced in Felgo 2.1.1.
|
[since Felgo 2.11.0] initTheme()
|
When using Felgo Apps components in your game, implement this signal handler to override the app's default theme values on app start. For more information have a look at the Theme global
object.
Note: The corresponding handler is onInitTheme.
This signal was introduced in Felgo 2.11.0.
|
[since Felgo 2.1.1] keyPressedGlobally(var event)
|
This signal is emitted when a key is pressed, independent from the current Item that has Item::focus.
This signal is emitted on a global level, and gets emitted after all children with focus and only if the event was not accepted by children before.
It is useful to handle this signal if you want to perform key handling in one spot.
The difference to normal Key handling is, that you cannot change the event.accepted property. So the event gets forwarded anyway and is only useful to intercept all key presses.
The corresponding handler is onKeyPressedGlobally.
Note: The corresponding handler is onKeyPressedGlobally.
This signal was introduced in Felgo 2.1.1.
See also Global Key Handling.
This handler gets called when the Felgo splash screen was shown and now faded out. It is also called if the license does not require a splash screen, initially at game startup. You can then continue with your game logic in
onSplashScreenFinished: ....
Note: A splash screen is only shown in the Felgo Starter License or if you did not set any licenseKey.
Upgrade to one of the other licenses to hide the splash screen.
Note: The corresponding handler is onSplashScreenFinished.
Method Documentation
|
[since Felgo 2.2.0] dp(value)
|
Returns the density-independent unit for this pixel value.
This allows you to define the same physical size for Item elements across platforms and screens with different densities.
DPI Examples
The dp value is calculated with the following formula: dp = pixel * screenDpi / 160
This means:
- On a 160 dpi screen like the iPhone 3 (non-retina display), the pixel value of 1 will return 1 dp unit.
- On a 320 dpi screen like the iPhone 4 (retina display), the pixel value of 2 will return 1 dp unit.
Although the pixel values are different, the physical size of them is the same!
160 dp equals 1 inch. You can calculate the inch value from the pixel value with pixelToInches().
Note: The recommended button height is 48dp. This equals 3/10 of an inch or 0.8 centimeters.
You can modify the result of all dp() function calls by changing the dpScale or uiScale
properties.
Example Usage
 import Felgo
 import QtQuick

 GameWindow {
   id: gameWindow

   Rectangle {
     width: parent.width
     height: gameWindow.dp(48)

     Text {
       text: "20sp"
       font.pixelSize: gameWindow.sp(20)
     }
   }
 }
Note: To calculate the dp value of elements that are children of a Scene, use Scene::dp().
Also see the guide Density Independence Support: dp, sp, pixelToInches, tablet,
orientation for more information on density independence. The Android Developers Guide about Supporting Multiple Screens is also a great read
to better understand density independence, as the same concepts of Android are used in Felgo.
This method was introduced in Felgo 2.2.0.
See also sp(), dpScale, and uiScale.
|
[since Felgo 2.2.0] physicalPixels(pixel)
|
Returns the pixel value multiplied with the devicePixelRatio of the screen.
On iOS & Mac devices, the reported screen size of GameWindow is a virtual point size. To get the real pixels of the screen, a multiplication with devicePixelRatio is needed.
You will mostly not need this value, but it may be useful for debug output or certain scenarios.
This method was introduced in Felgo 2.2.0.
|
[since Felgo 2.2.0] pixelToInches(pixel)
|
Returns the value in inches from the pixel value.
You can use the inch value for example to load different layouts based on the physical size.
This method was introduced in Felgo 2.2.0.
See also dp(), sp(), widthInInches, heightInInches, diameterInInches, and tablet.
|
[since Felgo 2.8.0] setScreenSize(newWidth, newHeight)
|
Directly modifying the screenWidth and screenHeight properties during runtime
can lead to unwanted effects. Use this method to safely change the screen size for the application window during runtime.
This method was introduced in Felgo 2.8.0.
See also screenWidth and screenHeight.
|
[since Felgo 2.2.0] sp(value)
|
Returns the density-independent unit for this pixel value. Only use this function for Text element font.pixelSize values.
This allows you to define the same physical size for Text elements across platforms and screens with different densities.
DPI Examples
The dp value is calculated with the following formula: dp = pixel * screenDpi / 160
This means:
- On a 160 dpi screen like the iPhone 3 (non-retina display), the pixel value of 1 will return 1 dp unit.
- On a 320 dpi screen like the iPhone 4 (retina display), the pixel value of 2 will return 1 dp unit.
Although the pixel values are different, the physical size of them is the same!
160 dp equals 1 inch. You can calculate the inch value from the pixel value with pixelToInches().
Note: The recommended button height is 48dp. This equals 3/10 of an inch or 0.8 centimeters.
You can modify the result of all sp() function calls by changing the spScale or uiScale
properties.
Note: The only difference to dp() is that you have a different spScale value
available to change the scale factor of Text elements. You could read the user settings for font sizes of the system and change it accordingly. This is done by default for native Android applications - you could implement
this function yourself by querying the user font settings and then changing the spScale value.
You could also use the spSale to allow users change the font size in your app at runtime, for example with a slider in a settings scene.
Example Usage
 import Felgo
 import QtQuick

 GameWindow {
   id: gameWindow

   Rectangle {
     width: parent.width
     height: gameWindow.dp(48)

     Text {
       text: "20sp"
       font.pixelSize: gameWindow.sp(20)
     }
   }
 }
Note: To calculate the sp value of elements that are children of a Scene, use Scene::dp().
Also see the guide Density Independence Support: dp, sp, pixelToInches, tablet,
orientation for more information on density independence. The Android Developers Guide about Supporting Multiple Screens is also a great read
to better understand density independence, as the same concepts of Android are used in Felgo.
This method was introduced in Felgo 2.2.0.
See also dp(), dpScale, and uiScale.


