Today I'll introduce you to a unique feature of Felgo which will save you loads of time: the Felgo level editor. Why is it such a big deal you ask?
Well, in short it allows you to do the following:
- Cut development time as level creation, balancing and testing works while your game is running.
- Customize the look of the level editor to perfectly match your game style, or use the default Felgo skin for quick results.
- Let your players create their own levels and build a community around your game - in return you get user-generated content which keeps your game interesting and something new to explore for your players.
- Monetize your user-created levels with a level store and award your best level creators to give them an incentive.
In this lesson, we'll focus on the first two major benefits! We'll cover the level store in the next lesson, so you won't miss anything. ;)
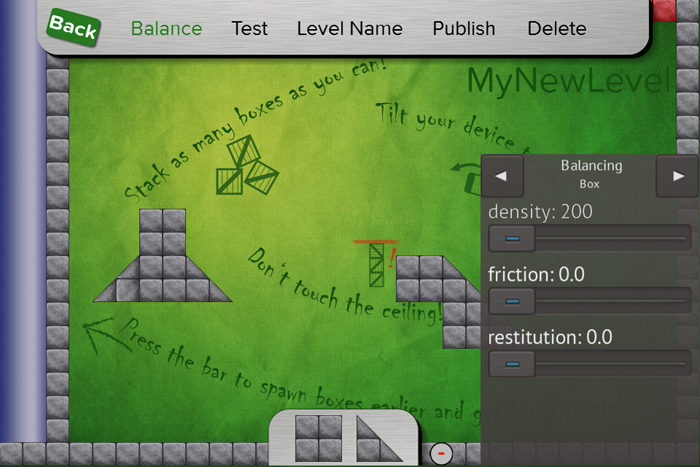
Balance your game at runtime
Every game has some properties that define if a game is fun or boring - tweaking these game properties and giving them the "most fun" value is called balancing. Wouldn't it be great if you could for example test different
gravity settings for a physics-based game and see the objects adopt to the change while you are moving a slider. Or adjusting the applied force of a jumping character without restarting the game and test the different
settings.
Here are the good news: With Felgo level editor, you can do all of the previous examples and a lot more, because you can change any properties while your game is running!
You can use these components for balancing at runtime:
Let's get to code
The following source code allows you to change the width and height properties of a Rectangle dynamically at runtime with a slider:
import Felgo 4.0
import QtQuick 2.0
GameWindow {
Scene {
ItemEditor {
id: itemEditor
anchors.right: parent.right
}
EntityBaseDraggable {
entityType: "orc"
Rectangle {
width: 30
height: 20
color: "green"
EditableComponent {
editableType: "Green Orc"
properties: {
"width": {"min": 0, "max": 200},
"height": {"min": 0, "max": 200}
}
}
}
}
}
}
Similarly, you can edit any property in your game as you like and balance it so it is the most fun to play. One you have found the ideal values, you can write them down and use them for your published game.
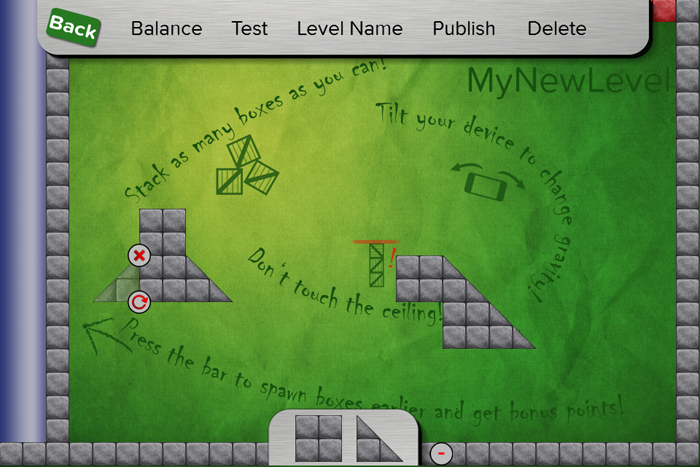
OR you decide to vary these properties and make different levels for your game - e.g. a level where gravity is different than in others! Here is how this may look like in your game:
This is what the next step is all about: how to store these settings and create new levels with the level editor.
Use the level editor and save time
The Felgo level editor helps you to create multiple levels easily. The cool thing is, you can immediately play and test if the levels are fun while the game is running. A level usually consists of entities placed in the
level in a challenging and fun way. It also consists of game-specific parameters like damage values, timer settings, or the available lives in the level - yes, you are right, these are exactly the values we have set before with
the ItemEditor & EditableComponent!
So how can we save the property settings of a level? It's really simple: just add the LevelEditor component to your game, and it takes care automatically of saving all ItemEditor settings and entity positions with a single call of saveCurrentLevel()!
With the following code you even can do a bit more:
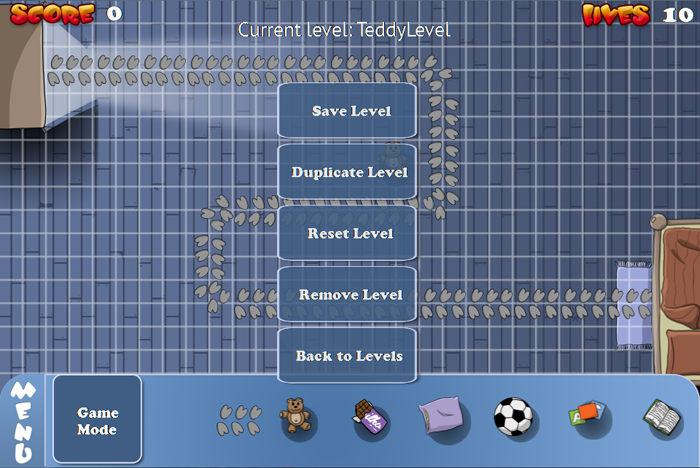
- Create a new level, save an existing one and show all stored levels
- Drag new orc entities to the scene with BuildEntityButton
import Felgo 4.0
import QtQuick 2.0
GameWindow {
EntityManager {
id: entityManager
entityContainer: gameScene
dynamicCreationEntityList: [ Qt.resolvedUrl("Orc.qml") ]
}
LevelEditor {
id: levelEditor
}
Scene {
id: gameScene
Row {
anchors.bottom: parent.bottom
SimpleButton {
text: "New Level"
onClicked: levelEditor.createNewLevel()
}
SimpleButton {
text: "Save Level"
onClicked: levelEditor.saveCurrentLevel()
}
SimpleButton {
text: "Show All Levels"
onClicked: {
levelEditor.loadAllLevelsFromStorageLocation(levelEditor.authorGeneratedLevelsLocation)
levelSelectionList.visible = true
}
}
}
LevelSelectionList {
id: levelSelectionList
visible: false
anchors.right: parent.right
levelMetaDataArray: levelEditor.authorGeneratedLevels
onLevelSelected: levelData => {
levelEditor.loadSingleLevel(levelData)
levelSelectionList.visible = false
}
}
}
}
Note that we moved the entity definition of our green orc into an own qml file called Orc.qml to better separate the project.
So with just about 80 lines of code, we have created a game with an in-game level editor to create and load levels!
Customize the Level Editor to your game
To make the best use of the level editor, you can customize its look so it matches the style of your game. See the following images of Squaby for example, which uses a custom
GUI for dragging the entities into the scene.
Adding your own UI is very easy to do with QML & JavaScript: just create your own images for the BuildEntityButton for dragging new objects into the game easily.
This image shows how the level editor looks like in Stack With Friends Demo:
You can have a look at the full source code of this published game in the app stores and learn how the level editor was implemented there.
Export Levels to Bundle Them with your Application
After you balanced your game or created own levels, you can now export your balancing and entity data as JSON files and bundle them with your app store application. Again, this is a very easy task: we simply add a button for
calling the exportLevelAsFile() function:
import Felgo 4.0
import QtQuick 2.0
Column {
SimpleButton {
text: "Export Level"
onClicked: levelEditor.exportLevelAsFile()
}
}
The exported levels are then stored in your Documents directory on your desktop PC and you can copy them for example to a folder called jsonLevels in your application's qml folder.
Integrate the Exported Levels
To load your exported levels from the last step, replace the previous authorGeneratedLevelsLocation with applicationJSONLevelsLocation and authorGeneratedLevels with applicationJSONLevels. If you put your exported levels to
a different folder like jsonLevels, also set the applicationJSONLevelsDirectory property of LevelEditor to "jsonLevels/".
Now you have a list of levels you created before bundled with your application and ready for your players. And again, you can style how your levels shall be displayed in the LevelSelectionList and make your game unique.
Recap
This time you've learned how to balance any property of your game at runtime to make your game the most fun. You also learned how to store the balancing settings for your properties to a level and how to load your saved
levels.
You can now use the level editor for balancing and creating new levels efficiently, while your game is running. In the next lesson, we'll move this concept one step further and add level sharing
between different users to your game! Stay tuned, I'm sure you're gonna like it. ;)
If you have any open questions about Felgo level editor and how you can use it in your game, please shoot me an email to support@felgo.com.
Cheers, Chris from Felgo
P.S.: We used the ItemEditor & EditableComponent for all of our published games and were able to make balancing fun and short. Now you can do
so too!
P.P.S.: If I had to choose 3 games which show what's possible with Felgo LevelEditor and runtime-balancing, it would be Stack With Friends Demo, Squaby and Felgo's Particle Editor! You can download them right now to your mobile device from the app stores or watch them in the
Felgo highlights video on YouTube. And they are also available in your demos folder of the Felgo SDK, so you can learn a lot from the complete source code of published
apps.


