Let your users authorize with external OAuth 2.0 providers.

User Authorization and Authentication
Use OAuth 2.0 to authorize and optionally use OpenID Connect (OIDC) to authenticate your users.
System UI
QML API to access native authorization interfaces.
Overview
OAuth 2.0 is the industry-standard protocol for authorization. Read more at https://oauth.net/2/.
Note: The plugin currently only supports Android- and iOS-based devices.
The OAuth 2.0 plugin supports the following features:
- Authentication: Let your users sign in with their accounts with external OAuth 2.0 providers.
- Persistence: Store tokens securely and provide access via an easy-to-use declarative QML API.
- Automatic token refresh: Refresh access tokens automatically via a refresh tokens.
- PKCE extension: Prevent against authorization code interception.
- OpenID Connect Token: Retrieve, decode and validate an OpenID Connect token.
Example Usage
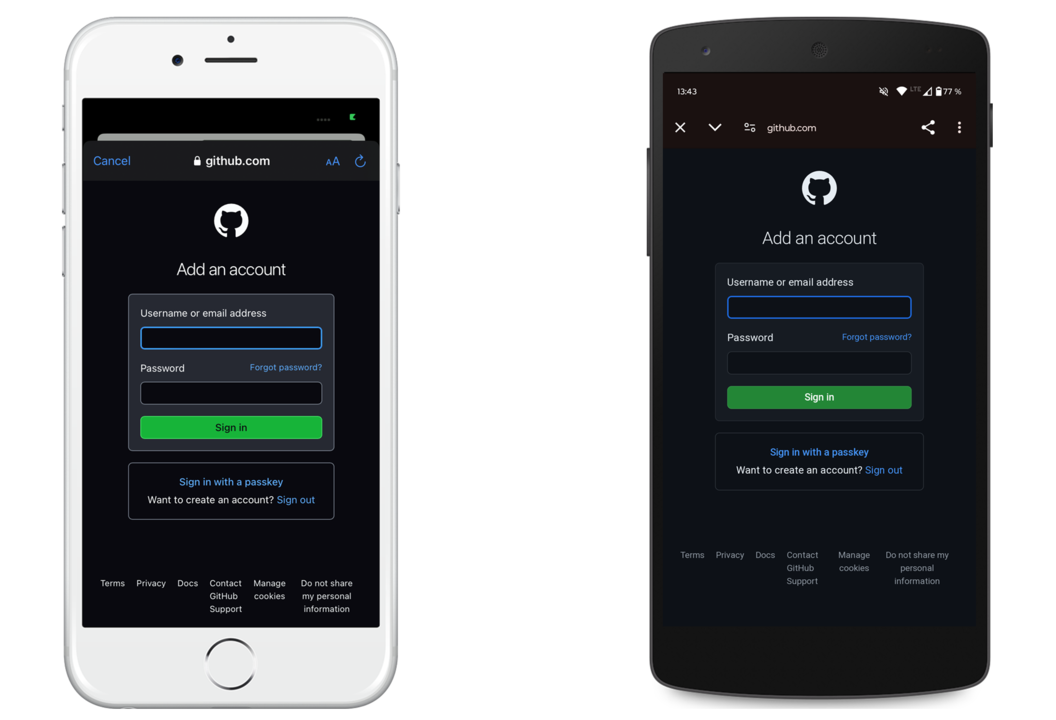
The following example sets up an OAuth2Client client to authorize a user with a GitHub app.
When the user clicks on "Login", it opens the GitHub login page in a system browser.
Afterwards, you can use an OAuth2Client::accessToken for REST API calls.
import QtQuick
import Felgo
App {
id: app
readonly property url userUrl: "https://api.github.com/user"
property var userData: null
OAuth2Client {
id: oauth
authUrl: "https://github.com/login/oauth/authorize"
tokenUrl: "https://github.com/login/oauth/access_token"
callbackUrl: "felgooauthtest://callback"
clientId: "<your client ID>"
clientSecret: "<your client secret>"
pkceType: OAuth2Client.None
promptType: OAuth2Client.Consent
onAuthenticationError: message => {
console.log("OAuth2: authentication error:", message)
errorText.text = "Auth error: " + message
}
onIsAuthenticatedChanged: {
if(isAuthenticated) {
errorText.text = ""
getUser()
}
}
}
NavigationStack {
FlickablePage {
title: "GitHub OAuth 2.0 Test"
flickable.contentHeight: content.height
Column {
id: content
width: parent.width
AppText {
width: parent.width
wrapMode: Text.WrapAtWordBoundaryOrAnywhere
text: "Access Token: " + oauth.accessToken
}
AppText {
width: parent.width
wrapMode: Text.WrapAtWordBoundaryOrAnywhere
text: "Refresh Token: " + oauth.refreshToken
}
Flow {
width: parent.width
AppButton {
text: "Login"
enabled: !oauth.isAuthenticated
onClicked: oauth.authenticate()
}
AppButton {
text: "Refresh tokens"
enabled: oauth.isAuthenticated && !!oauth.refreshToken
onClicked: oauth.requestRefreshedTokens()
}
AppButton {
text: "Logout"
enabled: oauth.isAuthenticated
onClicked: {
oauth.logout()
userData = null
}
}
}
AppText {
id: errorText
text: ""
width: parent.width
wrapMode: Text.WrapAtWordBoundaryOrAnywhere
}
AppText {
visible: !!userData
text: "Logged in as: " + userData?.login
width: parent.width
wrapMode: Text.WrapAtWordBoundaryOrAnywhere
}
AppImage {
visible: !!userData
source: userData?.avatar_url ?? ""
width: parent.width
fillMode: Image.PreserveAspectFit
}
}
}
}
function getUser() {
HttpRequest
.get(userUrl)
.set("Accept", "application/vnd.github+json")
.set("Authorization", "Bearer " + oauth.accessToken)
.set("X-GitHub-Api-Version", "2022-11-28")
.then(res => {
userData = JSON.parse(res.text)
console.log("User data:", JSON.stringify(userData, null, " "))
})
.catch(err => {
console.log("Could not get user:", err.status, err.code, err.message, err.response.text)
})
}
}
Token Refresh
The OAuth 2.0 standard supports automatic token refresh.
After authorization, the OAuth2Client item requests an access token from the token API. The API can also provide an optional OAuth2Client::refreshToken.
The refresh token is generally longer-lived and the plugin can use it to request an updated access token.
On startup, the item compares the OAuth2Client::accessTokenExpirationDate to the current date and time. If it is expired and a refresh token exists, it
can automatically request a refreshed access token if OAuth2Client::refreshTokensAutomatically is set to true.
You can also manually request refreshed tokens with OAuth2Client::requestRefreshedTokens(). This method checks if a refresh token exists, in which case it
uses it to request refreshed tokens.
In both the automatic and manual case, the OAuth2Client::authStatus is OAuth2Client.RefreshingTokens during refresh. Afterwards it again
contains OAuth2Client.Granted on success or OAuth2Client.NotAuthenticated on failure.
PKCE Extension
The plugin also supports the "Proof of Key Code Exchange" extension defined by the OAuth 2.0 standard.
PKCE prevents CSRF and authorization code injection attacks. Read more at the official documentation.
If your authorization API supports PKCE, you can enable it with the OAuth2Client::pkceType property.
Set it to one of the following values:
OAuth2Client.None: The default value of this property. No PKCE challenge is used during authorization.OAuth2Client.Plain: A plain PKCE challenge is used during authorization.OAuth2Client.SHA256: A SHA-256 hash of the PKCE challenge is used during authorization.
The item generates a random PKCE verifier when starting authorization. You can configure the code length with OAuth2Client::pkceLength.
It adds the PKCE code challenge to the OAuth2Client::authUrl. It then adds the PKCE verifier as parameter when retrieving the access token.
This way, no third-party app can intercept the callback URL and use the authorization code. The other app would not be provide the PKCE verifier value.
OpenID Connect Tokens
The plugin also supports the OpenID Connect extension.
During token retrieval, your backend can send an optional id_token parameter. If set, the plugin stores the raw value in OAuth2Client::idToken.
The token is a Base64-encoded JWT token.
The item also supports validating the token against an included signature. It supports the validation algorithms "SH256" (SHA-256) and "none" (no validation).
If the signature is not used or is valid, it stores the decoded id token in OAuth2Client::idTokenData.
Read more about OpenID Connect at the official documentation.
Available QML Items
|
OAuth2Client
|
Let your users authorize with external OAuth 2.0 providers
|
Adding and Activating Plugins
How to Add a Felgo Plugin to your App or Game
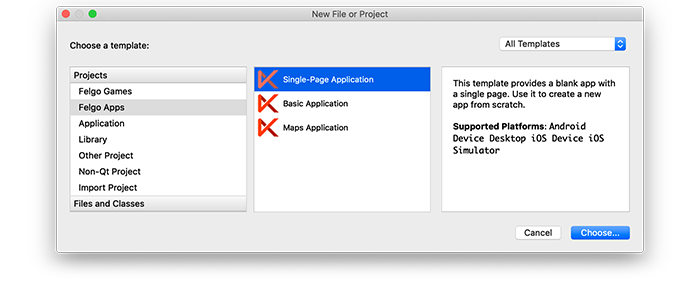
When you create a new project, you can choose to add example plugin integrations as well. Open Qt Creator and choose “File / New File or Project”, then choose Single-Page Application in the Felgo Apps section or any
other wizard. For Felgo Games, you can also find an own Game with Plugins project template as an own wizard.
Then select the platforms you want to run your application on. The plugins are available for both iOS & Android. There is a fallback functionality in place on Desktop platforms so your project still works when you call
methods of the plugins. This allows you to do the main development on your PC, and for testing the plugin functionality you can run the project on iOS and Android.
After the Kit Selection, you can choose which of the plugins you’d like to add to your project:

Then complete the wizard, your project is now set up with all the correct plugin dependencies for Android & iOS automatically. This includes:
- Setting up the
.gradle file for Android.
- Setting up the
.plist file for iOS.
- Setting up the
CMakeLists.txt file to include the plugin libraries for iOS.
Note: Additional integration steps are still required for most plugins, for example to add the actual plugin libraries for iOS to your project. Please have a look at the integration steps described in the
documentation for each of the used plugins.
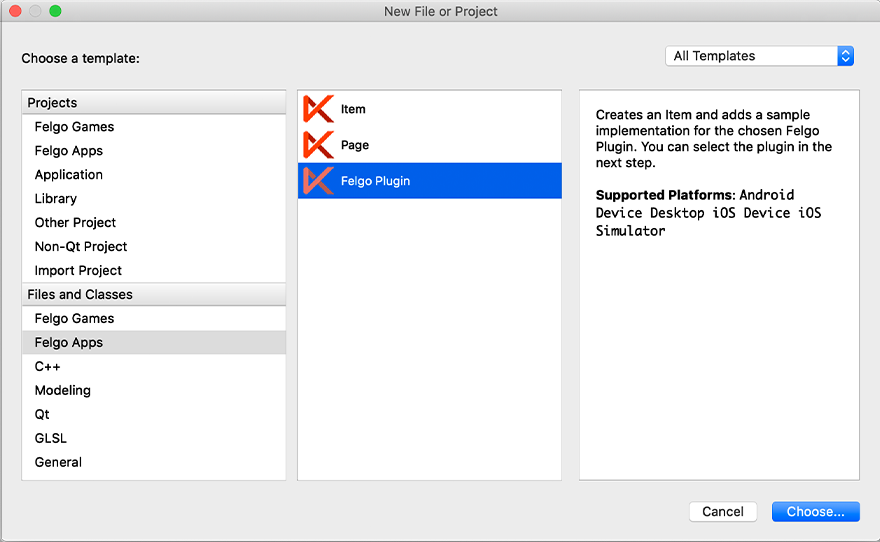
If you have an existing Felgo application, follow these steps to include a plugin to your app or game:
In Qt Creator, select “File / New File or Project” and choose either Felgo Games or Felgo Apps from Files and Classes. Then select Felgo Plugin and press Choose.
You can now select the plugin you want to add:

The plugin item, which contains the chosen plugin and a short usage example, is now added to your project. To use the item in your project, simply perform these steps:
- Include the created item (use the name you entered in the template before) in your
main.qml file.
- Modify the
CMakeLists.txt file & .plist file for iOS usage. See the iOS integration guide of the chosen plugin for more information.
- Modify the the
.gradle file for Android usage. See the Android integration guide of the chosen plugin for more information.
Note: If you have an existing Qt application, you can also add Felgo Plugins to your app! See here
how to do this.
Activating Plugins with a License Key
You can test all plugins as soon as the required integration steps and plugin configuration are completed.
However, the plugins are only available as Trial Versions if they are not activated with a valid license. When you are using unlicensed plugins, a dialog is shown and a watermark overlays your application to notify you about
the testing state of the plugin.
All monetization plugins are free to use in all licenses, other plugins are only fully usable if you have purchased the Startup or Business license. To activate plugins and enable
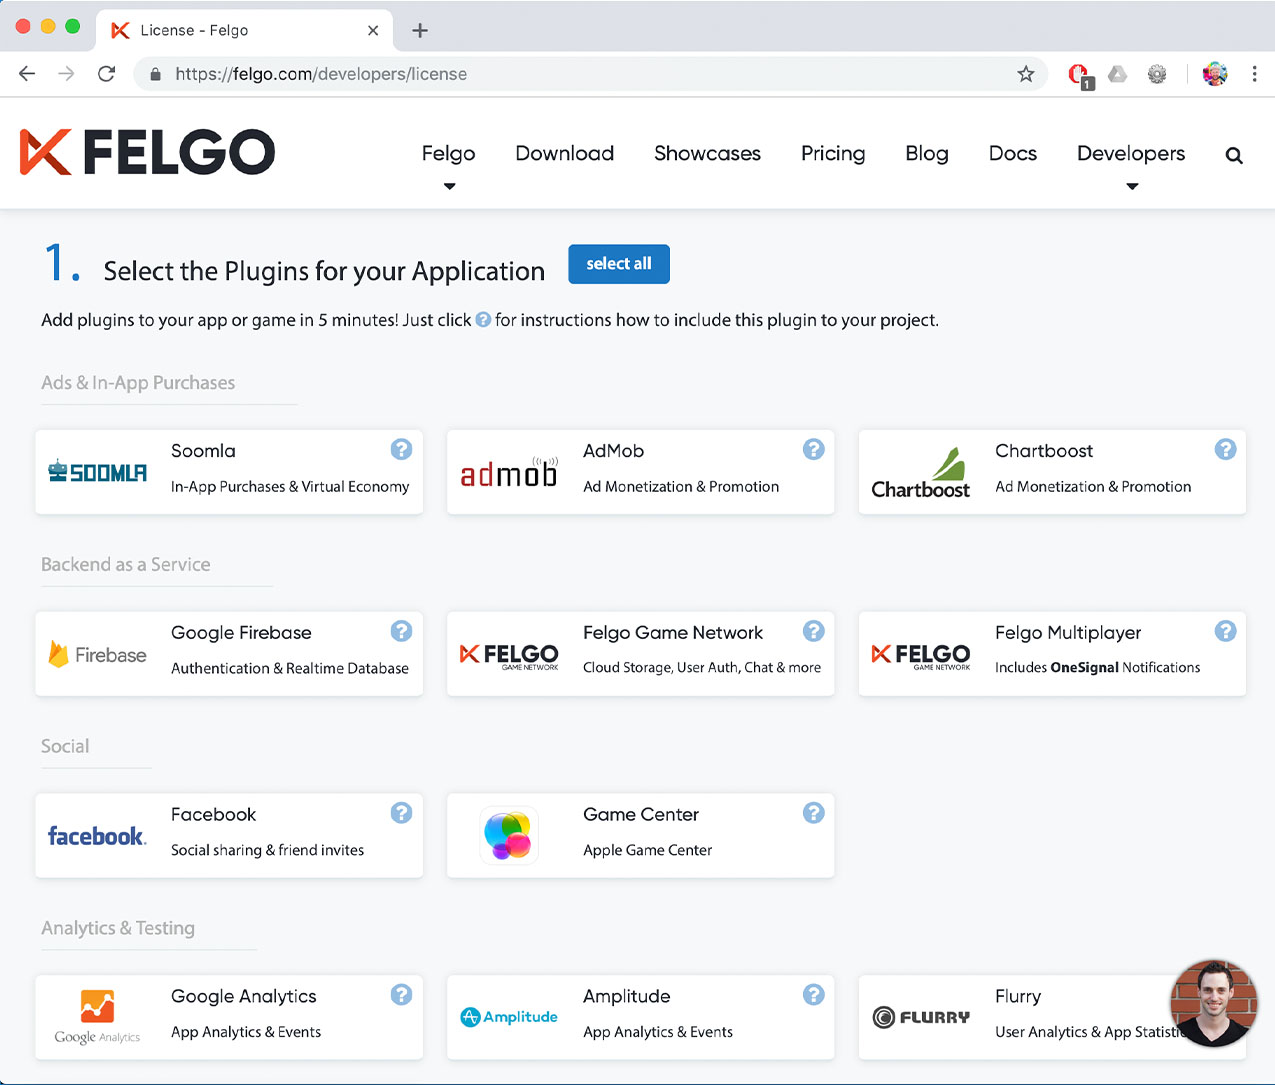
their full functionality it is required to create a license key. You can create such a key for your application using the license creation page.
This is how it works:
- Choose the plugins you want to include in your license key:
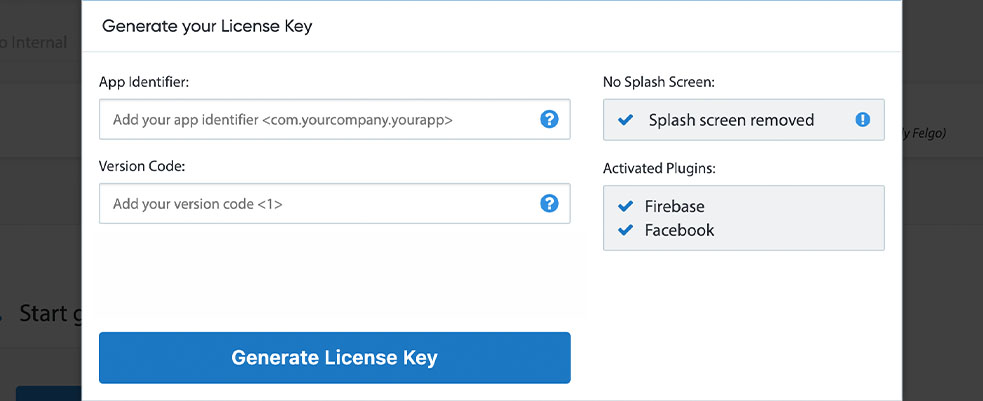
- Click on “Generate License Key” and set the app identifier & version code of your application. You can see that the AdMob plugin was enabled in this license key:
- Copy the generated licenseKey to your GameWindow or App component.
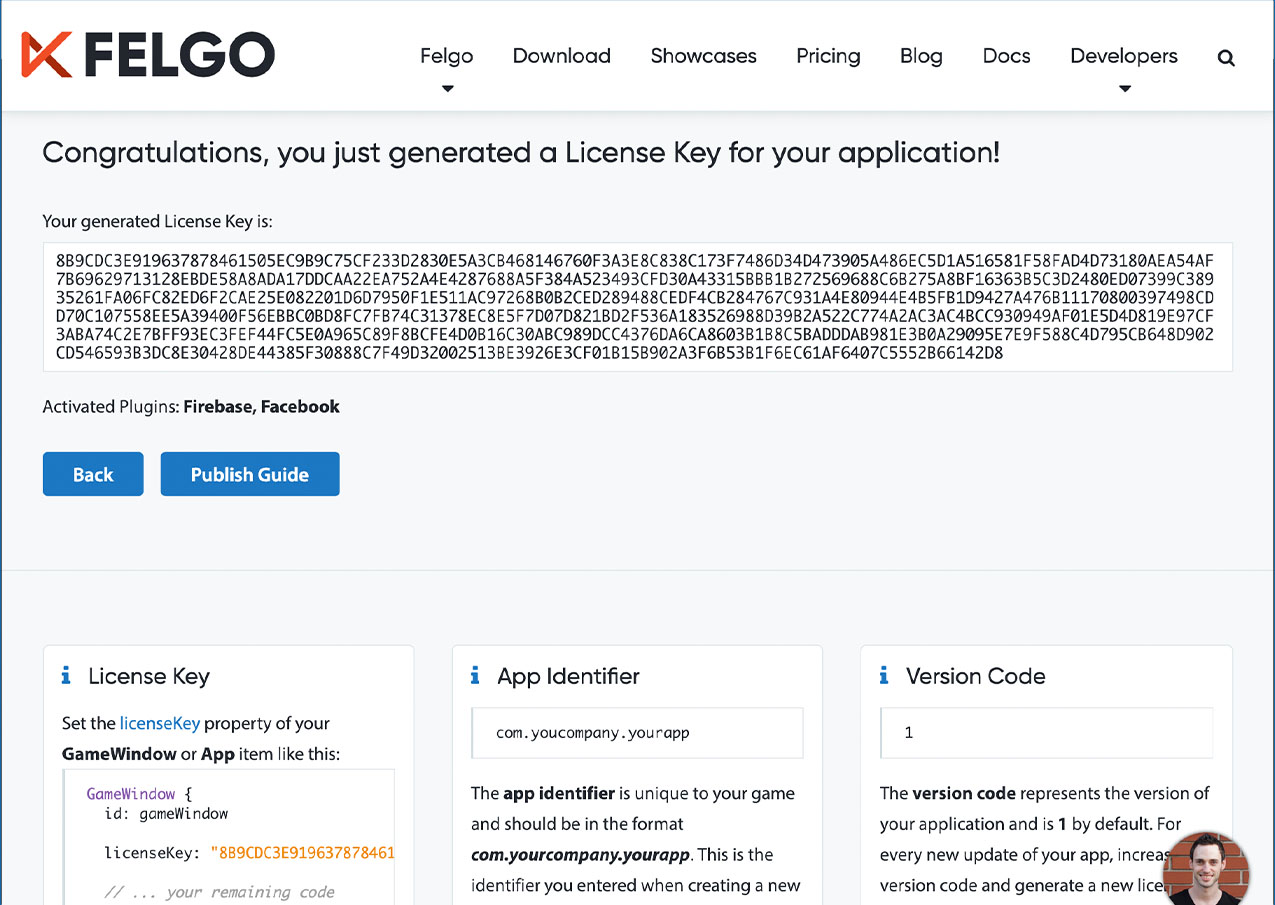
- You can now fully use the selected plugins!
Integration
To use the OAuth 2.0 plugin, add the platform-specific configuration to your project, described here:
Project Configuration
Add the following lines of code to your CMakeLists.txt file:
 set(FELGO_PLUGINS
   oauth2
 )
Note: Make sure to declare the FELGO_PLUGINS before calling felgo_configure_executable, which links the required Frameworks based on your settings.
iOS Integration Steps
For iOS, it requires no additional steps. The ASWebAuthenticationSession handles the callback automatically.
Android Integration Steps
- Register a custom URL scheme in order for the user authorization flow to be able to return to your app: Open the
android/AndroidManifest.xml and add an additional <intent-filter> block to the existing <activity>.
Use the same URL scheme that you have set for your OAuth2Client::callbackUrl like in the following example:
 <activity
     android:name="com.felgo.helper.FelgoActivity"
     ...>

     <!-- Launcher intent: -->
     <intent-filter>
         <action android:name="android.intent.action.MAIN" />
         <category android:name="android.intent.category.LAUNCHER" />
     </intent-filter>

     <!-- for OAuth 2.0 callback: -->
     <intent-filter>
         <data android:scheme="felgooauthtest" />
         <action android:name="android.intent.action.VIEW" />

         <category android:name="android.intent.category.DEFAULT" />
         <category android:name="android.intent.category.BROWSABLE" />
     </intent-filter>

 </activity>
- Open your
build.gradle file and add the following lines to the dependencies block:
 dependencies {
   implementation 'com.felgo.plugins:plugin-oauth2:4.+'
 }
Note: If you did not create your project from any of our latest wizards, make sure that your project uses the Gradle Build System like described here.
Used SDKs and Versions
| iOS |
AuthenticationServices, latest |
| Android |
AndroidX Browser, 1.5.0 |
Note: Other SDK versions higher than the stated ones might also be working but are not actively tested as of now.


